Security Lamp Illuminated on the IP, Engine Stalls, No Start, DTC B2960 (Security System Sensor Data Incorrect but Valid) Set (Inspect and Repair Cause of DTC B2960)

| Subject: | Security Lamp Illuminated on the IP, Engine Stalls, No Start, DTC B2960 (Security System Sensor Data Incorrect but Valid) Set (Inspect and Repair Cause of DTC B2960) |
| Models: | 1999-2001 Chevrolet and GMC C/K Pickup and Utility Models (Silverado, Sierra, Tahoe, Suburban, Yukon, Yukon XL) |
This bulletin is being revised to add information on inspecting for electrical intermittent conditions and important connector C201 tightening steps. Please discard Corporate Bulletin Number 01-08-56-002 (Section 08 -- Body and Accessories).
Condition
Some customers may comment on the following conditions. These symptoms may be intermittent.
| • | Security lamp illuminates while driving. The Security lamp may be On or Off when the customer brings the vehicle to the service facility. |
| • | The engine cranks but will not start and the Security lamp is flashing. |
| • | The engine starts then stalls and the Security lamp is flashing. |
Cause
Condition(s) may be due to an incorrect Passlock™ sensor voltage received by the body control module (BCM) from the Passlock™ sensor due to the following conditions. Most intermittent conditions are caused by faulty electrical connections or wiring.
| • | A 7 ohm variation in the sensor ground circuit wiring, circuit 1057 |
| • | A 100 ohm variation in the Passlock™ sensor signal wiring circuit, circuit 1836 |
Inspect for the following items:
| • | Broken wiring inside the insulation. |
| • | A poor connection between the male and female terminal at the connector. Refer to Testing for Proper Terminal Contact under Testing for Intermittent and Poor Connections in Wiring Systems for the specific procedure. |
| • | A poor terminal to wire connection. Some conditions that fall under this description include poor crimps, poor solder joints, crimping over the wire insulation instead of the wire itself, and corrosion in the wire to terminal contact area. |
| • | Wire insulation that is rubbed through. This causes an intermittent short as the bare area touches other wiring or parts of the vehicle. |
| • | A poor connection between the male and female terminal at a connector. This poor connection may be the result of contamination or deformation. |
| • | Contamination may be caused by the connector halves being improperly connected. A missing or damaged connector seal, damage to the connector itself, or exposing the terminals to moisture and dirt can also cause contamination. Contamination, usually in the underhood or underbody connectors, leads to terminal corrosion, causing an open circuit or intermittently open circuit. |
| - | Separate the connector halves. |
| - | Visually inspect the connector halves for contamination. Contamination may result in a white or green build-up within the connector body or between terminals. This causes high terminal resistance, intermittent contact, or an open circuit. An underhood or underbody connector that shows signs of contamination should be replaced in its entirety including the terminals, the seals, and the connector body. |
| • | Deformation is caused by probing the mating side of a connector terminal without the proper adapter, improperly joining the connector halves, or repeatedly separating and joining the connector halves. Deformation, usually to the female terminal connector tang, can result in poor terminal contact causing an open or intermittently open circuit. Using an equivalent male terminal from the J 38125-B, test that the retention force is significantly different between an good terminal and a suspect terminal. Replace the female terminal in question. |
Correction
Have any of the following components had service recently?
| • | The BCM |
| • | The ignition lock cylinder case assembly |
| • | The PCM/VCM |
If any of the above components have been replaced, the Programming Theft Deterrent System Components procedure must be performed before any diagnostic procedures are performed.
To assist in diagnosis, the following steps are provided.
- Does the engine start? If not, use the Engine Cranks but Does Not Run diagnostic information in the Engine Controls sub-section of the applicable Service Manual.
- Observe the Security indicator lamp in the instrument panel.
- Remove the key from the lock cylinder.
- With the Doors closed, place the key in the lock cylinder and turn to the Run position. Observe the Security indicator lamp.
Important:
• The Security telltale on the message center is controlled by the
vehicle theft deterrent (VTD) system and the content theft deterrent (CTD)
system. The Security telltale is controlled by the BCM through the Class 2
data line. • The VTD system portion of the BCM controls the Security telltale
when the ignition switch is in the On position. The VTD system uses the Security
telltale as a malfunction indicator. • The CTD system portion of the BCM controls the Security telltale
when the ignition switch is in the Off position. The CTD system uses the Security
telltale to identify system status.
| • | Security indicator should be Flashing when the door is open. |
| • | Security indicator should be Off when all the doors are closed. |
| • | If the Security indicator does not come On or go Off correctly, refer to the Content Theft Deterrent System diagnostic and repair information in the applicable Service Manual. |
| • | Lamp is On and does not go Off however, the engine starts. This indicates that the VTD system detected a fault when the engine was running. |
| • | Lamp flashes On and Off. This indicates a problem has been detected by the VTD (Passlock™) system and the engine may not start this key cycle, a current condition. |
Important: You must diagnose the diagnostic trouble codes (DTCs) in the order specified
in the DTC table shown below. Failure to do so may result in one or more of
the following conditions:
• Extended diagnostic time • Incorrect diagnosis • Incorrect parts replacement
DTC | Diagnostic Procedure | Module | ||||||||
|---|---|---|---|---|---|---|---|---|---|---|
|
Important: Before you use this table, diagnose P0601, P0602, P0604, and P0606. Refer to Diagnostic System Check - Theft Deterrent. | ||||||||||
B2947 | DTC B2947 | BCM | ||||||||
B2948 | DTC B2948 | BCM | ||||||||
B2957 | DTC B2957 | BCM | ||||||||
B2958 | DTC B2958 | BCM | ||||||||
B2960 | DTC B2960 | BCM | ||||||||
B3031 | DTC B3031 | BCM | ||||||||
B3033 | DTC B3033 | BCM | ||||||||
P1626 | DTC B1626 | PCM | ||||||||
P1631 | DTC B1631 | PCM | ||||||||
PXXXX Other PCM DTCs Refer to the following procedures:
| ||||||||||
If none of the above items are true, proceed with the following steps:
- Install seat covers.
- Connect the scan tool to the diagnostic link connector (DLC).
- Enter scan tool diagnostics.
- Select the model year of the vehicle.
- Select light truck.
- Select F1, (Body).
- Select "C" or "K" for Series.
- Select F0, Body Control Module.
- Select F0, (Diagnostic Trouble Codes (DTC)).
- Select F0, (DTC information).
- Select F0, (Current DTC).
- Record on the repair order any current DTCs displayed. If none, skip the next step.
- Is a current B2960 DTC displayed? If no, the condition is not present with this key cycle. Continue to the next step.
- Select Exit.
- Select F1, (History DTC).
- Are any history DTCs other than B2960 present? If so, diagnose those DTCs first using the appropriate service information, otherwise continue.
- Select Exit.
- Select Exit.
- Select F1, Data Display.
- Select F6, Security.
- Cycle the key to the OFF position and wait 20 seconds.
- Slowly turn the key to the RUN position. Be careful not to turn the key into the START position.
- Observe the following values:
- Rotate the key to the START position, and observe the following again:
- If no trouble is found and the customer has experienced one of the symptoms or the code is a history DTC, the most likely cause is the VTD (Passlock™) wiring, specifically the wires from the VTD (Passlock™) sensor to the BCM.
- Air bag deployment
- Personal injury
- Unnecessary SIR system repairs
- In order to avoid the above conditions, observe the following guidelines.
- Open the hood.
- Disconnect the negative battery cable.
- Install fender covers.
- Remove the left sound insulator, if equipped.
- Apply the parking brake in order to prevent the vehicle from moving.
- If equipped with an automatic transmission, move the shift lever all the way down to the last gear.
- Tilt the steering wheel to the full down position.
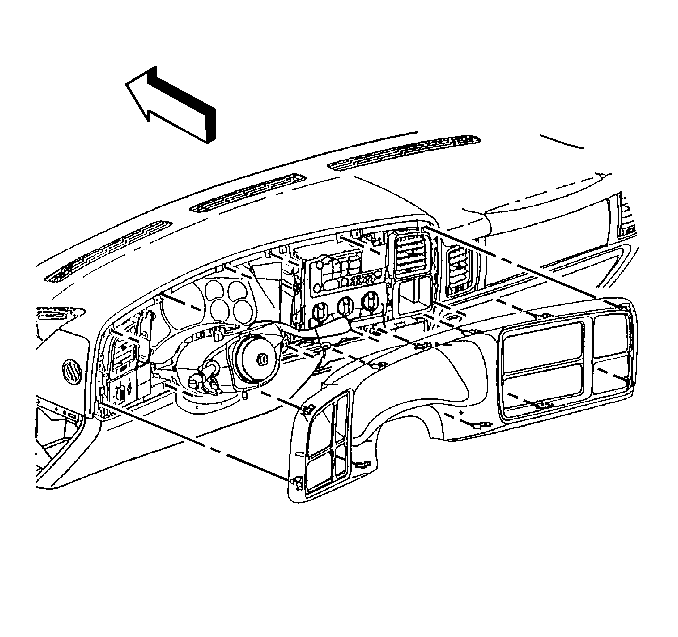
- Pull gently rearward on the corners of the bezel from the IP assembly.
- Remove the bezel.
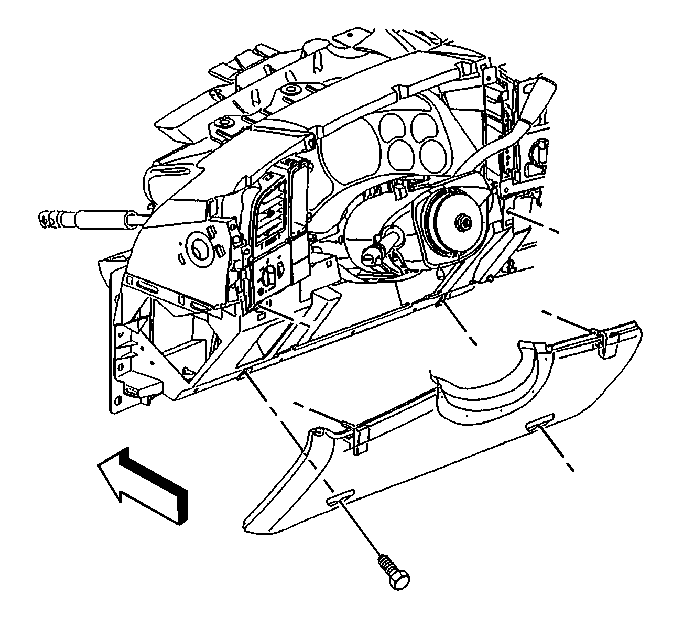
- Remove the knee bolster trim panel screws.
- Unsnap the knee bolster.
- Twist the brake release cable in order to disengage the knee bolster.
- Disconnect the lap cooler hose from the knee bolster trim.
- Remove the four knee bolster retaining nuts.
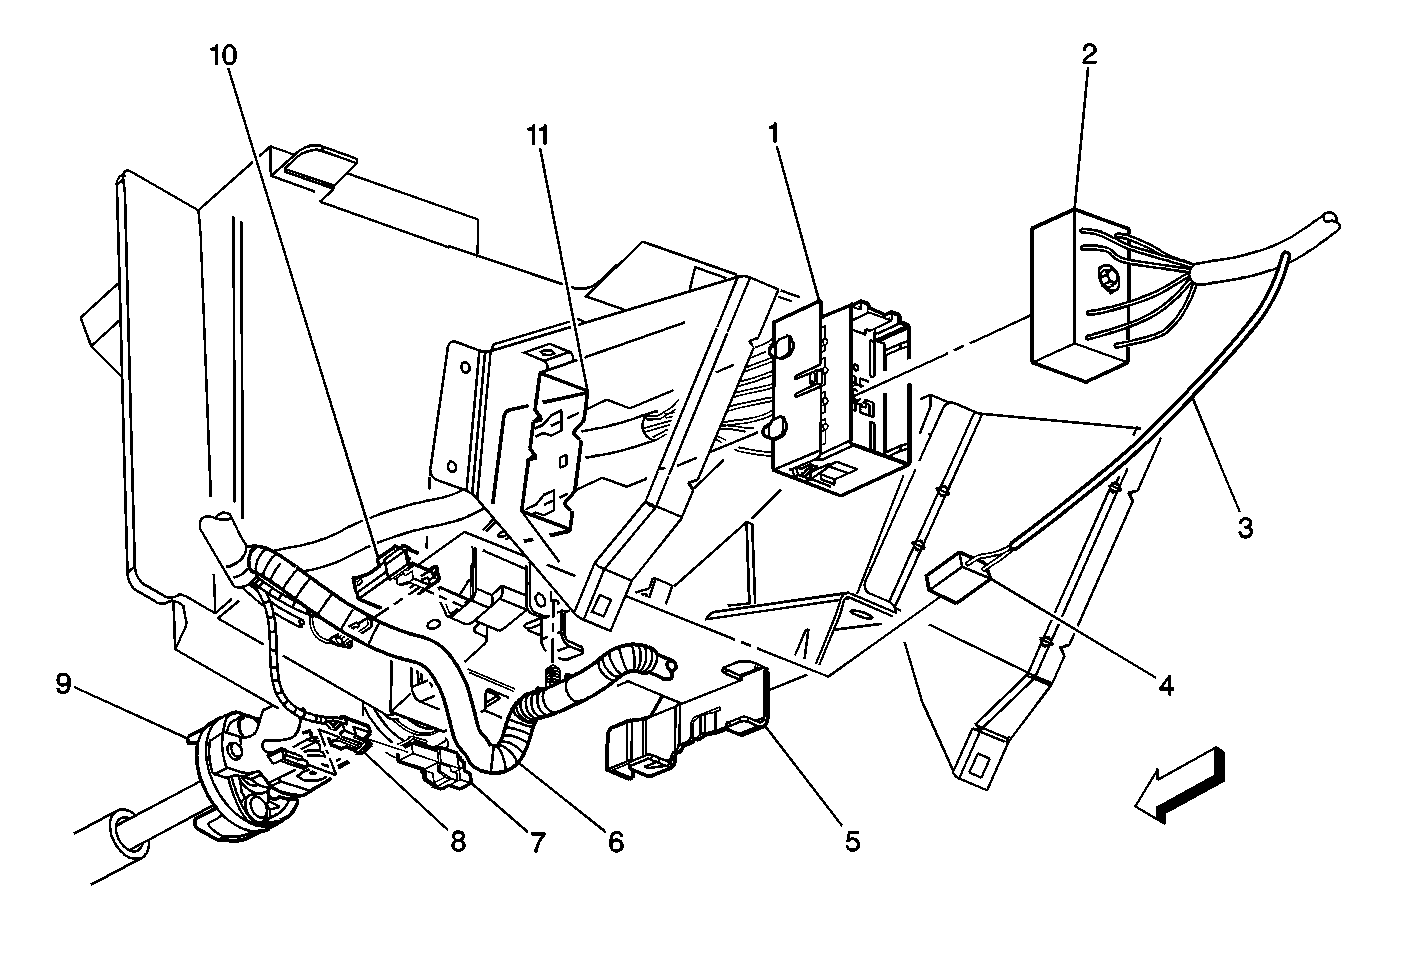
- Loosen the screw holding connector C201 together and separate. C201 is the connector for the steering column wires to the IP wiring harness on the left side of the column about half way down. It is a 48-way connector with a center retaining screw.
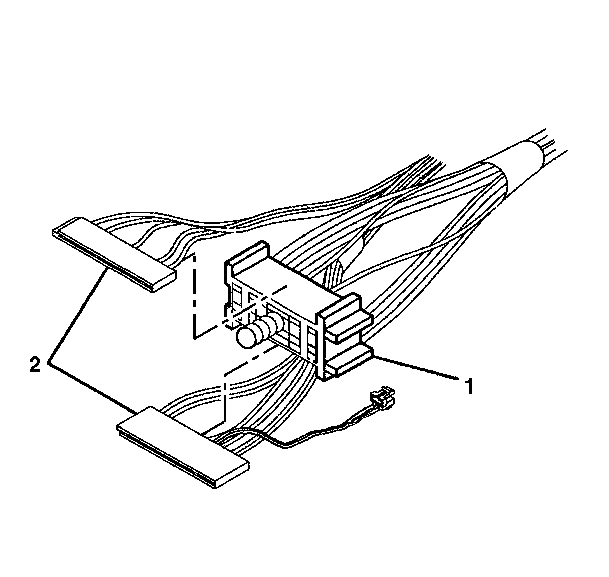
- Separate the turn signal and multifunction switch harness (2) from the 18-way connector (1). They have a locking tab in the center of each connector that needs to be released.
- Circuit number 1057, Orange with Black stripe wire, in cavity C4.
- On the end of the 18-way connector is the date the ignition switch wiring harness was manufactured. This date is etched in the plastic of the connector. It is displayed as two lines of numbers (ie: GM XXX, XXXX). The bottom row of 4 digits are the 4 digits which must be verified. The following defines the 4 digits:
- If the date code is less than N080, (November 08, 2000), solder the terminals to the wires in the following connector cavities of the ignition switch 18-way connector portion of C201.
- Connect the turn signal and multifunction switch harness (2) to the 18-way connector (1). Tighten the screw holding the wiring harness connectors together at the junction.
- Cycle the steering column tilt from full up to full down a minimum of ten times.
- Squeeze the ends of connector C201 together with your fingers, forcing the terminals and connector to properly seat together.
- Recheck the retaining screw for connector C201 torque.
- Again, cycle the steering column tilt from full up to full down a minimum of ten times.
- Again, squeeze the ends of connector C201 together with your fingers, forcing the terminals and connector to properly seat together.
- Recheck the retaining screw for connector C201 torque.
- Again, cycle the steering column tilt from full up to full down a minimum of ten times.
- Again, squeeze the ends of connector C201 together with your fingers, forcing the terminals and connector to properly seat together.
- Recheck the retaining screw for connector C201 torque.
- Install the knee bolster to the IP.
- Install the knee bolster trim panel to the IP.
- Install the sound insulator panel, if equipped.
- Install the knee bolster trim panel.
- Install the IP trim plate bezel to the IP.
- Connect the negative battery cable.
- Observe the Security indicator lamp when the key is turned to the RUN position. The Security lamp should be Off. If the lamp is On, you must recheck your work.
- Observe the SIR lamp. The lamp should be Off.
- Remove the fender covers and close the hood.
- Remove the seat covers.
| • | Passlock™ Data Voltage should be 5.0 volts. |
| • | Passlock™ State should be Normal. |
| • | Passlock™ Code should be Open. |
| • | Passlock™ Data Voltage should be less than 5.0 volts. Passlock™ Data Voltage should remain steady and not fluctuate. The test vehicle used for this diagnostic procedure had a voltage value of 2.49 volts. The vehicle being worked on may be either higher or lower than this value. The key is that it has to be less than 5.0 volts. |
| • | Passlock™ State should be "Monitor Passlock™". |
| • | Passlock™ Code should be Valid Code. |
Caution: This vehicle is equipped with a Supplemental Inflatable Restraint (SIR)
System. Failure to follow the correct procedure could cause the following
conditions:


Important: For all vehicles, use either the correct mating terminal, or electrical tool GM# 12094430, (J 38125-11A) from the J 38125-B Terminal Repair kit. Perform a pull test to determine if the terminals have proper tension. If one is found where the tension is suspect, replace the terminal.
Circuit number 812, Red with White stripe wire, in cavity C2.
Circuit number 1836, Yellow wire, in cavity D3.
| • | Month (1) Alpha/Numeric Character (1= January, 4 = April, 9 = September, O = October, N = November, etc.) |
| • | Day (2) numbers (1-31) |
| • | Year (1) Number (9 =1999, 0 = 2000) |
| • | Circuit number 1057, Orange with Black stripe wire, in cavity C4 |
| • | Circuit number 812, Red with White stripe wire, in cavity C2 |
| • | Circuit number 1836, Yellow wire, in cavity D3 |

Important: Connector bolt torque is critical. Tightening the bolt to 7 N·m (61 lb in) may cause the pal nut of the connector to strip. Tightening the bolt less than 4 N·m (35 lb in) may result in an intermittent connection.
Tighten
Tighten the retaining screw to 6 N·m (53 lb in).
Tighten
Tighten the retaining screw to 6 N·m (53 lb in).
Tighten
Tighten the retaining screw to 6 N·m (53 lb in).
Tighten
Tighten the retaining screw to 6 N·m (53 lb in).
Tighten
Tighten the nuts to 10 N·m (89 lb in).
| • | Connect the brake release cable to the park brake assembly. |
| • | Install the screws that retain the knee bolster trim panel to the instrument panel. |
Tighten
| • | Tighten the TORX® screws to 9 N·m (80 lb in). |
| • | Tighten the hex head screws to 2 N·m (18 lb in). |
| • | Position the courtesy lamp and install the retaining screw. |
Tighten
Tighten the socket retaining screw to 1.4 N·m (12 lb in).
Warranty Information
For vehicles repaired under warranty, use:
Labor Operation | Description | Labor Time |
|---|---|---|
N6626 | Wiring and/or Connector Repair - Theft Deterrent | 0.8 hr |
Add | With Luxury Console | 0.4 hr |
Add | With Standard Console | 0.1 hr |
Add | With Standard Console w/ IP Extension | 0.4 hr |
Add | With Driver Side Sound Insulator | 0.1 hr |
