4WD Switch Indicator Lights Flashing, 4WD Inoperative, DTCs C0327, P0500, P0836, P1875 Set (Replace Encoder Motor Sensor, Reprogram TCCM, Inspect Front Drive Axle Engagement Sleeve for Damage/Repair)

| Subject: | 4WD Switch Indicator Lights Flashing, 4WD Inoperative, DTCs C0327, P0500, P0836, P1875 Set (Replace Encoder Motor Sensor, Reprogram TCCM, Inspect Front Drive Axle Engagement Sleeve for Damage/Repair if Necessary) |
| Models: | 2003 Chevrolet Avalanche, Silverado, Suburban, Tahoe |
| 2003 GMC Sierra, Yukon, Yukon XL |
| with 4WD and Electric Shift or Active Transfer Case (RPO NP1 or NP8) |
This bulletin is being revised to update the Diagnosis and Correction Information and to change two part numbers. Please discard Corporate Bulletin Number 03-04-21-001C (Section 04 -- Driveline/Axle).
Condition
Some customers may comment that the Service 4WD light is on, the 4WD system is inoperative, the 4WD switch indicator lights are blinking or that a grinding noise is heard from the front axle.
Service Diagnosis
Technicians may find DTC C0327 in the Transfer Case Control Module (TCCM) and/or DTC P0836 in the Transmission Control Module (TCM) and/or DTC P0500 and P1875 in the Powertrain Control Module (PCM).
It is possible that the module may be in a mode that will not allow any shifts or updates for the software or calibrations. If this occurs, the TREC fuse (in the engine compartment) must be pulled and reinstalled after 30 seconds. This should allow further operation and service of the system. If a C0550 code is found, this is an unrelated concern and SI diagnostics should be followed for this concern.
Correction
Important: For ease of reassembly, shift the transfer case assembly to 2HI for the NV263 (NP1), or Neutral for the NV246 (NP8) prior to removing any components. For information on placing the NV246 (NP8) transfer case in NEUTRAL, see the procedure at the end of this bulletin.
- Remove the transfer case and front axle/engine skid plates (if equipped).
- Disconnect and position the front propeller shaft aside.
- Disconnect the transfer case encoder motor wiring harness.
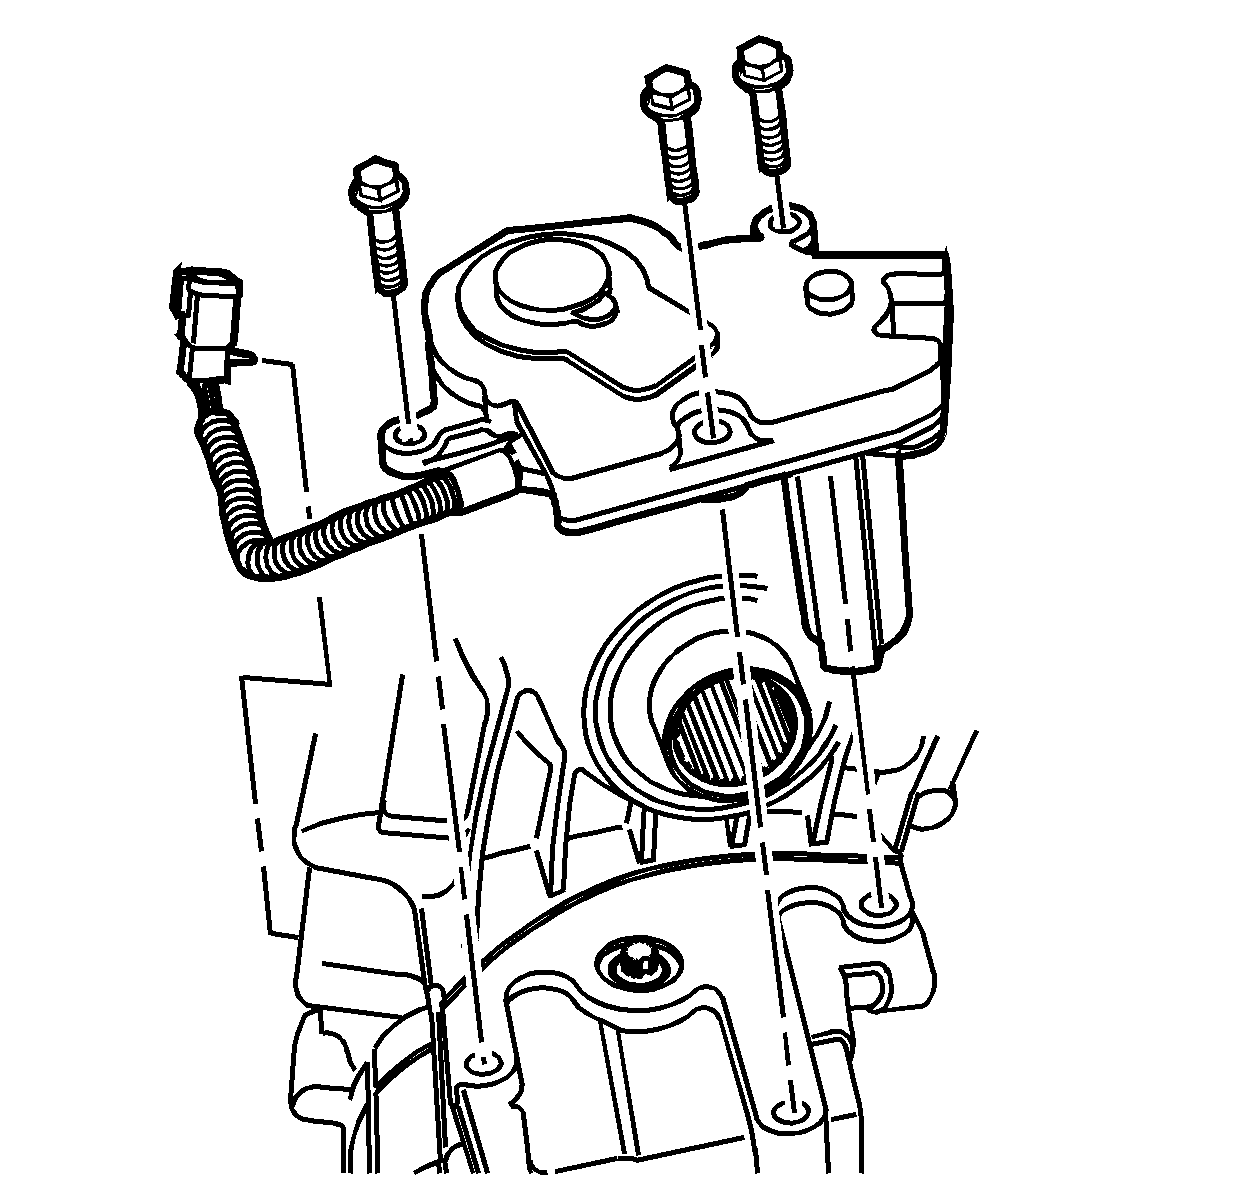
- Remove the three (3) bolts that retain the encoder motor to the transfer case.
- Separate the encoder motor assembly from the transfer case and place it on a work bench.
- Remove the four screws on the outer perimeter of the encoder motor housing.
- Carefully remove the cover from the encoder motor assembly. The cover has a seal on the bottom side. Place the cover in a position to protect this seal from damage and/or contamination.
- Locate the two shims; one on the small gear and another on the larger gear. Set them aside on a clean surface for reuse.
- Carefully lift the large gear from the housing. The sensor and wiring harness will come with the gear.
- Disconnect the wiring from the sensor.
- Separate the sensor from the large gear.
- Ensure the phenolic spacer is in position in the housing.
- Carefully position the new encoder sensor to the large gear aligning the key way slots. Just begin the insertion of the keyway over the key. Press the sensor onto the large gear using a ¾ inch deep well socket. This will ensure proper installation of the sensor.
- Connect the wiring harness to the sensor. The wiring harness connector wording (TOP) must face up or toward large gear.
- Position the sensor and gear into the housing with the positioning pin seated in the housing. Align timing marks on the large gear and housing previously mentioned.
- Reinstall the shims on the small and large gears.
- Ensure that the wiring harness is properly seated in the housing.
- Replace the encoder motor cover seal.
- Reinstall the cover with the four (4) new screws.
- Place the encoder to transfer case gasket into position on the dowel pins in the transfer case.
- Reinstall the encoder motor assembly to the transfer case.
- Reconnect the encoder motor wiring harness connector.
- Reinstall the front propeller shaft.
- Reinstall the transfer case skid plate, if equipped.
- Disconnect the wiring from the front axle actuator motor and the axle housing.
- Remove the right stabilizer shaft link assembly.
- Remove the six (6) right front wheel axle shaft companion flange bolts. Reposition the right front axle shaft away from the companion flange.
- Remove the five (5) inner axle shaft housing bolts from the differential carrier case.
- Remove the two (2) axle shaft housing nuts from the bracket.
- Position an oil drain pan under the front axle, as about ½ cup of differential fluid may drain from the differential as the right front axle tube and shaft assembly is removed from the vehicle.
- Remove the right front axle tube and shaft assembly from the vehicle.
- Inspect the engagement sleeve for damage to the internal teeth. If damage is found, replace the sleeve. This sleeve is powdered metal and will fracture if dropped.
- Clean the end of the axle/tube assembly and the differential carrier flange of the original sealer.
- Clean any metal shavings out of the axle housing if there are any, including flushing the fluid if needed.
- Position the axle/tube assembly with the companion flange resting on the bench.
- Reassemble the right front drive axle components ensuring that the spring is properly positioned over the end of the fork assembly , and that they are positioned to the engagement sleeve and the pilot in the axle shaft tube.
- Apply sealant, GM P/N 1052942 (Canadian P/N 10953466), or equivalent, to the axle housing to differential carrier sealing surface.
- Position the axle/tube assembly to the differential carrier and the mounting bolts.
- Reposition the right front axle shaft to the companion flange and install the (6) bolts.
- Install the right stabilizer shaft link assembly.
- Route and reconnect the wiring harness.
- Verify the fluid level in the front differential. If fluid is required, fill with SAE 80W-90 Axle Lubricant, GM P/N 1052271 (Canadian P/N 10950849), or equivalent.
- Reinstall the skid plates (if previously removed).
- Shift the NV246 (NP8) transfer case to the 2HI position. See procedure below. (The NV263 (NP1) should already be in 2HI)
- REPROGRAM THE TCCM IN THE 2HI POSITION for the NV263 (NP1) and NV246 (NP8).
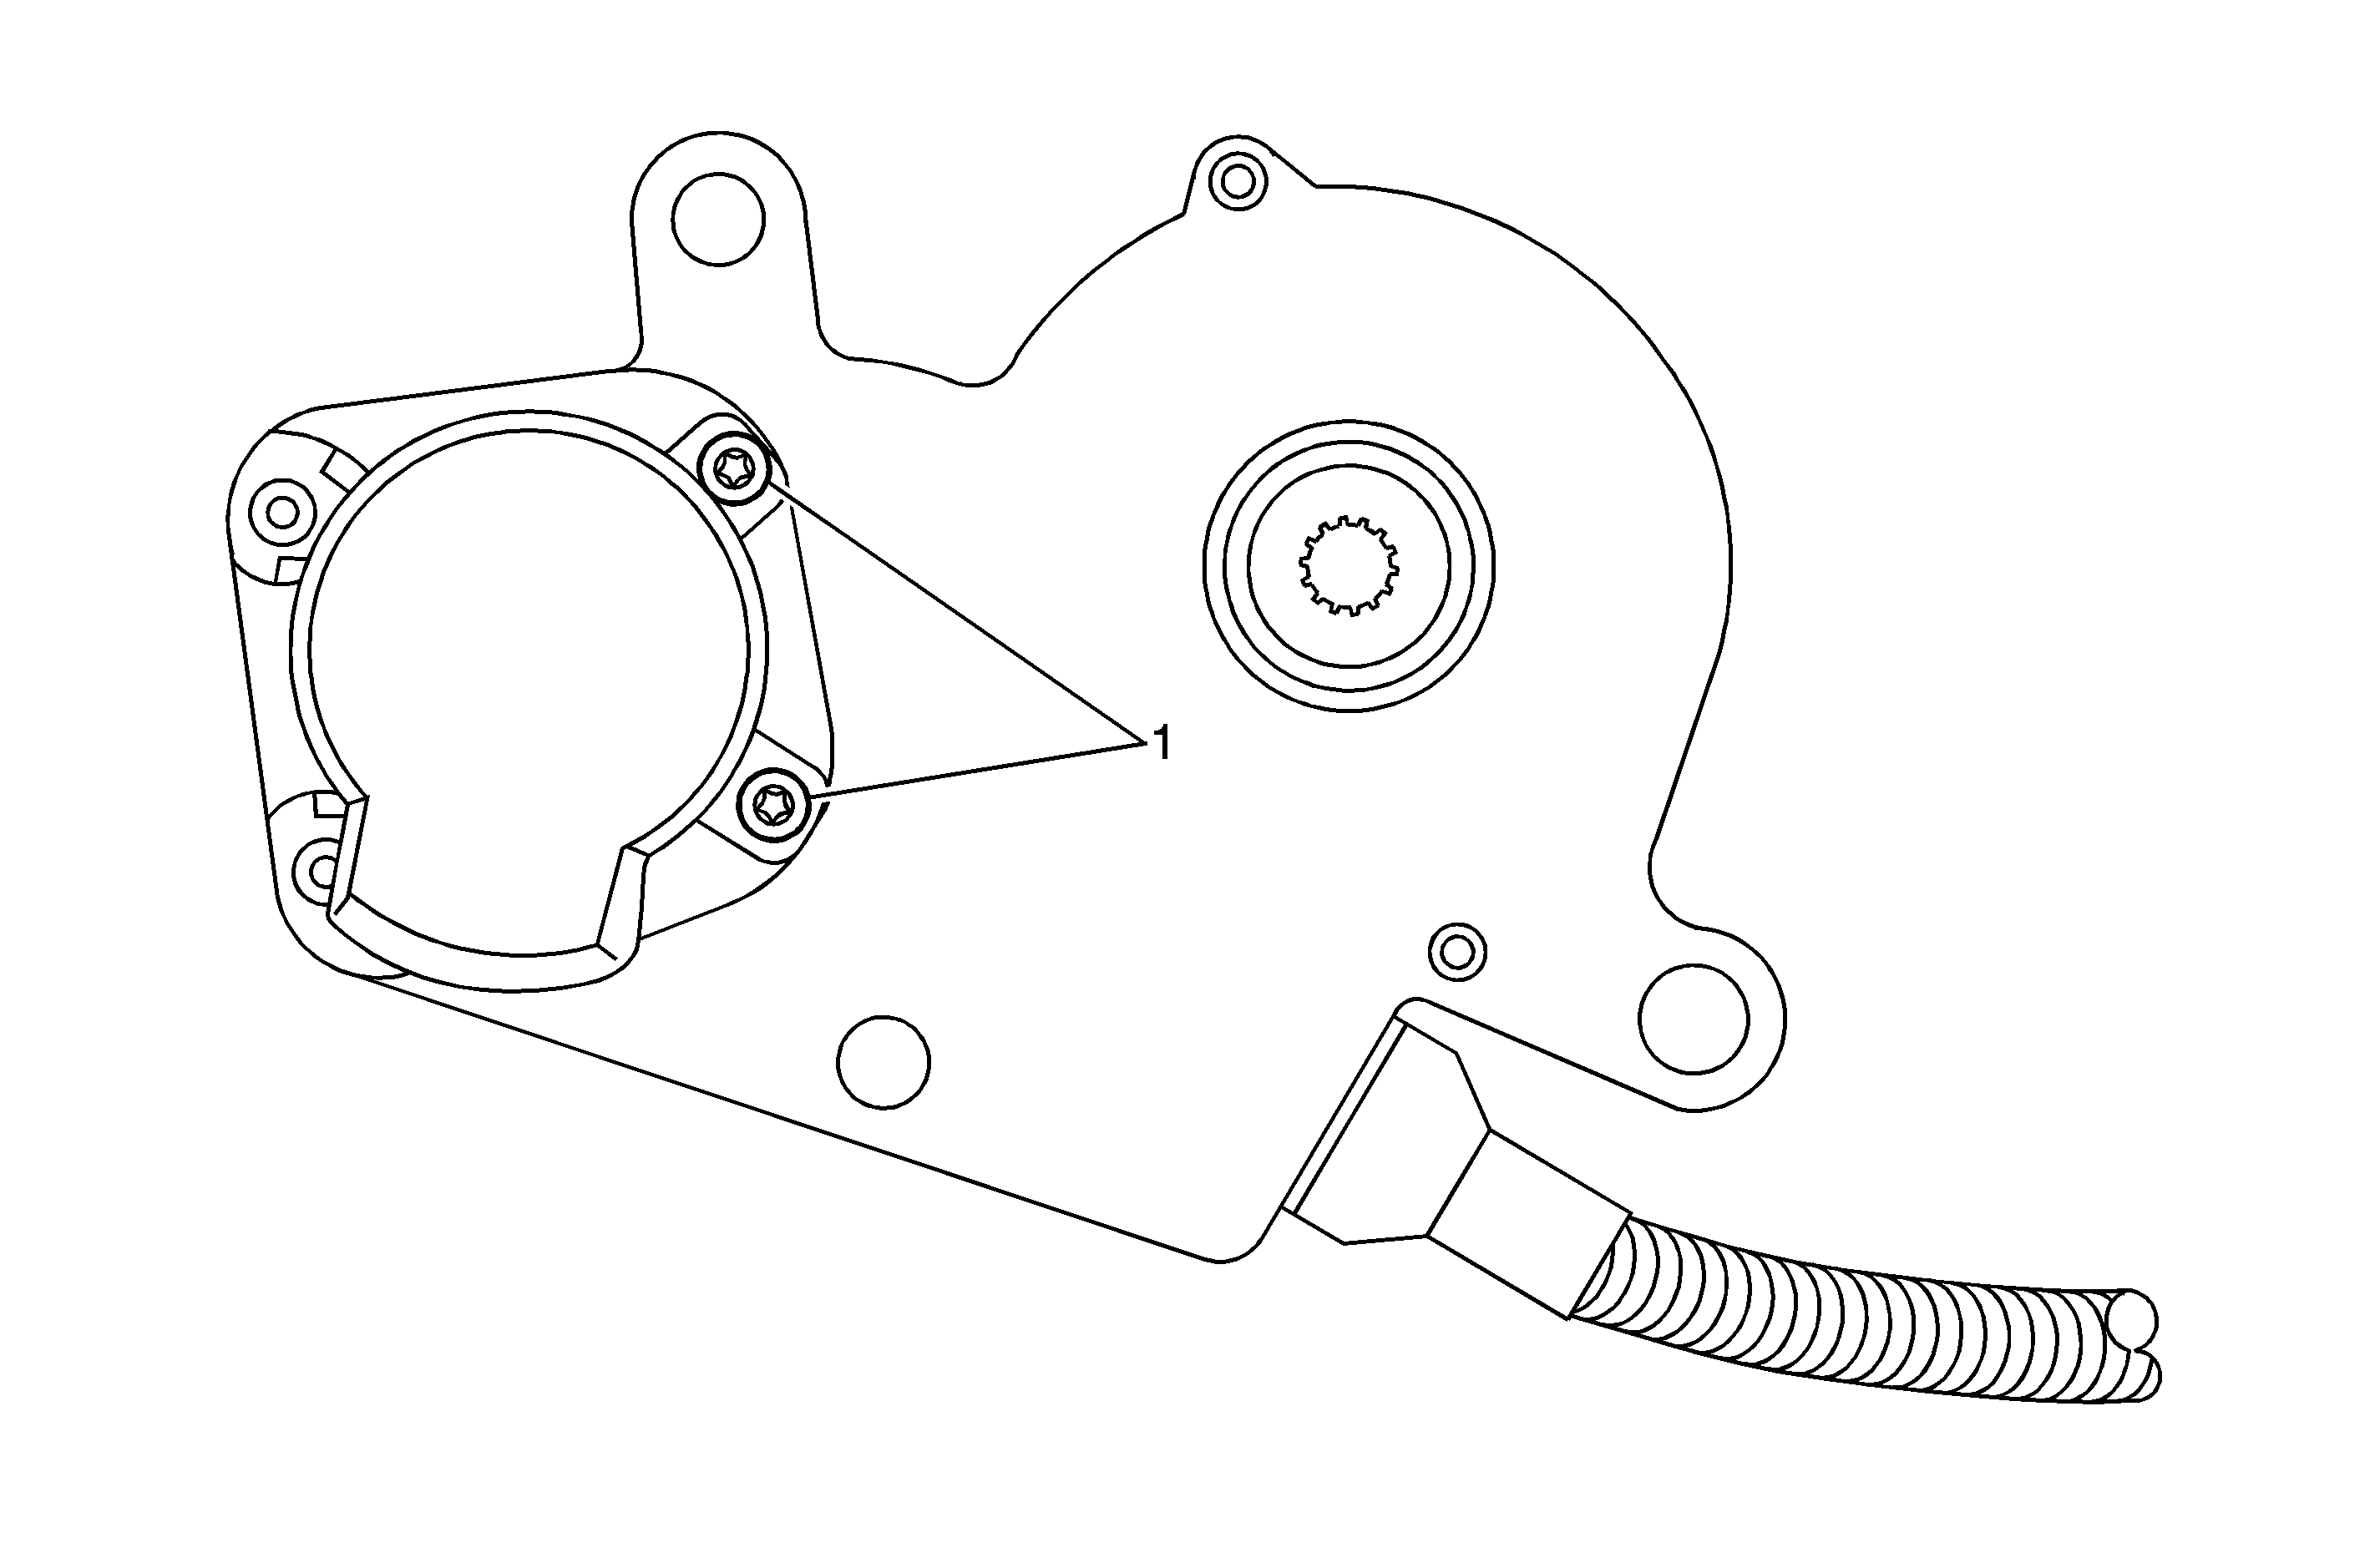
Important: DO NOT REMOVE THE SCREWS INDICATED WITH THE (1) IN THE ABOVE ILLUSTRATION.
Important: For proper timing and ease of reassembly, hold the gear in place as your remove the cover from the encoder motor assembly with your thumb or finger.
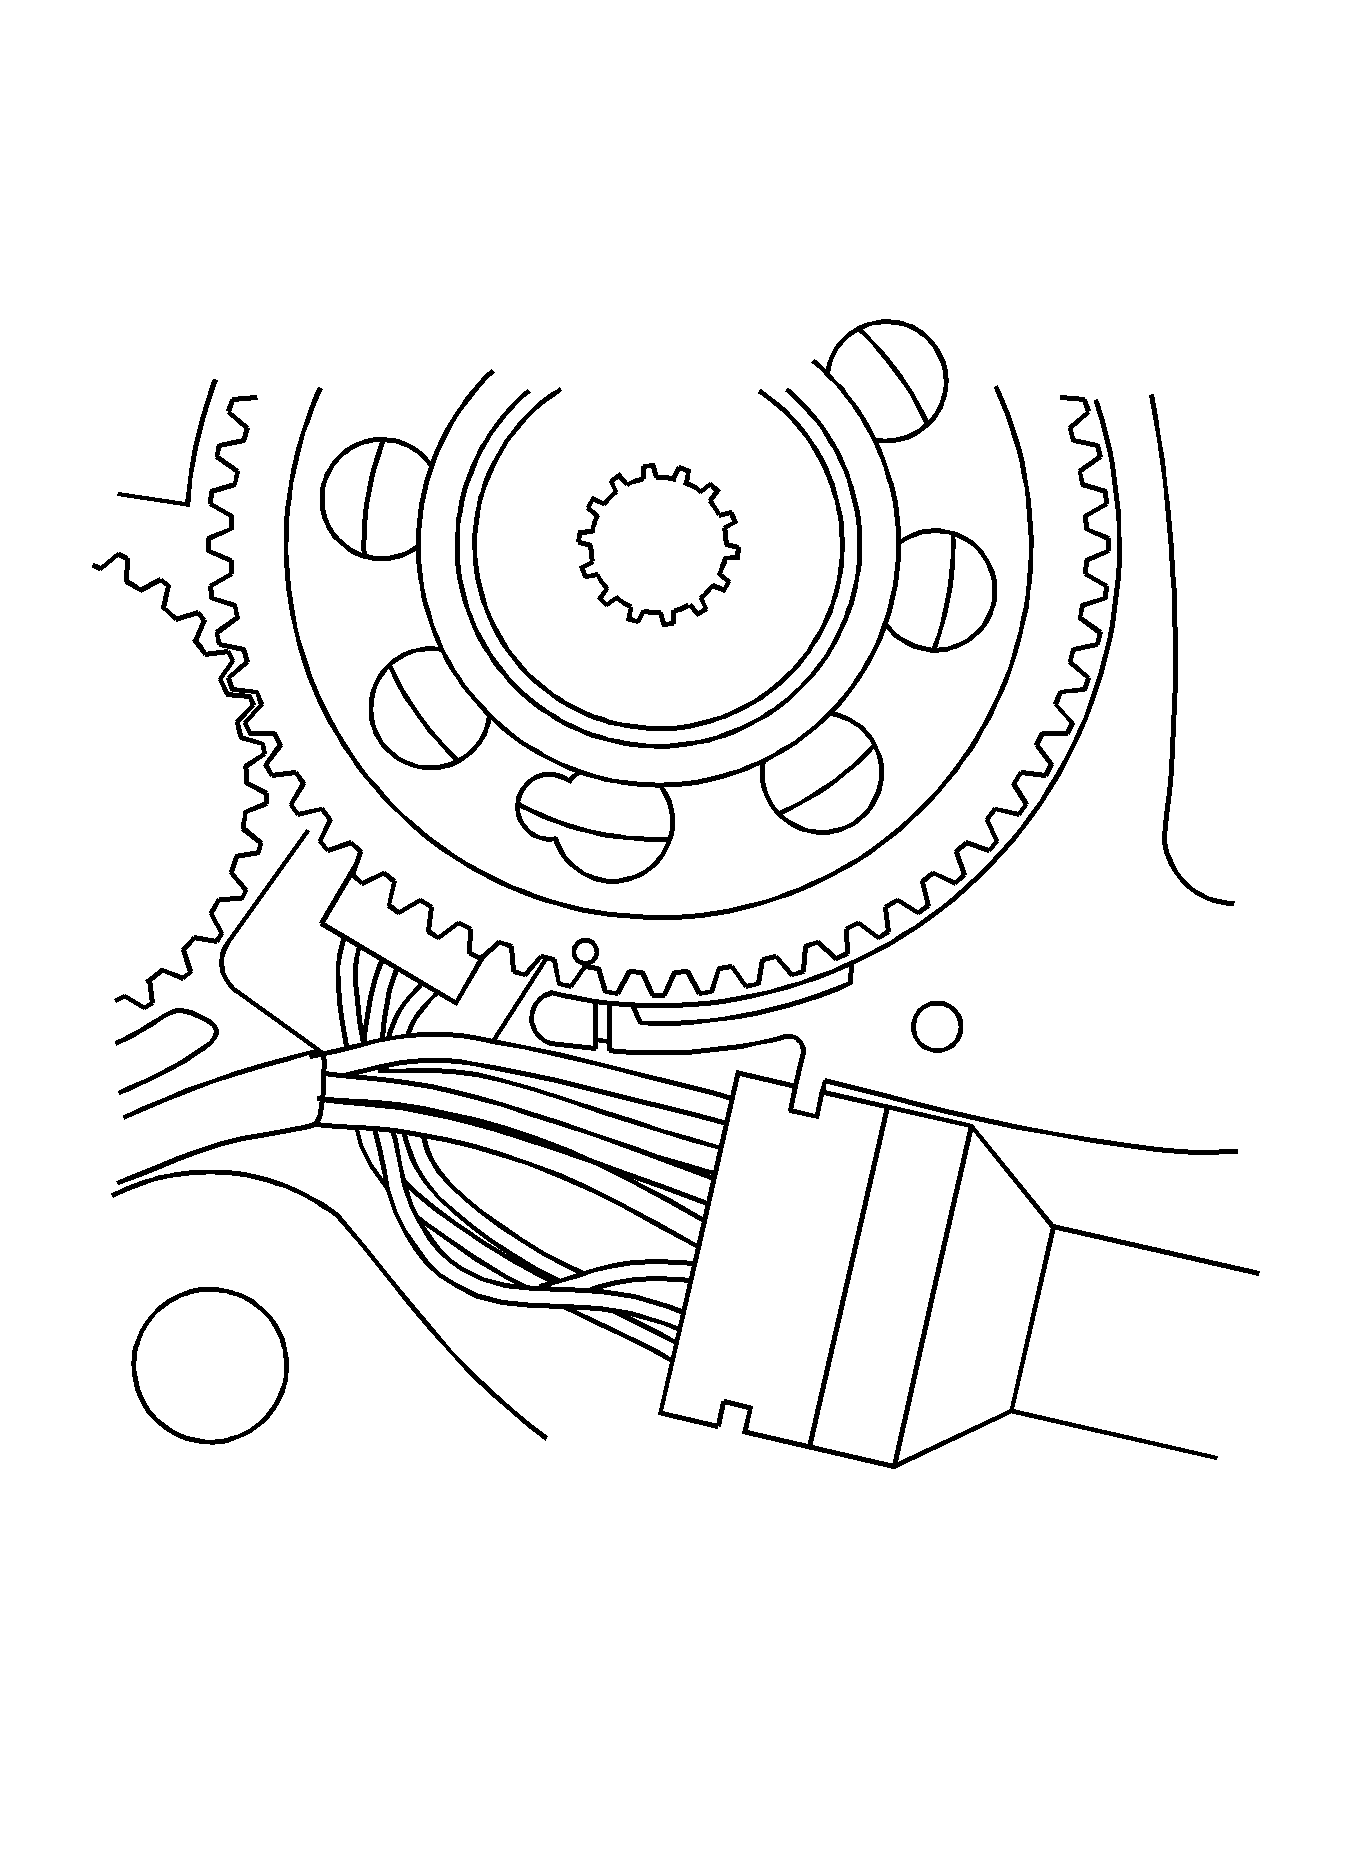
Important: Observe the location of the punch mark on the large gear in relation to the timing mark on the housing if the transfer case was placed in the 2HI for the NV263 (NP1), or Neutral for the NV246 (NP8). The timing marks should be within one tooth of proper alignment. If not, you must note the timing mark positions for reassembly.
Important: After removing the large gear from the housing, a dark gray phenolic spacer should remain in the casting where the bottom of the large gear resides. Locate this spacer and save for reuse.
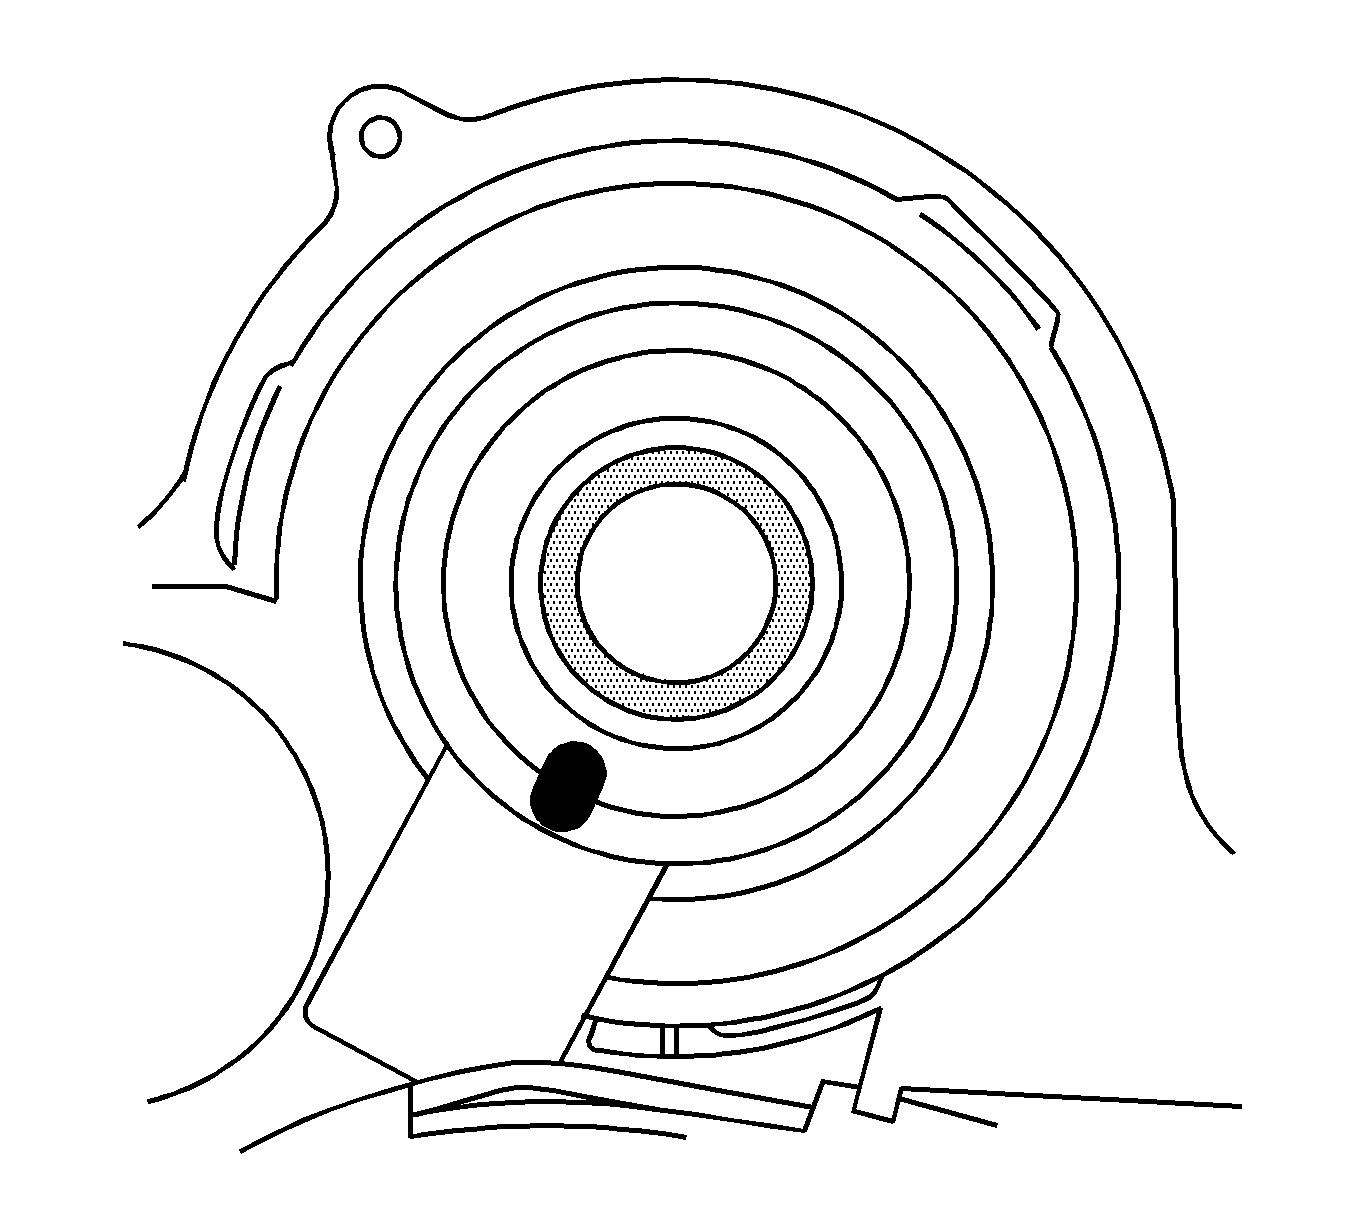
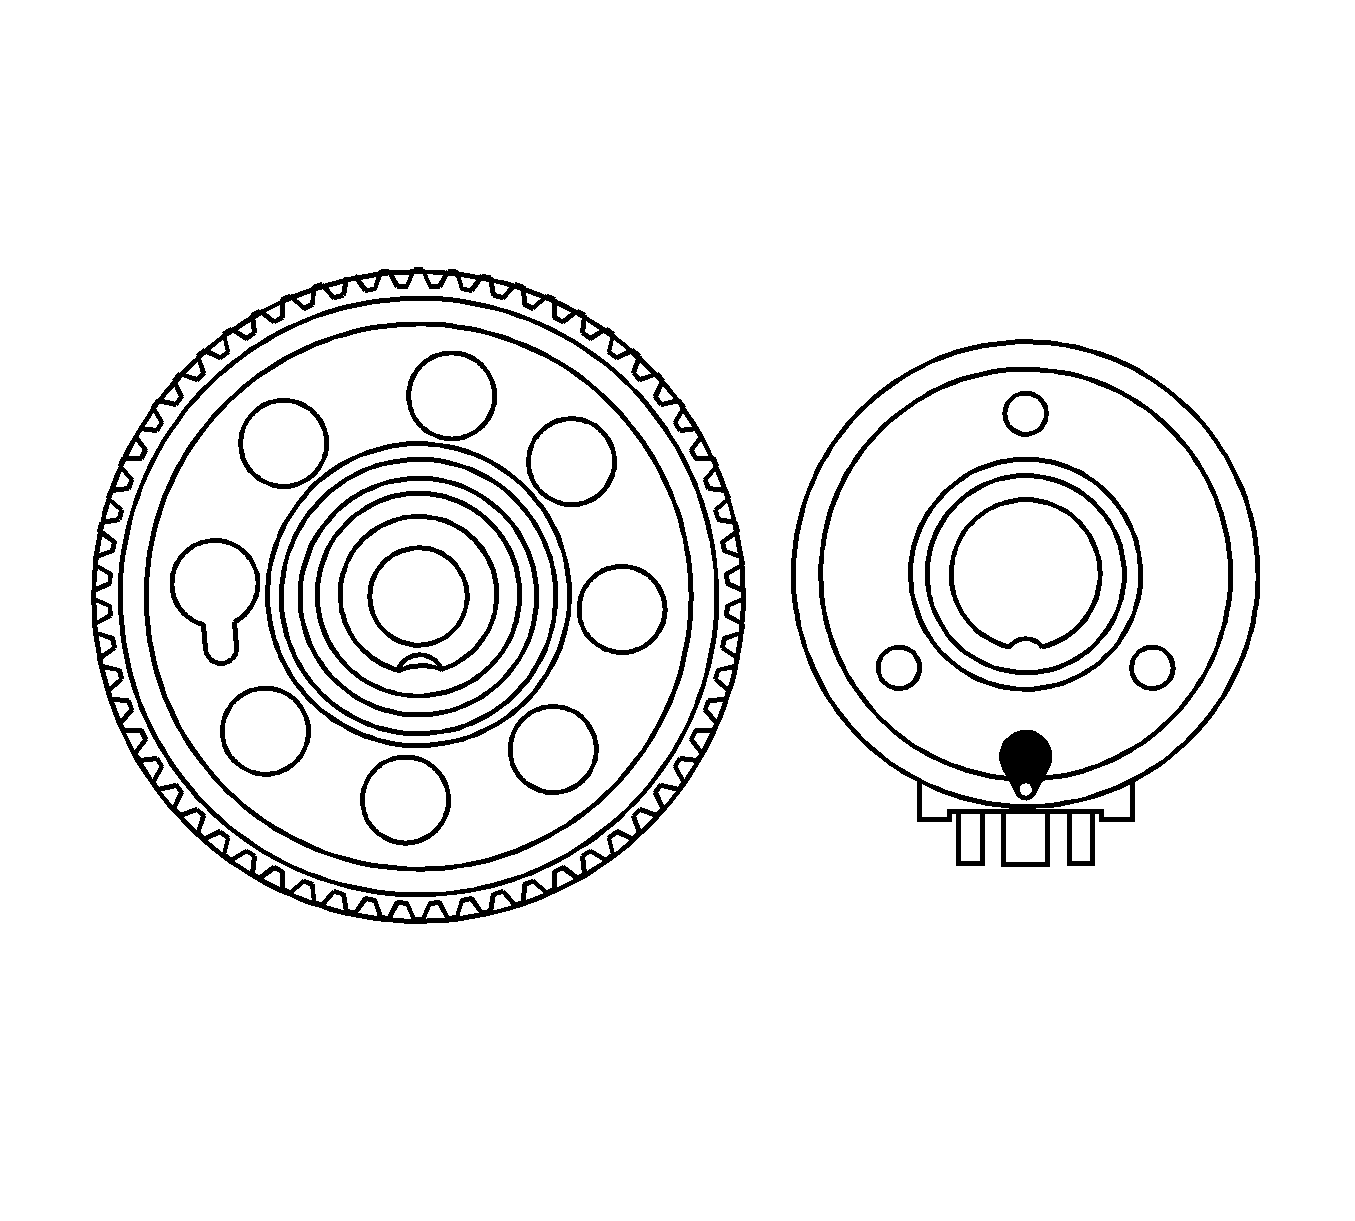
Important: The sensor has two (2) keyed areas which must be properly positioned when reassembled. The bottom of the sensor has a positioning pin that must be positioned in the cavity in the housing. The sensor key must be properly positioned over the key way in the large gear. Follow the step by step instructions below for ease of assembly.
Notice: Not using the socket to press the sensor on may result in damage to the sensor.
Tighten
| • | Tighten the two (2) long screws to 3.38 N·m (30 lb in). |
| • | Tighten the two (2) short screws to 2.25 N·m (20 lb in). |
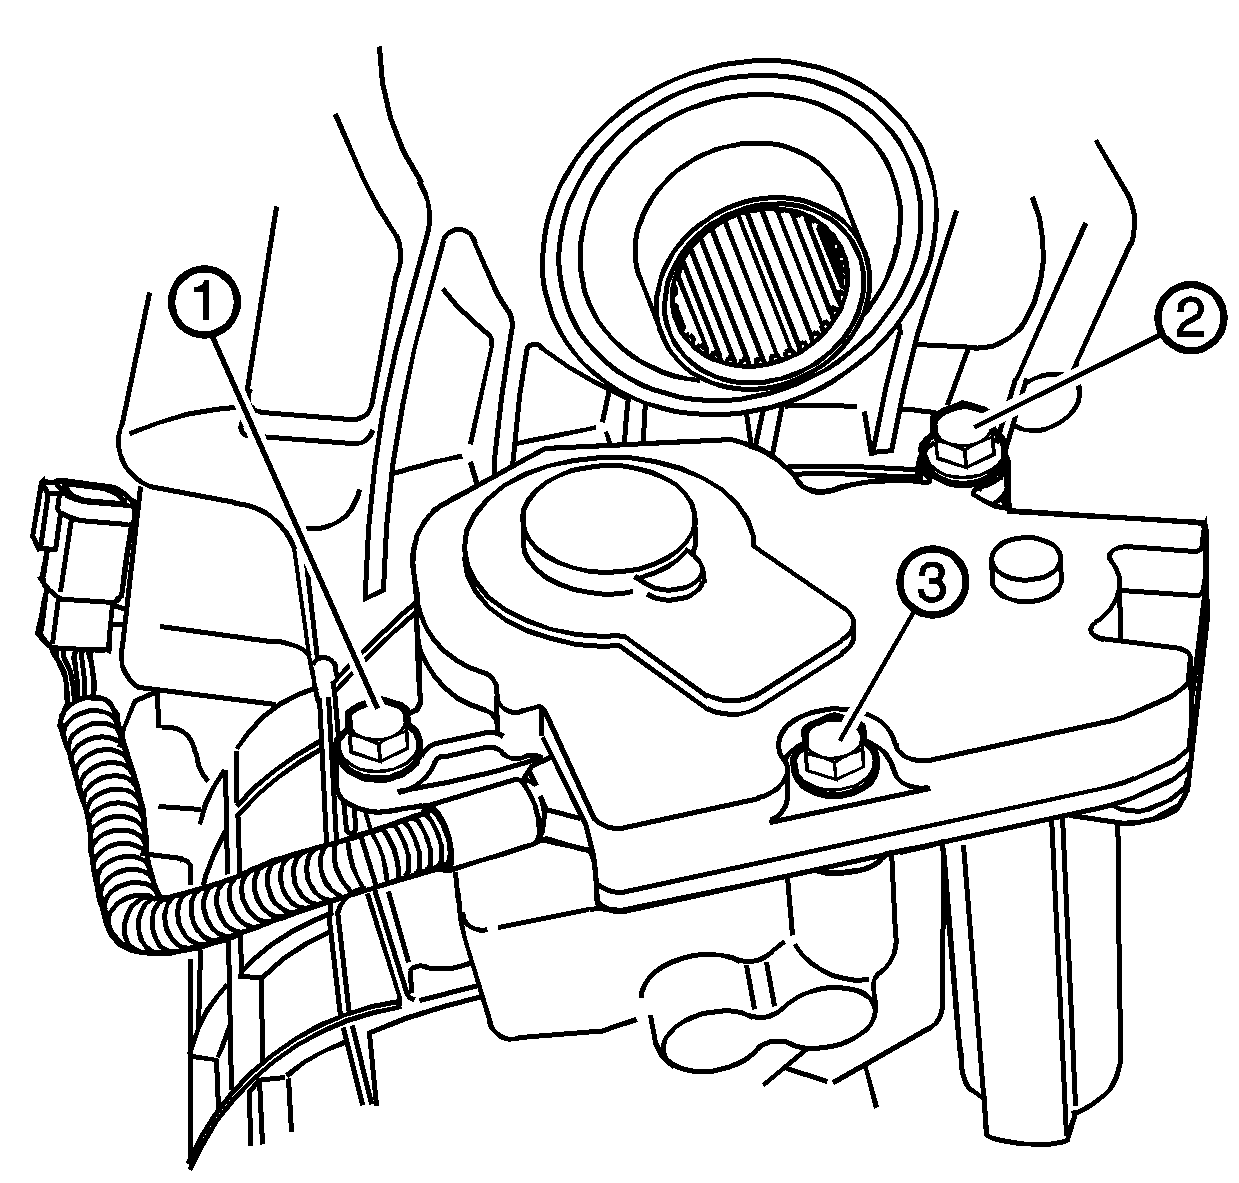
Tighten
Tighten the bolts in the sequence shown to 20 N·m
(15 lb ft).
Important: When the right front axle tube is removed from the vehicle, several components may fall out. Position a receptacle such as the engine oil drain with screen under the front differential carrier to catch these components.
Important: The bevel on the outer circumference of the engagement sleeve must be positioned into the axle shaft tube assembly.
Tighten
| • | Tighten the axle/shaft assembly to frame bolts to 100 N·m (75 lb ft). |
| • | Tighten the axle/shaft assembly to differential carrier bolts to 40 N·m (30 lb ft.). |
Tighten
Tighten the bolts to 79 N·m (58 lb ft).
Tighten
Tighten the stabilizer shaft nut to 10 N·m
(89 lb in).
Shifting NV246 (NP8) Transfer Case into Neutral
- Set the parking brake.
- Turn the ignition to the RUN position.
- Place the vehicle transmission in Neutral.
- Shift the transfer case to 2HI.
- Simultaneously press and hold the 2HI and 4LO buttons for ten (10) seconds. The RED Neutral light will come on when the transfer case shift to Neutral is complete.
- Shift the transmission to Reverse (R) for one second, then shift the transmission to DRIVE (D) for one second.
- Turn the ignition OFF. Place the shift lever in Park (P).
Shifting NV246 (NP8) Transfer Case into 2HI
- Set the parking brake.
- Turn the Ignition switch to the RUN position.
- Place your foot on the brake pedal and apply the brakes.
- Move the transmission shift lever to NEUTRAL (N).
- Press the button for 2HI. The transfer case Neutral light will go out and the transfer case will be in 2HI range.
- Turn the ignition to the LOCK position.
Parts Information
Part Number | Description | Qty |
|---|---|---|
88962315 | Sensor, Transfer Case Encoder, (NV246, NP8) | 1 |
88962313 | Sensor, Transfer Case Encoder, (NVG263, NP1) | 1 |
12384990 | Seal, Transfer Case Encoder Motor Cover | 1 |
12384988 | Screw, Transfer Case Encoder Motor Cover | 2 |
12384989 | Screw, Transfer Case Encoder Motor Cover | 2 |
26064275 | Clamp, Prop Shaft | 1 |
12479006 | Sleeve, Front Drive Axle Engagement (9.25" Axle) | 1 (If required) |
26033974 | Sleeve, Front Drive Axle Engagement (8.25" Axle) | 1 (If required) |
Parts are expected to be available from GMSPO on December 18, 2003.
Warranty Information
For vehicles repaired under warranty, use:
Labor Operation | Description | Labor Time |
|---|---|---|
*K9980 | Sensor, Encoder Motor Inspection/Replace | 1.5 hrs** |
Add | Diagnosis Time | 0.0-0.3 hr |
Add | With ¾ Ton (2500 Series) | 0.1 hr |
Add | To Replace Front Drive Axle Engagement Sleeve | 0.1 hr |
*This labor operation is a bulletin only labor operation and will not be published in the Labor Time Guide.
**This time also includes removal and inspection of the right front axle tube and shaft assembly and reprogramming the TCCM.
