Service and Blackout Lighting
Note: Before operating the vehicle, visually inspect the exterior lighting to
ensure that all lights are operating correctly in blackout and non-blackout modes.
Ensure that lights and reflectors are not obscured by dirt or have broken lenses.
The blackout driving light is mounted on the front bumper grille guard on the
left side of the vehicle. The blackout marker lamps are located on the front left
and right sides of the vehicle. The blackout stoplights are on the rear left and right
sides of the vehicle. The military blackout lighting provides a stealthy low illumination
to standard lighting systems.
Within the rear marker lamps are seperate color markers. Yellow will illuminate
for the brakes and red will illuminate for the drive mode. The front markers illuminate
yellow.
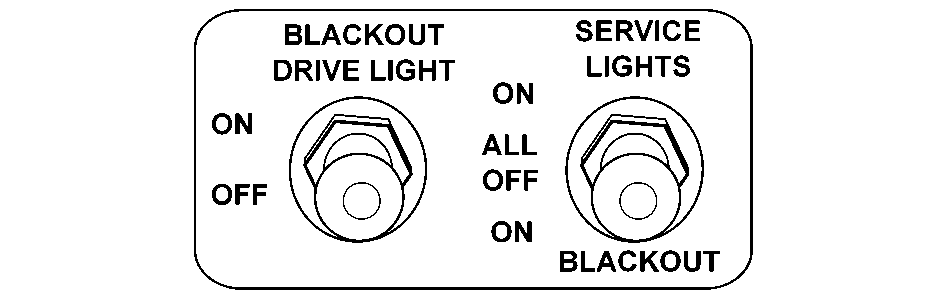
Service Lights/Blackout Control
Notice: If the vehicle is not
going to be driven for 24 hours or more, the service lights switch must be placed
in the "ALL OFF" position. This will help prevent the batteries from discharging.
Continued discharging could damage the batteries. Before normal driving operations,
turn on service lights to ensure headlights, brake lights and turn signals are operational.
The switch located on the left side of the accessory panel is the service lights/blackout
control.
With the ignition switch in the ON Position:
| • | Pull the switch outward then push upward to the service ON position. All
normal service lamps will be operational with normal controls. |
| • | Move the service lights/blackout switch to the center ALL OFF position.
All lamps and accessory power to the vehicle will turn off. |
| • | Move the switch to the blackout position, the following will occur: |
| - | The blackout lighting system will be operative. |
| - | The front and rear blackout marker lamps will illuminate. |
| - | The blackout stop lamps will illuminate when the brakes are applied. |
| - | The instrument panel warning lights will remain functional. |
| - | The hazard lights will remain functional. |
| - | The horn will not be functional. |
The vehicle’s military 12-pin trailer wiring connector and trailer lamps
are also controlled by this switch.
Blackout Drive Light Control
The switch located on the left side of the accessory panel next to the service
light switch is the blackout drive light control.
The service lights/blackout control switch must be in blackout position or in
the down position for the blackout drive light to function.
With the ignition switch in the ON position:
| • | Pull the switch outward then up to the ON position, the front blackout
drive lamp will activate. |
| • | Pull the switch outward then down to the OFF position, the blackout drive
lamp will deactivate. |
| • | The switch will return to the center position automatically after you
release it from either the ON or OFF position. |
