CAMPAIGN: MANDATORY SCHOOL BUS EQUIPMENT (DUAL HORNS)

Models: B6P 1985-89 School Bus (Canada Only) S7 1989 School Bus (Canada Only)
General Motors of Canada has determined that certain 1985-89 B6P and 1989 S7 School Buses sold in Canada do not conform to Canadian requirements. School Buses must be equipped with dual horns (high note and low note), 60 gallon fuel tanks and heavy duty rear shock absorbers. To meet these requirements, wiring and high note horn must be installed, the present 30 gallon tanks must be removed and new 60 gallon tanks installed and shock absorbers must be installed on vehicles with the VIN's listed in the Vehicles Involved section of this Bulletin.
VEHICLES INVOLVED:
Only the following vehicles are involved in this campaign. VIN's of vehicles requiring added high note horn:
1985 B6P 1986 B6P 1988 B6P --------- -------- ---------- 1GBG6P1B9FV215642 1GDG6P1B6GV527734 1GBM6P1BXJV106697 1GDJ6P1B6GV540960 1GBM6P1BX1V108207 1GDL6P1F4GV539544 1GBM6P1B01V106739 1GDL6P1F5GV539536 1GBM6P1B01V107731 1GDL6P1F8GV539532 1GBM6P1B1JV106815 1GBM6P1B2JV106631 1GBM6P1B3JV106802 1GBM6P1B7JV106799
1989 B6P 1989 S7 ---------- ---------- 1GBM6P1B0KV105267 1GBM7T1G6KV109809 1GBM6P1B1KV105293 1GBM6P1B3KV105294 1GBM6P1B4KV105403 1GBM6P1B5KV105653 1GBM6P1B6KV105287 1GBM6P1B9KV105297
VIN's for vehicles requiring 60 gallon fuel tanks
Usage Codes: A L86 Gasoline Engine B LA3 Gasoline Engine C LH4 Diesel Engine D L86 Gasoline Engine E LH4 Diesel Engine
1985 B6P Usage 1986 B6P Usage 1987 B6P Usage 1GDG6P1B6FV627864 - A 1GDG6P1B6GV522730 - A 1GBG6P1BOHV100978 - A 1GBM6P1E9FV111374 - B 1GDG6P1B7GV522784 - A 1GDG6P1B1HV532955 - A 1GDG6P1F8FV517918 - C 1GBK6P1B2GV117984 - A 1GDG6P1B7HV531048 - A 1GBM6P1B5GV117972 - A 1GDG6P1B9HV532945 - A
1988 B6P Usage 1999 B6P Usage 1GBG6P1B1JV100669 - D 1GBG6P1B7KV103187 - D 1GDG6P1B3JV534390 - D 1GDM6P1F3KV506404 - E 1GDJ6P1BXJV500999 - D 1GDL6P1B2KV503650 - D 1GDL6P1BXJV521747 - D 1GDL6P1B5KV520409 - D 1GDL6P1B6JV521745 - D 1GDM6P1B8KV500336 - D 1GDM6P1B8KV500353 - D
VIN's of vehicles requiring added heavy duty shock absorbers:
Usage Code:
A G52 H10 (15,000 LB RR Spring, 15,000 LB RR Axle) (Eaton 15040S) B G52 H95 (15,000 LB RR Spring, 15,000 LB RR Axle) (GMC H15) C G54 H93 (18,000 LB RR Spring, 17,500 LB RR Axle) (GMC H175) D G54 H11 (18,500 LB RR Spring, 19,000 LB RR Axle) (Eaton 19050S) E G54 H63 (18,500 LB RR Spring, 19,000 LB RR Axle) (Eaton 17121) F G56 H11 (20,800 LB RR Spring, 19,000 LB RR Axle) (Eaton 19050S)
1985 B6P Usage 1986 B6P Usage 1986 B6P Usage 1GBJ6P1FXFV214668 - C 1GBG6P1AXGV108981 - B 1GBL6P1B8GV109067 - C 1GBL6P1F1FV214714 - C 1GBG6P1A1GV109100 - B 1GBJ6P1B3GV106388 - C 1GBG6P1A8FV215879 - B 1GBG6P1A3GV109048 - B 1GBJ6P1B4GV106383 - C 1GBG6P1A5GV109083 - B 1GBJ6P1B4GV106416 - C 1GBG6P1A9GV109068 - B 1GBJ6P1B5GV106392 - C 1GBG6P1BXGV109055 - B 1GB16P1B8GV106421 - C 1GBG6P1B3GV109057 - B 1GBJ6P1B9GV106394 - C 1GBG6P1B3GV109060 - B 1GDL6P1F4GV539544 - E 1GBG6P1B5GV107617 - B 1GDL6P1F5GV539536 - E 1GBG6P1B6GV109053 - B 1GDL6P1F8GV539532 - E 1GBG6P1B8GV107305 - B 1GBL6P1F1GV109091 - C 1GBJ6P1F1GV109597 - C 1GBL6P1F3GV109089 - C 1GBJ6P1F2GV109169 - C 1GBJ6P1B2GV106401 - C 1GBJ6P1F4GV109660 - C 1GBJ6P1B2GV106415 - C 1GBJ6P1F9GV109637 - C 1GBJ6P1B5GV106411 - C 1GBL6P1B0GV109063 - C 1GBJ6P1B6GV106398 - C 1GBL6P1B2GV109064 - C 1GBJ6P1BXGV109076 - C 1GBJ6P1B4GV109073 - C 1GBJ6P1B6GV109074 - C 1GBJ6P1B8GV109075 - C 1GBJ6P1B9GV109070 - C 1GBL6P1B6GV109066 - C
1989 B6P Usage 1989 S7 Usage 1GDM6P1G3KV512678 - F 1GBL7T1GXKV105449 - F 1GDM6P1GKKV512666 - F 1GBL7T1G8KV108432 - F 1GDL6P1BXKV503167 - F 1GBL6P1B3KV108787 - D 1GBL6P1B7KV108758 - D 1GBL6P1B7KV108808 - D 1GDG6P1B7KV500440 - A 1GDG6P1B7KV500454 - A
All affected vehicles have been identified by the VIN listing provided to involved dealers with this bulletin. Any dealer not receiving a listing was not shipped any of the affected vehicles.
DEALER CAMPAIGN RESPONSIBILITY:
Dealers are to perform this campaign on all involved vehicles at no charge to owners, regardless of kilometres traveled, age of vehicle, or ownership, from this time forward.
Whenever a vehicle subject to this campaign is taken into your new or used vehicle inventory, or it is in your dealership for service, you are to ensure the campaign correction has been made before selling or releasing the vehicle.
Owners of vehicles recently sold from your new vehicle inventory are to be contacted by the dealer, and arrangements made to make the required modification according to instructions contained in this bulletin.
CAMPAIGN PROCEDURE:
Refer to Section 4 of the Service Policies and Procedures Manual for the detailed procedure on handling Product Campaigns. Dealers are requested to complete the campaign on all transfers as soon as possible.
OWNER NOTIFICATION:
All owners of record at the time of campaign release are shown on the attached computer listing and have been notified by first class mail from General Motors. The listings provided are for campaign activity only and should not be used for any other purpose.
PARTS INFORMATION:
Parts required to complete this campaign should be ordered through regular channels, as follows:
DUAL HORNS (High Note and Low Note) -----------------------------------' B6P SCHOOL BUS
Description Part Number Quantity -------------------------- ----------- -------- Horn and Bracket Asm, High Note 1892164 1 Bolt, Horn Mounting 11500918 1 Washer, Horn Mounting 2039066 2 Washer, Horn Mounting 11501869 1 Nut, Horn Mounting 11501038 1 Connector 8911256 1 Connector 12004201 1
S7 SCHOOL BUS
Description Part Number Quantity -------------------------- ----------- -------- Horn and Bracket Asm, High Note 1892164 1 Bolt, Horn Mounting 11500918 1 Washer, Horn Mounting 2043543 1 Nut, Horn Mounting 21521550 1
FUEL TANK DEFICIENCY
See VIN listing for usage codes
Description Part Number Quantity Usage A B C D E ------------- ----------- --------- ------------------- Fuel Tank Asm 15617724 1 A Fuel Tank Asm 2055773 1 B Fuel Tank Asm 15660404 1 C Fuel Tank Asm 15617724 1 D Fuel Tank Asm 15660404 1 E Support Asm 15648850 2 A B C Support Asm 15648849 3 A B C Support Asm 15648849 2 D E Bolt 9425080 8 A B C D E Washer 2436164 16 A B C D E Nut 9422299 8 A B C D E Bumper Asm 2029086 1 A B C D E Bolt 9425082 4 A B C D E Washer 2436165 8 A B C D E Nut 9422301 4 A B C D E Cushion Asm 15648844 2 A B C Cushion Asm 15648844 1 D E Cushion Asm 15648845 2 A B C Nut 11501033 4 A B C Nut 11501033 1 D E Strap 2019736 2 A B C D E Washer 3790768 2 A B C D E Nut 9424985 2 A B C D E Pin 692072 2 A B C D E Cotter Pin 103376 2 A B C D E Reinforcement 15648848 1 A B C D E Reinforcement 15648848 3 A B C Reinforcement 15648848 1 D E Bolt 9425080 6 A B C D E Washer 2436164 12 A B C D E Nut 9422299 6 A B C D E Hose, Fuel Sply 9439162 1 A D Hose, Fuel Sply 9438373 1 B Hose, Fuel Sply 9438383 1 C E Clamp 725108 2 A D
Description Part Number Quantity Usage A B C D E --------------- ---------- --------- ------------------- Hose, Fuel Rtrn 9439046 1 A D Hose, Fuel Rtrn 9438373 1 C E Clamp 15620999 A D Hose, Vent 9439162 1 D Clamp 725108 1 D Strap 11509088 1 D Gasket, Fuel Gauge 1516395 1 A B C D E Clamp, Vent 725108 2 D Hose, Frt Vapour 9439104 1 D Pipe, RR Vapour 15519983 1 D Clip 343464 2 D Bolt 11500916 2 D Washer 2039066 2 D Nut 11500749 2 D Hose, RR Vapour 9439104 1 D Clamp 725108 D
SHOCK DEFICIENCY
See VIN listing for usage codes.
Description Part Number Quantity Usage A B C D E F ------------------ ---------- -------- ----------------------- Shock Absorber Asm 22012096 2 A B Shock Absorber Asm 22012095 2 C D E F U-Bolt 793348 2 A C U-Bolt 793348 2 B U-Bolt 793295 2 D E F Crossmember, Frame 2077256 1 A B C D E F Rivet, Crossmember Standard Stock 4 A B C D E F Optional Bolt, Crossmember, 11508133 4 A B C D E F M12X1.75X25 Nut, Crossmember, 11500756 4 A B C D E F M12X1.75, PTN Washer, M12 Flat 14046942 8 A B C D E F Bracket, Shock Mtg 15503906 2 A B C Bracket, Shock Mtg 15503907 2 D E F Bolt, Shock Upper Mtg 2039062 2 A B C D E F Nut, Shock Upper Mtg 12338038 2 A B C D E F Washer, Shock Lower 2459728 2 A B C D E F Nut, Shock Lower 9422302 2 A B C D E F
PARTS AND LABOUR CLAIM INFORMATION:
Credit for the campaign work performed will be paid upon receipt of a property completed campaign claim card or DCS transmission in accordance with the following:
Repair Code Description Time Allowance ----------- ------------------- --------------- 2A HORN DEFICIENCY .3 Release Horn & Bracket Asm, Attaching Hardware, Ground Wire and Jumper Feed Wire and Install Horn
3A TANK DEFICIENCY 4.7 Remove Existing 30 gallon (NH2) Fuel Tank & Install 60 gallon (NH9) Fuel Tank
4A SHOCK DEFICIENCY 1.4 Install Frame Crossmember, Shock Absorbers and Mounting Brackets
5A HORN & SHOCK DEFICIENCY 6.1 Release Horn & Bracket Asm., Attaching Hardware, Ground Wire and Jumper Feed Wire and Install Horn Install Frame Crossmember, Shock Absorbers and Mounting Brackets
Time allowance includes 0.1 hour for dealer administrative detail associated with this campaign. Parts credit will be based on dealer net plus 30% to cover parts handling.
SERVICE PROCEDURE:
HORN DEFICIENCY
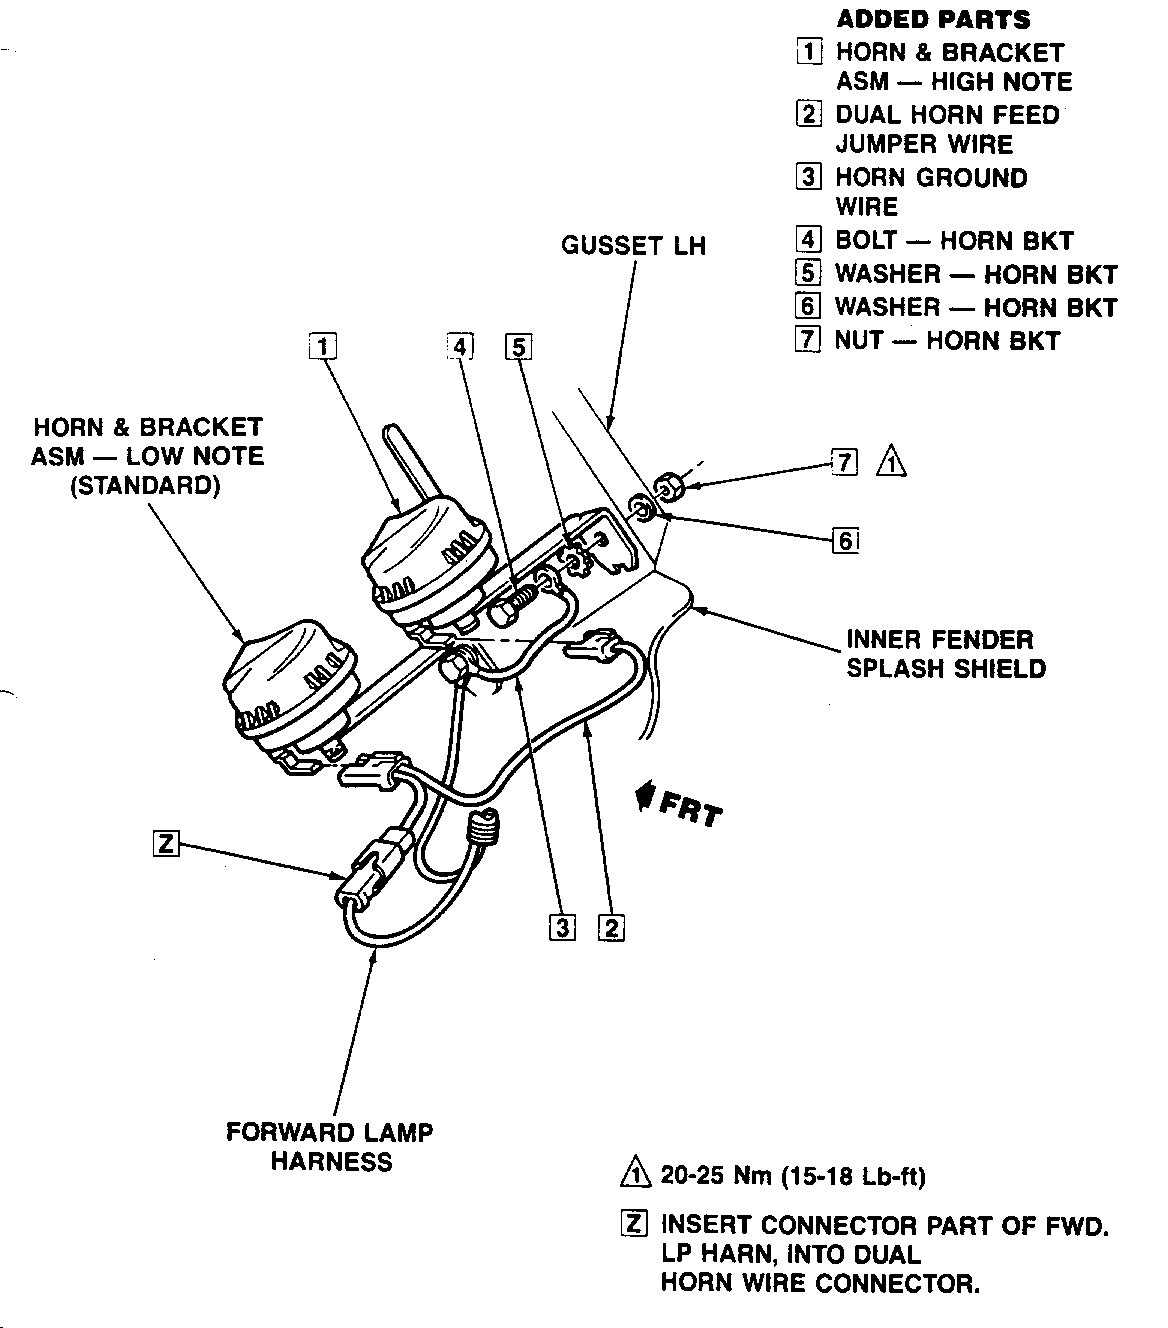
1. Disconnect battery negative ground cable. 2. Unplug forward lamp harness connector from existing low note horn and plug new dual horn feed jumper [2] into forward lamp harness connector. 3. Unbolt existing low note horn and bracket assembly from L.H. splash shield. Clean mounting surface of splash shield and bracket of corrosion or paint. 4. Install one end of horn round wire [31 on horn mounting bolt with existing ground wire from forward lamp harness. Apply sealer on splash shield and reinstall low note horn. Torque nut to 20-25 N.m (15-18 lb. ft.). 5. Before installing new high note horn and bracket assembly [1] on splash shield, clean mounting surfaces of paint or corrosion and apply sealer. 6. Install remaining end of horn ground wire [3] to high note horn bracket mounting bolt [4]. Install bolt, washers, and nut ([4] [5] [6] [7]) on mounting bracket and bolt bracket to splash shield. Torque nut to 20-25 N.m (15-18 lb. ft.).
FUEL TANK DEFICIENCY
It is recommended that vehicle be driven up on 2 inch or 4 inch blocks to facilitate removal and sliding out of tank from under vehicle body. Otherwise, clearance will be marginal.
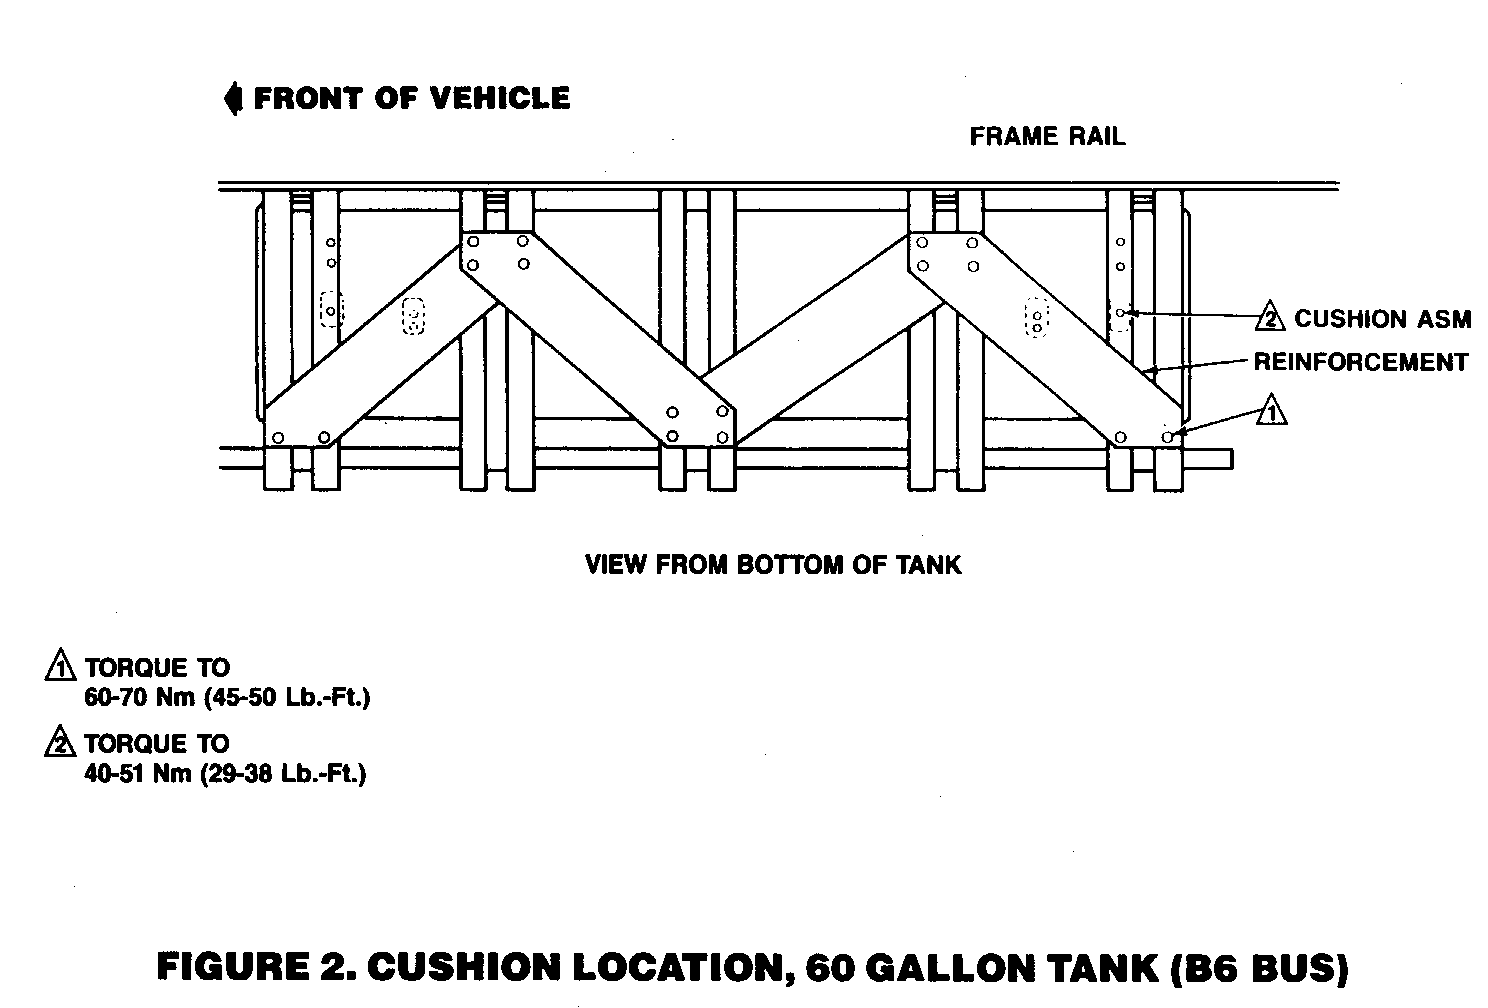
NOTICE: A previous campaign bulletin has refitted school buses with cushion assemblies on the fuel tank supports. If this has not been done, it should be performed as part of this service procedure. If the procedure has already been performed, it will still require the addition of one more cushion assembly. Refer to campaign bulletin 9A08.
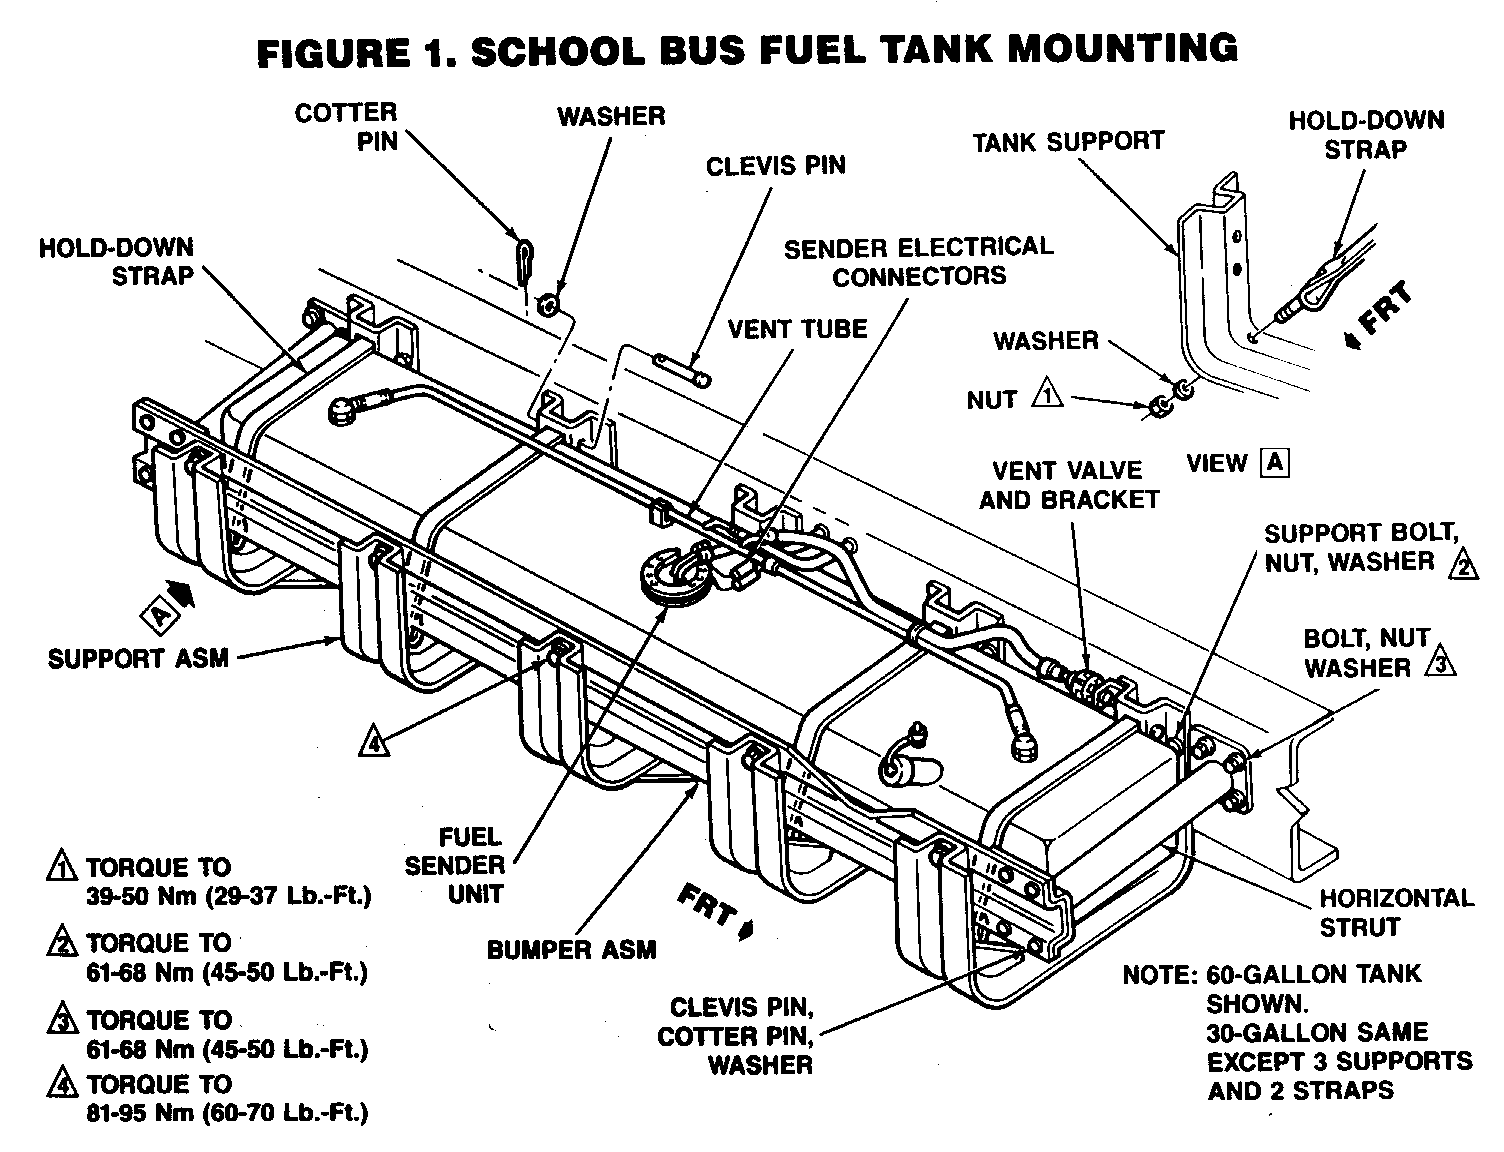
REMOVAL OF OLD 30 GALLON FUEL TANK
1. Disconnect negative battery ground cable. 2. Remove drain plug from fuel tank and drain fuel. Refer to service manual for proper procedures and safety precautions. Tank must be empty of all fuel to allow safe and easy removal. 3. Remove fuel line brackets, tie straps, and grommets in frame at fuel sender location. Remove line grommets from frame. 4. Pull fuel lines through frame until clamps are accessible. Remove clamps and disconnect hoses. 5. Install a dolly jack and wooden blocks under tank for support. Centre tank properly for balance on dolly jack. 6. Remove and retain the clevis pins, cotter pins, and washers holding the horizontal struts to the bumper assembly at the front and rear of the tank. 7. Remove and retain the four nuts, bolts, and washers holding the three fuel tank support brackets to the frame. Remove vent valve and bracket with the front support bracket. 8. Lower tank sufficiently to gain access to fuel sender unit. 9. Disconnect fuel sender unit harness connector at tank unit. 10. Lower tank and slide tank and supports outboard from frame. 11. Remove fuel tank mounting straps and hardware. Also remove vent valve and mounting bracket Retain these items for reinstallation. 12. Remove old fuel tank and discard.
INSTALLATION OF NEW 60 GALLON FUEL TANK
1. Re-assemble new fuel tank supports.
A. For vehicles prior to 1989 discard: 3 supports, 2 reinforcements, bumper assembly. B. For vehicles from 1989 discard bumper assembly. C. For vehicles prior to 1989 add following new parts: 5 supports, 4 reinforcements, 1 new bumper, 2 straps and mounting hardware, 4 cushion assemblies. D. For vehicles from 1989 add following new parts: 2 supports, 2 reinforcements, 1 bumper, 2 straps and mounting hardware, 1 cushion assembly. E. For installation of cushion assemblies, use template and drilling instructions supplied with campaign bulletin 9A08. F. Install new tank in reassembled brackets and install the 4 hold down straps. Torque strap nuts to 39-50 N.m (29-37 lb. ft.). G. Remove fuel sender unit from old tank and install in new tank with new gasket. Clean gasket mounting area thoroughly. H. Install new vapour vent tube on vehicles from 1989. Also install new attaching hoses, clamps, vent hose to valve, and valve with mounting bracket removed from old tank.
2. Move rear strut on frame to the rear to accommodate 60 gallon tank. Holes for bolts already exist. Torque bolts to 61-68 N.m (44-50 lb. ft.). 3. Centre tank in proper mounting position before rolling it back under vehicle. Raise tank sufficiently to reconnect sender unit to engine harness connector. 4. Jack up tank and mounting bracket to proper height for mounting. 5. Reconnect fuel lines, fine brackets, and reinstall grommets in frame. 6. Reinstall mounting support brackets to frame with existing hardware. Torque nuts to 61-68 N.m (44-50 lb. ft.). 7. Reconnect negative battery ground cable, refuel vehicle, start engine, and test for leaks.
SHOCK ABSORBER DEFICIENCY
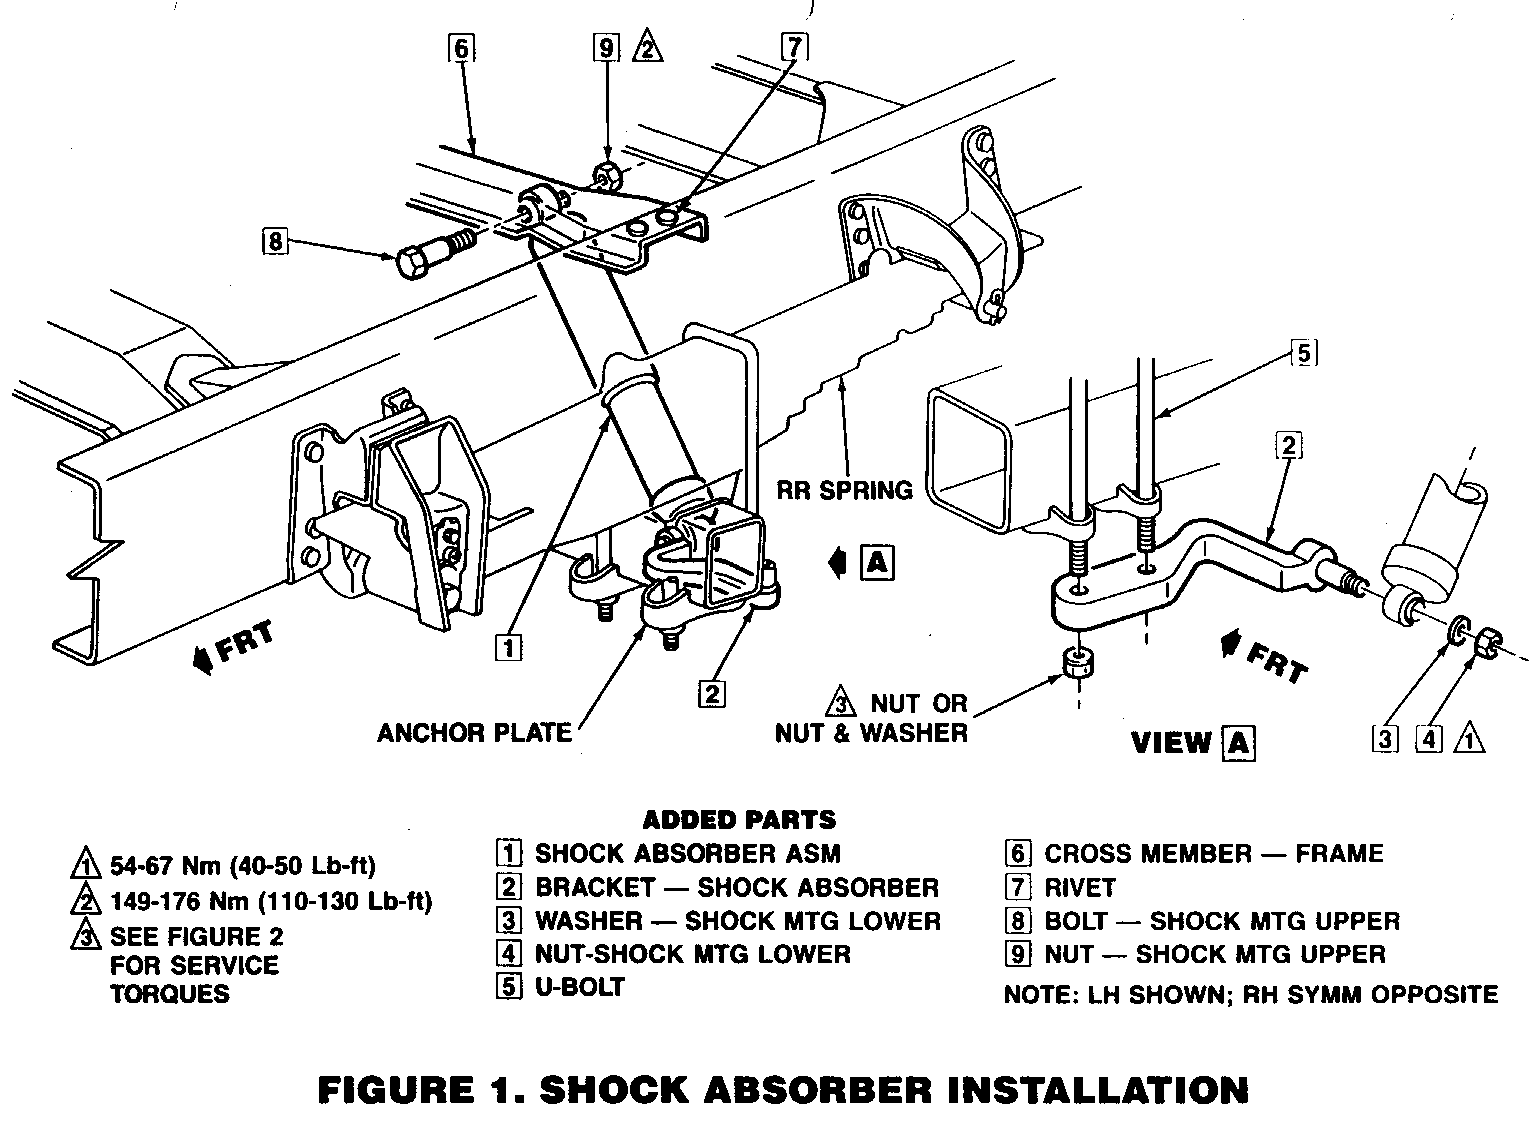
1. Install crossmember [61 on frame behind rear axle. Rivet member [6] to frame with four rivets [7]. If rivets cannot be installed due to lack of working room at frame or lack of proper tools, install M12 bolts, prevailing torque nuts, and flat washers under bolt head and under nut. See parts information for part numbers and description. Torque nut to 60-81 N.m (44-60 lb. ft.) or torque bolt to 70-110 N.m (50-80 lb. ft.). 2. Install a bottle jack under spring anchor plates and raise jack sufficiently to hold anchor plate from tipping when rear nuts are removed from U-bolts. 3. Remove existing rear U-bolts [5] on right and left hand rear springs. Discard U-bolts and retain washers and nuts. 4. Install new rear U-bolts [5] on springs. 5. Install shock absorber mounting brackets [2]. Reattach nuts and washers on U-bolts [5]. Remove bottle jack from anchor plate. 6. Torque nuts on anchor plates and shock absorber mounting brackets [2] as detailed in Figure 2. 7. Install shock absorbers [1] with upper bolts and nuts [8], [9] and lower nut and washer [4], [3]. 8. Torque lower nut to 54-67 N.m (40-50 lb. ft.). Torque upper nut to 149-176 N.m (110- 130 lb. ft.). 9. Lower vehicle.
INSTALLATION OF CAMPAIGN IDENTIFICATION LABEL
Clean surface of radiator upper mounting panel and apply a Campaign Identification Label. Make sure the correct campaign number is inserted on the label. This will indicate that the campaign has been completed.
Dear General Motors Customer.
General Motors of Canada has determined that certain 1985-89 B6P and 1989 S7 School Buses sold in Canada do not conform to Canadian requirements. Canadian School Buses must,be equipped with dual horns (high note and low note) and heavy duty rear shock absorbers.
To correct this condition, wiring and high note horn and heavy duty rear shock absorbers will be installed by your GM dealer.
This service will be performed for you at no charge
Please contact your GM dealer as soon as possible to arrange a service date.
This letter identifies your vehicle. Presentation of this letter to your dealer win assist their Service personnel in completing the necessary correction to your vehicle in the shortest possible time.
Further assistance, if required, may be obtained from our Customer Assistance Centre, toll free, by calling 1-800-263-3777, or if you live in Quebec, 1-800-263-7854.
We are sorry to cause you this inconvenience; however, we have taken this action in the interest of your continued satisfaction with our products.
***************************************************************************** FIGURE 1, DUAL HORN INSTALLATION -------------------------------- ADDED PARTS 1] HORN & BRACKET ASM - HIGH NOTE 2] DUAL HORN FEED JUMPER WIRE 3] HORN GROUND WIRE 4] BOLT - HORN BKT 5] WASHER - HORN BKT 6] WASHER - HORN BKT 7] NUT - HORN BKT
**************************************************************************** FIGURE 4 SHOCK ABSORBER INSTALLATION ------------------------------------- /1\ 54-67 Nm (40-50 Lb-ft) /2\ 149-176 Nm (110-130 Lb-ft) /3\ SEE FIGURE 5 FOR SERVICE TORQUES
ADDED PARTS
[1] SHOCK ABSORBER ASM [6] CROSS MEMBER - FRAME [2] BRACKET - SHOCK ABSORBER [7] RIVET [3] WASHER - SHOCK MTG LOWER [8] BOLT - SHOCK MTG UPPER [4] NUT-SHOCK MTG LOWER [9] NUT - SHOCK MTG UPPER [5] U-BOLT NOTE: LH SHOWN; RH SYMM OPPOSITE
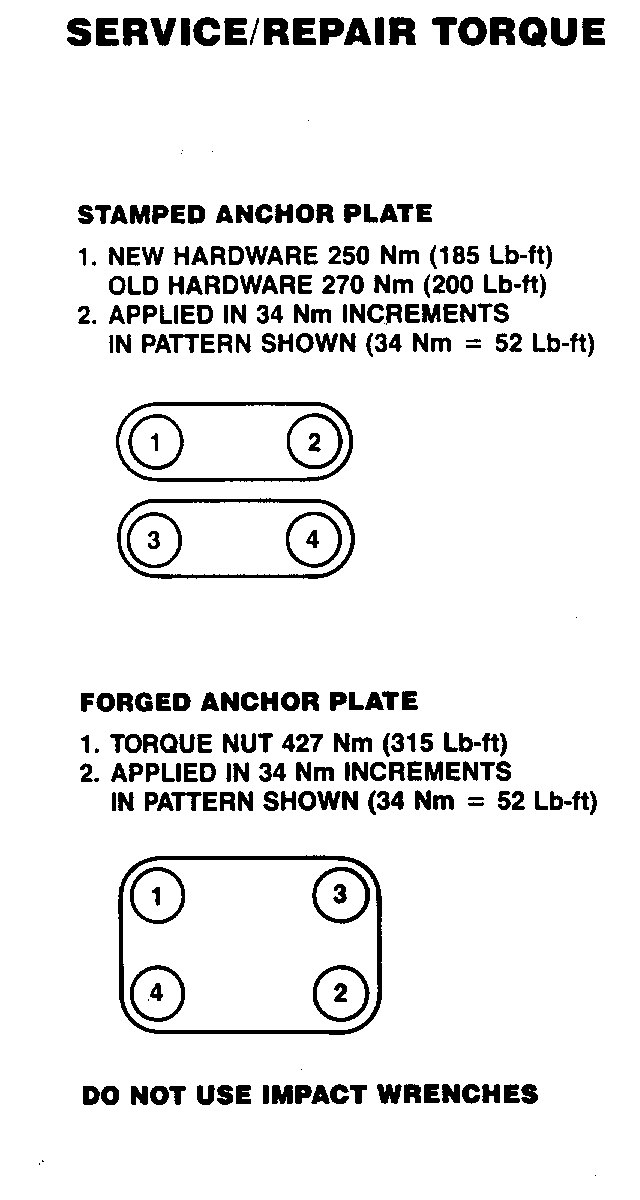
***************************************************************************** SERVICE/REPAIR TORQUE (Figure 5) ---------------------------------- STAMPED ANCHOR PLATE
1. NEW HARDWARE 250 Nm (185 Lb-ft) OLD HARDWARE 270 Nm (200 Lb-ft) 2. APPLIED IN 34 Nm INCREMENTS IN PATTERN SHOWN (34 Nm = 52 Lb-ft)
FORGED ANCHOR PLATE 1. TORQUE NUT 427 Nm (315 Lb-ft) 2. APPLIED IN 34 Nm INCREMENTS IN PATTERN SHOWN (34 Nm = 52 Lb-ft)
DO NOT USE IMPACT WRENCHES
General Motors bulletins are intended for use by professional technicians, not a "do-it-yourselfer". They are written to inform those technicians of conditions that may occur on some vehicles, or to provide information that could assist in the proper service of a vehicle. Properly trained technicians have the equipment, tools, safety instructions and know-how to do a job properly and safely. If a condition is described, do not assume that the bulletin applies to your vehicle, or that your vehicle will have that condition. See a General Motors dealer servicing your brand of General Motors vehicle for information on whether your vehicle may benefit from the information.
