CAMPAIGN: JATCO ELECTROMATIC TRANS. THRUST BEARING

CUSTOMER SATISFACTION CAMPAIGN
SUBJECT: 97050 - JATCO ELECTROMATIC TRANSMISSION THRUST BEARING
MODELS: 1996 CHEVROLET AND GMC W4 MEDIUM DUTY TRUCKS WITH JATCO ELECTROMATIC TRANSMISSION
General Motors has decided that certain 1996 W4 Medium Duty trucks equipped with JATCO Electromatic@ transmission may exhibit a condition in which the transmission thrust bearing may crack due to improper manufacturing. If this thrust bearing cracks, severe transmission damage could result.
To prevent the possibility of this condition occurring, dealers are to replace the existing thrust bearing in the transmission with a new, improved thrust bearing. During transmission reassembly, dealers are to flush the transmission; then, will either install a transmission filter kit (if the vehicle is not already equipped with one) or will replace the transmission filter cartridge, however, this transmission filter kit cannot be installed on Budget One-Way rental vehicles.
VEHICLES INVOLVED
Involved are certain 1996 Chevrolet and GMC W4 Medium Duty trucks equipped with JATCO Electromatic@ transmission and built within the following VIN breakpoints: PLANT YEAR DIVISION MODEL PLANT CODE FROM TO
1996 Chevrolet W4 Fujisawa "7" T7003352 T7005863 1996 GMC W4 Fujisawa "7" T7003287 T7005918
NOTICE: Dealers should confirm vehicle eligibility through VISS (Vehicle Information Service System) or ServiceNet (GMC only) prior to beginning campaign repairs. [Not all vehicles within the above breakpoints may be involved]
Involved vehicles have been identified by Vehicle Identification Number. Computer listings containing the complete Vehicle Identification Number, customer name and address data have been prepared, and are being furnished to involved dealers with the campaign bulletin. The customer name and address data furnished will enable dealers to follow-up with customers involved in this campaign. Any dealer not receiving a computer listing with the campaign bulletin has no involved vehicles currently assigned.
These dealer listings may contain customer names and addresses obtained from State Motor Vehicle Registration Records. The use of such motor vehicle registration data for any other purpose is a violation of law in several states. Accordingly, you are urged to limit the use of this listing to the follow-up necessary to complete this campaign.
PARTS INFORMATION
Parts required to complete this campaign are to be obtained from General Motors Service Parts Operations (GMSPO). Please refer to your "involved vehicles listing" prior to ordering requirements. Normal orders should be placed on a DRO = Daily Replenishment Order. An emergency requirement should be ordered on a CSO = Customer Special Order.
Part Quantity/ Number Description Vehicle
97180080 JATCO Campaign Transmission 1 Repair Kit
97720073 Silicone Sealer 250 Gram Tube (10 Applications/Tube)
97720052 Filter Cartridge 1 (if Req'd)
97720033 Filter Kit 1 (if Req'd)
12346143 Dexron III 13 Quarts
CUSTOMER NOTIFICATION
Customers will be notified of this campaign on their vehicles by General Motors (see copy of typical customer letter included with this bulletin - actual divisional letter may vary slightly).
DEALER CAMPAIGN RESPONSIBILITY
All unsold new vehicles in dealers' possession and subject to this campaign must be held and inspected/repaired per the service procedure of this campaign bulletin before customers take possession of these vehicles.
Dealers are to service all vehicles subject to this campaign at no charge to customers, regardless of mileage, age of vehicle, or ownership, from this time forward.
Customers who have recently purchased vehicles sold from your vehicle inventory, and for which there is no customer information indicated on the dealer listing, are to be contacted by the dealer. Arrangements are to be made to make the required correction according to the instructions contained in this bulletin. This could be done by mailing to such customers a copy of the appropriate divisional customer letter accompanying this bulletin. Campaign follow-up cards should not be used for this purpose, since the customer may not as yet have received the notification letter.
In summary, whenever a vehicle subject to this campaign enters your vehicle inventory, or is in your dealership for service in the future, please take the steps necessary to be sure the campaign correction has been made before selling or releasing the vehicle.
SERVICE PROCEDURE
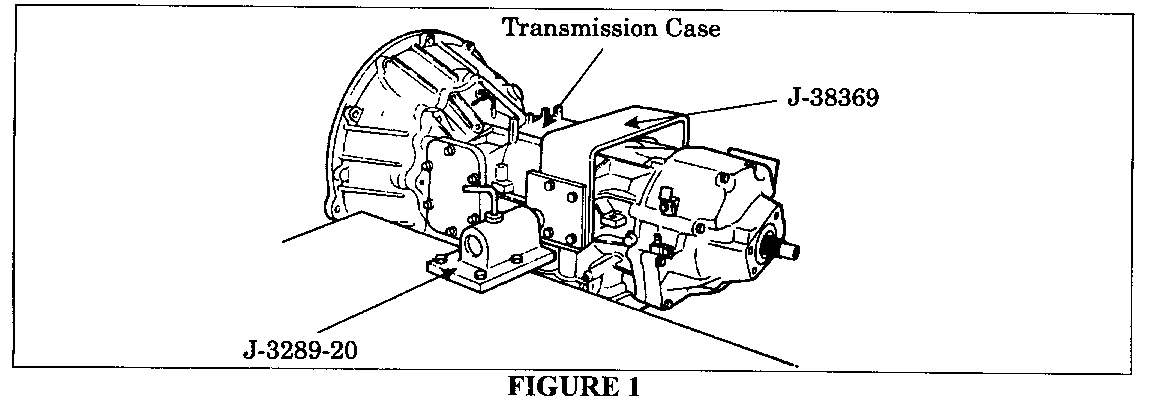
SPECIAL KIT: During the week of June 30, 1997, each dealer was shipped a kit of special tools, J-38369 (holding fixture), J-3289-20 (holding fixture base), J-6125- B (slide hammer), J-38139 (adapter), and J-37211 (front oil seal installer), for use in this campaign. This kit furnished at no charge. Additional kits, if required, may be purchased by contacting Kent-Moore at 1-800-345-2233 and asking for part number EG1449703.
Disassembling The Transmission
1. Remove the transmission from the vehicle in accordance with the appropriate Service Manual.
2. Mount the transmission onto the holding fixture (J-38369) and holding fixture base (J-3289-20) (Figure 1).
3. Remove the torque converter, be careful that it does not fall to the floor.
CAUTION:
The torque converter weighs approximately 53 lbs. and has sharp edges. To prevent personal injury, be extremely careful when removing it from the transmission case and be sure to wear protective gloves.
4. Rotate the transmission to a vertical position in the holding fixture so that the input shaft side now faces upward. Use a floor pan to catch any remaining fluid.
5. Remove and discard the eight converter bell housing flange bolts.
IMPORTANT: The converter bell housing flange bolts must not be reused. During transmission reassembly, be sure to replace these flange bolts with new ones supplied in the JATCO Campaign Transmission Repair Kit (PIN 97180080).
6. Remove the converter bell housing from the transmission case.
7. Rotate the transmission to a horizontal position in the holding fixture so that the oil pan now faces upward. Remove the transmission oil pan.
8. Make sure that the bottom of the oil pan and the oil strainer mesh are clean.
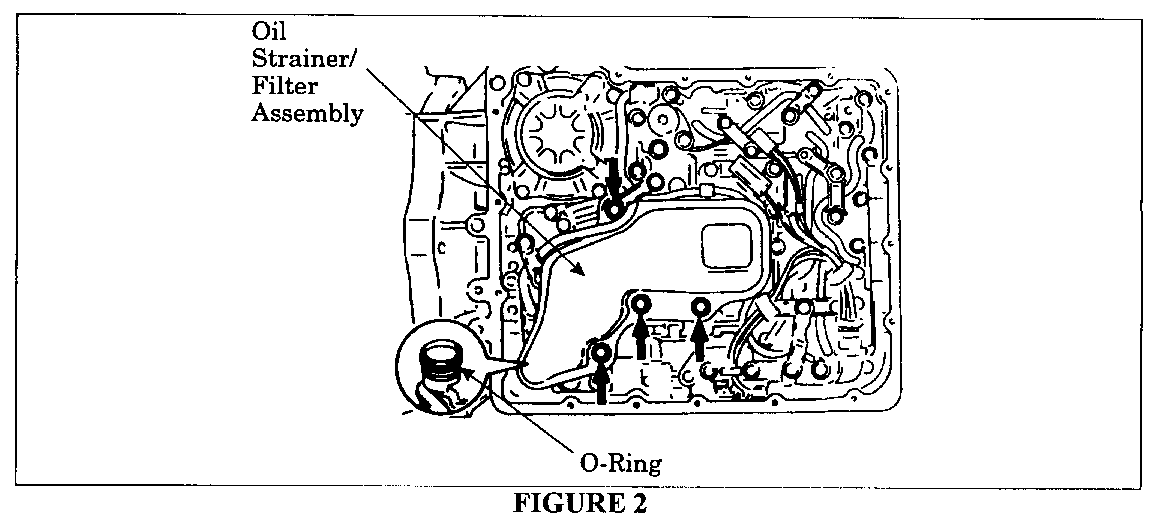
9. Remove the four oil strainer bolts. Remove the oil strainer/filter assembly and clean it with non-caustic cleaner (Figure 2).
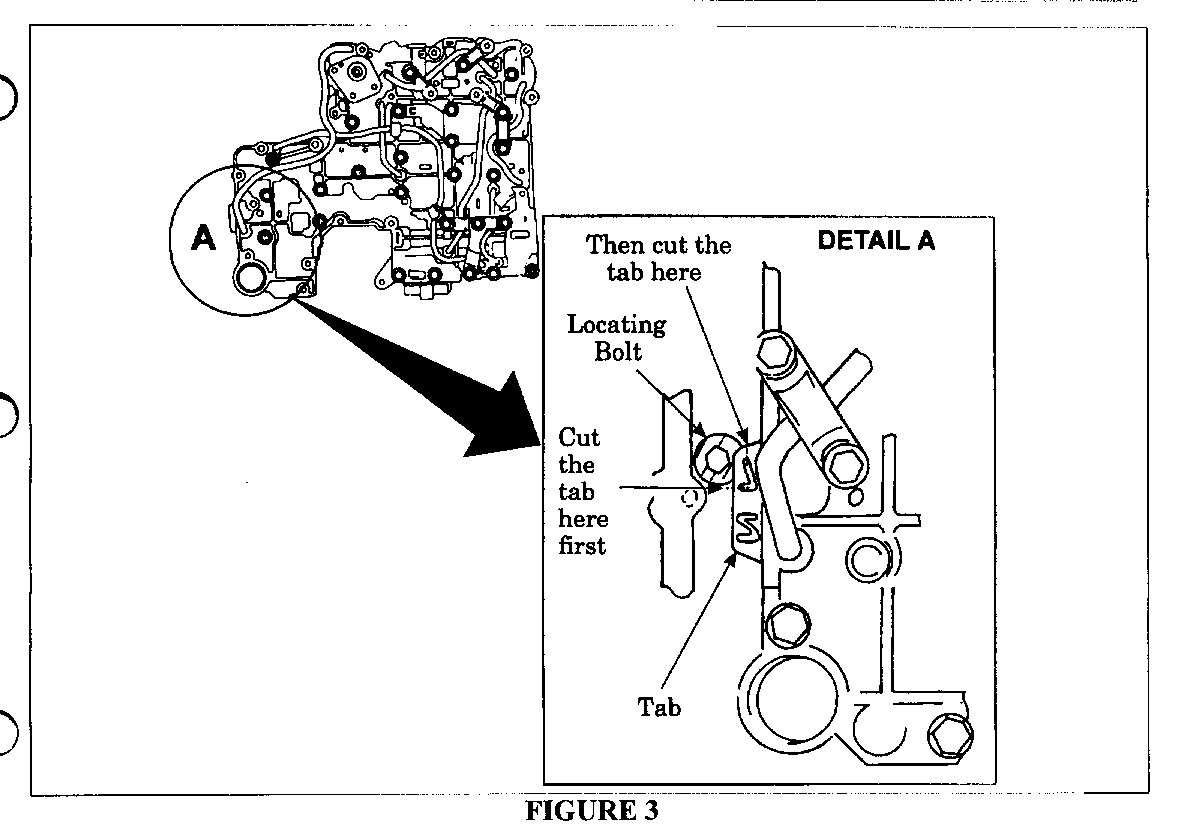
10. Cut the tab located on the front of the valve body assembly. Refer to Figure 3 and the instruction video (AIM97-VID-C01) for tab cutting details.
CAUTION:
Be extremely careful when cutting the tab. Be sure that the cutting tool is sharp and do not allow any cut pieces to fall into the transmission. Place a clean magnet next to the tab to catch any cut pieces.
11. Rotate the transmission on the holding fixture so that the input shaft now faces upward.
12. Remove and discard the O-ring from the input shaft.
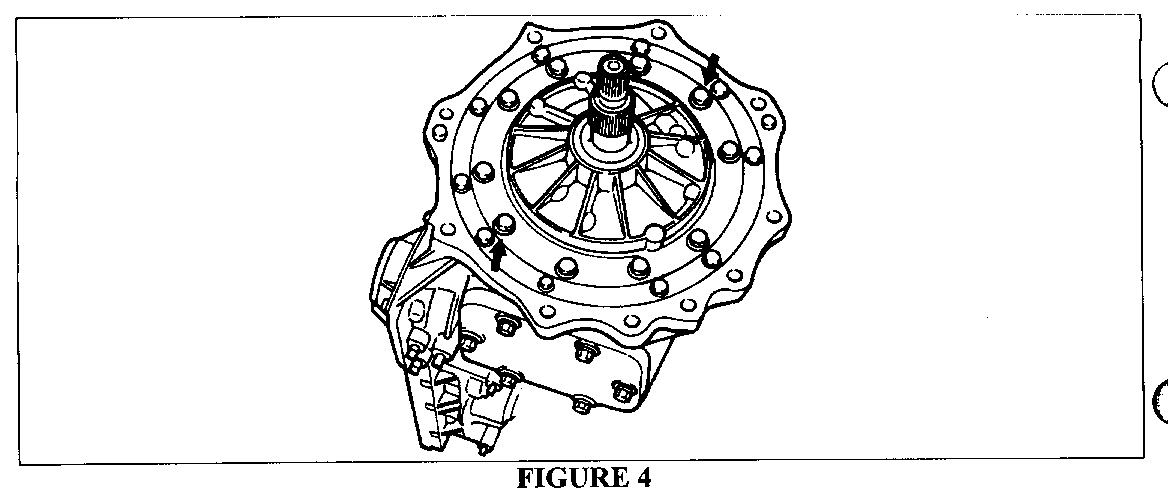
13. Remove and discard two of the 10 flange bolts from the oil pump housing (Figure 4).
NOTE: Removal of these two flange bolts allows two slide hammers to be screwed into the threaded holes and be used as an oil pump puller. Any two of the 10 flange bolts may be used for this step. Be sure that the two bolts chosen are 180 degrees apart from each other.
IMPORTANT: Be sure to discard the two oil pump housing flange bolts removed. They are one-time use only flange bolts that once loosened, must be replaced. New flange bolts are supplied in the JATCO Campaign Transmission Repair Kit.
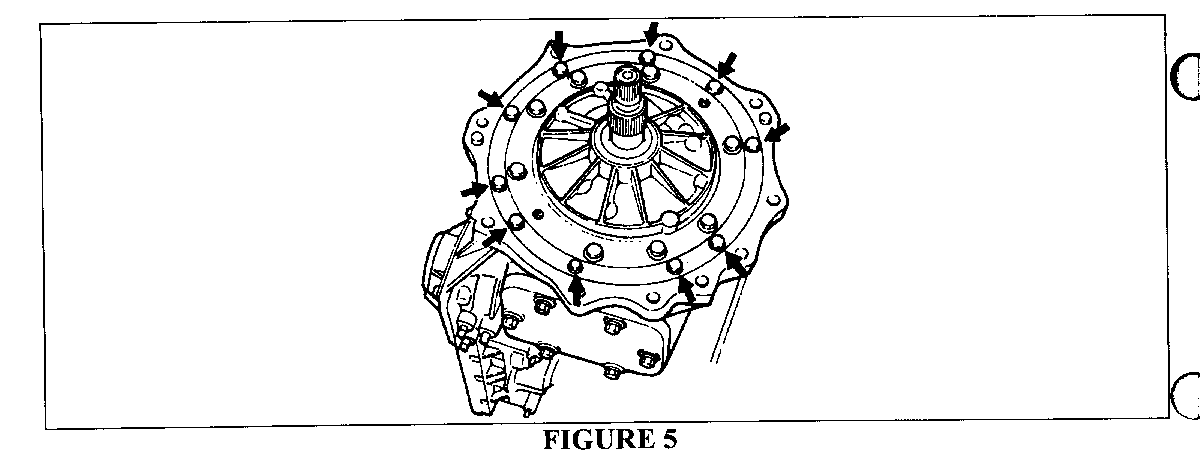
14. Loosen the 10 oil pump retainer bolts (Figure 5).
IMPORTANT: Do not remove these 10 bolts entirely. They help keep the oil pump assembly intact.
15. Using a non-abrasive marker (i.e., grease pencil), make some small alignment marks before removing the oil pump assembly casing. Screw two slide hammers (J-6125-B) completely into the two vacant thread openings in the oil pump casing. Remove the oil pump assembly casing from the transmission case using the two slide hammers (Figure 6). Remove and discard the sealant ring from the input shaft.
CAUTION:
Be extremely careful when removing the oil pump casing from the transmission case. Be sure that the floating retainer ring does not slip out of place or come off. Should the floating retainer ring slip out of place, the inner O-ring will need to be replaced.
16. Remove the input shaft assembly.
17. Remove the PTO gear and bearing (if equipped).
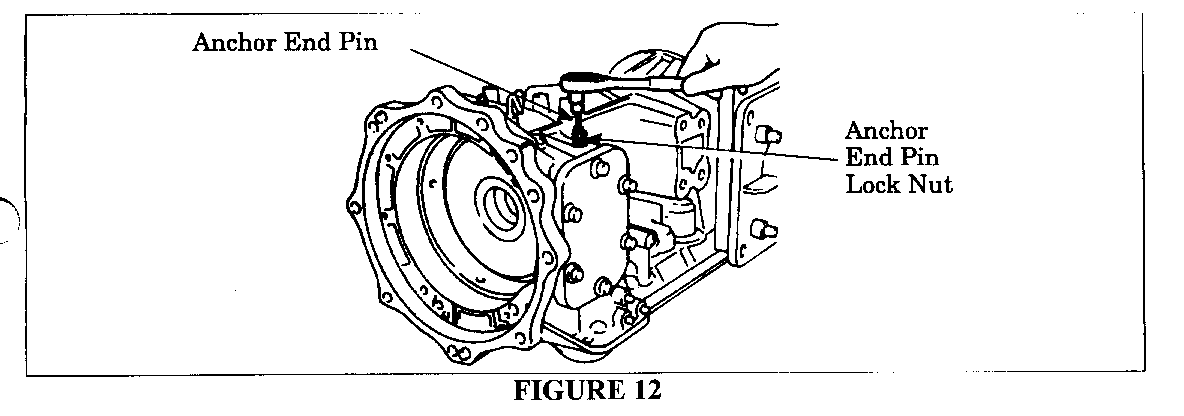
18. Remove the two drum support flange bolts located on the outside of the transmission case. Loosen the anchor end pin lock nut and the anchor end pin (Figure 7).
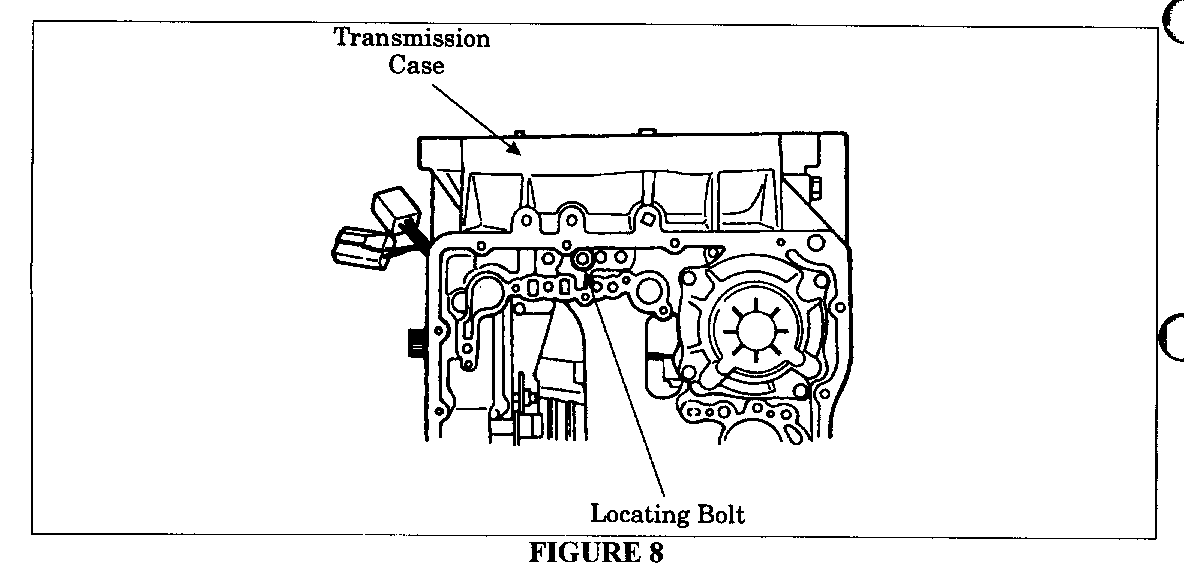
19. Remove the locating bolt inside the transmission oil pan (Figure 8).
IMPORTANT: Do not use air tools when removing the locating bolt. Use of air tools could damage the aluminum transmission case and/or the locating bolt.
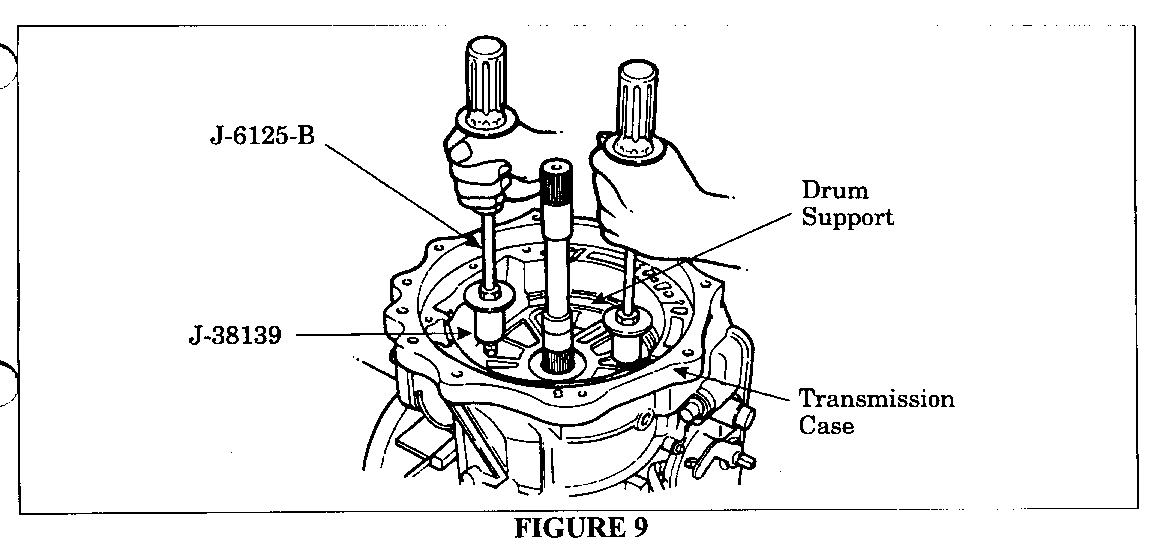
20. Using the input shaft as a guide, remove the drum support from the transmission case using two slide hammers (J-6125-B) and adapters (J-38139) (Figure 9).
NOTE: The input shaft will be used as a guide when removing the drum support from the transmission case.
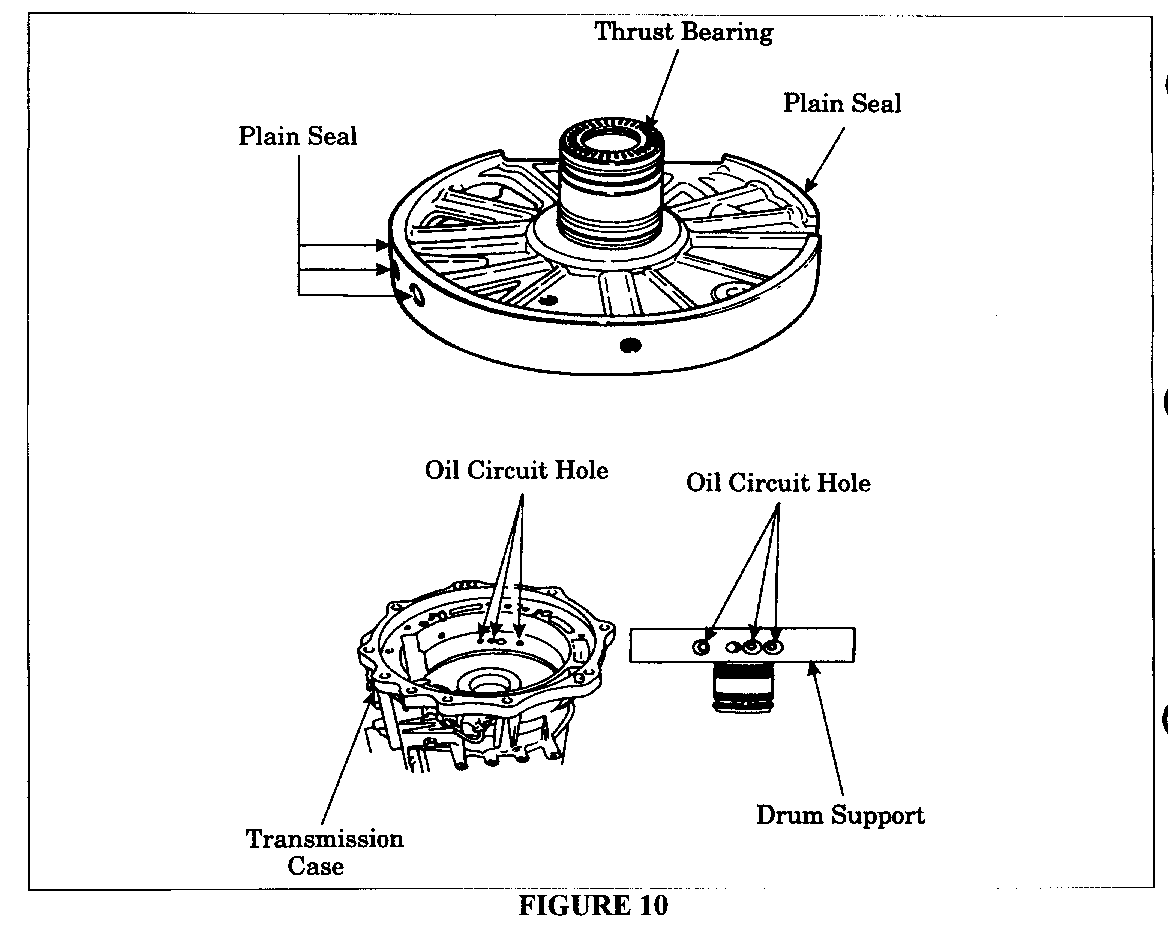
IMPORTANT: Be sure to pull straight up on the drum support with the slide hammers. Use the input shaft as a guide. Be sure not to lose the thrust bearing (Figure 10). It will be cleaned and reinstalled later during transmission reassembly.
NOTE: The four small plain seals are cut when the drum support is removed from the transmission case (Figure 10). These seals will be replaced later with new seals supplied in the JATCO Campaign Transmission Repair Kit.
21. Clean the drum support ports of any foreign material, making sure that no flakes fall inside of the transmission (Figure 10).
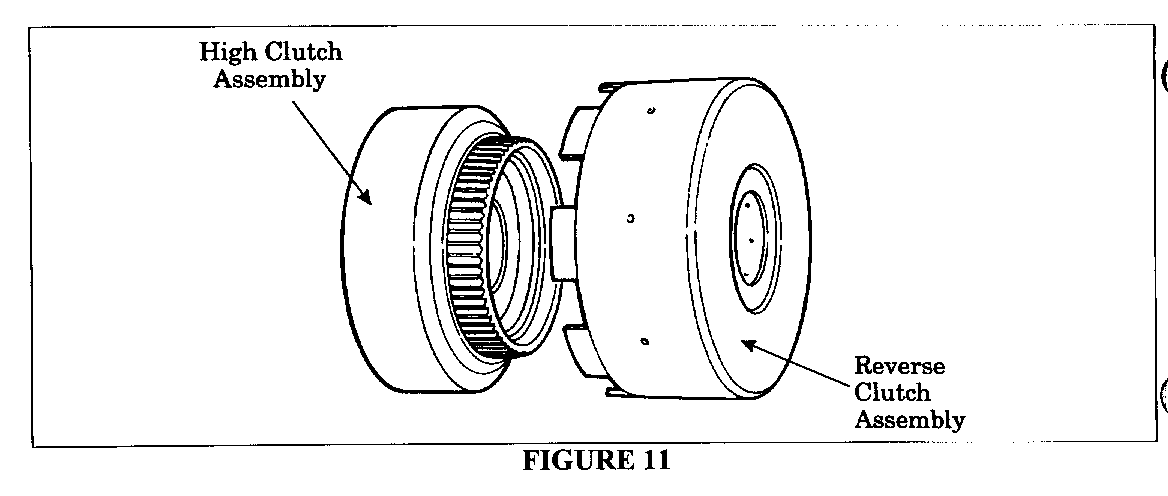
22. Remove the reverse clutch assembly (Figure 1 1).
23. Remove the high clutch assembly, making note of the direction of the thrust bearings (Figure 11).
24. Remove and retain the anchor end pin lock nut. Remove and discard the anchor end pin (Figure 12).
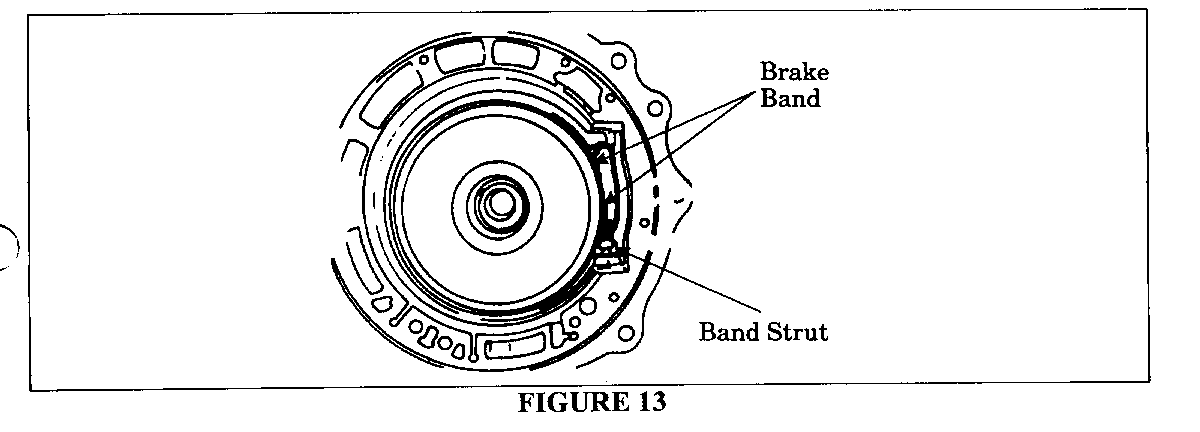
25. Remove the brake band and the band strut (Figure 13).
IMPORTANT: Be careful not to allow the brake band to stretch apart after removing it. To prevent this from happening, be sure to secure the two ends together.
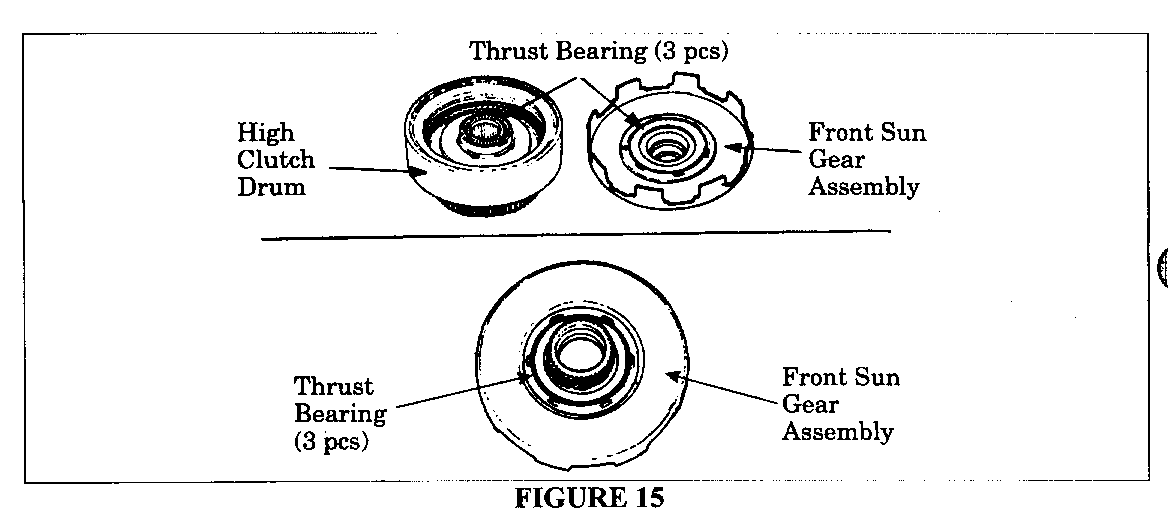
26. Remove the high clutch hub (Figure 14). Remove the front sun gear assembly (Figure 14). Note the direction of the bearings. The bearings need to roll on the machined surface.
NOTE: When the front sun gear assembly is removed, the top thrust bearing stays with the gear. The bottom thrust bearing stays in place on top of the front planetary gear (Figure 15). Be sure to remove this bottom thrust bearing.
Pay particular attention to the direction the bearings are removed. The bearings may need to roll on the machined surface. This is the same for the gear on the other side. They have tabs that center it for proper placement and fit.
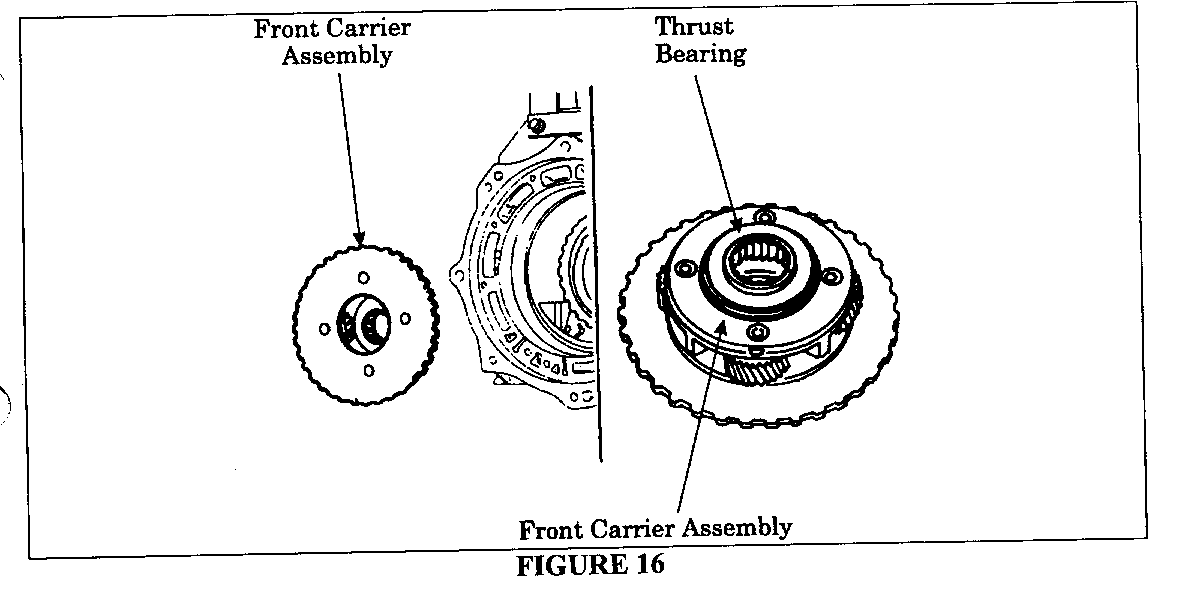
27. Remove the front carrier assembly (Figure 16).
28. Remove the existing thrust bearing from the front carrier assembly (Figure 16).
29. Discard the existing thrust bearing.
30. Apply petroleum jelly to the new thrust bearing supplied in the JATCO Campaign Transmission Repair Kit (P/N 97180080).
NOTE: The new thrust bearing has four notches on its inner circle. The existing thrust bearing has three notches.
31. Install the new thrust bearing onto the rear of the front carrier assembly.
IMPORTANT: Be sure to install the new thrust bearing with its black side facing up.
32. Attach the front carrier assembly to the forward clutch assembly.
IMPORTANT: Be sure the front carrier assembly is completely flush with the forward clutch assembly.
33. Apply petroleum jelly to the two thrust bearings; then install them onto both sides of the front sun gear assembly.
34. Install the front sun gear assembly into the front carrier assembly.
35. Install the high clutch hub onto the front sun gear assembly.
36. Apply petroleum jelly to the thrust bearing and install the thrust bearing onto the rear side of the high clutch drum assembly.
37. Install the high clutch drum assembly onto the high clutch hub. Use a light twisting motion, if needed, to align the clutches.
38. Install the reverse clutch drum onto the high clutch drum, making sure there is no gap between the front sun gear assembly and the reverse clutch drum.
NOTE: To make the reverse clutch drum installation easier, temporarily install the input shaft before installing the reverse clutch drum. Lightly twist the input shaft as you install the reverse clutch drum.
IMPORTANT: Observe the clutch pack (i.e., high clutch drum and reverse clutch drum) carefully during installation. The reverse clutch drum must be installed completely flush with the front sun gear assembly when it is assembled. If the reverse clutch drum is not completely flush with the front sun gear assembly, remove the clutch pack and install it again.
39. Insert the new anchor end pin supplied in the JATCO Campaign Transmission Repair Kit into the threaded hole in the transmission case and turn it until the pin tip is visible inside the transmission case. Apply petroleum jelly to the band strut and install it onto the brake band. Install the brake band and band strut into the transmission.
IMPORTANT: Be careful not to drop the band strut into the transmission.
40. Secure the brake band by turning the new anchor end pin until the green thread locking sealant on the pin threads is about to make contact with the transmission case.
CAUTION:
Do not let the green thread locking sealant make contact with the transmission case. This sealant activates upon contact and will cure within 30 minutes. If this occurs, adjusting the brake band will be difficult. Do not adjust the brake band at this time. The brake band will be adjusted later in this service procedure.
41. Apply petroleum jelly to the output side of the bearing race and install the bearing race into the high clutch drum.
IMPORTANT: Be sure that the three tabs on the bearing race are set into the alignment holes in the high clutch drum.
42. Apply petroleum jelly to the bearing and install it into the drum support making sure you see the bearing side as it is installed into the drum support.
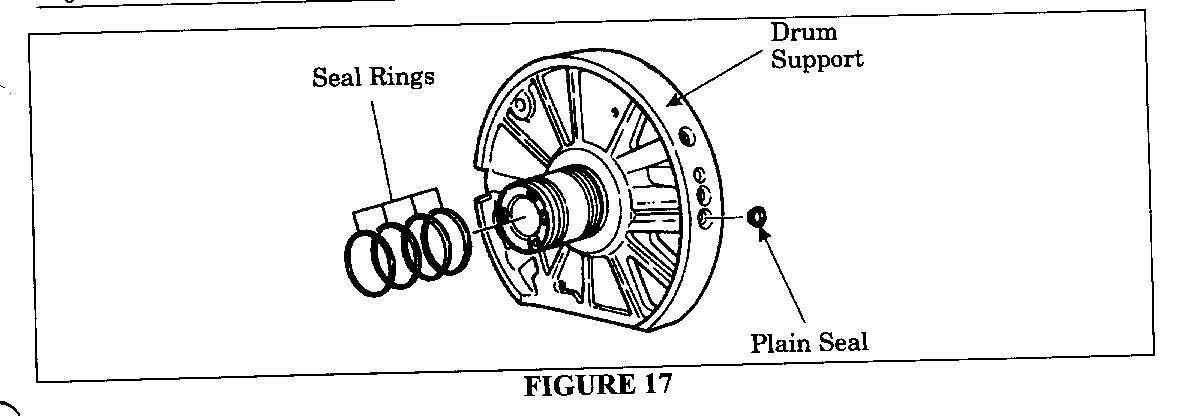
43. Remove and discard the four seal rings on the shaft of the drum support (Figure 17).
NOTE: The sealant rings for the high clutch drum are smaller than those for the reverse clutch drum.
44. Apply petroleum jelly on the machined surface of the drum support and into the grooves of the sealant rings.
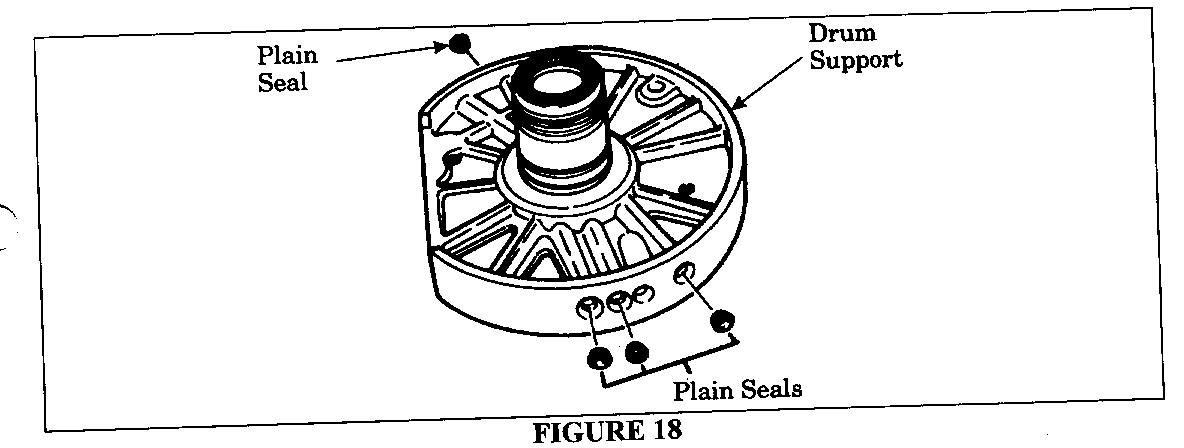
45. Install the thrust washer. Install the four new seal rings supplied in the JATCO Campaign Transmission Repair Kit onto the drum support and apply petroleum jelly over the seal rings. Install the four new plain seals supplied in the JATCO Campaign Transmission Repair Kit onto the drum support (Figure 18).
IMPORTANT: When installing the four new plain seals, be sure to use the special oil supplied in the JATCO Campaign Transmission Repair Kit to lubricate the seals. Do not however, use this special oil on the sealant rings on the shaft of the drum support. This special oil will prevent the sealant rings on the drum support shaft from sealing properly.
46. Apply the special oil supplied in the JATCO Campaign Transmission Repair Kit to the inside of the transmission case on the machined surface where the drum support will rest.
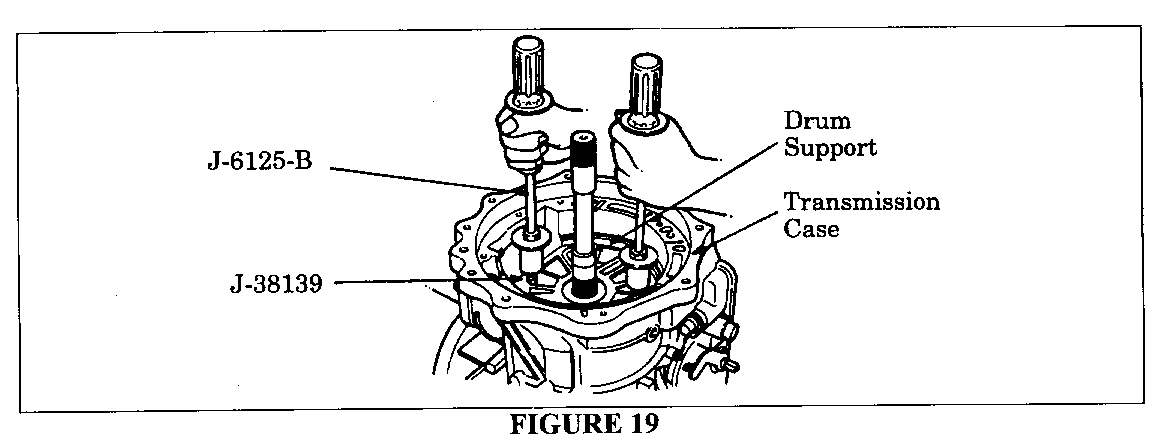
47. Insert the input shaft into the drum support. Using the two slide hammers (J-6125-B) and adapters (J-38139), and the input shaft as a guide, position the drum support over the transmission case (Figure 19).
48. Align the flat side of the drum support toward the PTO opening and insert the drum support gently into the transmission case, elevating it slightly.
CAUTION:
Do not force the drum support into place. Forcing it may cut the plain seals.
If the drum support bolt holes and the holes in the transmission case do not line up, turn the drum support slightly using an alignment tool. Do not turn the drum support back and forth. This action may cut the plain seals. If the plain seals are cut, they will need to be replaced. if the drum has to be removed, replace the plain seals.
49. Prior to removing the slide hammers, install the locating bolt and the two new drum support flange bolts supplied in the JATCO Campaign Transmission Repair Kit. Seal the two new drum support flange bolts with ThreeBond 1215 Silicone Sealer (P/N 97720073), or its equivalent. Tighten the locating bolt first, then tighten the two new drum support flange bolts to 31 lb. ft. (42 Nm) each.
IMPORTANT: When using ThreeBond 1215 Silicone Sealer, or its equivalent, be sure to follow all safety guidelines printed on the package.
50. Remove the input shaft from the drum support. Apply petroleum jelly to the new sealant ring supplied in the JATCO Campaign Transmission Repair Kit and on the groove. Install the sealant ring onto the input shaft.
51. Install the thrust bearing into the transmission (if equipped), noting to replace it in the same direction it was removed.
52. Install the PTO gear into the transmission (if equipped).
53. Install the input shaft fully into the transmission. Install the new oil pump gasket supplied in the JATCO Campaign Transmission Repair Kit onto the transmission case.
IMPORTANT: Be sure that the transmission case surface is thoroughly clean before installing the new gasket, using only a lint-free cloth or paper towel.
54. Remove the existing O-ring from the oil pump and install the new O-ring supplied in the JATCO Campaign Transmission Repair Kit.
IMPORTANT: Be careful not to stretch the new O-ring during installation. To prevent stretching, roll it carefully onto the oil pump.
55. Apply petroleum jelly to the outside of the new O-ring.
56. Apply ThreeBond 1215 Silicone Sealer, or its equivalent, to nine of the ten oil pump retainer bolts.
NOTE: To make the oil pump installation into the transmission case easier, remove the oil pump retaining bolt nearest the PTO cover (i.e., the 3 o'clock position) and insert an alignment tool into the open bolt hole.
Insert the two slide hammers and install the front oil pump into the transmission case, using the alignment tool as a guide. It only goes in one way. Note the alignment marks you made when you removed it.
57. Remove the alignment tool from the bolt hole. Apply ThreeBond 1215 Silicone Sealer, or its equivalent, to the remaining oil pump retainer bolt and install it.
58. Remove the two slide hammers, and hand tighten the 10 oil pump retainer bolts.
59. Tighten the 10 oil pump retainer bolts in a standard criss-cross pattern to 20 lb. ft. (27 Nm) each. Apply ThreeBond 1215 Silicone Sealer, or its equivalent, to the two new oil pump housing flange bolts supplied in the JATCO Campaign Transmission Repair Kit and install them into the oil pump housing.
60. Tighten the two new oil pump housing flange bolts to 40 lb. ft. (54 Nm) each.
61. Apply petroleum jelly to the new 0-ring supplied in the JATCO Campaign Transmission Repair Kit and install it to the front of the input shaft.
IMPORTANT: Be sure to install this O-ring during reassembly. If this O-ring is not installed, the transmission will not go into lock-up. This new O-ring can be identified by a blue dot.
62. Carefully remove the existing front oil seal from the oil pump housing and install the new front seal supplied in the JATCO Campaign Transmission Repair Kit using the front oil seal installer (J-37211).
IMPORTANT: Be extremely careful when removing the front oil seal. This seal can become brittle with age. If it is forced out, the seat could break apart and pieces could fall into the transmission.
63. Position the converter bell housing onto the transmission case.
64. Install the eight new flange bolts supplied in he JATCO Campaign Transmission Repair Kit to secure the converter bell housing to the transmission case. Tighten the eight new flange bolts to 90 lb. ft. (123 Nm) each, using a standard criss-cross pattern.
65. Rotate the transmission in the holding fixture so that the oil pan is now facing downward.
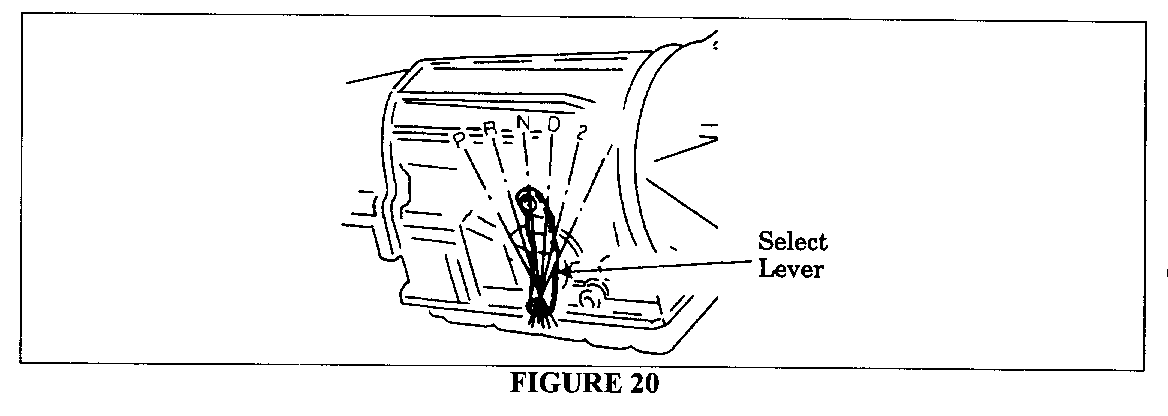
66. Place the select lever in the "N" range (Figure 20). Temporarily install the companion flange to the output shaft using the existing companion nut. Turn the output shaft to center the brake band. Tighten the brake band anchor end pin to 43 lb. in. (5 Nm) (Figure 21).
67. Loosen the brake band anchor end pin two and one half (2 1/2) turns only.
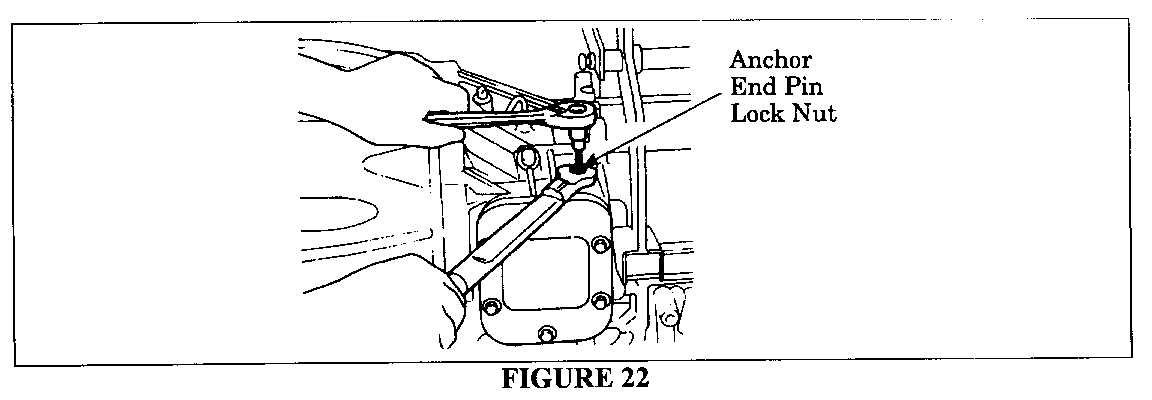
68. Install the anchor end pin lock nut to the anchor end pin and tighten the lock nut to 28 lb. ft. (45 Nm) (Figure 22).
IMPORTANT: When tightening the lock nut, be sure that the anchor end pin does not turn.
69. Remove the companion flange and discard the original companion nut.
NOTE: This companion nut will be replaced later with a new one supplied in the JATCO Campaign Transmission Repair Kit.
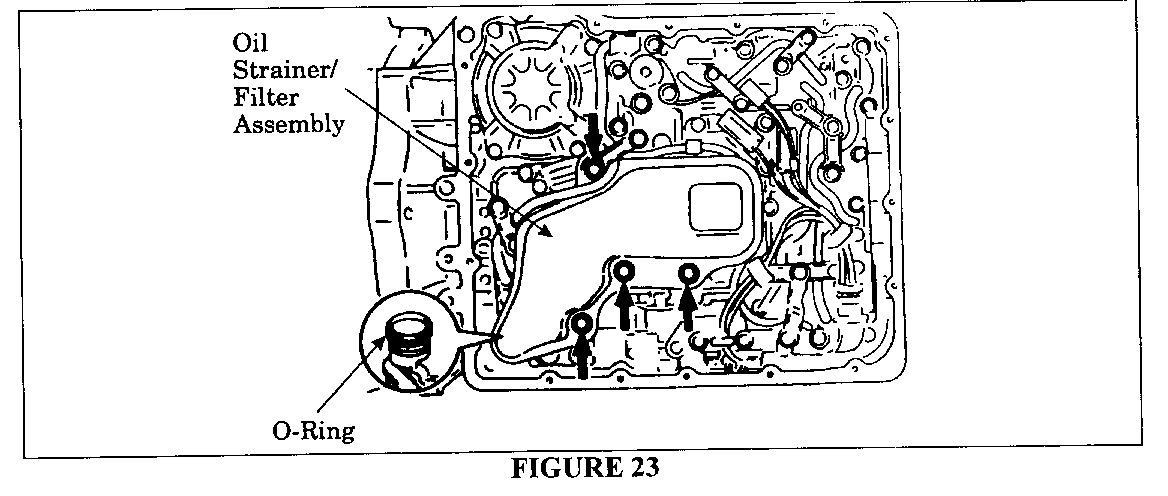
70. Rotate the transmission in the holding fixture so that the oil pan is now facing upward. Apply petroleum jelly to the new 0-ring supplied in the JATCO Campaign Transmission Repair Kit and install it onto the oil strainer/filter assembly. Carefully install the oil strainer/filter assembly into the transmission and secure it with the four bolts. Tighten the four bolts to 69 lb. in. (8 Nm) each (Figure 23).
71. Prior to installing the new oil pan gasket supplied in the JATCO Campaign Transmission Repair Kit onto the transmission case, remove residual transmission oil. Install a new oil pan gasket.
IMPORTANT: To prevent possible transmission case damage, be sure to remove any residual transmission oil from the transmission case surface and each of the bolt holes before installing the new oil pan gasket.
72. Remove and discard the existing oil pan gasket from the oil pan. Position the oil pan onto the transmission case and secure it with the 18 new bolts supplied in the JATCO Campaign Transmission Repair Kit. Tighten the 18 new bolts to 61 lb. in. (7 Nm) each.
73. Rotate the transmission in the holding fixture so that the oil pan is now facing downward. Install the torque converter.
IMPORTANT: Be sure to measure the clearance between the torque converter ring and the converter bell housing surface. Maximum clearance should be 23 mm (0.91 inch) (Figure 24) from the converter bell housing surface to the front of the torque converter where the flexplate attaches.
74. Remove the transmission from the holding fixture base.
75. Remove the holding fixture from the transmission.
76. Re-install the transmission into the vehicle in accordance with the appropriate Service Manual.
IMPORTANT: Be sure to flush the transmission oil cooler and lines in accordance with the appropriate Service Manual and with Service Bulletin SB95-05-C002, issued 11/95.
If the affected vehicle does not have an in-line transmission filter installed, be sure to install the appropriate JATCO Electromatic@ Transmission Fitter Kit. If the affected vehicle already has an in-line transmission fitter installed, replace the filter cartridge with a new one. Refer to Service Bulletin SB97-05-C004, issued 5197, for servicing details.
77. When all repairs have been completed, check for any leaks and for proper transmission operation.
78. Install GM Campaign Identification Label.
CAMPAIGN IDENTIFICATION LABEL
Each vehicle corrected in accordance with the instructions outlined in this Product Campaign Bulletin will require a "Campaign Identification Label". Each label provides a space to include the campaign number and the five (5) digit dealer code of the dealer performing the campaign service. This information may be inserted with a typewriter or a ball point pen.
Each "Campaign Identification Label" is to be located on the radiator core support in an area which will be visible when the vehicle is brought in by the customer for periodic servicing. When installing the Campaign Identification Label, be sure to pull the tab to allow adhesion of the clear protective covering. Additional Campaign Identification Labels can be obtained from VISPAC Incorporated by calling 1-800-269-5100 (Monday-Friday, 8:00 a.m. to 4:30 p.m. EST). Ask for Item Number S-1015 when ordering.
Apply the "Campaign Identification Label" only on a clean, dry surface.
CLAIM INFORMATION
Submit a Product Campaign Claim with the information indicated below:
* REPAIR PART FAILED PARTS LABOR LABOR PERFORMED COUNT PART NO ALLOW CC-FC 0P HOURS
R&R Transmission 3 --- ** MA-96 V0078 6.3
R&R Transmission 4 --- ** MA-96 V0079 6.5 & Replace Trans Filter Cartridge
R&R Transmission 4 --- ** MA-96 V0081 6.6 & Install Trans Filter Kit)
* For Campaign Administrative Allowance, add 0.1 hours to the "Labor Hours".
** The "Parts Allowance" should be the sum total of the current GMSPO Dealer Net price plus 40% for parts needed to complete the repair.
Refer to the General Motors Corporation Claims Processing Manual for details on Product Campaign Claim Submission.
97050
(Sample Of Notification Used)
October, 1997
Dear Chevrolet/GMC Customer:
This notice is sent to inform you of a recall campaign that includes your vehicle.
Reason For This Recall: General Motors has decided that certain 1996 W4 Medium Duty trucks equipped with JATCO Electromatic@ transmission may exhibit a condition in which the transmission thrust bearing may crack due to improper manufacturing. If this thrust bearing cracks, severe transmission damage could result.
What Will Be Done: To prevent the possibility of this condition occurring, your dealer will replace the existing thrust bearing in the transmission with a new, improved thrust bearing. During transmission reassembly, your dealer will flush the transmission; then, will either install a transmission filter kit (if the vehicle is not already equipped with one) or will replace the transmission filter cartridge, however, this transmission filter kit cannot be installed on Budget One-Way rental vehicles. This service will be performed for you at no charge.
Contacting Your Dealer: Please contact your dealer as soon as possible to arrange a service date and to assure parts. Instructions for making this correction have been sent to your dealer. Please ask your dealer if you wish to know how much time will be needed to schedule, process and repair your vehicle.
If you experience any trouble scheduling your vehicle or you have any questions regarding this recall action, please contact the Pontiac-GMC Customer Assistance Center at 1-800-462-8782. The deaf, hearing impaired, or speech impaired should call 1-800-462-8583 (utilizes Telecommunication Devices for the Deaf/Text Telephones, TDD/TTY).
Customer Reply Card: The enclosed customer reply card identifies your vehicle. Presentation of this card to your dealer will assist in making the necessary correction in the shortest possible time. If you no longer own this vehicle, please let us know by completing the postage paid reply card and returning it to us.
We are sorry to cause you this inconvenience; however, we have taken this action in the interest of your continued satisfaction with our products.
Chevrolet/Pontiac-GMC Division GENERAL MOTORS CORPORATION
Enclosure


General Motors bulletins are intended for use by professional technicians, not a "do-it-yourselfer". They are written to inform those technicians of conditions that may occur on some vehicles, or to provide information that could assist in the proper service of a vehicle. Properly trained technicians have the equipment, tools, safety instructions and know-how to do a job properly and safely. If a condition is described, do not assume that the bulletin applies to your vehicle, or that your vehicle will have that condition. See a General Motors dealer servicing your brand of General Motors vehicle for information on whether your vehicle may benefit from the information.
