Removal Procedure
Tools Required
J 26813-B Steering
Linkage Puller
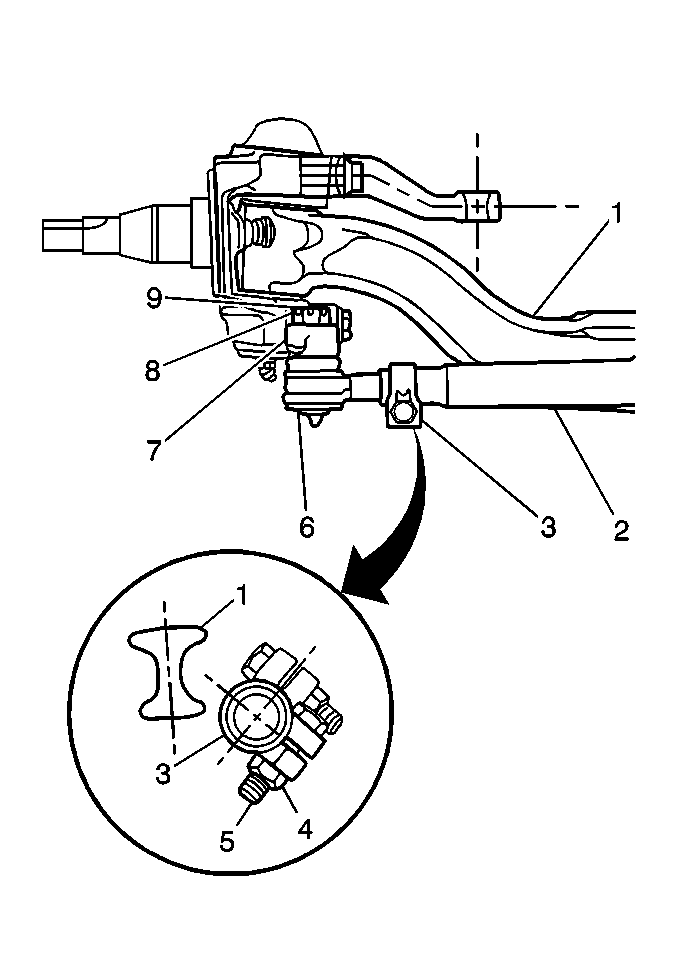
- Remove the cotter pin (9)
from the tie rod end ball joint (6).
- Discard the cotter pin.
- Remove the nut (8) from the tie rod ball joint.
- Loosen the tie rod tube clamp (3).
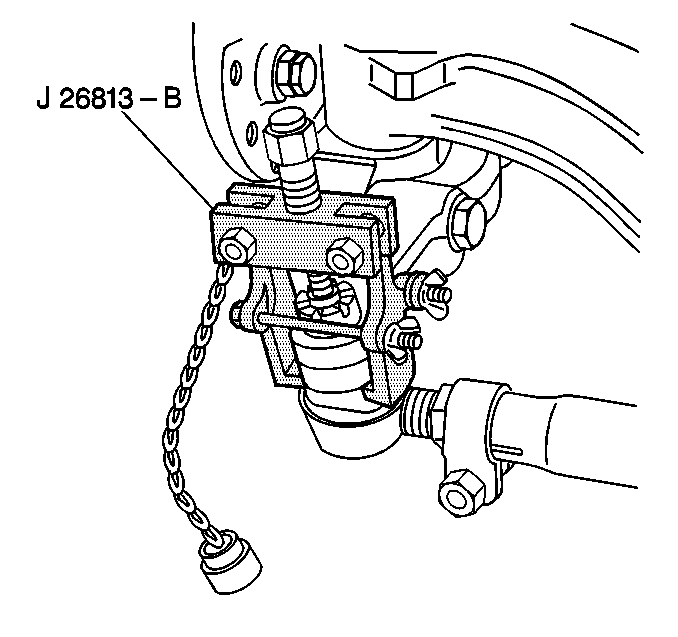
- Use the J 26813-B
in order to remove the tie rod ball joint.
- Remove the tie rod ball
joint (7) from the tie rod tube (2).
- Inspect the tie rod end threads. Refer to
Tie Rod End Inspection
.
- Inspect the ball stud threads for the following conditions:
- Inspect the ball stud nut threads for the following conditions:
- Inspect the ball stud taper for the following conditions:
- Inspect the tie rod tube (2) for straightness.
| • | If the tube is bent less than 5 degrees, cold straighten
the tube. |
| • | If the tube is bent more than 5 degrees, replace the tube. |
- Clean all of the threads in order to remove any dirt and rust.
- Clean the tapers in order to remove any dirt and rust.
Installation Procedure
Important: Thread the tie rod ball joints (6) in an equal distance.
- Install the tie rod ball joint into the tie rod tube (2).
- Install the tie rod ball joint into the tie rod arm (7).
Notice: Use the correct fastener in the correct location. Replacement fasteners
must be the correct part number for that application. Fasteners requiring
replacement or fasteners requiring the use of thread locking compound or sealant
are identified in the service procedure. Do not use paints, lubricants, or
corrosion inhibitors on fasteners or fastener joint surfaces unless specified.
These coatings affect fastener torque and joint clamping force and may damage
the fastener. Use the correct tightening sequence and specifications when
installing fasteners in order to avoid damage to parts and systems.
Important:
| • | Advance the ball joint nut (8) to the nearest cotter pin
slot. |
| • | Do not back off a ball joint nut in order to insert a cotter pin (9). |
- Install the ball joint nut (8).
Tighten
| • | Tighten the ball joint nuts in the axle assemblies (6)
with a 3 675 kg (8,100 lb) rating to 130 N·m
(95 lb ft). |
| • | Tighten the ball joint nuts in all other axle assemblies to 160 N·m
(120 lb ft). |
- Install the new cotter pin (9).
- Lubricate the tie rod ball joints with the chassis lubricant.
Refer to
Fluid and Lubricant Recommendations
and
Maintenance Schedule
in
Maintenance and Lubrication.
- Adjust the toe-in. Refer to
Front Toe Adjustment
in Wheel Alignment.
- Install the tie rod tube clamp bolt nuts (4).
Tighten
Tighten the tie rod tube clamp bolt (5) nuts to 75 N·m
(55 lb ft).
