CAMPAIGN:AUTO APPLY PARKING BRAKE MALFUNCTIONS

SUBJECT: AUTO APPLY PARKING BRAKE MALFUNCTIONS -------------------------------------
Models: 1990 Chevrolet/GMC P3 Motor Homes with 16,000# GVW Rating (RPO C7P) Equipped with Auto Apply Parking Brake and 178" and/or 208" Wheel Base -------------------------------------------------------------------
TO: ALL GENERAL MOTORS DEALERS
---------------------------
General Motors of Canada Limited has determined that a defect which relates to motor vehicle safety exists in certain 1990 P30 Motor Home Chassis. If there is a fluid leak in the auto-apply hydraulic parking brake system the parking brake may apply while the vehicle is being driven. The "BRAKE" telltale would come on and there would be a noticeable drag when driving. Under these circumstances, there would also be no loss of control of the vehicle, and the driver should pull the vehicle off the road and seek proper service. If the driver ignores the "BRAKE" telltale and continues to drive with the parking brake applied, the parking brake system subsequently could fail. If the driver then attempted to park the vehicle and released the brake pedal, the Motor Home could roll. However, the brake pedal could still be applied by the driver to prevent the Motor Home from rolling.
To correct this condition, dealers must follow the procedure contained in this bulletin and install an Auto-Apply Park Brake System Service Kit, bleed the hydraulic power system, and adjust the parking brake.
VEHICLES INVOLVED:
Involved are the following 1990 Chevrolet/GMC P3 Motor Homes with 16,000# GVW Rating RPO C7P):
1GBKP37N2L3321858 1GBKP37N3L3315454 1GDKP37N2L3502661 1GBKP37N4L3317911 1GBKP37N4L3315737 1GDKP37N5L3502136 1GBKP37NXL3314060 1GBKP37N6L3313973 1GDKP37N6L3502162 1GBKP37N1L3316506 1GBKP37N6L3315951 1GDKP37N6L3502565 1GBKP37N2L3315221 1GBKP37N6L3319028 1GDKP37N7L3502414 1GBKP37N2L3315901 1GBKP37N8L3315384 1GDKP37N7L3502512 1GBKP37N2L3321584 1GDKP37N1L3503011 1GBKP37N7L3315750 1GBKP37N2L3321665 1GDKP37N2L3502515 1GBKP37N8L3318043
NOTE: PLEASE CHECK DCS SCREEN 4S OR YOUR V.I.N. LISTING BEFORE PERFORMING CAMPAIGN TO ENSURE THAT THE VEHICLE IS AFFECTED. ONLY AFFECTED VIN'S WILL BE PAID.
All affected vehicles have been identified by the VIN listing provided to involved dealers with this bulletin. Any dealer not receiving a listing was not shipped any of the affected vehicles.
DEALER CAMPAIGN RESPONSIBILITY:
All unsold new vehicles in dealer' possession and subject to this campaign be held and inspected/repaired per the Service Procedure of this Campaign Bulletin before owners take possession of these vehicles.
Dealers are to perform this campaign on all involved vehicles at no charge to owners, regardless of kilometres traveled, age of vehicle, or ownership, from this time forward.
Owners of vehicles recently sold from your new vehicle inventory with no owner information indicated on the dealer listing, are to be contacted by the dealer, and arrangements made to make the required correction according to instructions contained in is bulletin. This could be done by mailing to such owners a copy of the owner letter accompanying this bulletin. Campaign follow- up cards should not be used for this purpose, since the owner may not as yet have received the notification letter.
In summary, whenever a vehicle subject to this campaign is taken into your new or used vehicle inventory, or is in your dealership for service in the future, please take the steps necessary to be sure the campaign correction has been made before selling or releasing the vehicle.
CAMPAIGN PROCEDURE:
Refer to Section 4 of the Service Policies and Procedures Manual for the detailed procedure on handling Product Campaigns. Dealers are requested to complete the campaign on all transfers as soon as possible.
OWNER NOTIFICATION:
All owners of record at the time of campaign release are shown on the attached computer listing and have been notified by first class mail from General Motors (see copy of owner letter included with this bulletin). The listings provided are for campaign activity only and should not be used for any other purpose.
PARTS INFORMATION:
Parts required to complete this campaign should be ordered through regular channels, as follows:
Part Number Description Quantity/Vehicle ----------- ----------- ----------------
12380411 Auto Apply Parking Brake Service Kit 1
THE FOLLOWING PARTS ARE INCLUDED IN THE SERVICE KIT:
Cable Clip Nuts 1/4"-20 (GM 286M) - Qty. 2 Cable Washer Valve Seal Repair Kit Power Steering Reservoir Caps Manual Control Supply Hose Power Steering Vent Overflow Hose Relay Valve Inlet Pipe Assembly Power Steering Vent Overflow Hose Clamp Park Brake Operation Label Parking Brake Brace Label Installation Sheet Bolts 1/4"-20x 2.00" (GM 280-M) Qty. 2 Instruction Sheet
PARTS AND LABOUR INFORMATION
Credit for the campaign work performed will be paid upon receipt of a properly completed campaign claim card or DCS transmission in accordance with the following:
Repair Code Description Time Allowance ----------- ----------- -------------- 2A Install Auto Apply Parking 1.8 Brake Service Kit
Time allowance includes 0. 1 hour for dealer administrative detail associated with this campaign. Parts credit will be based on dealer net plus 30% to cover parts handling. The amount of $6.00 has been included in repair code 2A for steering fluid, lubriplate and thread sealant.
GENERAL INFORMATION
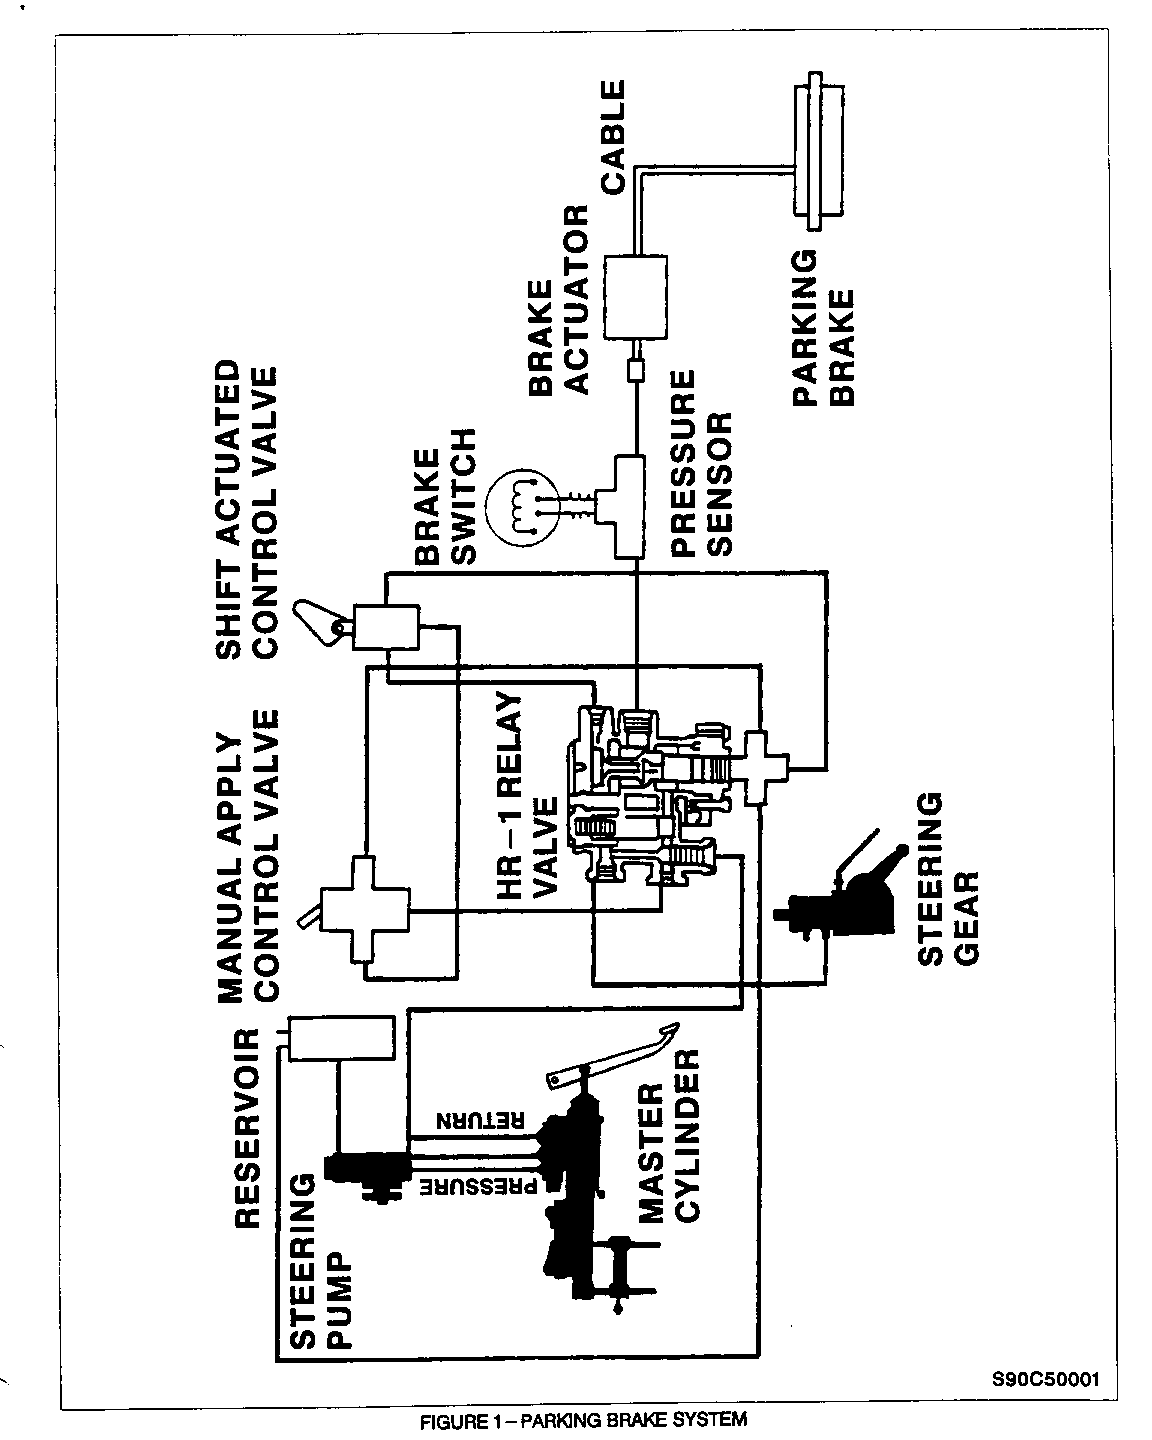
The parking brake system on the 1990 16,000# GVW P3 Motor Home chassis incorporates a unique automatic apply feature with an expanding parking brake. The parking brake is spring applied and hydraulically released. Hydraulic pressure is supplied by the power steering pump. Full brake disengagement requires that 95 to 115 PSI pressure exists at the brake actuator. (See Figure 1.)
The parking brake is automatically applied when the shift lever is in the "park" position, or it may be manually applied by pulling out the yellow parking brake control knob. The system features an HR-1 relay valve serving as a flow control point. The HR- 1 reduces and directs flow to and from a spring actuator operating the parking brake (See Figure 1).
* In the event the vehicle stall, the wheels can be spun freely for at least ten minutes until pressure is drained from the brake actuator and the spring brake reapplies.
* A parking brake light in the vehicle warns the operator when the brake is applied. This brake is light will come on when the pressure at the actuator is less than 60 PSL.
DIAGNOTIC INFORMATION
Diapostic Charts in Truck Service Bulletin 90-5-126 (Corporate Number 065020) Group 5-Brakes, dated October, 1990 can be used to determine if the Automatic Apply Parking Brake System is functioning normally and to identify what repairs may be required. The bleed procedures in Bulletin Number 90-5-126 have been revised. A corrected bleed procedure is provided later in this bulletin. Additionally, bulletin 90-5-126 incorporates information on replacement and bleed procedure of the HR-1 Relay Valve. However this information is NOT needed to perform the Service Procedure in this Bulletin. It is mentioned for future reference material only.
SERVICE PROCEDURE:
CAUTION:
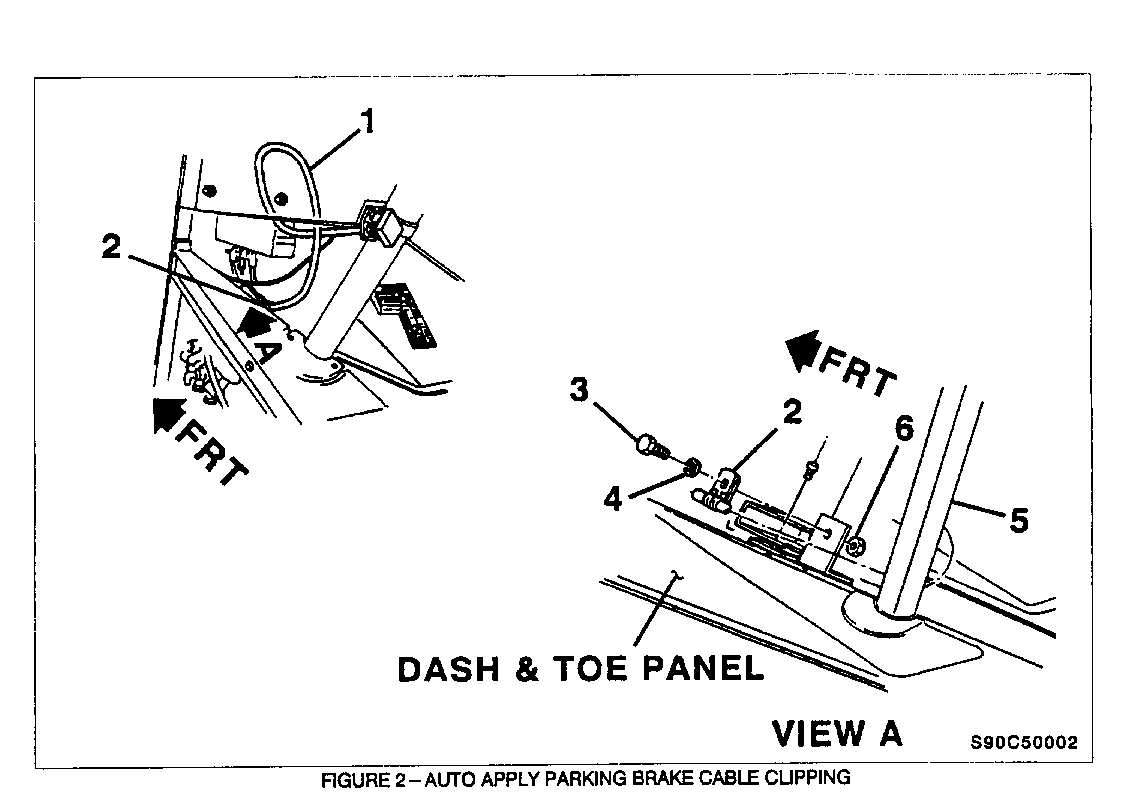
WEAR SAFETY GLASSES, PERSONAL INJURY COULD OCCUR. EXHAUST MANIFOLD MAY BE HOT, ALLOW TO COOL PRIOR TO PERFORMING REPAIRS. (See Figure 2)
1. Place the column shift selector lever in "park", turn ignition key to the "off" position, do not manually apply the parking brake with the control knob. Block the wheels to prevent vehicle movement during servicing.
2. From inside the vehicle, locate the parking brake control cable (#l) located under the instrument panel adjacent to the steering column and cable clip (#2) (at floor).
3. Remove the cable clip nut (#6) and bolt (#3) and washer(s) (#4). Discard the washer(s). Retain the bolt and nut for the reinstallation procedure.
4. Remove the cable clip (#2) from the cable (#l) and discard. Utilizing a new clip attach the cable to the bracket using the existing bolt and nut and a new washer. Align the clip to prevent possible kinks in the cable from occurring during the tightening of the bolt and nut.
5. Torque the nut (#6) to 6-9 N.m (5-7 lbs. ft.).
6. Safely vent the exhaust and start the engine. Put the column shift selector lever in the "neutral" position and manually apply the parking brake using the manual parking brake control knob. Release the parking brake by pushing in the parking brake control knob. Verify the parking brake telltale lamp on the dash goes out. Reapply the manual parking brake and verify the parking brake actuates. Also verify that parking brake cable operates smoothly.
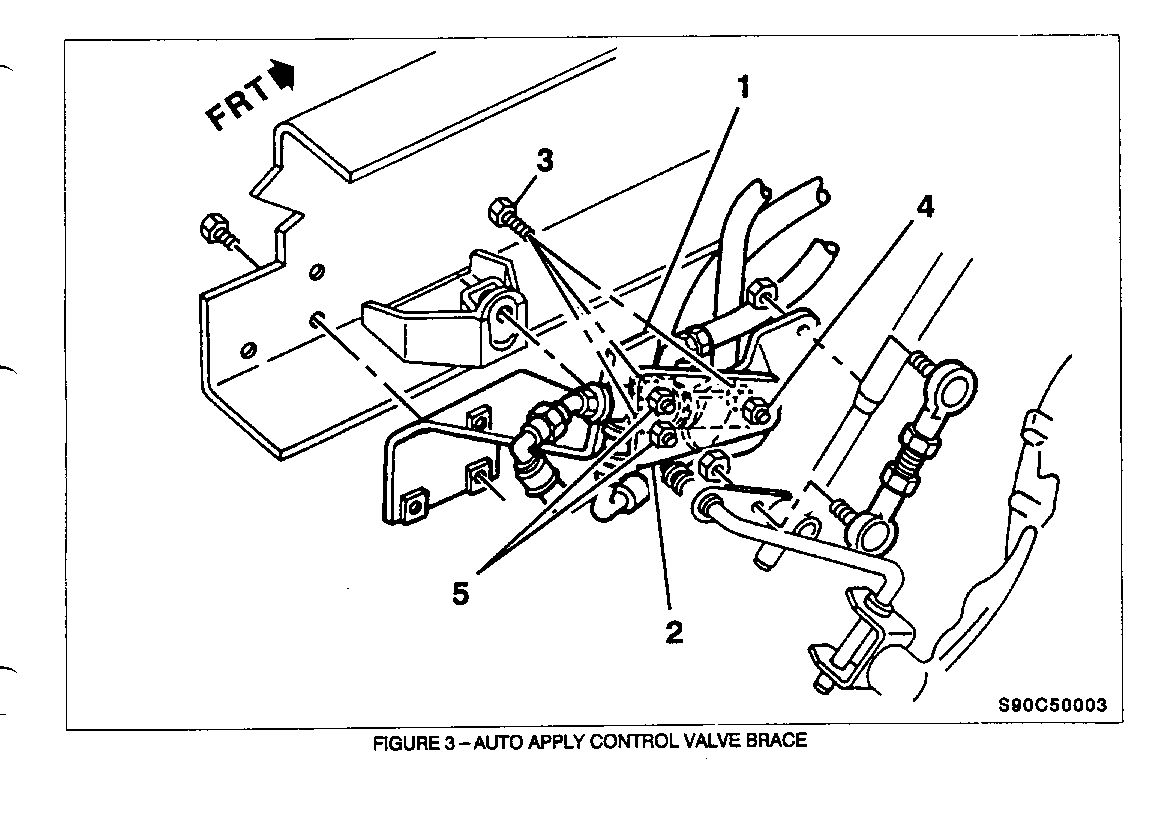
7. Replace the power steering reservoir cap with a new vented cap. Cut the new vent overflow hose length to approximately 870 mm (34 1/4") and install to reservoir cap using the new hose fastening clamp. Route the vent overflow hose across and under the fuse box, behind the washer bottle and downward in front of the driver's wheel well. (See Figure 3)
8. Raise the vehicle following all safety precautions. If a hoist is not available, raise the front axle and use suitable safety stands.
9. Place the column selector lever in the "park" position, turn the ignition to the "off" position and manually apply the parking brake using the parking brake control knob.
10. Locate the parking brake control valve (#l) on the left inside frame rail adjacent to the transmission shift control.
11. Remove the three parking brake control valve brace bolts (#3). Discard the two 1/4" nuts (#5) and bolts (#3) and all three washers. Retain the 5/16" bolt and nut (#4).
12. Install a new brace (#2) towards the transmission on the parking brake control valve so that the brace faces inboard. Install brace using two new 1/4" bolts (#3) and nuts (#5) in the rear holes of the brace. Reinstall the existing 5/16" bolt and nut (#4) in the forward hole.
Important: Nuts and bolts must be installed as shown in Figure 3 with the nuts clamping against the new brace.
13. Torque all three nuts (#4 and 5) to 6-9 N.m (5-7 lbs. ft.).
14. With the column shift selector lever in the "park" position, start the engine, manually release the parking brake using the parking brake control knob, and cycle the auto apply parking brake system by moving the column shift selector lever from "park" to "drive". Verify the parking brake functions properly.
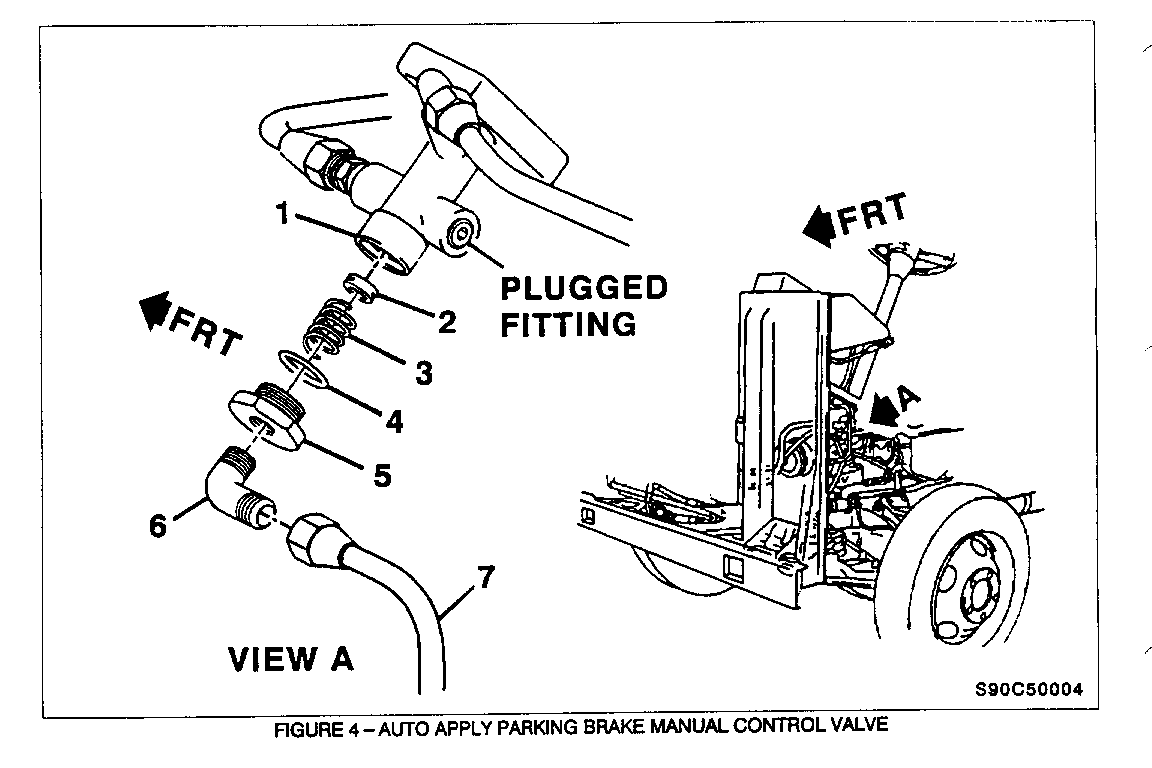
15. Place the column shift selector lever back into "park", turn the ignition to the "off" position and manually apply the parking brake using the parking brake control knob. Inspect the parking brake control valve for any hydraulic leaks. Torque the fittings as required. (See Figure 4)
16. Remove the left front inner wheel well panel. Retain all fasteners and panel for the reinstallation process. Pin-point the manual control valve (#1) located above the relay valve that is located above the hydro-boost unit. Prepare the removal area by having a catch pan and/or towels or rags available to catch any oil leakage from the supply pipe/valve during removal.
17. Remove and discard the supply pipe (#7) located between the manual control valve (#l) and relay valve. Remove the cap nut (#5) and elbow (#6) as an assembly. Remove the inlet valve (#2), spring (#3) and 0-ring (#4). The inlet valve (#2) may not drop out due to oil viscosity; it may be necessary to use a thin pick to dislodge the inlet valve (#2) from inside the valve.
18. Prior to assembly, lubricate the control valve bores (#1), 0-ring (#4) and cap nut threads (#5) with lubriplate or equivalent. Install replacement 0-ring (#4) over replacement cap nut (#5; place spring (#3) on inner pocket of cap nut (#5) and rest inlet valve (#2) on top of the spring (#3). Balancing this assembly, gently raise into the valve body. Upon making contact with the valve, hand tighten assembly. Then torque cap nut (#5) to 6-15 N.m (5-12 lbs. ft.) in proper alignment with supply pipe. (Improper assembly may result in an inoperative/noisy park brake.)
Notice: Excessive torque of the cap nut (Figure 4, View A, #5) may result in the crushing of the bottom portion of the control valve.
19. Remove the nut and compression fitting from the replacement elbow assembly and discard. Apply thread sealant to threads going into new cap nut (#5) and threaded surface of new elbow (#6). Thread elbow (#6) into cap nut (#5) and torque the cap nut (#5) to 12-14 N.m (9-10 lbs. ft.). Align the elbow (#6) for reattachment to a new supply pipe.
Important: Do not apply sealant over the elbow opening.
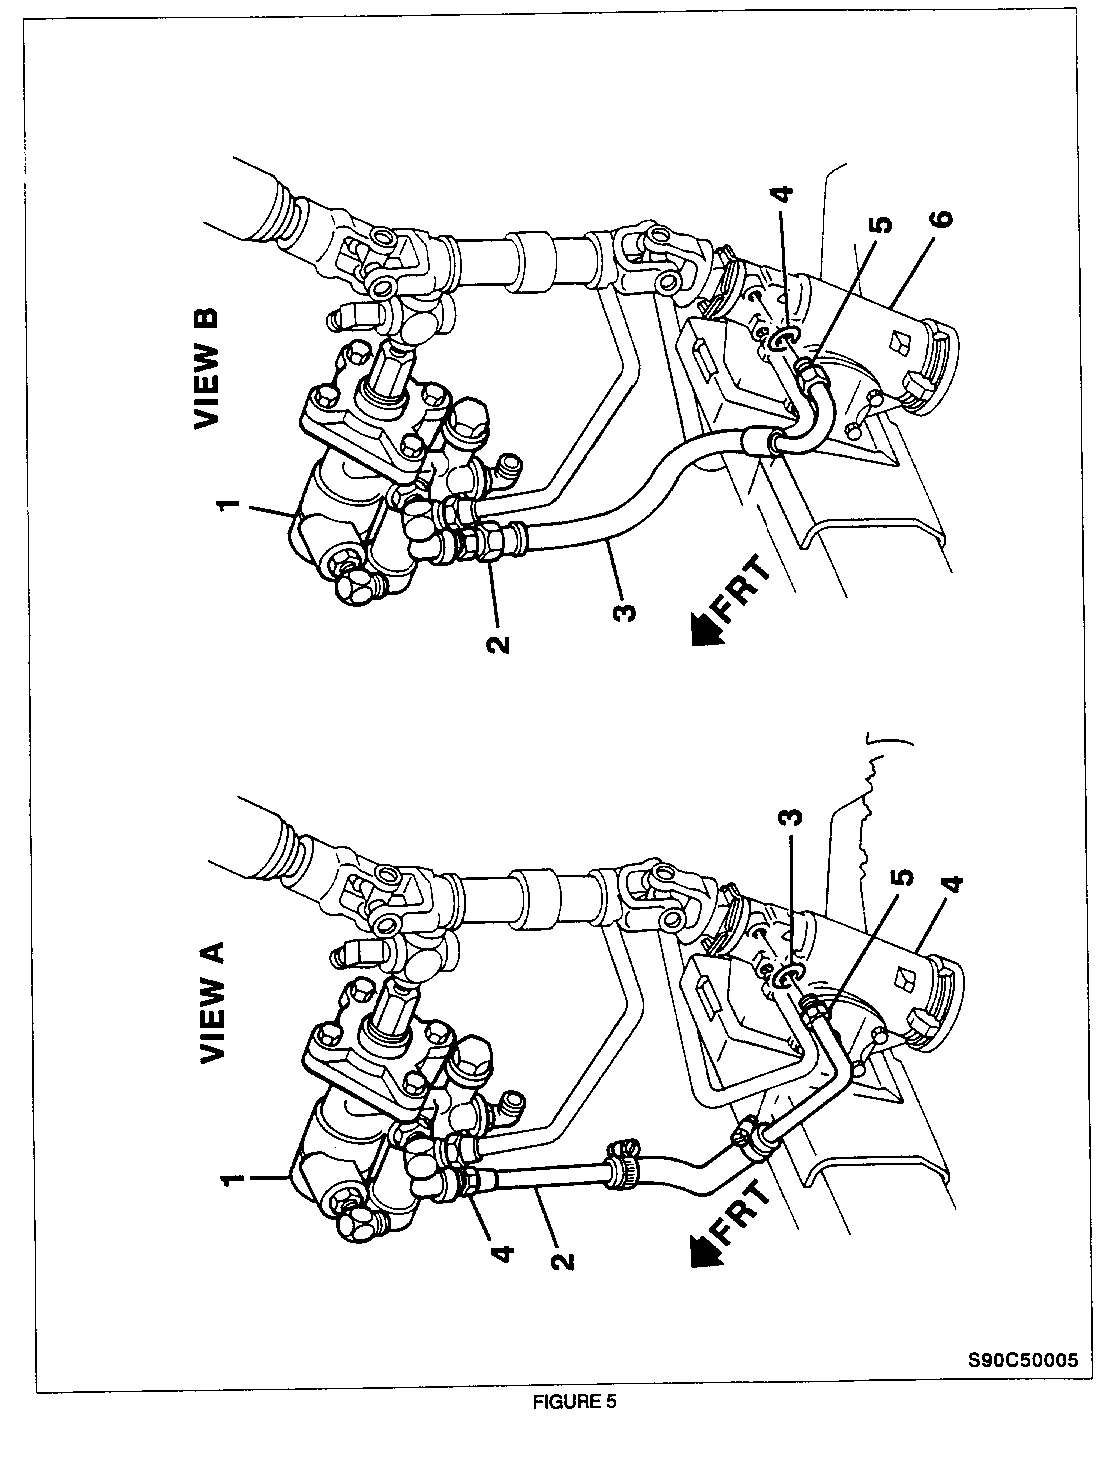
20. Install a new manual control supply hose (#7) between the manual control valve and relay valve. Torque the nuts to 12-14 N.m (9-10 lbs. ft). (See Figure 5 - Views A and B)
21. Place column shift selector lever in the "neutral" position. DO NOT manually apply the parking brake. Turn ignition to the "off" position.
22. Locate the relay valve assembly (#1) and steering gear relay valve inlet pipe assembly (#2) shown in View A. Prepare the removal area by having a catch pan and towels or rags available to catch any oil leakage from the hose during removal.
23. Refer to View A and remove the relay valve inlet pipe assembly (#2) at the tube nut (#4) and steering gear nut (#5). Catch as much fluid as possible. Remove the 0-ring (#3) from the steering gear.
24. Refer to View B, install one end of new hose assembly (#3) at steering gear (#6) and carefully seat 0-ring (#4) into the steering gear seat, finger tighten the steering gear nut (#5). Install other end of hose assembly (#3) at the relay valve (#l) and finger tighten the tube nut 2).
25. Refer to View B and torque the steering gear nut (#5) at the steering gear to 20-34 N.m (15-25 lbs. ft.) and the tube nut at the relay valve assembly (#2) to 20-27 N.m (15-20 lbs. ft.).
26. Bleed the power steering system using the "Power Steering Bleed Procedure" described below.
27. Adjust the parking brake using "Parking Brake Adjustment" procedure contained later in this bulletin.
28. Lower the front of the vehicle.
29. Install Campaign Identification label.
POWER STEERING BLEED PROCEDURE
Notice: To maintain proper fluid level throughout the bleed procedure, check and fill the power steering reservoir with power steering fluid as necessary. Keep the column shift selector ONLY in the "PARK" position when filling.
1. Place column shift selector lever in "park", turn ignition to "off" position.
2. Fill the power steering pump fluid reservoir to the proper level and let the fluid settle for at least a few minutes.
3. Start the engine. Let the engine run for a few seconds; then turn off.
4. Add power steering fluid, if necessary.
5. Repeat Steps 1 through 4 until the fluid level remains constant after running the engine.
6. Start die engine and place the column shift selector lever in "neutral", do not apply the manual parking brake and shut off the engine after the illuminated "brake" light goes off.
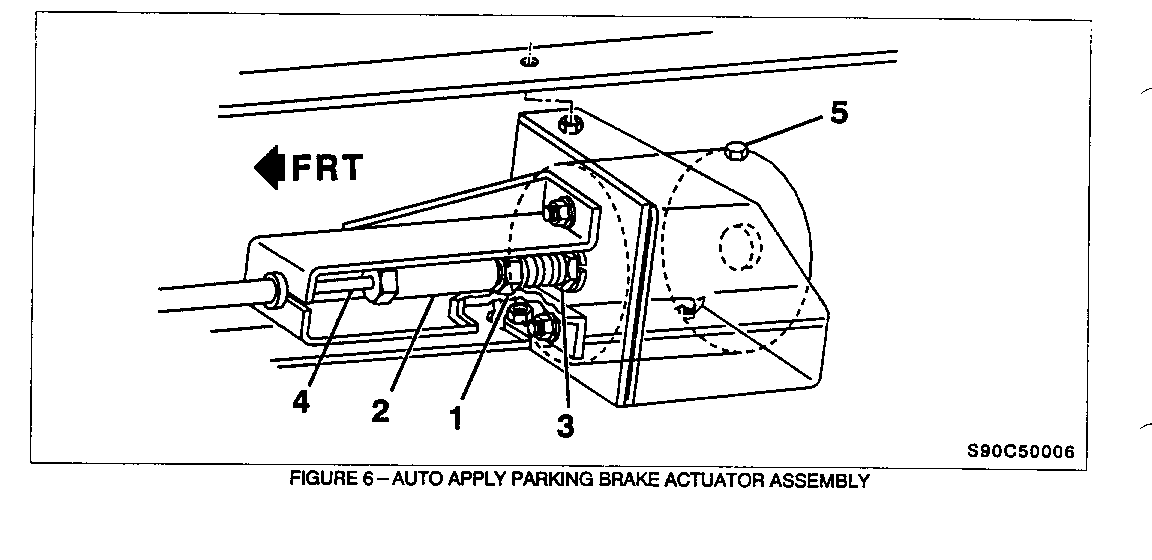
7. Remove the bleed bolt (Figure 6, #5) located on top of the parking brake actuator and bleed the system.
8. Tighten the actuator bleed bolt and cycle the system by starting the engine and applying the manual parking brake.
9. Repeat Steps 6 through 8 until air is removed from system.
10. Turn off the engine. Check the fluid level and refill as required.
11. If the fluid is extremely foamy, allow the vehicle to stand a few minutes and repeat the above procedure.
12. If air still remains in the system, repeat Steps 6 through 11.
13. Pump the brakes several times with the engine off and the column shift selector in the "neutral" position.
14. Start die engine with the vehicle in "park". Slowly turn the steering wheel right and left, lightly contacting the wheel stops. Shut the engine off and check the power steering fluid level, add fluid, if necessary.
15. Place the column shift selector lever in "neutral" position and start engine. Engage the parking brake using the manual control valve.
16. Partially open the upper exhaust fitting of the manual control valve located above the relay valve. Allow a small amount of fluid to bleed out of the fitting, then quickly tighten the fitting.
17. Repeat Steps 15 through 16, as required.
18. After completion of the bleeding procedure, reinspect the hoses for any fluid leaks. Retorque as required. .
PARKING BRAKE ADJUSTMENTS
1. Place the column shift selector lever in "neutral", turn the manual parking brake to the "off" position and start and run the engine until the parking brake telltale lamp goes off.
2. Either raise and support the rear axle with suitable safety stands or disconnect the driveline shaft. Block the front wheels.
3. To adjust the brake-to-drum clearance, remove the dust cover (plug) on the parking brake drum. Turn the drum to align the access hole in the drum with the adjusting star wheel. Adjust star wheel through the drum opening until the brake just locks up. Back off the star wheel two to four notches. When properly adjusted, the drum should spin free with only light drag.
4. Inspect the parking brake shoes and drum and repair as required.
5. If the driveline shaft was disconnected, reconnect or lower the rear axle. (See Figure 6)
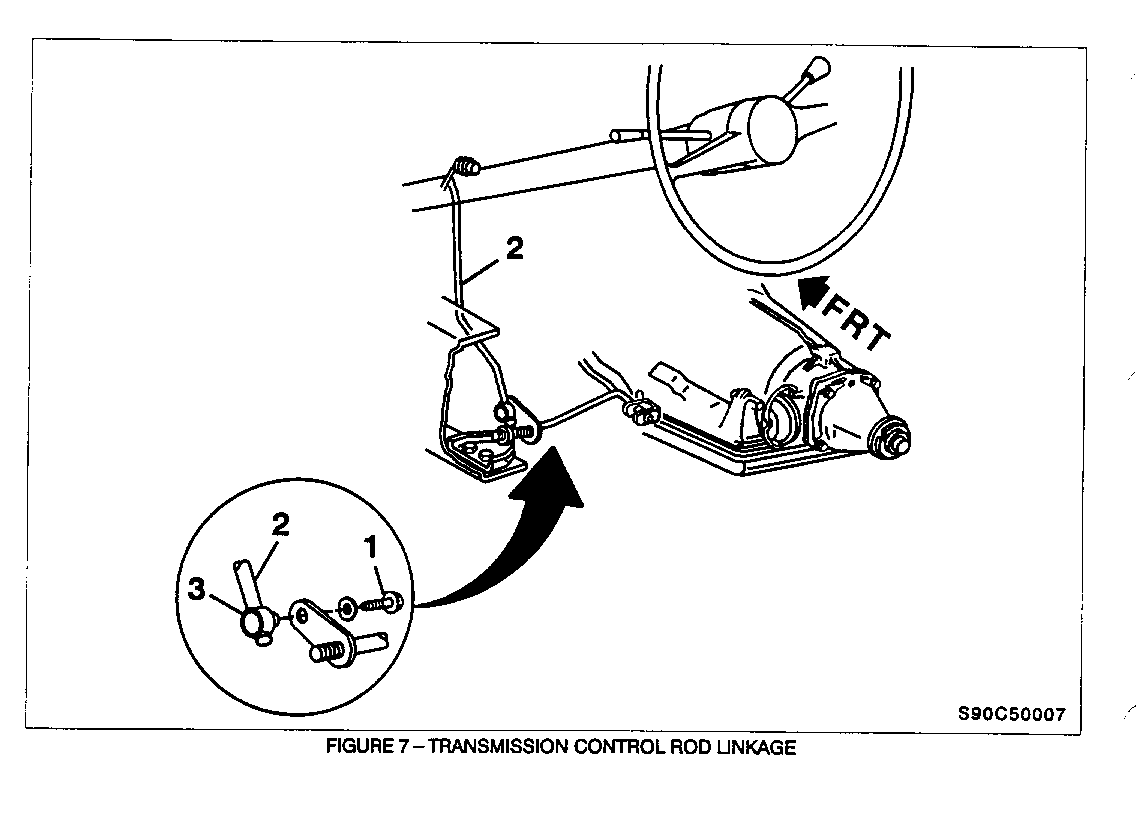
6. To adjust the cable free play, place the column shift selector lever in the "neutral" position and start the engine until the brake light goes off, then shut engine off. Loosen the jam nut (#l) towards the brake actuator. Turn the 5-inch-long hex nut (#2) along the stud until no free play exists. Move the jam nut (#1) until it is tight against the 5-inch-long hex nut (#2). Tighten the safety nut (#3) against the jam nut (#1). When properly adjusted, the actuator rod (#4) should stroke between .75 and 1.00 inch. (See Figure 7)
7. To adjust the transmission linkage, apply the manual parking brake and place the column shift selector lever in the "neutral" position. Under the vehicle, adjacent to the transmission, loosen the transmission shift lever assembly bolt (#l). Place the transmission range selector lever (#4) in "neutral", then move the range selector lever (#4) to die forward position (past park) and back up to the third detent (3 clicks). Hold the transmission selector rod (#2) tightly in the swivel (#3). Tighten the transmission shift lever assembly bolt (#l) to 23 N.m (17 lbs. ft.). Put the column shift selector lever in the "park" position. Check the adjustment. The column selector lever must go into all positions. The engine must start in the "park or "neutral" positions only.
8. Check for proper operation of the parking brake system and correct as required.
9. Reinstall the inner wheel well panel.
10. Remove the exhaust vent hose.
11. Remove wheel blocks.
12. Install the Power Brake Operation label on the sunvisor.
13. Install Campaign Identification Label.
INSTALLATION OF CAMPAIGN IDENTIFICATION LABEL
Clean surface of radiator upper mounting panel and apply a Campaign Identification Label. Make sure the connect campaign number is inserted on the label. This will indicate that the campaign has been completed.
Dear General Motors Customer:
General Motors of Canada Limited has determined that a defect which relates to motor vehicle safety exists in certain 1990 P30 Motor Home Chassis. If there is a fluid leak in the auto-apply hydraulic parking brake system the parking brake may apply while the vehicle is being driven. The "BRAKE" telltale would come on and there would be a noticeable drag when driving. Under these circumstances, there would also be no loss of control of the vehicle, and the driver should pull the vehicle off the road and seek proper service. If the driver ignores the "BRAKE" telltale and continues to drive with the parking brake applied, the parking brake system subsequently could fail. If the driver then attempted to park the vehicle and released the brake pedal, the Motor Home could roll. However, the brake pedal could still be applied by the driver to prevent the Motor Home from rolling.
To correct this condition, your dealer must install an Auto-Apply Park Brake System Service Kit, bleed the hydraulic power system, and adjust the parking brake.
This service will be provided for you at no charge.
Please contact your GM dealer as soon as possible to arrange a service date.
If parts are required, ask your dealer for details regarding their availability. If parts are not in stock, they can be ordered before scheduling your service date.
This letter identifies your vehicle. Presentation of this letter to your dealer will assist their Service personnel in completing the necessary correction to your vehicle in the shortest possible time.
We are sorry to cause you this inconvenience; however, we have taken this action in the interest of your continued satisfaction with our products.
Customer Support Department General Motors of Canada Limited
General Motors bulletins are intended for use by professional technicians, not a "do-it-yourselfer". They are written to inform those technicians of conditions that may occur on some vehicles, or to provide information that could assist in the proper service of a vehicle. Properly trained technicians have the equipment, tools, safety instructions and know-how to do a job properly and safely. If a condition is described, do not assume that the bulletin applies to your vehicle, or that your vehicle will have that condition. See a General Motors dealer servicing your brand of General Motors vehicle for information on whether your vehicle may benefit from the information.
