Seat Belt Buckle and Latch Replacement - No. 3 Rear Tahoe/Yukon
Caution: To avoid personal injury to the occupants of the vehicle, observe the
following precautions:
• More than one supplier's seat belts are used, therefore, install
ONLY the seat belt components specified in the GM parts catalog. • To verify that the correct seat belt components were installed,
insert the seat belt latch in the seat belt buckle. The latch must be fully
seated and be retained in the buckle until purposely released.
Removal Procedure
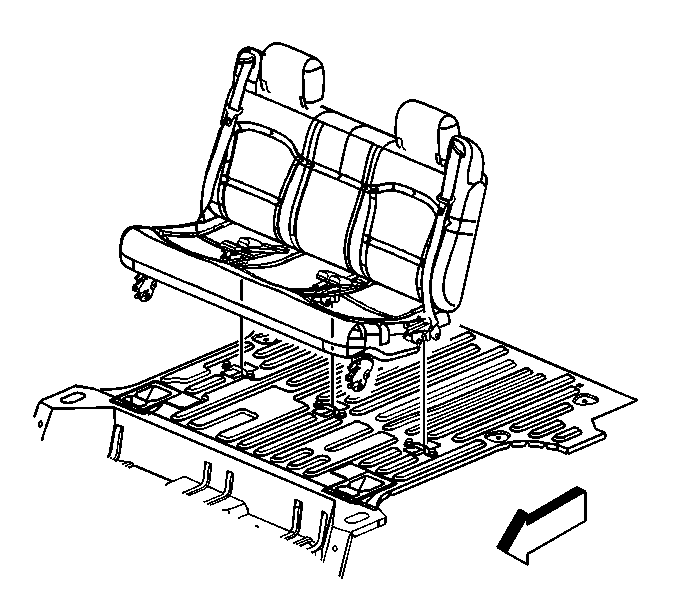
- Remove the seat from the vehicle. Refer to Rear Bench Seat Replacement in Seats.
- Manually rotate the center latch to the latched position to release the seat back.
- Remove the latch cover.
- Remove the latch mounting bolt attaching the retractor bolt anchor to the cushion frame.
- Remove the seat back. Refer to Rear Seat Back Replacement in Seats.
- Remove the head rests. Refer to Head Restraint Replacement in Seats.
- Remove the seat back trim.
- Remove the retractor mounting bolt.
- Separate the bottom cushion trim J-strip.
- Remove the handle mounting bolts.
- Remove the seatbelt anchor bolt cover.
- Remove the floor anchor bolt.
- Remove the buckle attaching bolts.
- Remove the buckle and latch from the vehicle.
Installation Procedure
- Install the buckle and latch to the vehicle.
- Install the buckle attaching bolts.
- Install the handle mounting bolts.
- Connect the bottom cushion trim J-strip.
- Install the retractor mounting bolt.
- Install the floor anchor bolt.
- Install the seat belt anchor bolt cover.
- Install the seat back trim.
- Install the headrests. Refer to Head Restraint Replacement in Seats.
- Install the seat back. Refer to Rear Seat Back Replacement in Seats.
- Install the latch mounting bolt attaching the retractor bolt anchor to the cushion frame.
- Install the latch cover.
- Manually rotate the center latch to the unlatched position in order to secure the seat back.
- Install the seat to the vehicle. Refer to Rear Bench Seat Replacement in Seats.
Notice: Use the correct fastener in the correct location. Replacement fasteners must be the correct part number for that application. Fasteners requiring replacement or fasteners requiring the use of thread locking compound or sealant are identified in the service procedure. Do not use paints, lubricants, or corrosion inhibitors on fasteners or fastener joint surfaces unless specified. These coatings affect fastener torque and joint clamping force and may damage the fastener. Use the correct tightening sequence and specifications when installing fasteners in order to avoid damage to parts and systems.
Tighten
Tighten the bolts to 55 N·m (40 lb ft).
Tighten
Tighten the bolts to 55 N·m (40 lb ft).
Tighten
Tighten the bolt to 55 N·m (40 lb ft).
Tighten
Tighten the bolt to 55 N·m (41 lb ft).
Tighten
Tighten the bolt to 55 N·m (40 lb ft).
Seat Belt Buckle and Latch Replacement - No. 3 Rear Suburban/Yukon XL
Caution: To avoid personal injury to the occupants of the vehicle, observe the
following precautions:
• More than one supplier's seat belts are used, therefore, install
ONLY the seat belt components specified in the GM parts catalog. • To verify that the correct seat belt components were installed,
insert the seat belt latch in the seat belt buckle. The latch must be fully
seated and be retained in the buckle until purposely released.
Removal Procedure
- Remove the seat from the vehicle. Refer to Rear Bench Seat Replacement in Seats.
- Manually rotate the center latch to the latched position to release the seat back.
- Remove the latch cover.
- Remove the latch mounting bolt attaching the retractor bolt anchor to the cushion frame.
- Remove the seat back. Refer to Rear Seat Back Replacement in Seats.
- Remove the head rests. Refer to Head Restraint Replacement in Seats.
- Remove the seat back trim.
- Remove the retractor mounting bolt.
- Separate the bottom cushion trim J-strip.
- Remove the handle mounting bolts.
- Remove the seatbelt anchor bolt cover.
- Remove the floor anchor bolt.
- Remove the buckle attaching bolts.
- Remove the buckle and latch from the vehicle.
Installation Procedure
- Install the buckle and latch to the vehicle.
- Install the buckle attaching bolts.
- Install the handle mounting bolts.
- Connect the bottom cushion trim J-strip.
- Install the retractor mounting bolt.
- Install the floor anchor bolt.
- Install the seat belt anchor bolt cover.
- Install the seat back trim.
- Install the headrests. Refer to Head Restraint Replacement in Seats.
- Install the seat back. Refer to Rear Seat Back Replacement in Seats.
- Install the latch mounting bolt attaching the retractor bolt anchor to the cushion frame.
- Install the latch cover.
- Manually rotate the center latch to the unlatched position in order to secure the seat back.
- Install the seat to the vehicle. Refer to Rear Bench Seat Replacement in Seats.
Notice: Use the correct fastener in the correct location. Replacement fasteners must be the correct part number for that application. Fasteners requiring replacement or fasteners requiring the use of thread locking compound or sealant are identified in the service procedure. Do not use paints, lubricants, or corrosion inhibitors on fasteners or fastener joint surfaces unless specified. These coatings affect fastener torque and joint clamping force and may damage the fastener. Use the correct tightening sequence and specifications when installing fasteners in order to avoid damage to parts and systems.
Tighten
Tighten the bolts to 55 N·m (40 lb ft).
Tighten
Tighten the bolts to 55 N·m (40 lb ft).
Tighten
Tighten the bolt to 55 N·m (40 lb ft).
Tighten
Tighten the bolt to 55 N·m (41 lb ft).
Tighten
Tighten the bolt to 55 N·m (40 lb ft).
