- Bend the differential adjuster nut lock tabs over the differential adjuster
nut sleeves, 8.25 inch axle - both sides, 9.25 inch axle -
right side.
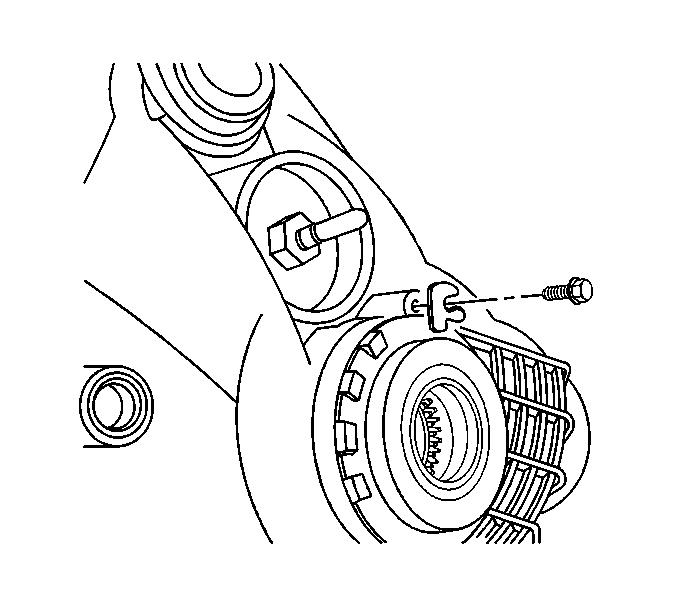
- Install the differential adjuster nut lock, 9.25 inch axle - left
side.
Notice: Refer to Fastener Notice in the Preface section.
- Install the differential adjuster nut lock bolt.
Tighten
Tighten the differential adjuster lock nut bolt to 20 N·m (15 lb ft).
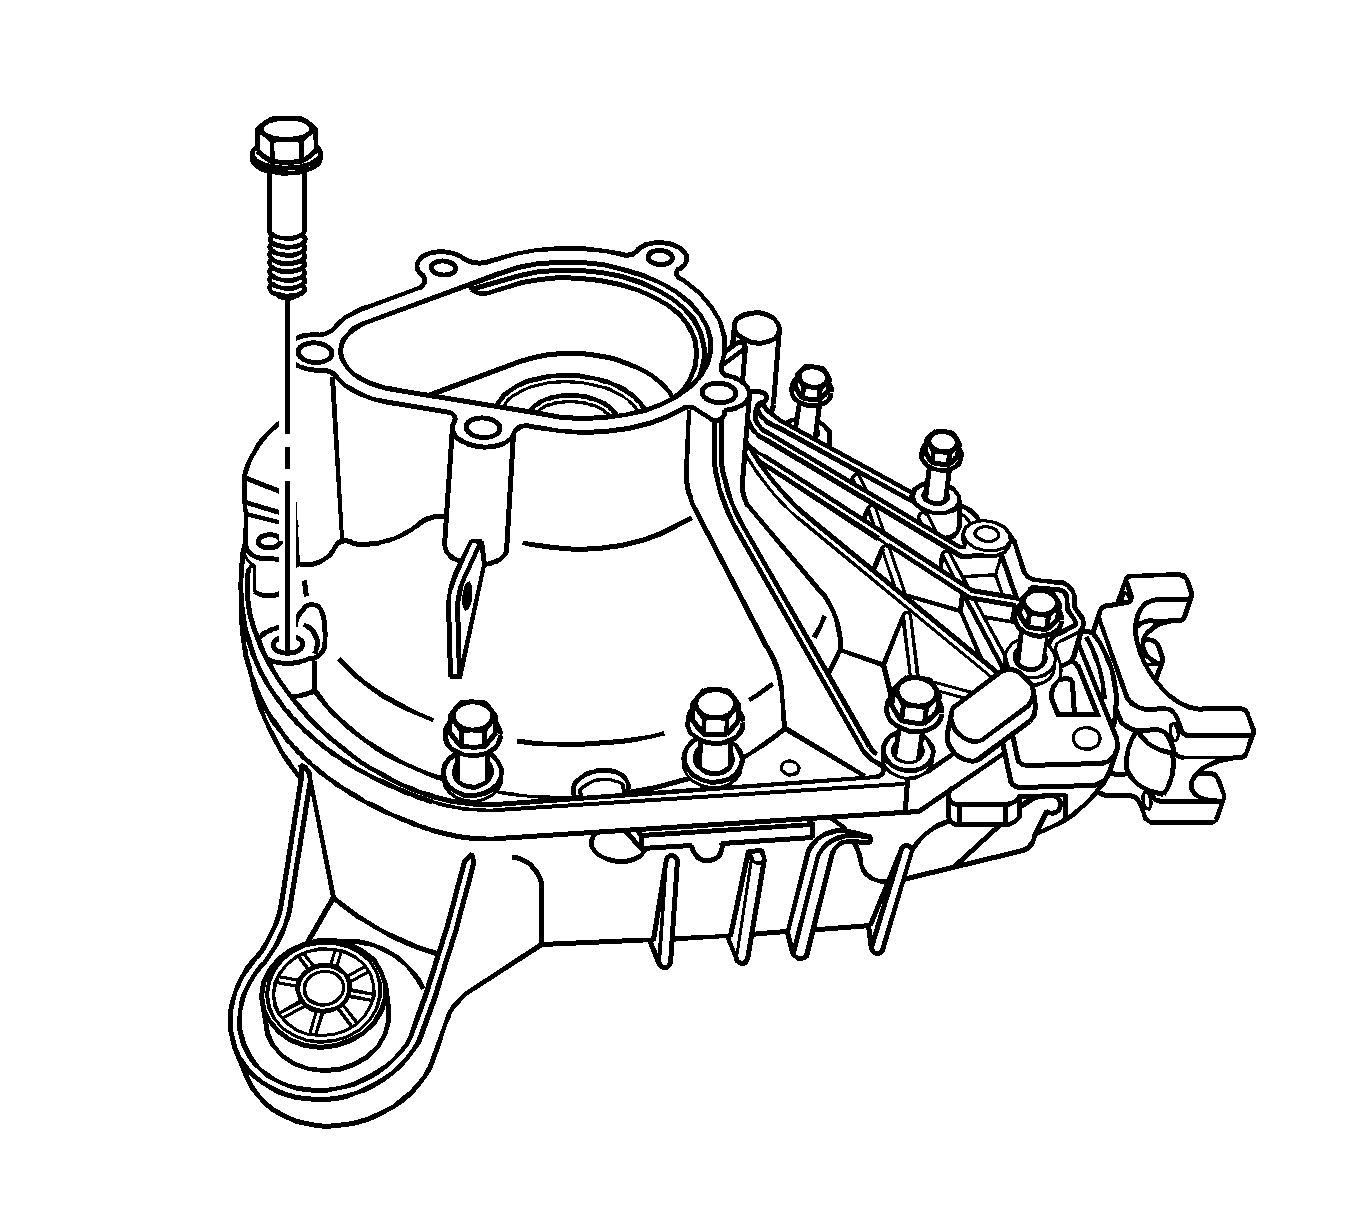
- Remove the differential carrier assembly
bolts.
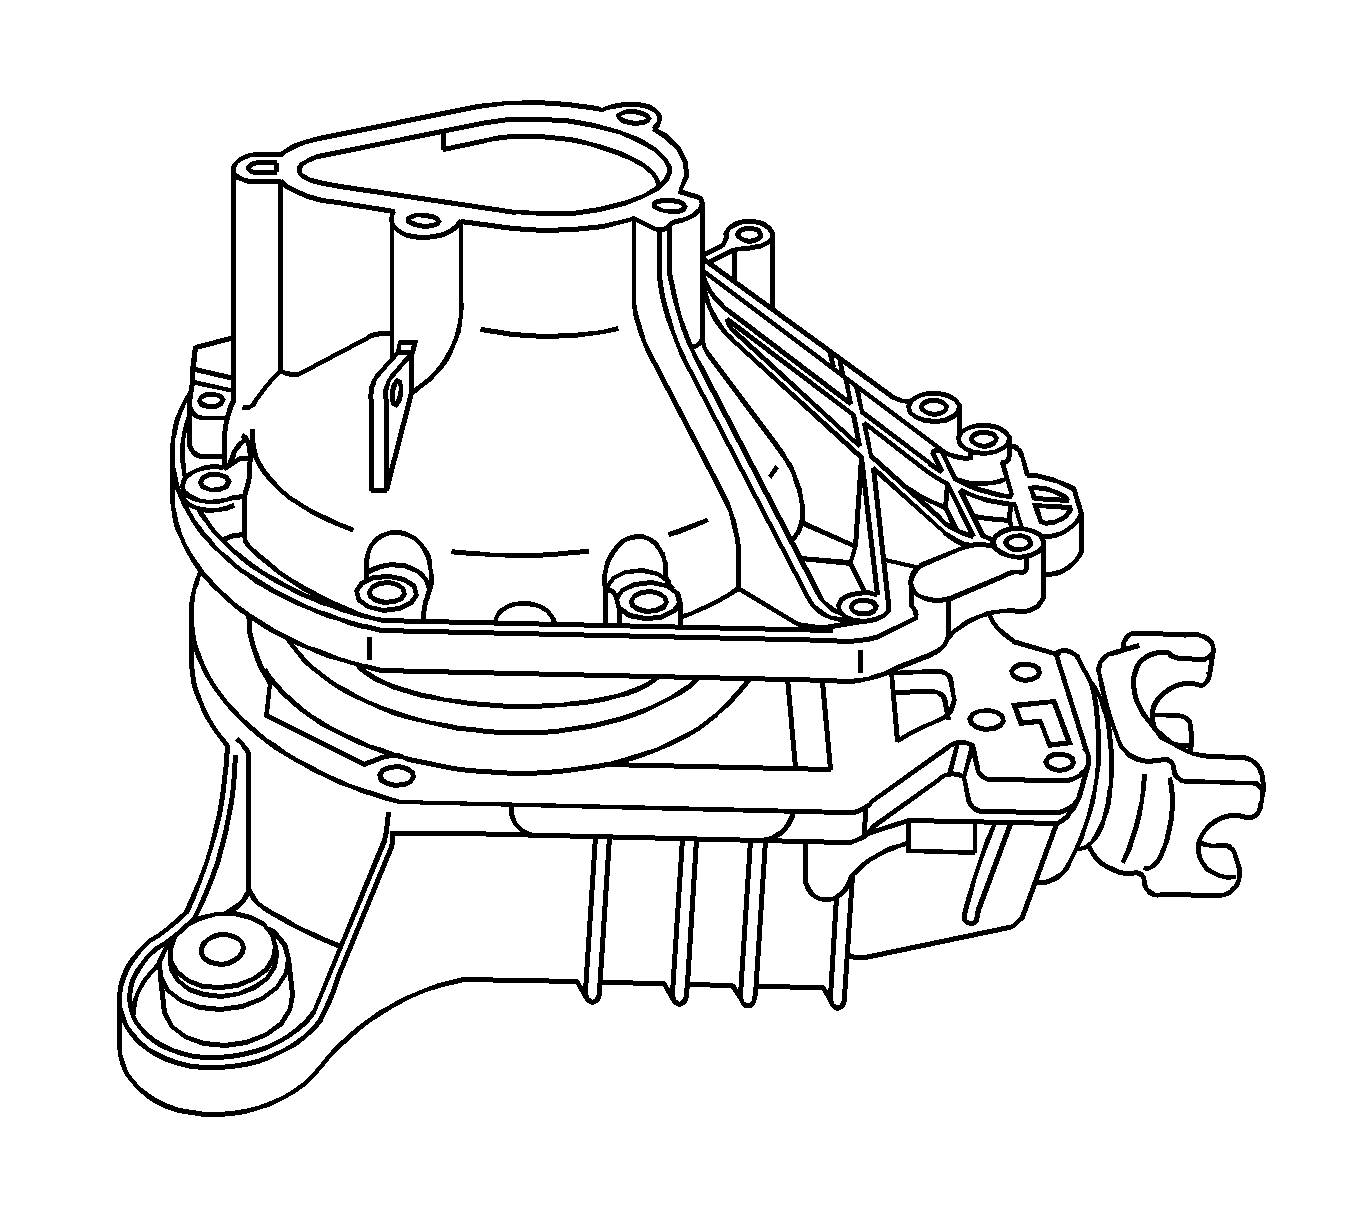
- Remove the right differential carrier case half.
- Clean the sealing surface of each half of the differential carrier case
and the inner axle housing to differential carrier assembly.
The surfaces must be clean of all the grease and the oil.
- Apply a bead of sealer to one differential carrier case half sealing surface.
Use the correct sealer. Refer to
Sealers, Adhesives, and Lubricants
.
- Install the right differential carrier case half.
- Install the differential carrier case bolts.
Tighten
Tighten the differential carrier case bolts to 47 N·m (35 lb ft).
- Lubricate the clutch shaft pilot bearing with axle lubricant. Use the
correct fluid. Refer to
Sealers, Adhesives, and Lubricants
.
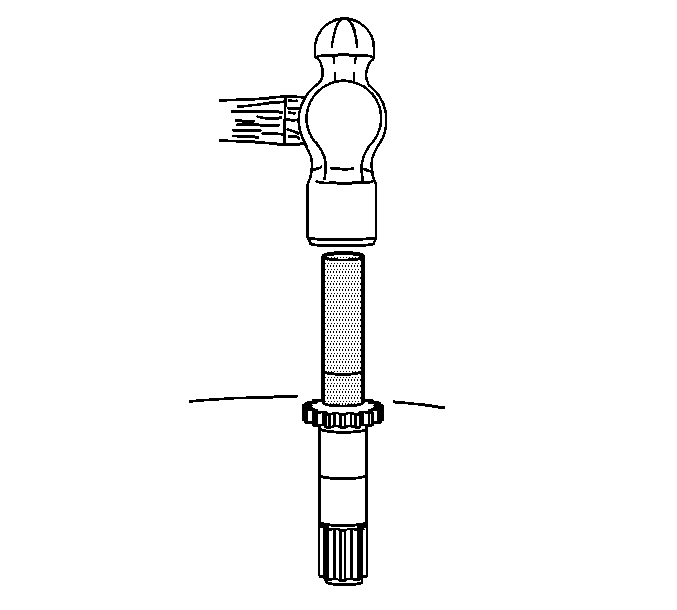
- Install
the clutch shaft pilot bearing using the J 33842
.
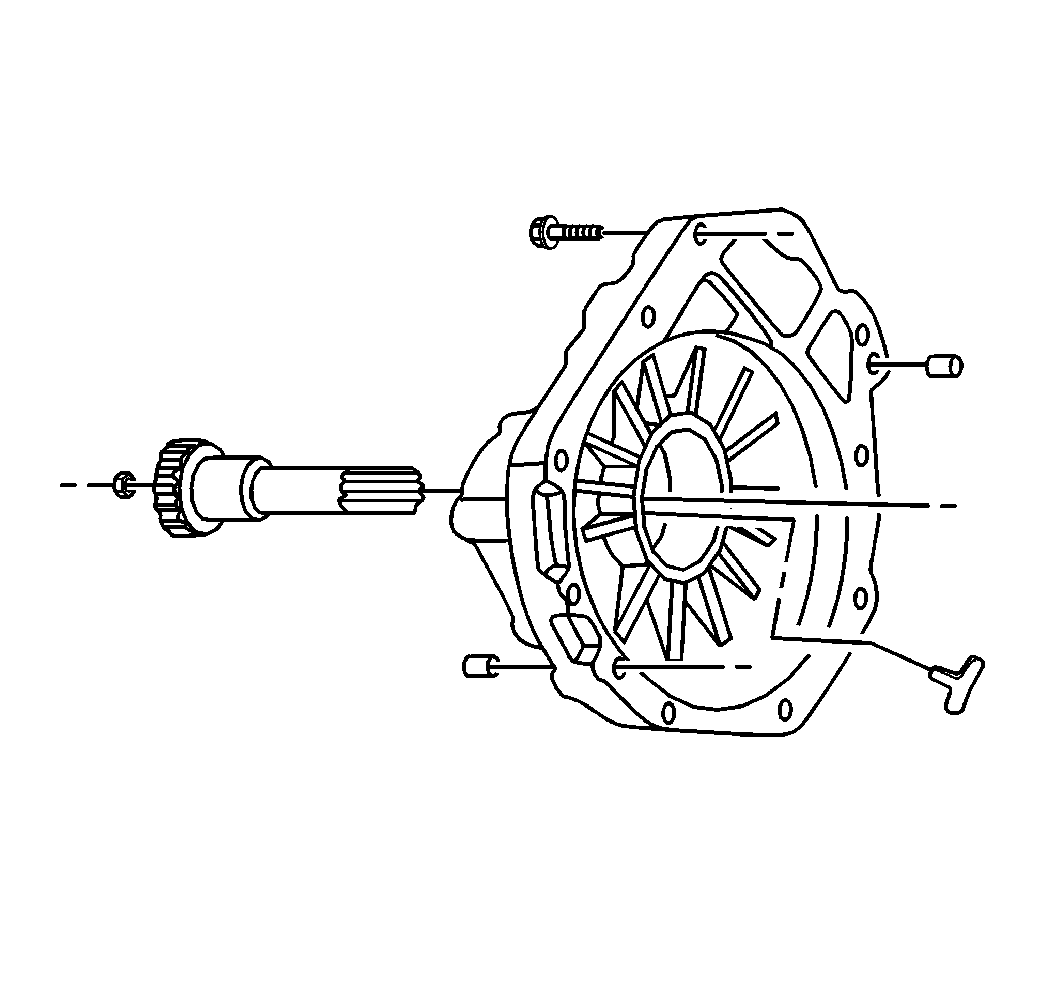
- Install the clutch shaft to the differential carrier case half.
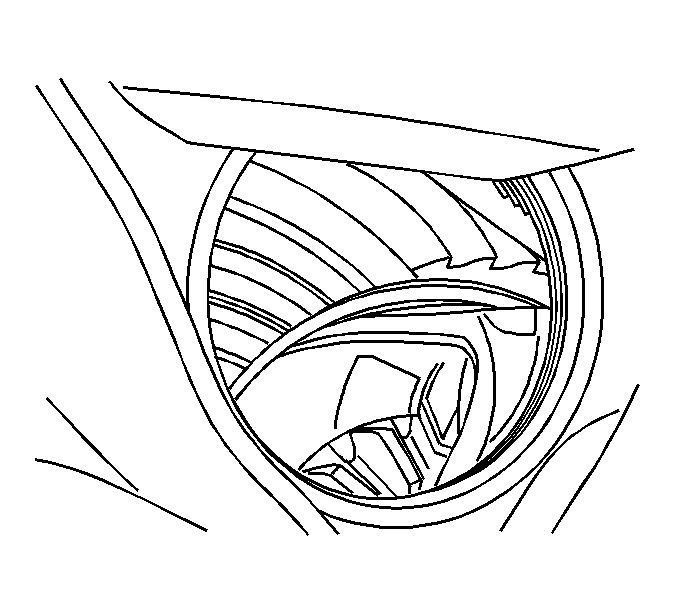
- For ratcheting style vent connectors, rotate
the pinion yoke until the differential case window can be seen through the vent hose
connector opening.
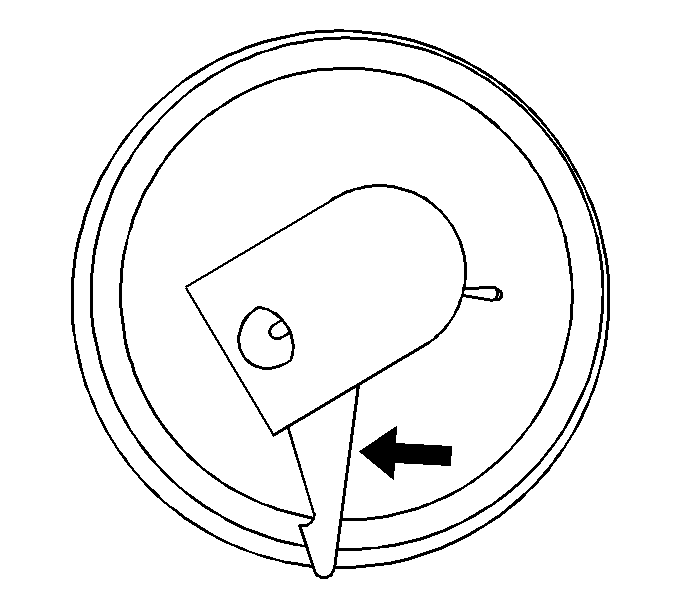
- Place the alignment arm of the vent hose
connector in the 6 o'clock position.
Notice: Refer to Component Fastener Tightening Notice in the Preface section.
- Install the vent hose connector with the alignment arm in the 6 o'clock
position into the vent hose connector opening.
Tighten
Tighten the vent hose connector to 28 N·m (21 lb ft).
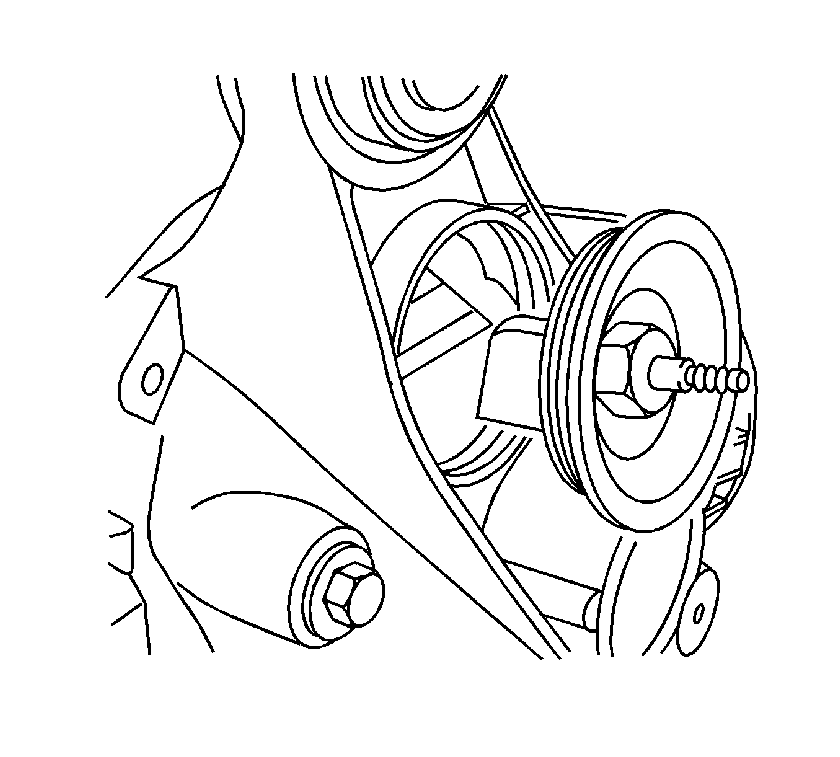
- For non-ratcheting style vent connectors,
install the vent hose connector.
Tighten
Tighten the vent hose connector to 28 N·m (21 lb ft).
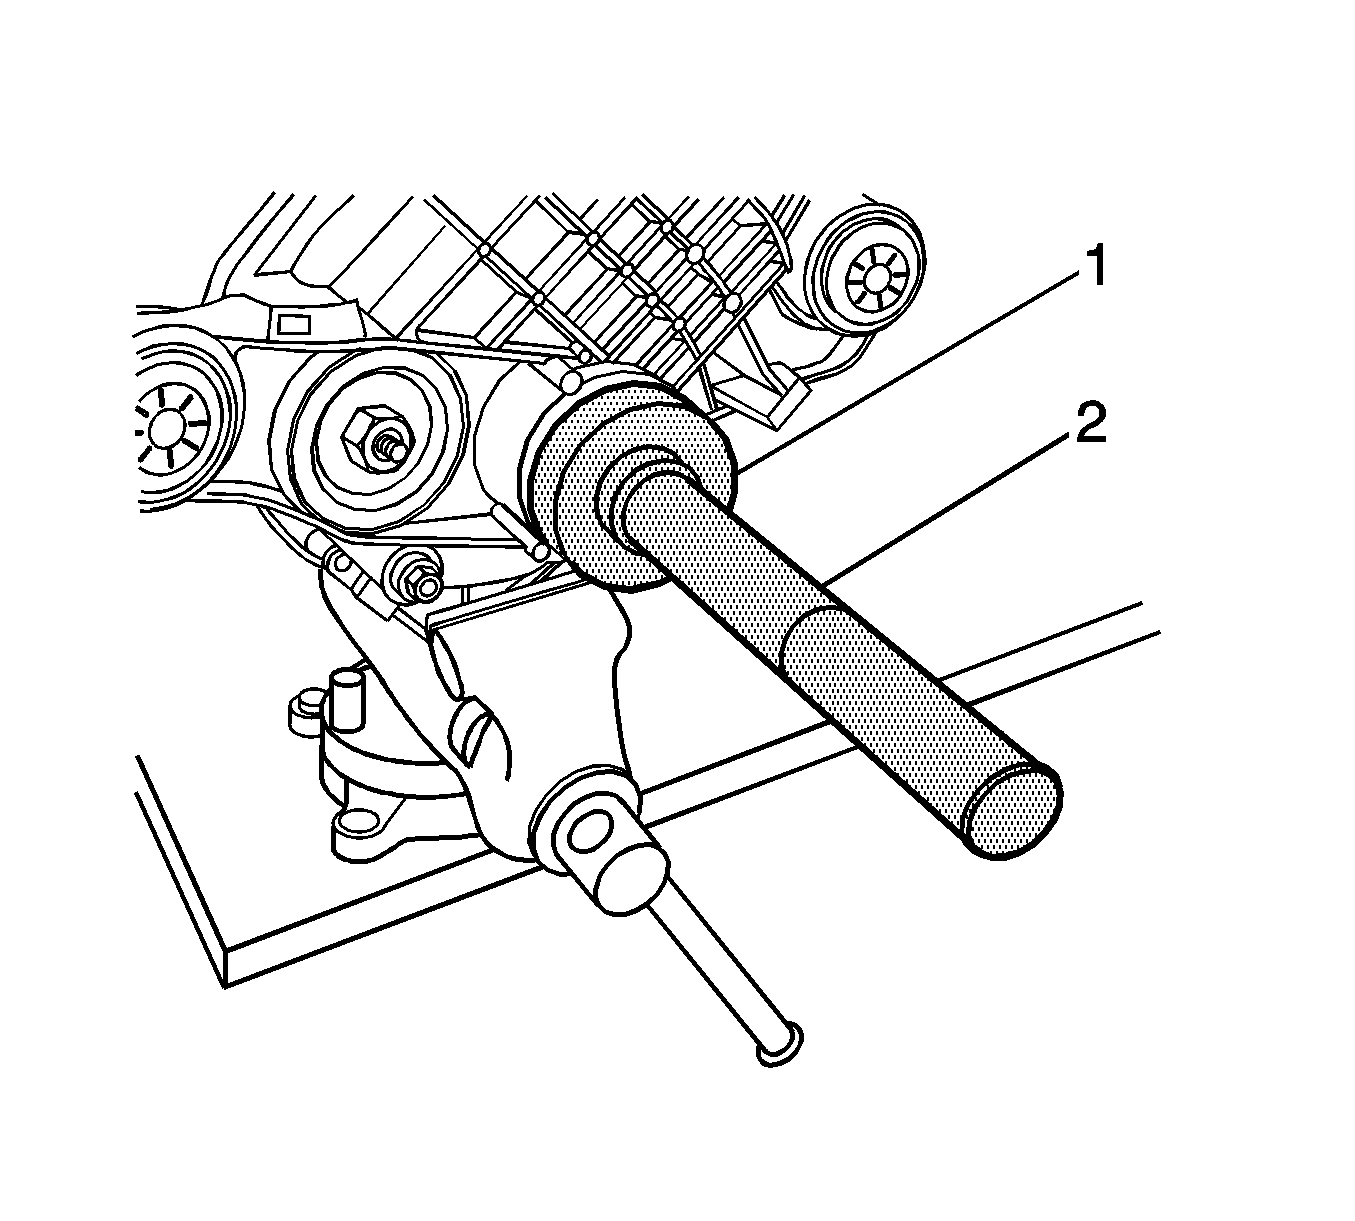
- Install the new left side axle shaft seal
using the J 45225
(1) and
the J 8092
(2).
- Install the new left side inner axle shaft retainer ring.
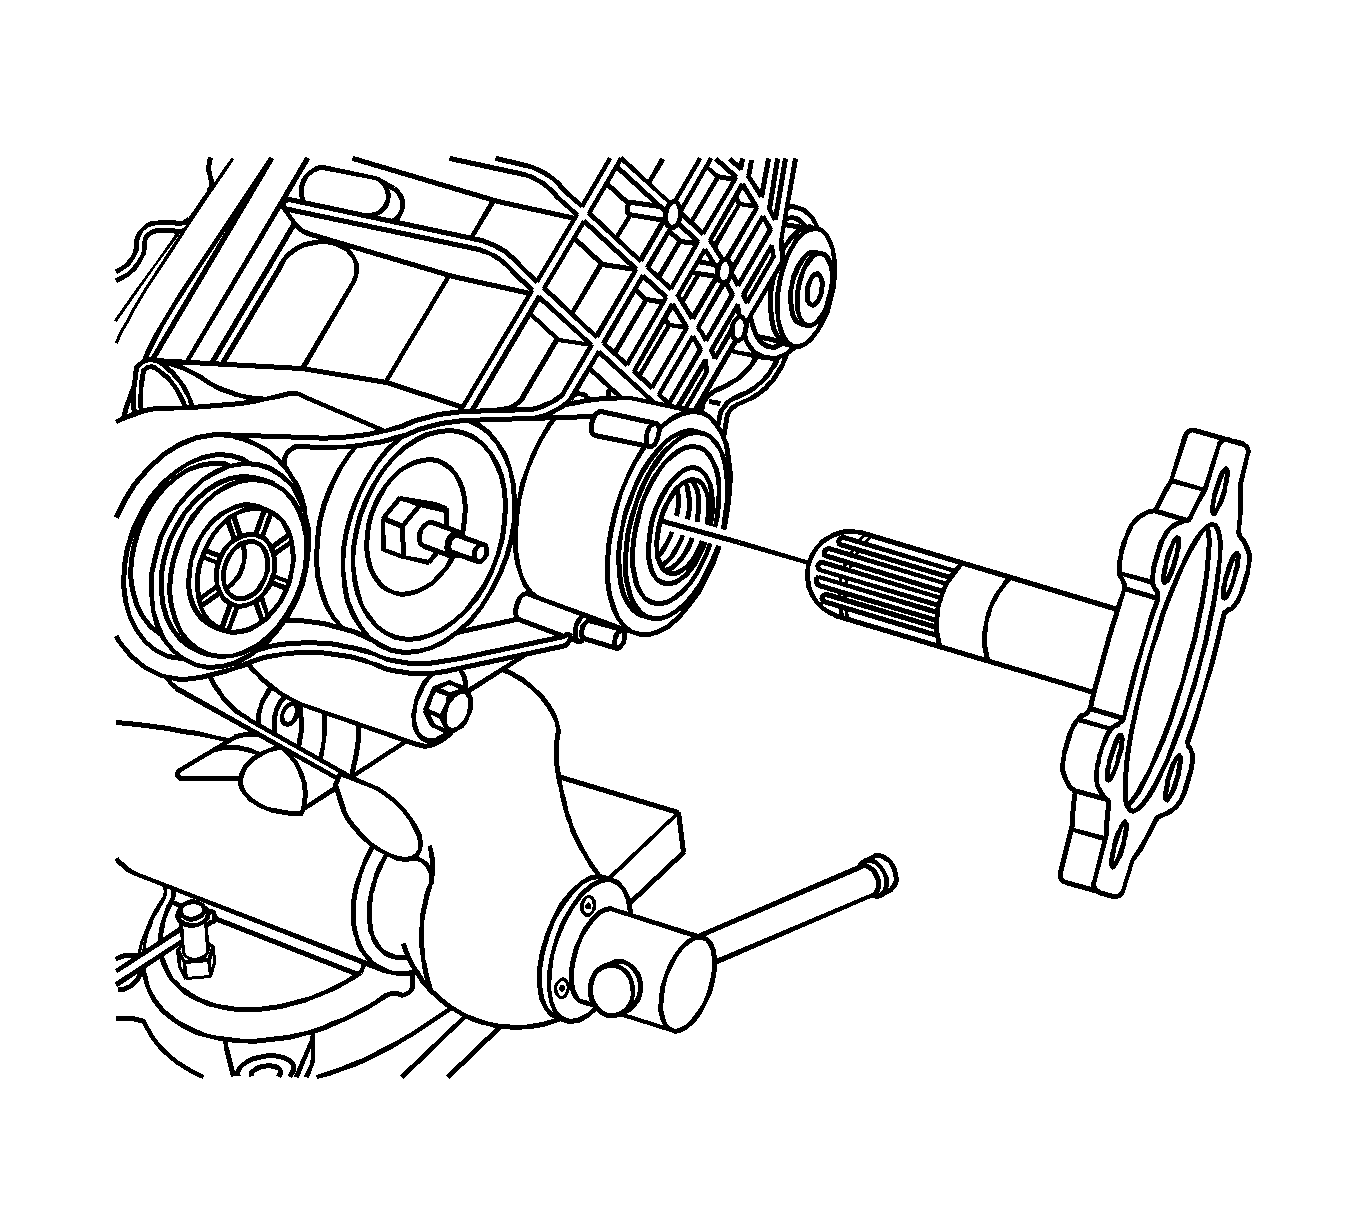
- Install the left side inner axle shaft by doing the following:
| 19.1. | Install the left side inner shaft into the differential carrier assembly
until the inner shaft is seated against the differential side gear. |
| 19.2. | While holding the inner shaft against the differential side gear, turn
the inner shaft in order to align the splines of the inner shaft with the splines
on the differential side gear. |
| 19.3. | Drive the inner shaft into the differential case side gear using a soft-faced
mallet until the retaining ring on the inner shaft is fully seated within the groove
in the differential case side gear. |
Pull back on the inner shaft to ensure that the inner shaft is properly retained
in the differential case side gear.
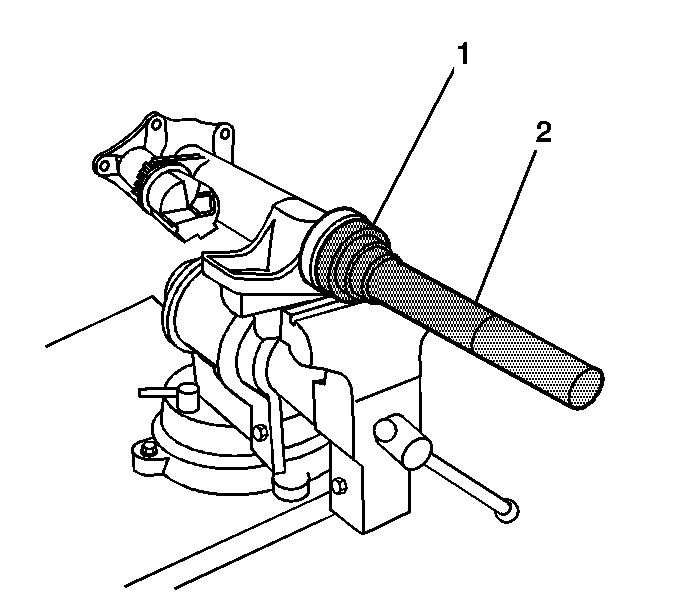
- Install the right side inner shaft bearing into the inner shaft housing by performing
the following steps:
| 20.1. | Install the inner axle shaft housing into a vise. |
Clamp only on the mounting flange of the inner axle shaft housing.
| 20.2. | Install the bearing with the square shoulder in using the J 36609
(1) and the J 8092
(2). |
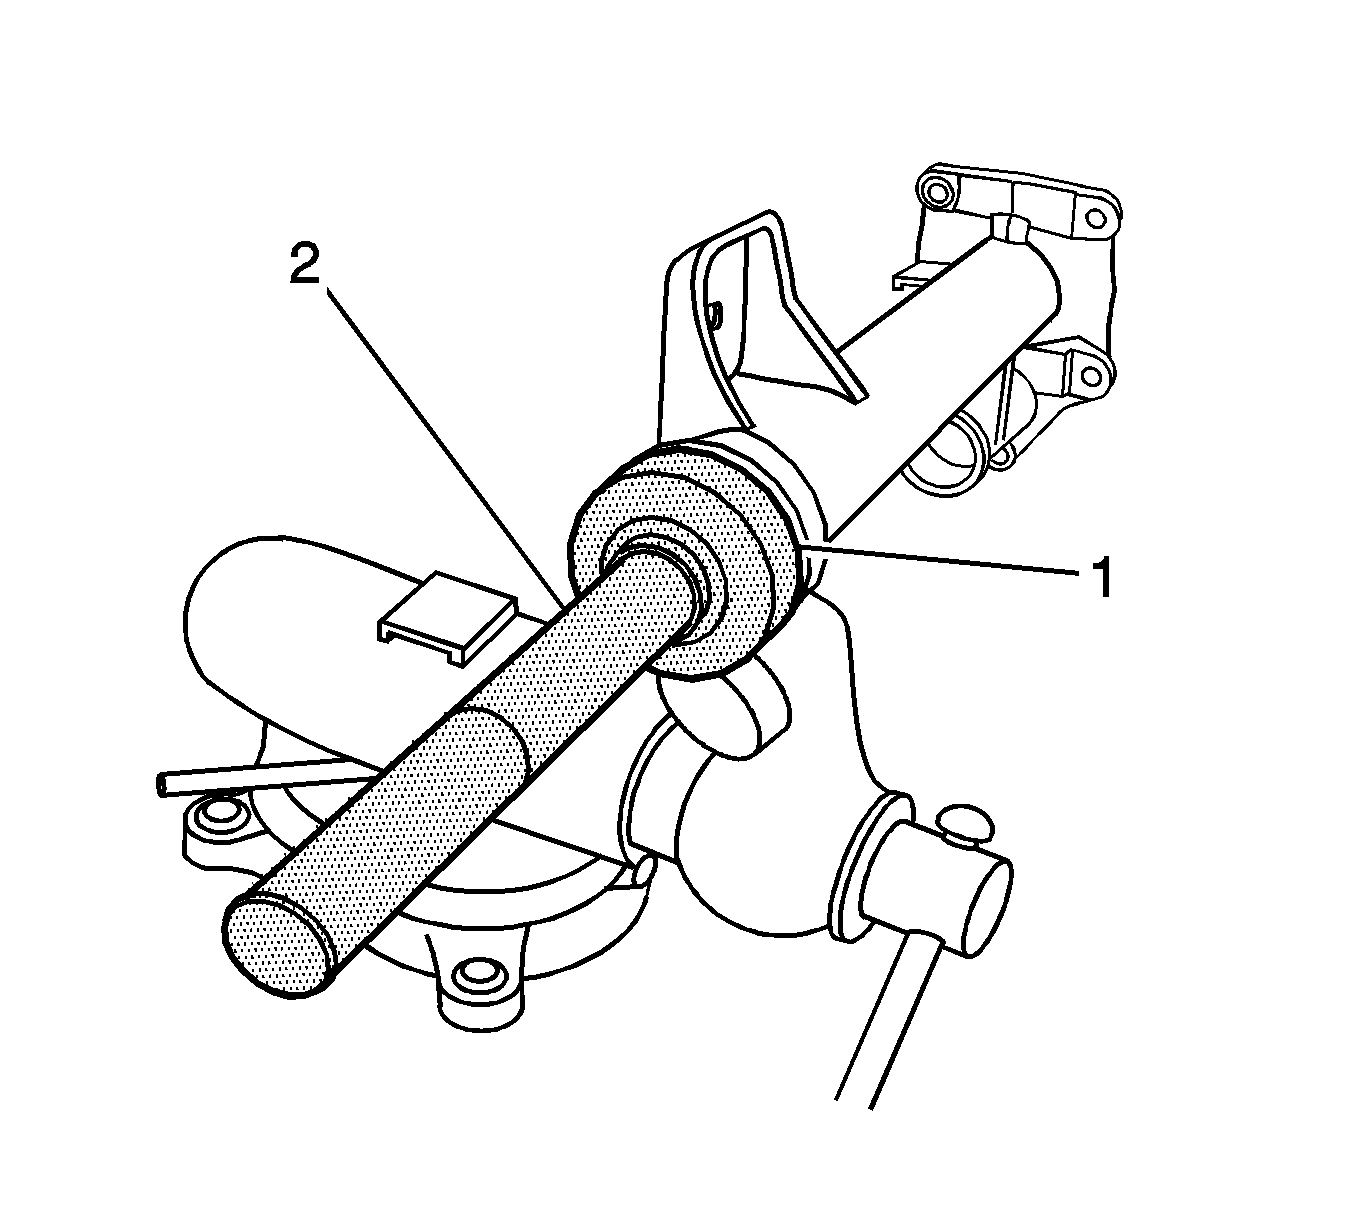
- Install the new right side inner axle shaft
seal using the J 45225
(1)
and the J 8092
(2).
- Install the inner axle shaft into the inner shaft housing.
Carefully tap the inner axle shaft into place with a soft-faced mallet.
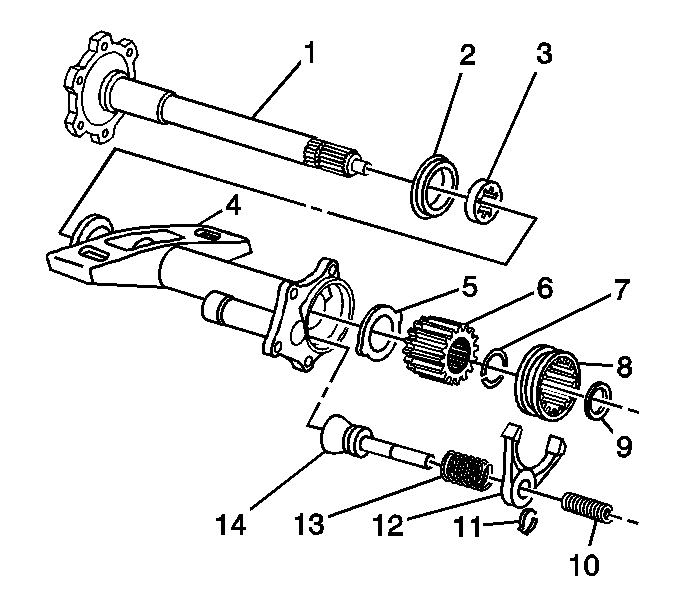
- For the 8.25 inch S4WD axle -
1st design, install the following components into the inner axle shaft housing:
| | Important: Use chassis grease in order to hold the thrust washer in place.
|
| 23.1. | The thrust washer (5) |
Ensure the tabs on the thrust washer are aligned with the slots in the inner
axle shaft housing (4).
| 23.2. | The retainer ring (7) into the clutch gear (6). |
| 23.3. | The clutch gear (6) onto the inner axle shaft (1). |
Drive the clutch gear into place with a plastic hammer.
| 23.5. | The clutch gear shim (9) |
| 23.6. | The clutch sleeve (8) |
| 23.7. | The clutch fork assembly (14, 13, 12, 11) |
| 23.8. | The clutch fork inner spring (10) into the differential carrier
case. |
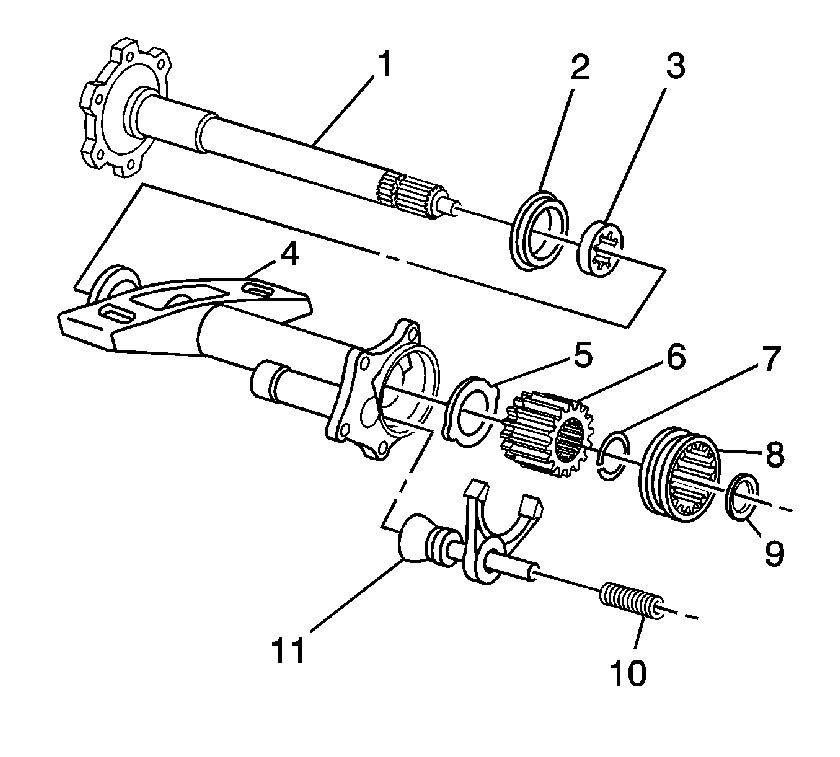
- For the 8.25 inch S4WD axle - 2nd design, assemble the following
components into the inner axle shaft housing:
| | Important: Use chassis grease in order to hold the thrust washer in place.
|
| 24.1. | Install the thrust washer (5) |
Ensure the tabs on the thrust washer are aligned with the slots in the inner
axle shaft housing (4).
| 24.2. | Install the new retainer ring (7) onto the clutch gear (6). |
| 24.3. | Install the clutch gear (6) onto the inner axle shaft (1). |
Drive the clutch gear into place with a plastic hammer.
| 24.5. | Install the clutch gear shim (9) |
| 24.6. | Install the clutch sleeve (8) |
| 24.7. | Install the clutch fork assembly (11) |
| 24.8. | Install the clutch fork inner spring (10) |
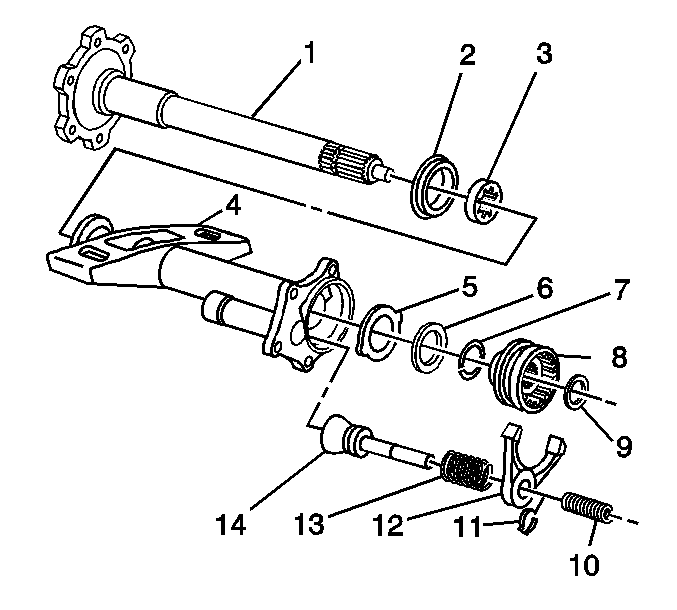
- For the 9.25 inch axle - 1st
design, install the following components into the inner axle shaft housing:
| | Important: Use chassis grease in order to hold the thrust washer in place.
|
| 25.1. | The thrust washer (5) |
Ensure the tabs on the thrust washer are aligned with the slot in the inner
axle shaft housing (4).
| 25.2. | The second thrust washer (6) |
| 25.3. | The retainer ring (7) onto the inner axle shaft (1). |
| 25.5. | The clutch gear shim (9) |
| 25.6. | The clutch sleeve (8) |
| 25.7. | The clutch fork assembly (14, 13, 12, 11) |
| 25.8. | The clutch fork inner spring (10) into the differential carrier
case. |
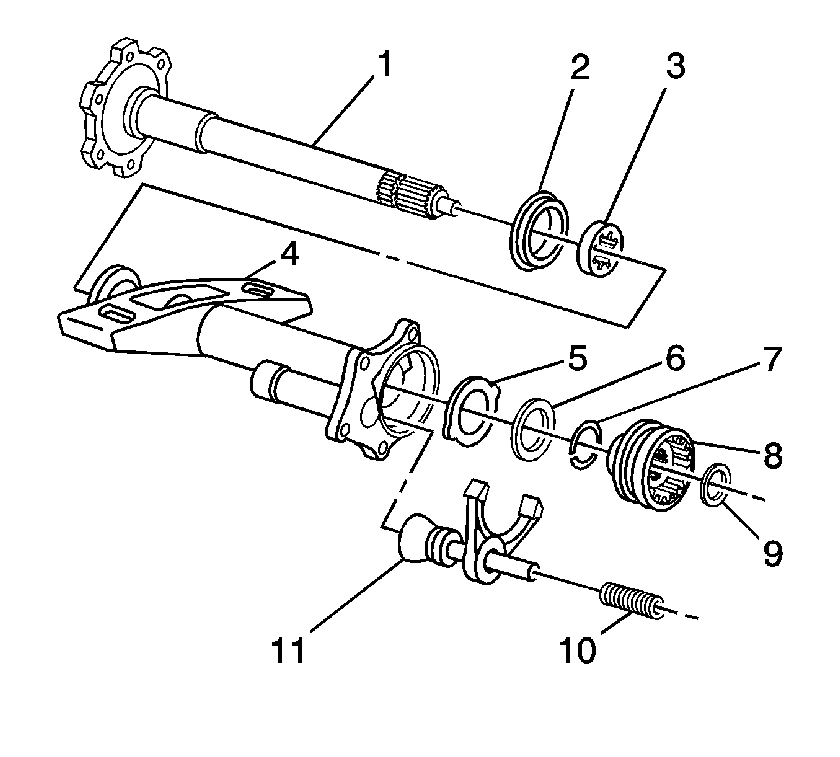
- For the 9.25 inch axle - 2nd design, install the following components
into the inner axle shaft housing:
| | Important: Use chassis grease in order to hold the thrust washer in place.
|
| 26.1. | Install the thrust washer (5) |
Ensure the tabs on the thrust washer are aligned with the slots in the inner
axle shaft housing.
| 26.2. | Install the second thrust washer (6) into the inner axle shaft
housing. |
| 26.3. | Install the new retainer ring (7) onto the inner axle shaft (1). |
| 26.5. | Install the clutch gear shim (9) |
| 26.6. | Install the clutch sleeve (8) |
| 26.7. | Install the clutch fork assembly (11) |
| 26.8. | Install the clutch fork inner spring (10) |
- Apply sealant to the inner axle housing to differential carrier sealing
surface. Use the correct sealer. Refer to
Sealers, Adhesives, and Lubricants
.
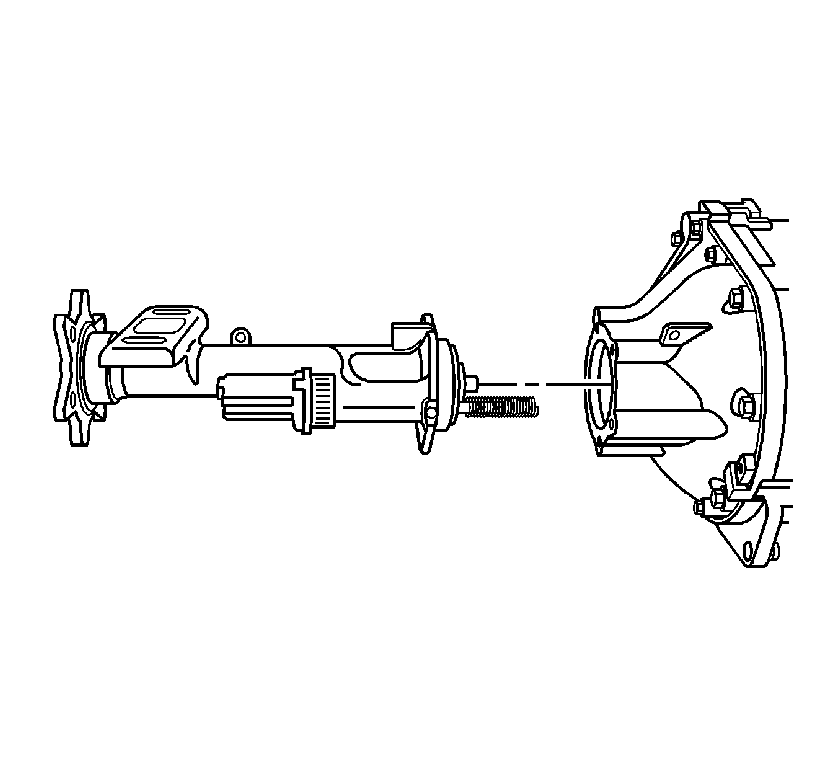
- Install the inner shaft housing to the differential
carrier assembly case.
- Install the inner shaft housing bolts.
Tighten
Tighten the inner shaft housing bolts to 40 N·m (30 lb ft).
- Install the drain plug and the washer.
- Install the fill plug and the washer.
Tighten
Tighten the drain plug and the fill plug to 33 N·m (24 lb ft).
Notice: Refer to Component Fastener Tightening Notice in the Preface section.
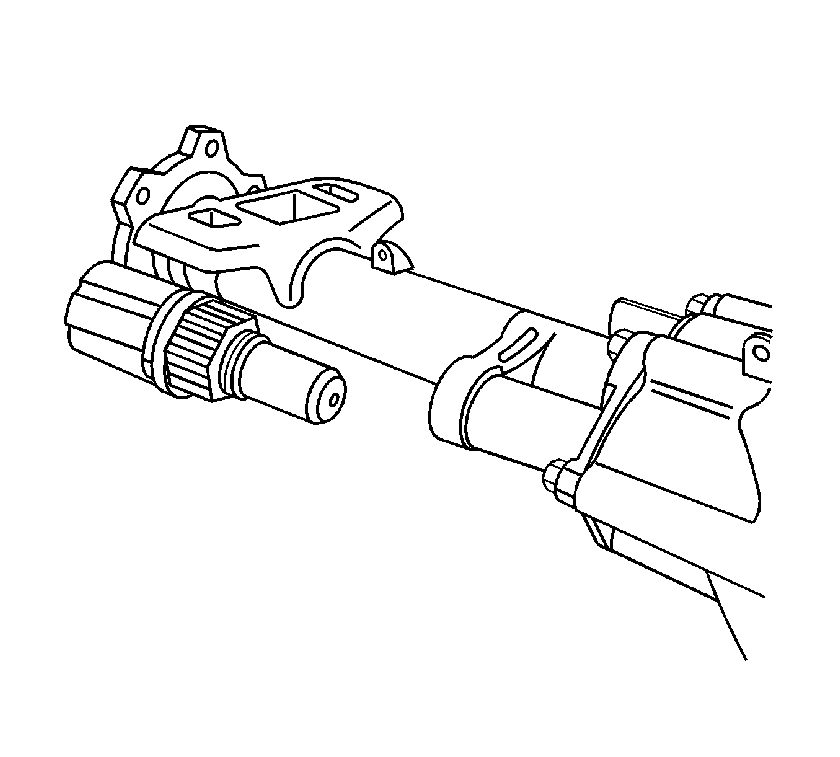
- Install the front drive axle actuator.
Apply sealant to the threads of the front axle actuator. Use the correct sealant.
Refer to
Sealers, Adhesives, and Lubricants
.
Tighten
Tighten the front drive axle actuator to 20 N·m (15 lb ft).
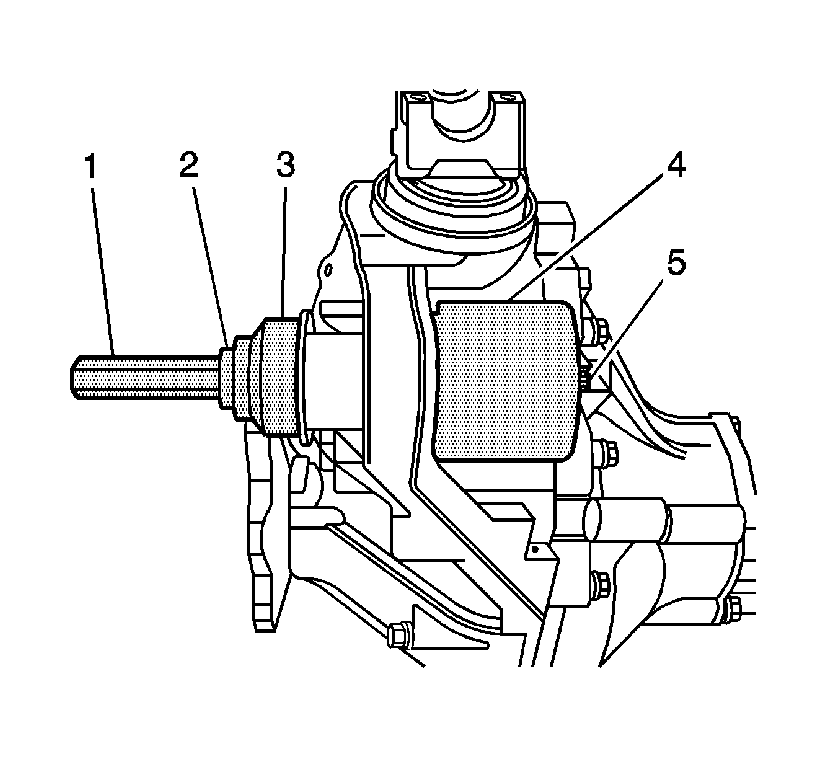
- Install the lower differential carrier assembly
bushing by performing the following steps:
| 33.1. | Install the J 21474-18 (1), the thrust bearing (2),
the J 36616-2 (3), the J 36616-1 (4), and the forcing
screw (5) as shown. |
| 33.2. | While holding the forcing screw, slowly tighten the J 21474-18
until the bushing has stopped against the step on the bushing and is centered within
the differential carrier assembly bushing bore. |
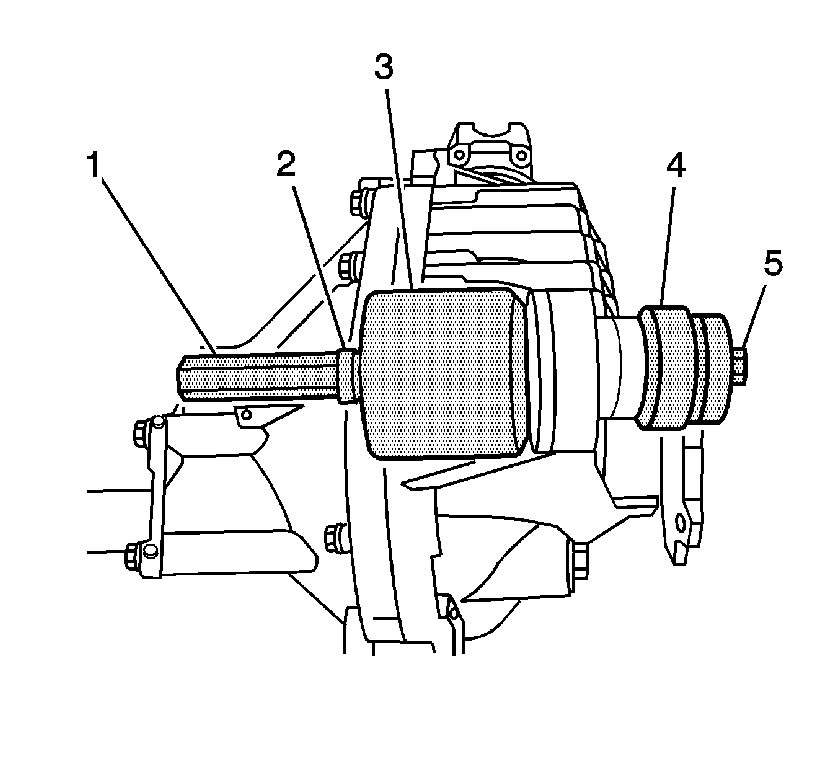
- Install the upper differential carrier assembly bushing by performing the following
steps:
| 34.1. | Install the J 21474-18 (1), the thrust bearing (2),
the J 36616-2 (3), the J 36616-1 (4), and the forcing
screw (5) as shown. |
| 34.2. | While holding the forcing screw, slowly tighten the J 21474-18
until the bushing has stopped against the step on the bushing and is centered within
the differential carrier assembly bushing bore. |
- Bend the differential adjuster nut lock tabs over the differential adjuster
nut sleeves.

- Remove the differential carrier assembly
bolts.

- Remove the right differential carrier case half.
- Clean the sealing surface of each half of the differential carrier case
and the inner axle housing to differential carrier assembly.
The surfaces must be clean of all the grease and the oil.
- Apply a bead of sealer to one differential carrier case half sealing surface.
Use the correct sealer. Refer to
Sealers, Adhesives, and Lubricants
.
- Install the right differential carrier case half.
Notice: Refer to Fastener Notice in the Preface section.
- Install the differential carrier case bolts.
Tighten
Tighten the differential carrier case bolts to 47 N·m (35 lb ft).

- For ratcheting style vent connectors, rotate
the pinion yoke until the differential case window can be seen through the vent hose
connector opening.

- Place the alignment arm of the vent hose
connector in the 6 o'clock position.
Notice: Refer to Component Fastener Tightening Notice in the Preface section.
- Install the vent hose connector with the alignment arm in the 6 o'clock
position into the vent hose connector opening.
Tighten
Tighten the vent hose connector to 28 N·m (21 lb ft).

- For non-ratcheting style vent connectors,
install the vent hose connector.
Tighten
Tighten the vent hose connector to 28 N·m (21 lb ft).
- Install the differential carrier assembly into a vise.

- Install the new left side axle shaft seal
using the J 45225
(1) and
the J 8092
(2).
- Install the new left side inner axle shaft retainer ring.

- Install the new left side axle shaft seal
using the J 45225
(1) and
the J 8092
(2).
- Install the new left side inner axle shaft retainer ring.

- Install the left side inner axle shaft by doing the following:
| 17.1. | Install the left side inner shaft into the differential carrier assembly
until the inner shaft is seated against the differential side gear. |
| 17.2. | While holding the inner shaft against the differential side gear, turn
the inner shaft in order to align the splines of the inner shaft with the splines
on the differential side gear. |
| 17.3. | Drive the inner shaft into the differential case side gear using a soft-faced
mallet until the retaining ring on the inner shaft is fully seated within the groove
in the differential case side gear. |
Pull back on the inner shaft to ensure that the inner shaft is properly retained
in the differential case side gear.

- Install the right side inner shaft bearing into the inner shaft housing by performing
the following steps:
| 18.1. | Install the inner axle shaft housing into a vise. |
Clamp only on the mounting flange of the inner axle shaft housing.
| 18.2. | Install the bearing with the square shoulder in using the J 36609
(1) and the J 8092
(2). |

- Install the new inner shaft seal using theJ 45225
(1) and the J 8092
(2).
- Apply sealant to the inner axle housing to differential carrier sealing
surface. Use the correct sealant. Refer to
Sealers, Adhesives, and Lubricants
.
- Install the inner shaft housing to the differential carrier assembly case.
- Install the inner shaft housing bolts.
Tighten
Tighten the inner axle shaft housing bolts to 40 N·m (30 lb ft).
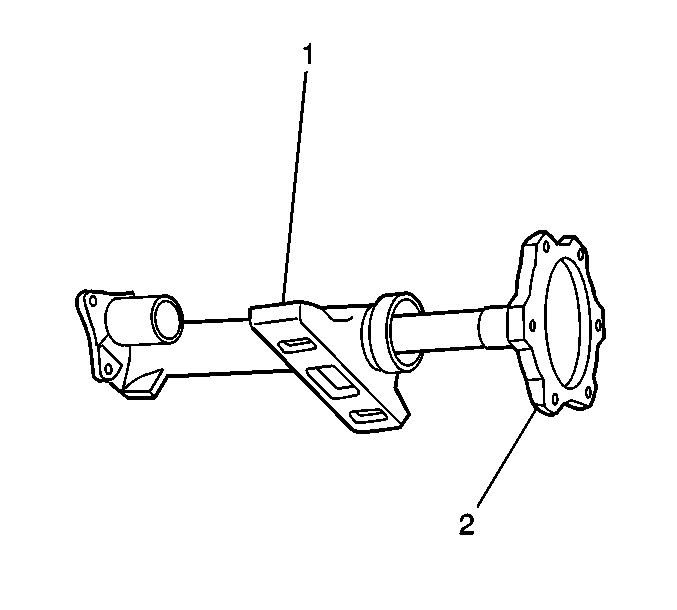
- Install the inner shaft (2) into
the inner shaft housing (1) by doing the following:
| 23.1. | Install the inner shaft into the inner axle shaft housing until the inner
shaft is seated against the differential side gear. |
| 23.2. | While holding the inner shaft against the differential side gear, turn
the inner shaft in order to align the splines of the inner shaft with the splines
on the differential side gear. |
| 23.3. | Drive the inner shaft into the differential case side gear using a soft-faced
mallet until the retaining ring on the inner shaft is fully seated within the groove
in the differential case side gear. |
Pull back on the inner shaft to ensure that the inner shaft is properly retained
in the differential case side gear.
- Install the drain plug and the washer.
- Install the fill plug and the washer.
Tighten
Tighten the drain plug and the fill plug to 33 N·m (24 lb ft).

- Install the lower differential carrier assembly
bushing by performing the following steps:
| 26.1. | Install the J 21474-18 (1), the thrust bearing (2),
the J 36616-2 (3), the J 36616-1 (4), and the forcing
screw (5) as shown. |
| 26.2. | While holding the forcing screw, slowly tighten the J 21474-18
until the bushing has stopped against the step on the bushing and is centered within
the differential carrier assembly bushing bore. |

- Install the upper differential carrier assembly bushing by performing the following
steps:
| 27.1. | Install the J 21474-18 (1), the thrust bearing (2),
the J 36616-2 (3), the J 36616-1 (4), and the forcing
screw (5) as shown. |
| 27.2. | While holding the forcing screw, slowly tighten the J 21474-18
until the bushing has stopped against the step on the bushing and is centered within
the differential carrier assembly bushing bore. |


