CAMPAIGN: SEAT BELT BUCKLE UNLATCH

THIS BULLETIN CANCELS AND REPLACES BULLETIN 5D27 ISSUED MARCH 1996. ALL COPIES OF 5D27 SHOULD BE DESTROYED.
THE SERVICE PROCEDURE HAS BEEN REVISED TO INCLUDE AN INSPECTION PROCEDURE. THE WARRANTY INFORMATION SECTION HAS BEEN REVISED TO ADD AN ADDITIONAL REPAIR CODE FOR INSPECTION ONLY AND NEW ART WORK HAS BEEN PROVIDED.
SUBJECT: SEAT BELT BUCKLE UNLATCH ------------------------
Models: 1994-1995 Chevrolet Silverado Extended Cab 1994-1995 GMC Sierra Extended Cab -------------------------------------------
TO: ALL GENERAL MOTORS DEALERS
--------------------------
General Motors of Canada Limited has decided that a defect, which relates to motor vehicle safety, exists in CERTAIN 1994-1995 Chevrolet Silverado and GMC Sierra Extended Cab pickups equipped with front seat belt assemblies having a double-loop energy-management system. A condition exists where in a frontal collision, ff both the lap-belt and shoulder-belt energy-management loops release at/or near the same time, acceleration forces can cause the buckle release mechanism to activate and allow the buckle to separate from the latch. If the buckle released, the system would fail to provide the appropriate occupant restraint performance. Additionally, a small number of vehicles equipped with light-duty naturally aspirated diesel engines (L49), which were built with straight (no energy-management loops) front seat belt systems before and after the larger suspect population, may not meet the HIC (Head Injury Criteria) requirements of CMVSS 208,"Seat Belt Installation." In the event of a vehicle crash, the occupants of these seats may not be properly restrained.
To correct these conditions, dealers will remove the stitching that creates the energy-management loop in the shoulder belt(s) on trucks with gas engines or 6.5L H.O. turbo diesel engines (L65, VIN Code "F"). For vehicles with light-duty 6.5L naturally aspirated diesel engines (L49) and light-duty 6.5L turbo diesel engines (L56), the retractor portion of the seat belt assembly/assemblies will be replaced with one having the newly designed energy-management twin-loop system.
VEHICLES INVOLVED:
Involved are CERTAIN 1994-1995 Chevrolet Silverado and GMC Sierra Extended Cab pickups built within the following VIN breakpoints:
Plant Year Model Plant Code From Through ---- ----- ------ ----- ---- -------
1994 GMC Sierra w/L49/L56 Pontiac East E SOP EOP 1994 GMC Sierra w/L49/L56 Oshawa 1 SOP EOP 1994 Chev Silverado w/L49/L56 Pontiac East E SOP EOP 1994 Chev Silverado w/L49/L56 Oshawa 1 SOP EOP 1994 GMC Sierra w/o L/49/L56 Pontiac East E RE502456 EOP 1994 GMC Sierra w/o L49/L56 Oshawa 1 R1503718 EOP 1994 Chev Silverado w/o L49/L566 Pontiac East E RE117069 EOP 1994 Chev Silverado w/o L49/L56 Oshawa 1 R1119186 EOP 1995 GMC Sierra w/L56 Pontiac East E SOP SE527015 1995 GMC Sierra w/L56 Oshawa 1 SOP S1550218 1995 Chev Silverado w/L56 Pontiac East E SOP SE201851 1995 Chev Silverado w/L56 Oshawa 1 SOP S1213496 1995 GMC Sierra w/L49 Pontiac East E SOP SE538031 1995 GMC Sierra w/L49 Oshawa 1 SOP S1570865 1995 Chev Silverado w/L49 Pontiac East E SOP SE243461 1995 Chev Silverado w/L/49 Oshawa 1 SOP S1258606 1995 GMC Sierra w/o L56/L49 Pontiac East E SOP SE527015 1995 GMC Sierra w/o L56/L49 Oshawa 1 SOP S1550218 1995 Chev Silverado w/o L56/L49 Pontiac East E SOP SE201851 1995 Chev Silverado w/o L56/L49 Oshawa 1 SOP S1213496
NOTE: PLEASE CHECK DCS SCREEN 445 OR YOUR V.I.N. LISTING BEFORE PERFORMING CAMPAIGN TO ENSURE THAT THE VEHICLE IS AFFECTED. ONLY AFFECTED VIN'S WELL BE PAID.
All affected vehicles have been identified by the VIN listing provided to involved dealers with this bulletin. Any dealer not receiving a listing was not shipped any of the affected vehicles.
DEALER CAMPAIGN RESPONSIBILITY:
All unsold new vehicles in dealer's possession and subject to this campaign must be held and inspected/repaired per the Service Procedure of this Campaign Bulletin before owners take possession of these vehicles.
Dealers are to perform this campaign on all involved vehicles at no charge to owners, regardless of kilometres traveled, age of vehicle, or ownership, from this time forward.
Owners of vehicles recently sold from your new vehicle inventory with no owner information indicated on the dealer listing, are to be contacted by the dealer, and arrangements made to make the required correction according to instructions contained in this bulletin. This could be done by mailing to such owners a copy of the owner letter accompanying this bulletin. Campaign follow-up cards should not be used for this purpose, since the owner may not as yet have received the notification letter.
In summary, whenever a vehicle subject to this campaign is taken into your new or used vehicle inventory, or is in your dealership for service in the future, please take the steps necessary to be sure the campaign correction has been made before selling or releasing the vehicle.
CAMPAIGN PROCEDURE:
Refer to Section 4 of the Service Policies and Procedures Manual for the detailed procedure on handling Product Campaigns. Dealers are requested to complete the campaign on all transfers as soon as possible.
OWNER NOTIFICATION:
All owners of record at the time of campaign release are shown on the attached computer listing and have been notified by first class mail from General Motors (see copy of owner letter included with this bulletin). The listings provided are for campaign activity only and should not be used for any other purpose.
PARTS INFORMATION:
NOTE: THERE WILL BE A SEPARATE DEALER LISTING FOR EACH COLOUR SEAT BELT. PLEASE ORDER PARTS BASED ON THESE LISTINGS.
Parts required to complete this campaign should be ordered through regular channels, as follows:
1994 AND 1995 SEAT BELT COVER RETAINING BUTTONS:
Part Number Description Quantity/Vehicle ----------- ----------- ---------------- 15738361 Seat Belt Cover Retaining Button, 1 Gray (131) 15738362 Seat Belt Cover Retaining Button, 1 Blue (241 and 261) 15738363 Seat Belt Cover Retaining Button, 1 Beige (64I) 15738364 Seat Belt Cover Retaining Button, 1 Red (471 and 79I)
1994 SEAT BELT RETRACTOR ASSEMBLY:
Part Number Description Quantity/Vehicle ----------- ----------- -----------------
12386367 Seat Belt Retractor Assembly, LH, 1 Gray (13I) 12386368 Seat Belt Retractor Assembly, RH, 1 Gray (13I) 12386369 Seat Belt Retractor Assembly, LH 1 Blue (24I) 12386370 Seat Belt Retractor Assembly, RH 1 Blue (24I) 12386371 Seat Belt Retractor Assembly, LH 1 Red (47I) 12386372 Seat Belt Retractor Assembly, RH. 1 Red (47I) 12386373 Seat Belt Retractor Assembly, LH, 1 Beige (641) 12386374 Seat Belt Retractor Assembly, RH 1 Beige (64I)
1995 SEAT BELT RETRACTOR ASSEMBLY:
Part Number Description Quantity/Vehicle ----------- ----------- ----------------
12384794 Seat Belt Retractor Assembly, 1 Gray (13I) 12384796 Seat Belt Retractor Assembly, 1 Blue (26I) 12384798 Seat Belt Retractor Assembly, 1 Beige (64I) 12384800 Seat Belt Retractor Assembly, 1 Red (79I)
NOTE: THREE SEAM RIPPER TOOLS HAVE BEEN SENT WITH THIS CAMPAIGN BULLETIN. ONE SEAM RIPPER WILL REPAIR TEN (10) VEHICLES. IF AN ADDITIONAL SEAM RIPPER TOOL IS NEEDED DUE TO BREAKAGE OR LOSS, CONTACT OSHAWA, BY FAX, AT 905-644-1563.
PARTS AND LABOUR CLAIM INFORMATION:
Credit for the campaign work performed will be paid upon receipt of a properly completed campaign claim card or DCS transmission in accordance with the following:
Repair Time Code Description Allowance ------ ----------- ----------
1A Inspect Seat Belt, No E-M Loop on Shoulder Harness .3
2A R & R Passenger Side Only Seat Belt Retractor .3
3A R & R Driver and Passenger Side Seat Belt Retractor .4
4A Remove Passenger Side EM Loop Stitching .4 and Install Button
5A Remove Driver and Passenger Side EM Loop Stitching .5 and Install Button
Time allowance includes 0. 1 hour for dealer administrative detail associated with this campaign. Parts credit will be based on dealer net plus 40% to cover parts handling.
SERVICE PROCEDURE:
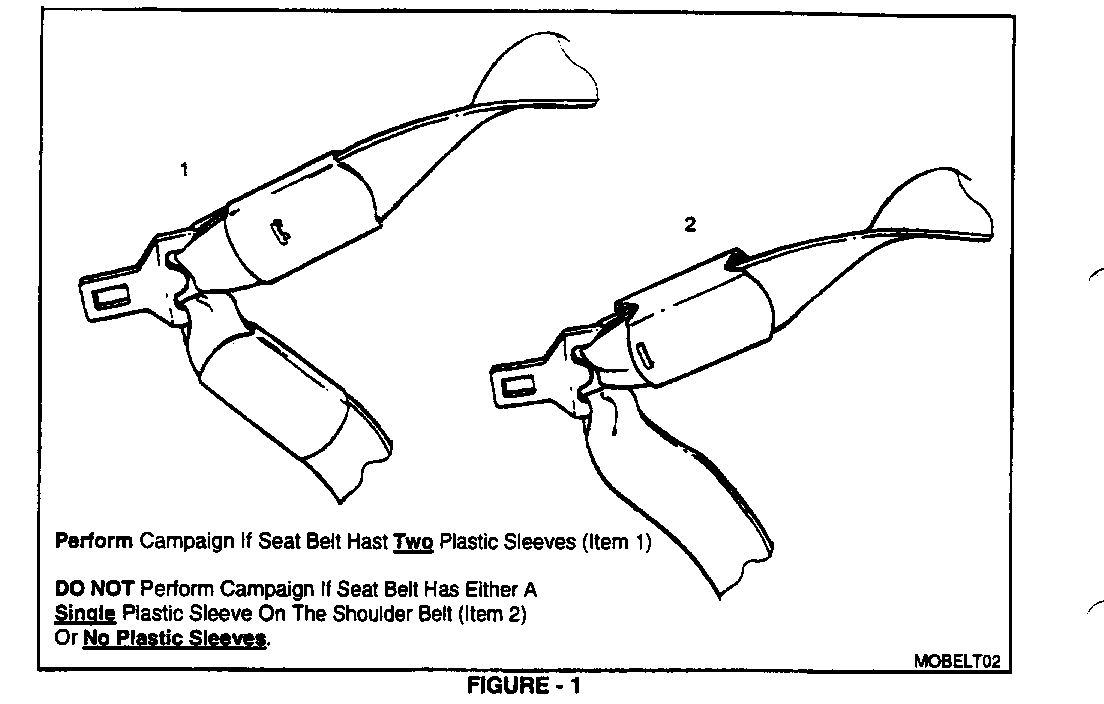
The vehicles involved have front seat belt assemblies that have an energy management loop system which are covered by a plastic sleeve. To properly identify the retractor assemblies that are involved in the bulletin, follow the inspection procedure listed below.
1. Open the driver/passenger door. Locate the seat belt retractor assembly portion of the seat belt (installed at the "B" pillar).
- For the retractor assembly that has 2 plastic sleeves attached to the shoulder as well as the lap belt webbing (Figure 1, Item 1), continue on in the bulletin for proper service procedures that need to be performed.
- For the retractor assemblies that have a single plastic sleeve on the shoulder belt webbing only, or has no plastic sleeves (Figure 1, Item 2), NO REPAIR IS REQUIRED. A Campaign Identification Label should be installed at this time.
SERVICE PROCEDURE "A" - For 1994-1995 C/K With RPO L49, (VIN Code P) and RPO L56, (VIN Code S) Diesel Engines Only
This procedure addresses removing the Seat Belt Retractor Assembly only on 1994-1995 C/K With RPO L49, (VIN Code P) and RPO L56, (VIN Code S) Diesel Engines Only:
o For 1994 models: Replace both Driver and Passenger Side Retractor Assembly.
o For 1995 models: Replace the Passenger Side Retractor Assembly ONLY.
Retractor Removal Procedure:
FIGURE 1
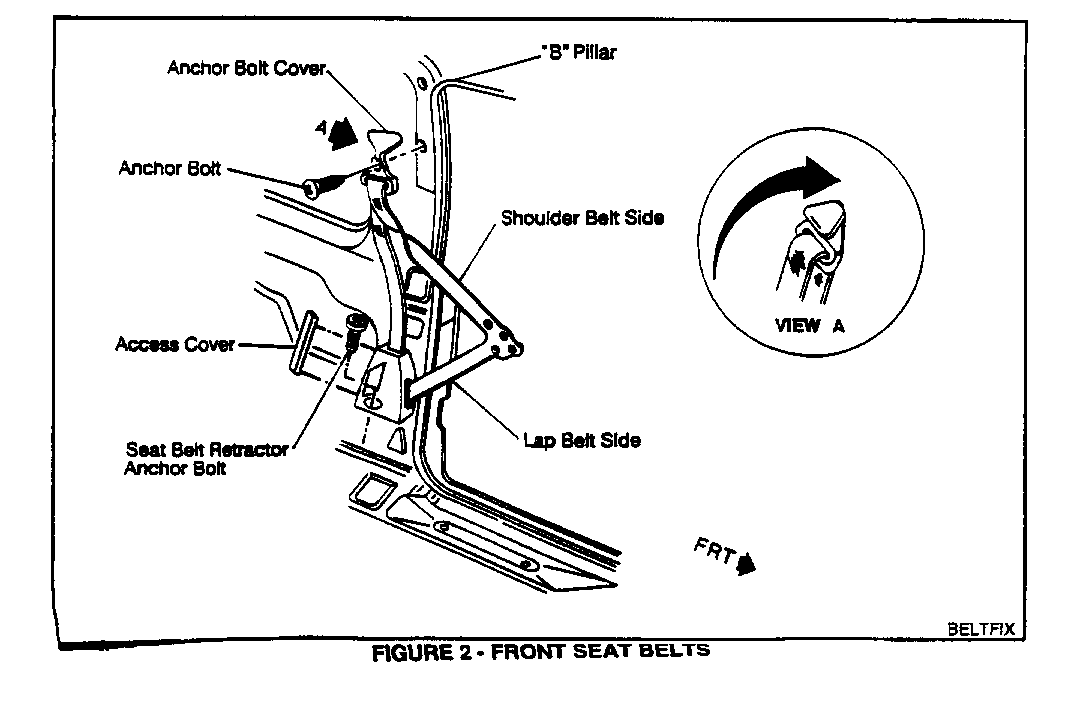
1. Remove the anchor bolt cover from the door "B" pillar anchor plate. The cover swings bottom upward.
2. Remove anchor bolt from door "B" pillar weld nut.
3. Remove the anchor bolt retaining the seat belt retractor to the floor. To access the bolt, remove the access cover on the back side of retractor. This cover is removed from the top and is swung outward.
4. Remove the retractor/belt assembly.
Installation Procedure:
1. Install retractor system to the floor. When installing the anchor bolt, start the bolt by hand to ensure that the bolt is threaded straight. After bolt has been started, torque bolt to 55 N.m (41 lbs. ft.). Close the cover.
IMPORTANT: Before attaching the anchor plate to the door "B" pillar, make sure that the seat belt webbing is not twisted.
2. Install anchor bolt through the anchor plate and washer. When installing anchor bolt into weld nut located at the "B" pillar, start the bolt by hand to ensure that the bolt is threaded straight. After bolt has been started, tighten bolt and torque bolt to 55 N.m (41 lbs. ft.).
3. Install cover over the door "B" pillar anchor plate.
4. Install Campaign Identification Label.
SERVICE PROCEDURE "B": - For 1994-1995 C/K With Any Gas Engine, Or L65 H.O. 6.5L Turbo (VIN Code F) Diesel Engines
This procedure addresses removal of stitching from the Energy Management (EM) loop, in the shoulder belt side of the seat belt assembly on 1994-1995 C/K With Any Gas Engine, Or L65 H.O. 6.5L Turbo (VIN Code F) Diesel Engine. This procedure MUST NOT be done to the lap belt side.
o For 1994 models: Remove stitching from only the shoulder belt EM loop on both the Driver and Passenger seat belt assemblies.
o For 1995 models: Remove stitching from the shoulder belt EM loop on the Passenger seat belt assembly ONLY
IMPORTANT: Care must be taken when removing the EM loop stitching. The actual seat belt webbing material must not be cut. Remove all excess stitching from webbing when cutting is completed.
Stitching Removal Procedure:
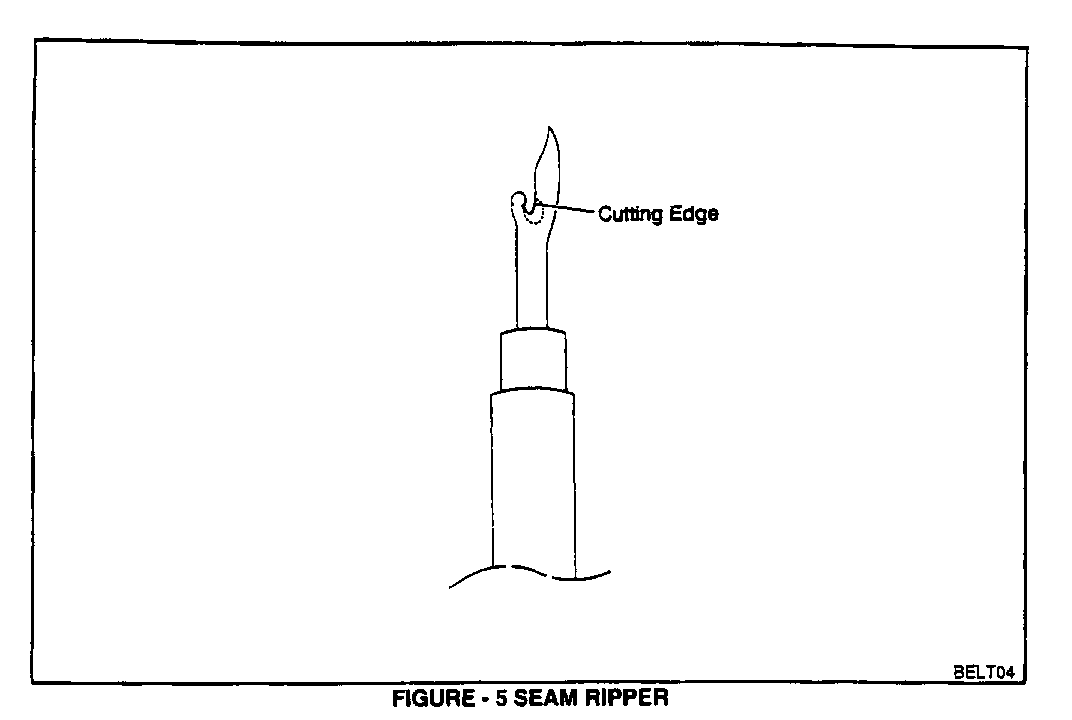
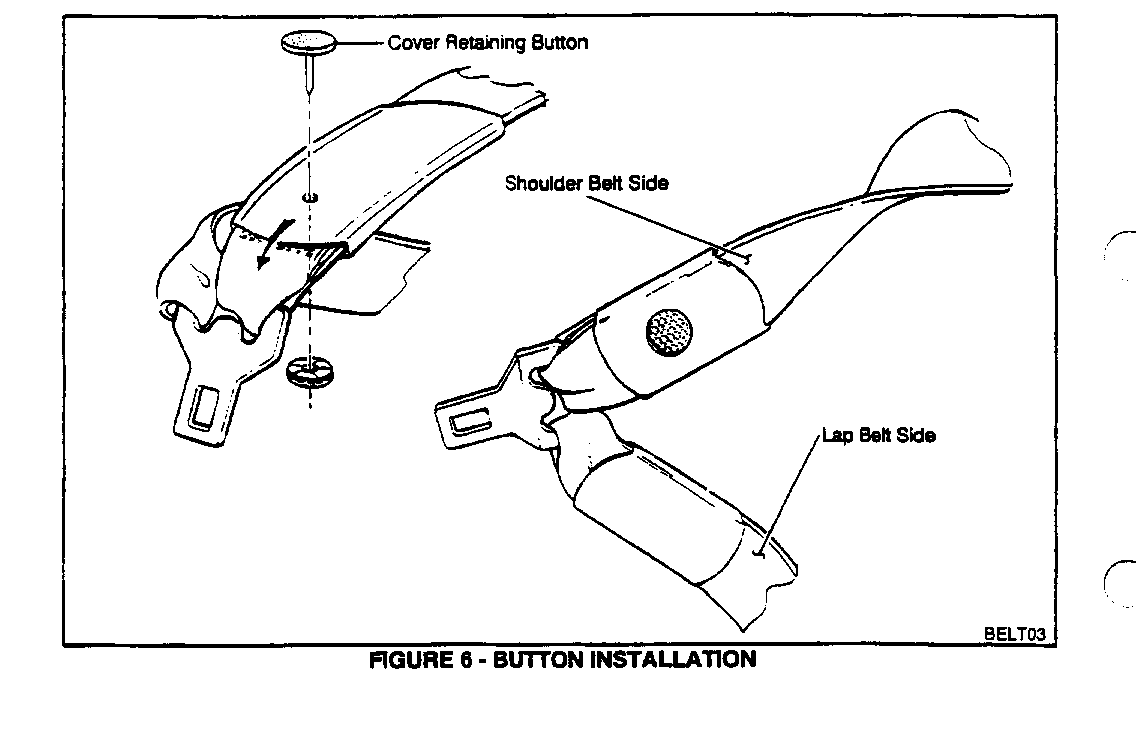
FIGURES 2,3,4,5
It is not necessary to remove the retractor assembly from the truck for this procedure.
1. Extend the seat belt from the retractor.
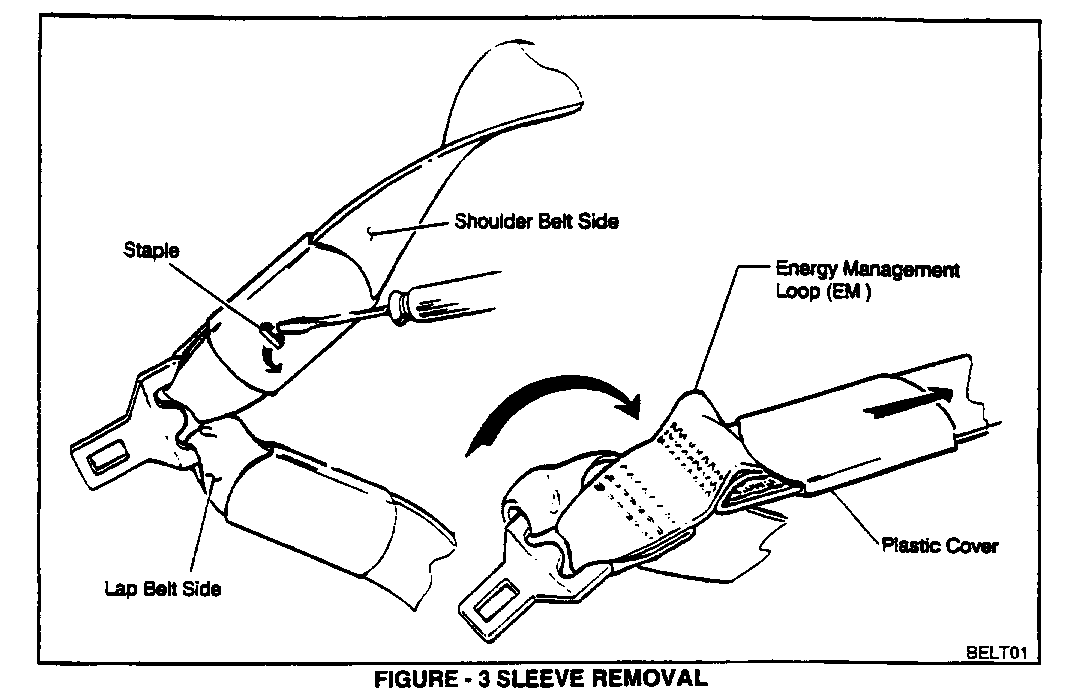
2. Remove the small staple retaining the plastic cover to the webbing by inserting a small flat blade screwdriver under staple and lifting it (Figure 2).
3. Slide the plastic cover back (Figure 2) to reveal the EM loop and Yellow Warning Label (Figure 3).
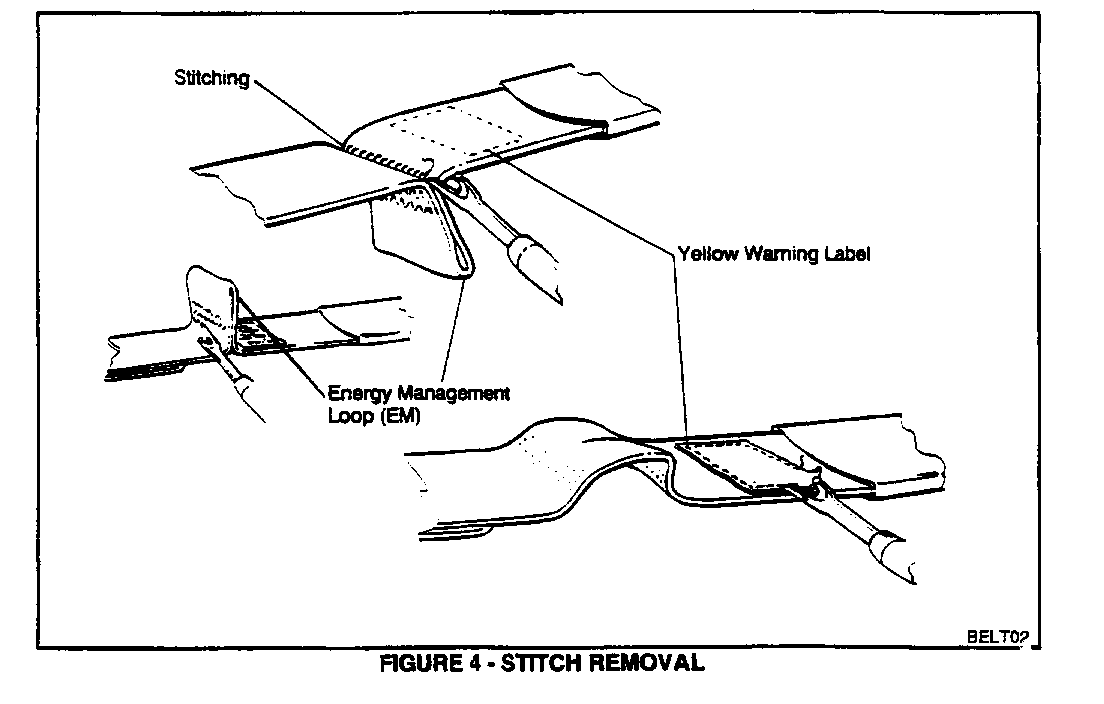
4. Using the seam ripping tool provided with this campaign (Figure 4), cut each stitch and remove the thread from the three rows of stitching that make up the EM loop. DO NOT use an X-acto blade to cut the stitching. DO NOT cut, tear, or snag the seat belt webbing material. If the webbing material has been cut or damaged, the retractor assembly should be replaced.
IMPORTANT: The seam ripper is designed for the purpose of removing stitching. The ripping tool has a point at the tip that allows the tool to stretch/lift the stitch and apply force to allow the cutting edge of the tool to cut the stitch and not the webbing. The cutting edge of the tool is located in the centre portion of the tool in the curved area. This allows the tool to cut the stitch properly. DO NOT pull up on tool while cutting, possible damage to the tool or possible injury may result. The tool should be pushed toward the stitch for proper cutting.
5. Remove the stitching from the yellow Warning Label and discard label. No replacement label is required.
6. Relocate the plastic cover back to its original position and fasten plastic cover to the webbing with a new cover retaining button (Figure 5). Push button through the hole created by the staple. If necessary, use a small pointed punch to create a hole in the cover opposite the staple hole.
7. Install Campaign Identification Label.
INSTALLATION OF CAMPAIGN IDENTIFICATION LABEL
Clean surface of radiator upper mounting panel and apply a Campaign Identification Label. Make sure the correct campaign number is inserted on the label. This will indicate that the campaign has been completed.
March 1996
Dear General Motors Customer:
General Motors of Canada Limited has decided that a defect, which relates to motor vehicle safety, exists in CERTAIN 1994-1995 Chevrolet Silverado and GMC Sierra Extended Cab pickups equipped with front seat belt assemblies having a double loop energy-management system. A condition expists where in a frontal collision, if both the lab-belt and shoulder-belt energy-management loops release at/or near the same time, acceleration forces can cause the buckle release mechanism to activate and allow the buckle to separate from the latch. If the buckle released, the system would fail to provide the appropriate occupant restraint performance. Additionally, a small number these vehicles equipped light-duty naturally aspirated diesel engines, (L49), which were built with straight (no energy-management loops) front seat belt systems before and after the larger suspect population, may not meet the HIC (Heady Injury Criteria) requirements of CMVSS 208, "Seat Belt Installation" In the event of a vehicle crash, the occupants of these seats may not be properly restrained.
To correct these conditions, your dealer will remove the stitching that creates the energy-management loop in the shoulder belt(s) on trucks with gas engines on 6.5L H.O. turbo diesel engines. For vehicles with light duty 6.5L naturally aspirated diesel engines and light duty 6.5L turbo diesel engines, the retractor portion of the seat belt assembly/assemblies will be replaced with one having the newly designed energy-management twin-loop system.
This service will be provided for you at no charge.
Please contact your GM dealer as soon as possible to arrange a service date.
If parts are required, ask your dealer for details regarding their availability. If parts are not in stock, they can be ordered before scheduling your service date.
This letter identifies your vehicle. Presentation of this letter to your dealer will assist their Service personnel in completing the necessary correction to your vehicle in the shortest possible time.
We are sorry to cause you this inconvenience; however, we have taken this action in the interest of your continued satisfaction with our products.
Customer Support Department General Motors of Canada Limited
General Motors bulletins are intended for use by professional technicians, not a "do-it-yourselfer". They are written to inform those technicians of conditions that may occur on some vehicles, or to provide information that could assist in the proper service of a vehicle. Properly trained technicians have the equipment, tools, safety instructions and know-how to do a job properly and safely. If a condition is described, do not assume that the bulletin applies to your vehicle, or that your vehicle will have that condition. See a General Motors dealer servicing your brand of General Motors vehicle for information on whether your vehicle may benefit from the information.
