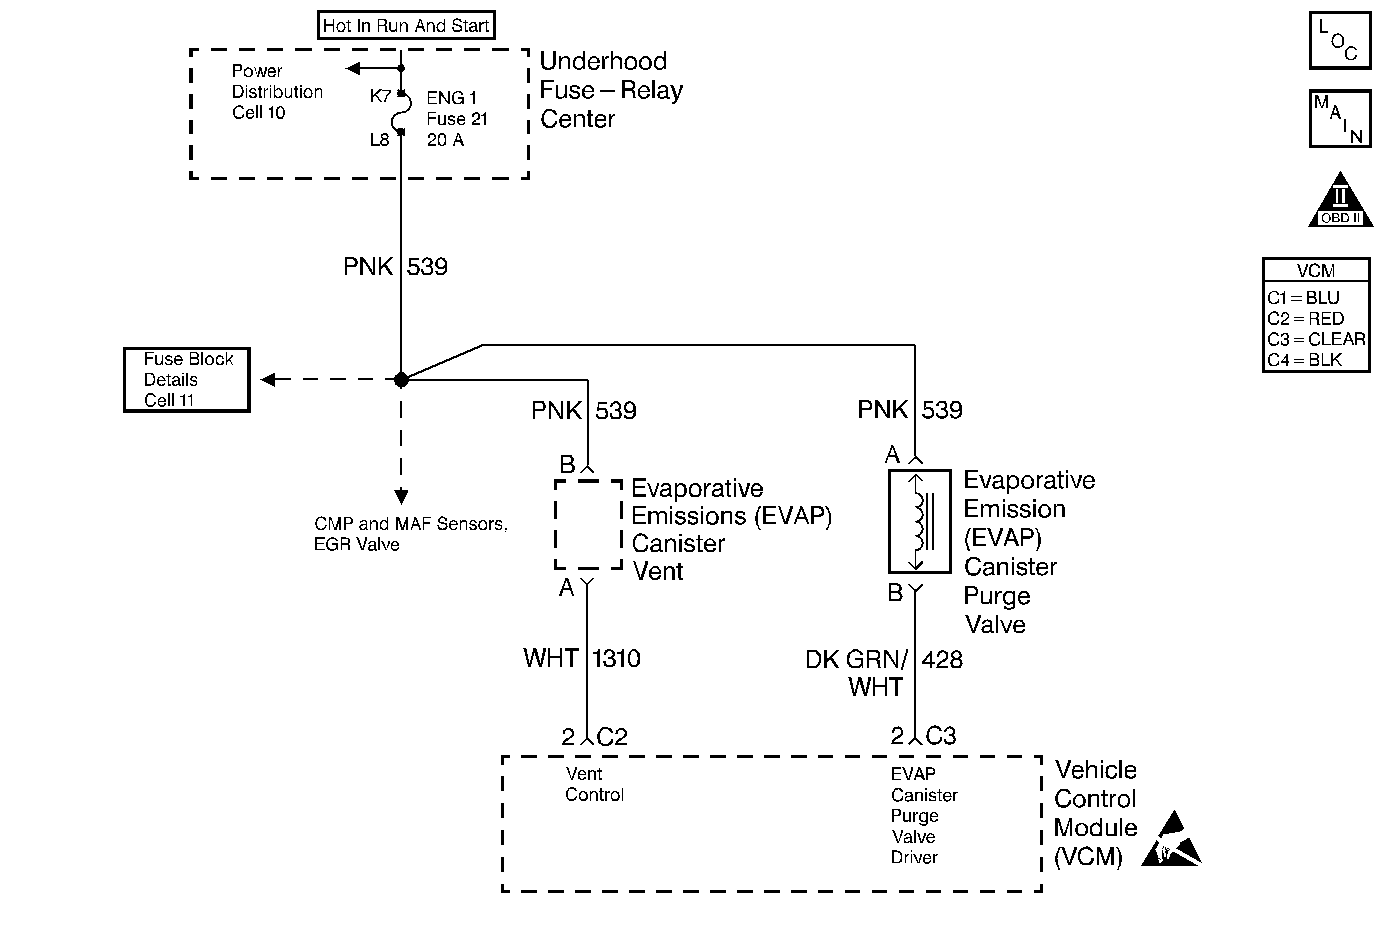
Circuit Description
The evaporative system includes the following components:
| • | The fuel tank |
| • | The EVAP vent solenoid |
| • | The fuel tank pressure sensor |
| • | The fuel pipes and hoses |
| • | The vapor lines |
| • | The fuel cap |
| • | The evaporative emission canister |
| • | The purge lines |
| • | The EVAP purge solenoid |
The evaporative leak detection diagnostic strategy is based on applying the vacuum to the EVAP system and monitoring the vacuum decay. The VCM monitors the vacuum level via the fuel tank pressure sensor input. At an appropriate time, the EVAP purge solenoid and the EVAP vent solenoid turn ON, allowing the engine vacuum to draw a small vacuum on the entire evaporative emission system. If a sufficient vacuum level cannot be achieved, a large leak or a malfunctioning EVAP purge solenoid is indicated. The following conditions can be reasons for an EVAP system malfunction:
| • | A missing, damaged, improperly installed, or loose fuel cap |
| • | A disconnected or damaged fuel tank pressure sensor |
| • | A disconnected, damaged, pinched, or blocked EVAP purge line |
| • | A disconnected or damaged EVAP vent hose |
| • | A disconnected, damaged, pinched, or blocked fuel tank vapor line |
| • | A disconnected or damaged EVAP purge solenoid |
| • | A disconnected or damaged EVAP vent solenoid |
| • | An open ignition feed or ground circuit to the EVAP vent or purge solenoid |
| • | A damaged EVAP canister |
| • | A leaking fuel sender assembly O-ring |
| • | A leaking fuel tank or fuel filler neck |
Diagnostic Aids
Check for the following conditions:
| • | A loose, missing, damaged, or improperly installed fuel cap |
| • | Missing or damaged O-rings at EVAP canister fuel vapor and purge line fittings |
| • | A cracked or punctured EVAP canister |
| • | A damaged or disconnected source vacuum line, EVAP purge line, vent hose or fuel tank vapor line |
| • | A poor connection at the VCM: Inspect the harness connectors for the following conditions: |
| - | Backed out terminals |
| - | Improper mating |
| - | Broken locks |
| - | Improperly formed or damaged terminals |
| - | Poor terminal to wire connection |
| • | A damaged harness: Inspect the wiring harness to the EVAP vent solenoid, EVAP purge solenoid, and the fuel tank pressure sensor for an intermittent open or short circuit |
| • | A kinked, pinched or plugged vacuum source, EVAP purge, or fuel tank vapor line. Verify that the lines are not restricted |
Refer to EVAP System Cleaning before starting repairs.
Reviewing the Fail Records vehicle mileage since the diagnostic test last failed may help determine how often the condition that caused the DTC to be set occurs. This may assist in diagnosing the condition.
Test Description
Number(s) below refer to the step numbers on the Diagnostic Table
-
Checks to see if a vacuum source is present, along with certain conditions before the purge solenoid is commanded ON. Also shows a change of vacuum as the purge solenoid is being cycled
-
Checks for power to the solenoid, the ground circuit, the connections at the purge solenoid and the solenoid itself.
-
Checks for an open or grounded ignition feed circuit.
-
Checks for an open EVAP canister purge control circuit or faulty control module.
Step | Action | Value(s) | Yes | No |
|---|---|---|---|---|
1 | Was the Powertrain On-Board Diagnostic (OBD) System Check performed? | -- | ||
Is vacuum present when the solenoid is energized? | 45°C (113°F) 2000 RPM | |||
Is the test light ON? | -- | |||
Is the test light ON? | -- | |||
Is the test light ON? | -- | |||
6 | Check the purge line to the EVAP canister and repair if necessary. If the purge line is OK, then no problem is found. Is the action complete? | -- | -- | |
7 |
Was a problem found? | -- | ||
8 | Repair the open in the ignition feed circuit. Is the action complete? | -- | -- | |
9 | Repair the open in the EVAP canister purge control circuit to the EVAP purge solenoid. Is the action complete? | -- | -- | |
10 |
Was a problem found? | -- | ||
11 | Replace the EVAP purge solenoid. Refer to the Evaporative Emission Canister Purge Solenoid Valve Replacement . Is the action complete? | -- | -- | |
12 | Replace the control module. Refer to VCM Replacement/Programming . Is the action complete? | -- | -- | |
13 |
Does the component operate properly? | -- | System OK |
