Battery Negative Cable Replacement Battery to Battery Tray
Removal Procedure
Important:
• Always use replacement cables that are of the same type, diameter and length of the cables that you are replacing. • Always route the replacement cable the same way as the original cable.
- Disconnect the negative battery cable. Refer to Battery Negative Cable Disconnection and Connection.
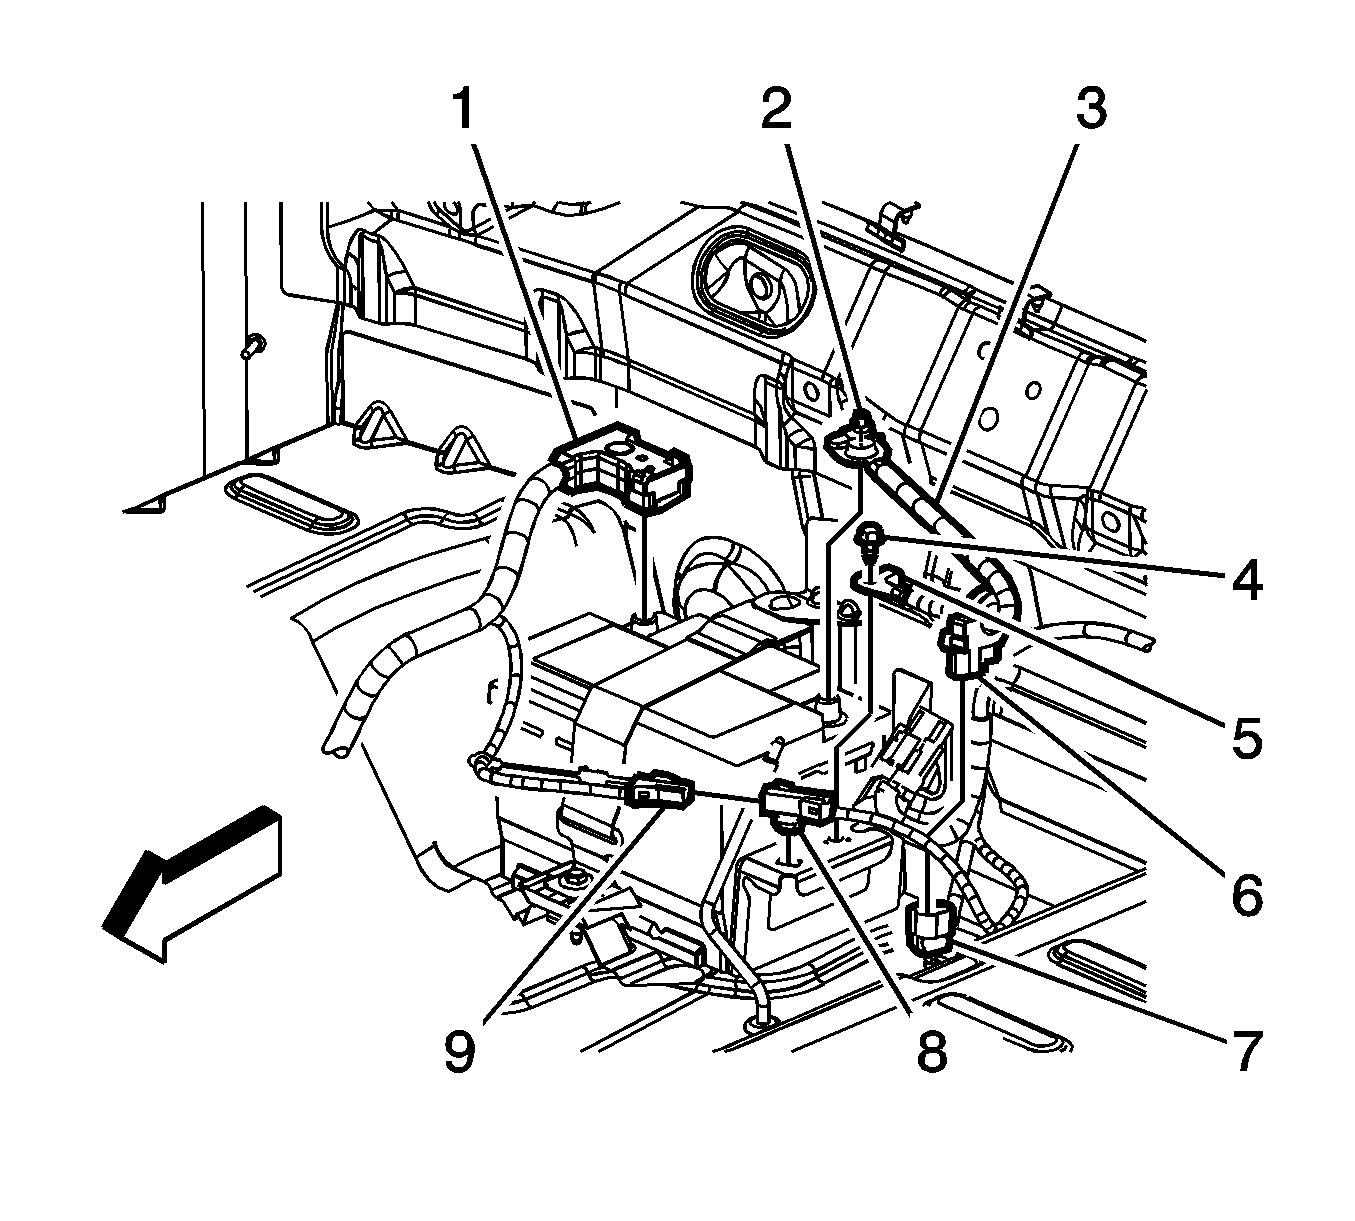
- Disconnect the body harness electrical connector (7) from the battery current sensor (6).
- Remove the negative battery cable ground bolt (4).
- Separate the negative battery cable terminal (5) from the battery support.
- Remove the negative battery cable (3).
Installation Procedure
- Install the negative battery cable (3). Ensure that the anti-rotation tab on the terminal (5) is correctly located.
- Install the negative battery cable ground bolt (4).
- Connect the body harness electrical connector (7) to the battery current sensor (6).
- Connect the negative battery cable. Refer to Battery Negative Cable Disconnection and Connection.

Notice: Refer to Fastener Notice in the Preface section.
Tighten
Tighten the bolt to 17 N·m (13 lb ft).
Battery Negative Cable Replacement Battery to Chassis
Removal Procedure
Important:
• Always use replacement cables that are of the same type, diameter and length of the cables that you are replacing. • Always route the replacement cable the same way as the original cable.
- Disconnect the negative battery cable. Refer to Battery Negative Cable Disconnection and Connection.
- Raise and support the vehicle. Refer to Lifting and Jacking the Vehicle.
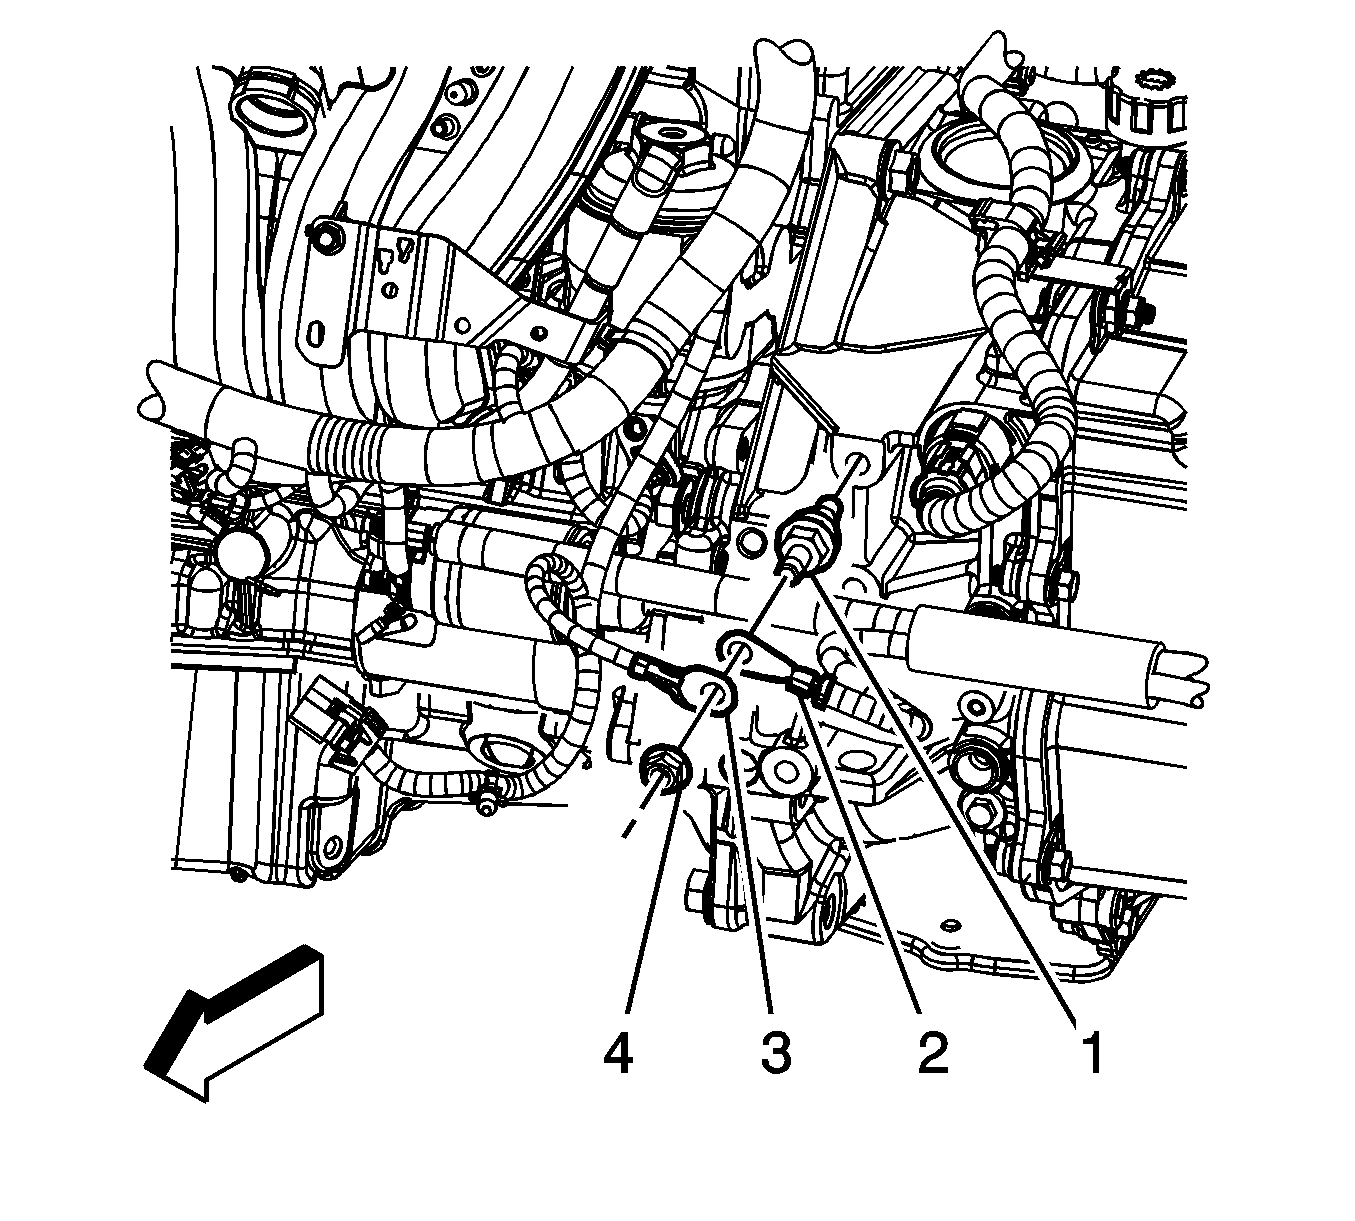
- If equipped with regular production options (RPOs) L61/LE5 with MN5 perform the following, remove the engine harness ground nut (4).
- Remove the engine harness ground terminal (3) from the stud (1).
- Remove the negative battery cable ground terminal (2) from the stud (1).
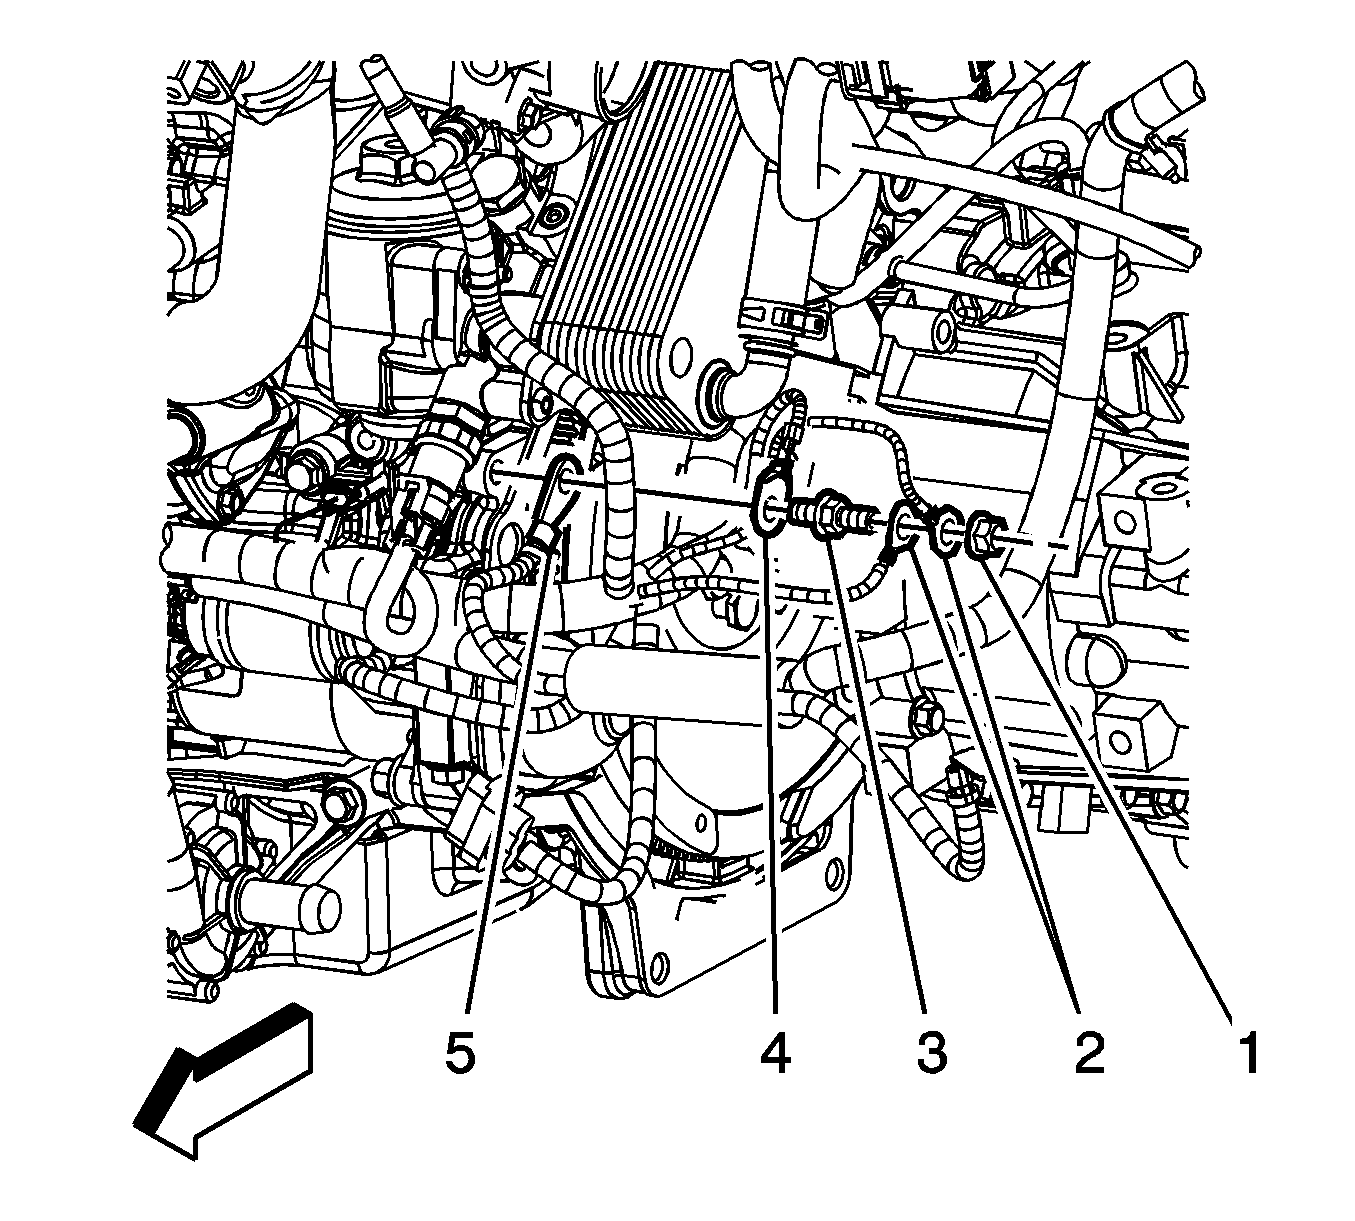
- If equipped with RPOs L61/LE5 with M86 perform the following, remove the engine harness ground nut (1).
- Remove the engine harness ground terminal (3) from the stud (2).
- Remove the stud (2).
- Separate the negative battery cable ground terminal (4) from the engine block.
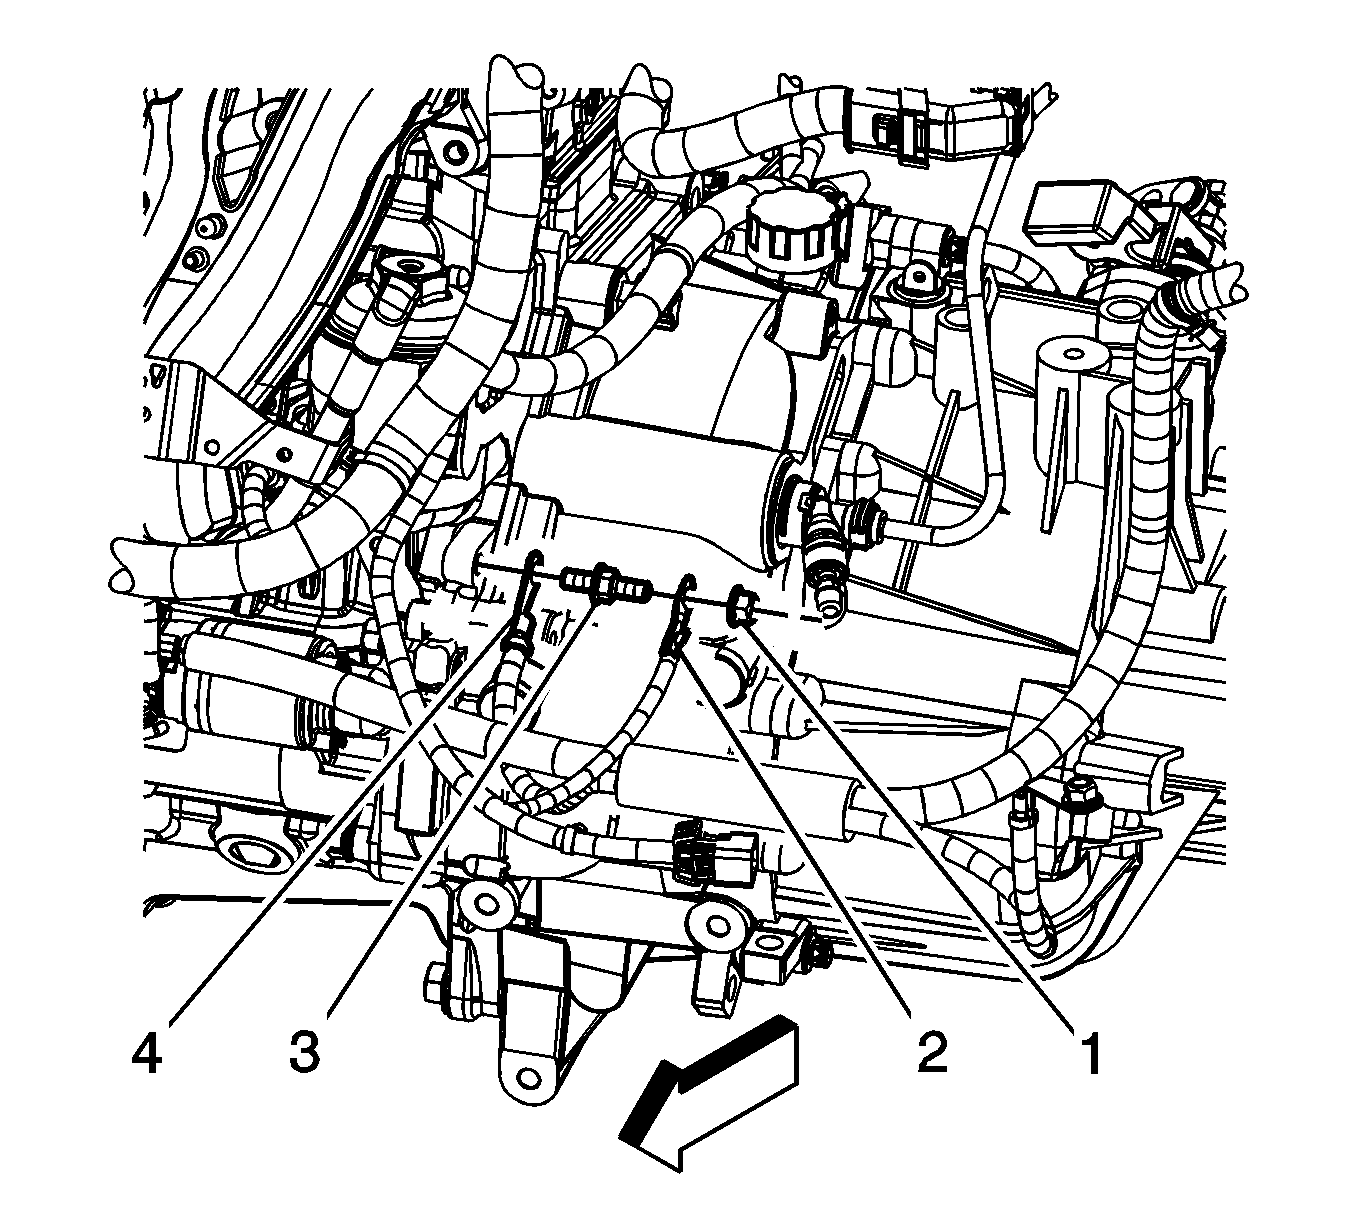
- If equipped with RPO LNF perform the following, remove the engine harness ground nut (1).
- Remove the engine harness grounds (2).
- Remove the stud (2).
- Reposition the engine harness ground (4).
- Separate the negative battery cable ground terminal (5) from the engine block.
- Remove the Left head lamp assembly. Refer to Headlamp Replacement.
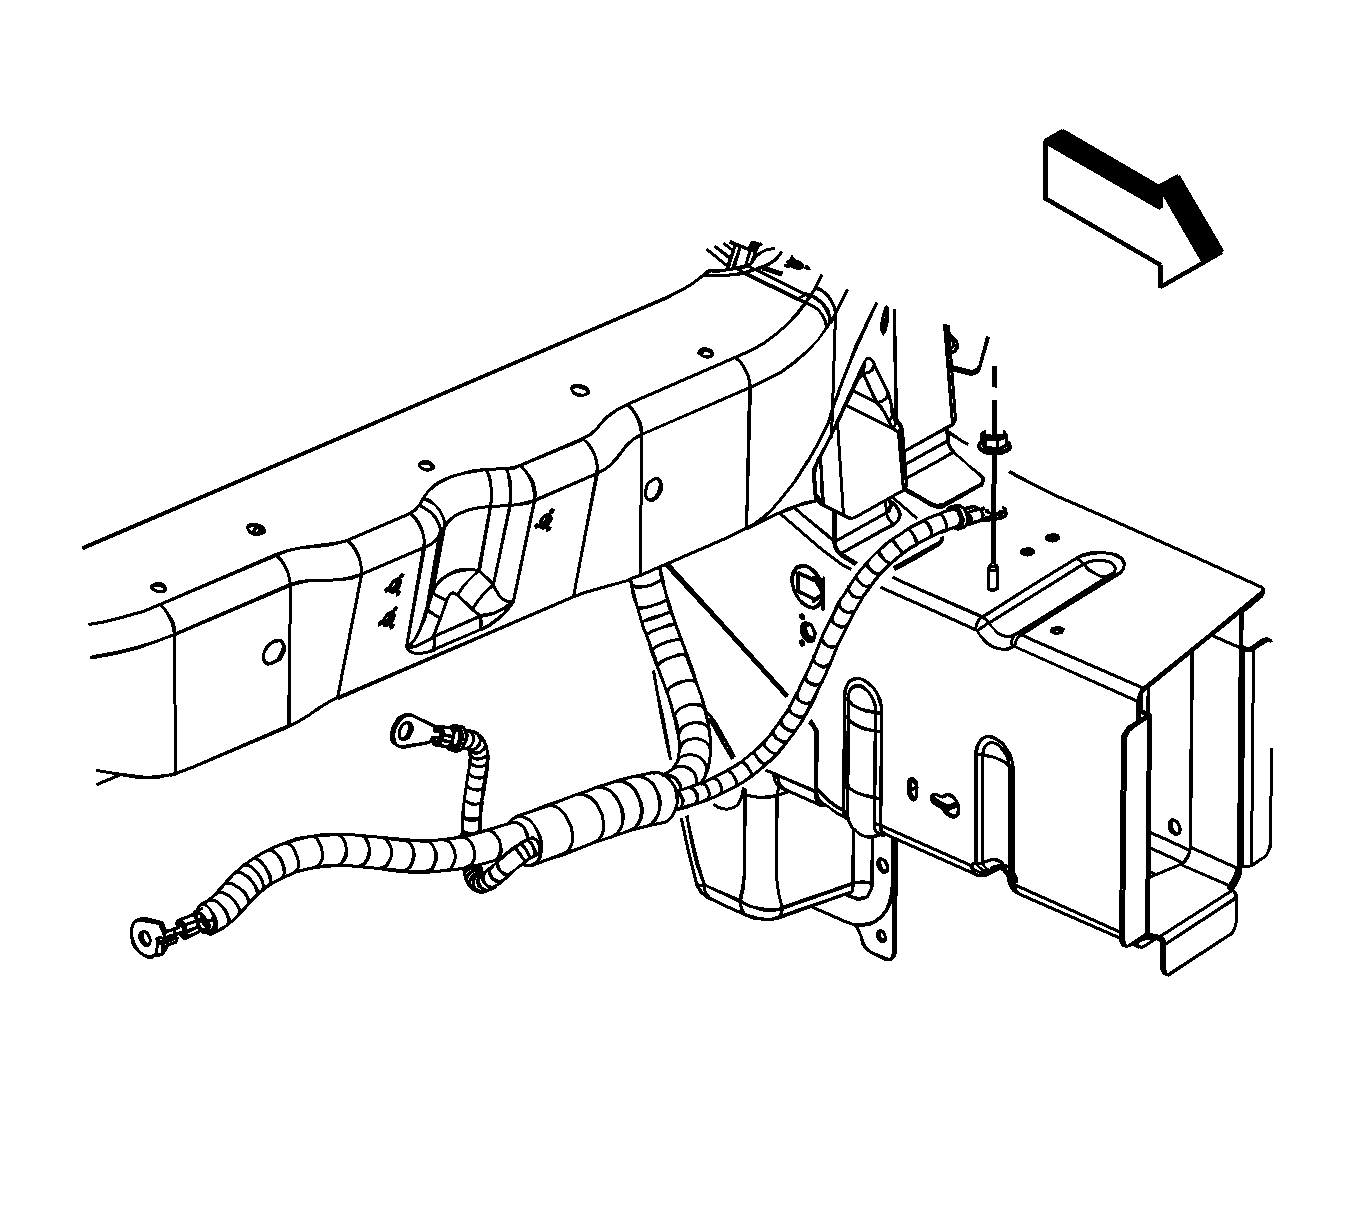
- Through the left head lamp opening, remove the negative battery cable ground nut from the stud on the side rail.
- Remove the negative battery cable ground terminal from the stud.
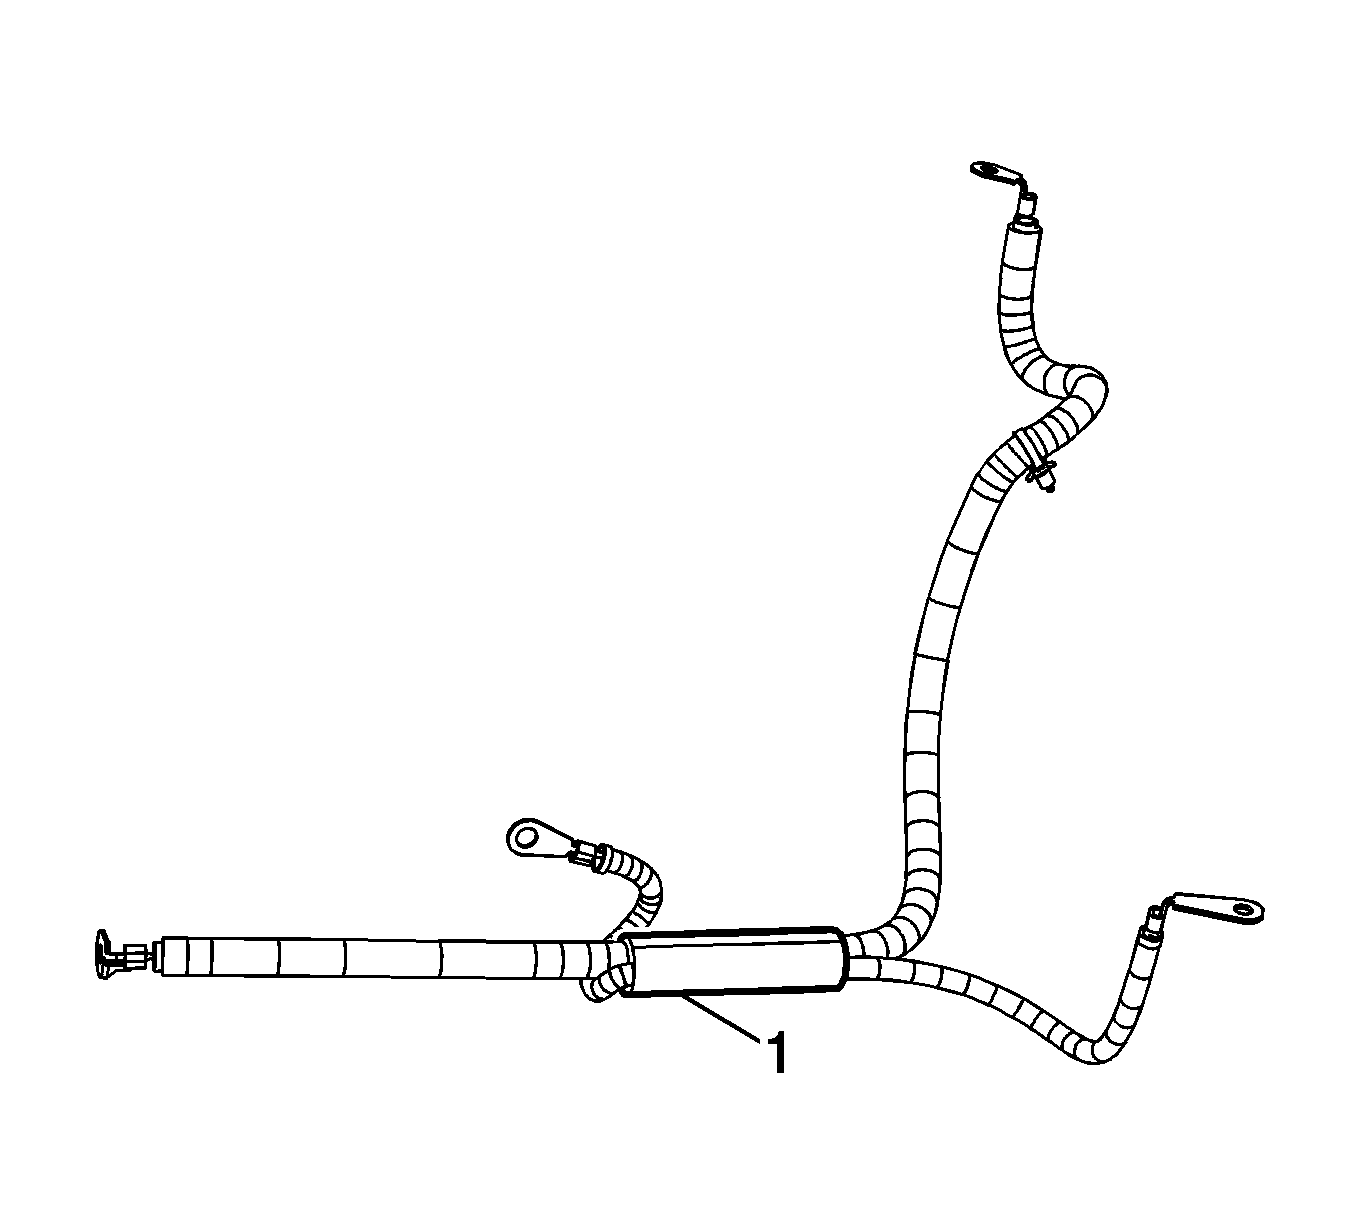
- Cut open the tape on the positive/negative battery cable conduit (1).
- Remove the old tape from the conduit.
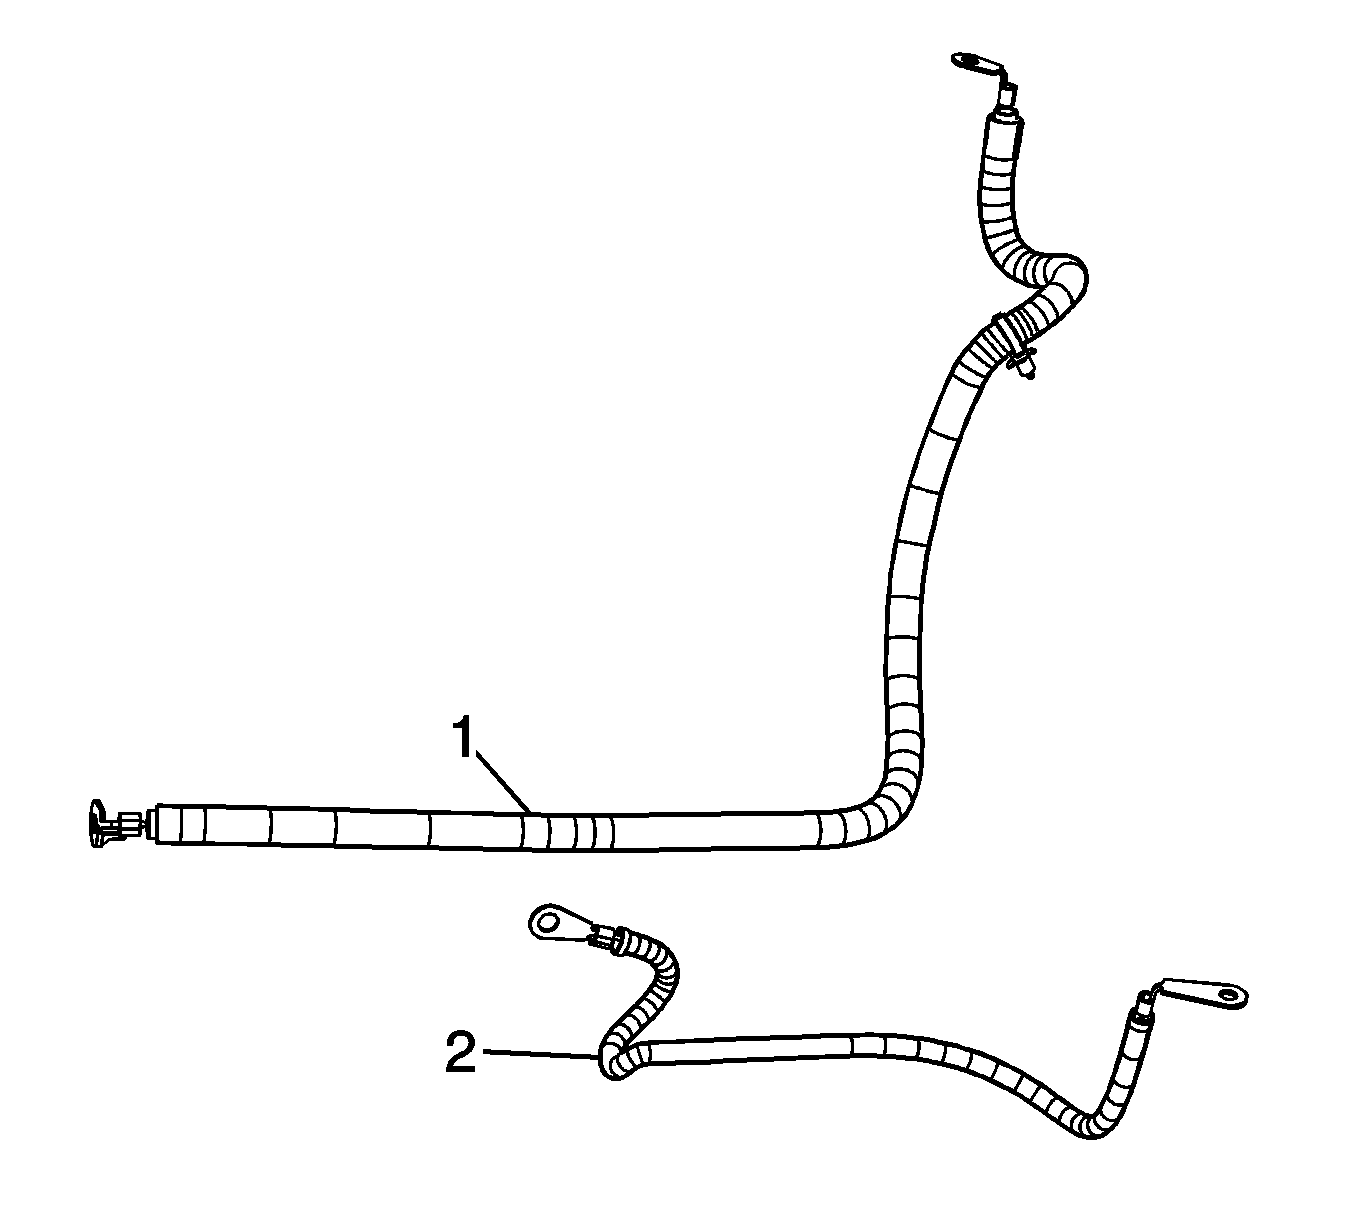
- Remove the negative battery cable (2).
Installation Procedure
- Install the negative battery cable (2) to the conduit.
- Wrap tape around the positive/negative battery cable conduit (1).
- Through the left head lamp opening, install the negative battery cable ground terminal to the stud.
- Install the battery cable ground nut to the stud on the side rail.
- Install the Left head lamp assembly. Refer to Headlamp Replacement.
- If equipped with RPO LNF perform the following, position the negative battery cable ground terminal (5) to the engine block.
- Position the engine harness ground (4) on top of the ground terminal.
- Install the stud (2).
- Install the engine harness grounds (2) onto the stud.
- Install the engine harness ground nut (1).
- If equipped with RPOs L61/LE5 with M86 perform the following, position the negative battery cable ground terminal (4) to the engine block.
- Install the stud (2).
- Install the engine harness ground terminal (3) to the stud (2).
- Install the engine harness ground nut (1).
- If equipped with RPOs L61/LE5 with MN5 perform the following, install the negative battery cable ground terminal (2) to the stud (1).
- Install the engine harness ground terminal (3) to the stud (1).
- Install the engine harness ground nut (4).
- Lower the vehicle.
- Connect the negative battery cable. Refer to Battery Negative Cable Disconnection and Connection.


Notice: Refer to Fastener Notice in the Preface section.
Tighten
Tighten the nut to 20 N·m (15 lb ft).

Tighten
Tighten the stud to 25 N·m (18 lb ft).
Tighten
Tighten the nut to 17 N·m (13 lb ft).

Tighten
Tighten the stud to 25 N·m (18 lb ft).
Tighten
Tighten the nut to 17 N·m (13 lb ft).

Tighten
Tighten the nut to 17 N·m (13 lb ft).
