CAMPAIGN: UNEXPECTED OPENING (HOOD LATCH ADJUSTMENT)

Subject: PRODUCT SAFETY CAMPAIGN 88C29 UNEXPECTED HOOD OPENING
Model and Year: 1987-88 CHEVROLET CORSICA AND BERETTA
The National Traffic and Motor Vehicle Safety Act, as amended, provides that each vehicle which is subject to a recall campaign of this type must be adequately repaired within a reasonable time after the owner has tendered it for repair. A failure to repair within sixty (60) days after tender of a vehicle is prima facie evidence of failure to repair within a reasonable time.
If the condition is not adequately repaired within a reasonable time, the owner may be entitled to an identical or reasonably equivalent vehicle at no charge or to a refund of the purchase price less a reasonable allowance for depreciation.
To avoid having to provide these burdensome solutions, every effort must be made to promptly schedule an appointment with each owner and to repair their vehicle as soon as possible. As you will see in reading the attached copy of the letter that is being sent to owners, the owners are being instructed to contact the Chevrolet Customer Assistance Center if their dealer does not remedy the condition within five (5) days of the mutually agreed upon service date. I f the condition is not remedied within a reasonable time, they are instructed on how to contact the National Highway Traffic Safety Administration.
DEFECT INVOLVED
General Motors has determined that a def ect which relates to motor vehicle safety exists in certain 1987-88 Chevrolet Corsica and Beretta model vehicles. The secondary hood latch assemblies on some of these vehicles is not properly adjusted and can result in the secondary latch becoming bent. A bent secondary hood latch can lead to a condition where full primary latch engagement is not attained.
If the secondary hood latch is not properly engaged and the primary hood latch was also not engaged, the hood could open unexpectedly. If this were to occur while the vehicle was in motion, the hood may contact the windshield, reducing the forward vision area of the driver, and a vehicle crash without prior warning could result.
To prevent this condition from occurring, dealers are to replace the primary hood latch assembly, the secondary hood latch assembly, and the latch support bracket.
VEHICLES INVOLVED
Involved are certain 1987-88 Chevrolet Corsica and Beretta model vehicles built within the following VIN breakpoints:
PLANT YEAR MODEL PLANT CODE FROM THROUGH ---- ----- --------- ----- -------- -------- 1987 L-Car Linden "E" HE100361 HE110671 1987 " Wilmington "Y" HY100001 HY106246 1988 " Linden "E" JE200001 JE541533 1988 " wilmington "Y" JY200001 JY551659
Involved vehicles have been identified by Vehicle Identification Number Computer Listings. Computer listings contain the complete Vehicle Identification Number, owner name and address data, and are furnished to involved dealers with the campaign bulletin. Owner name and address data furnished will enable dealers to follow-up with owners involved in this campaign.
These listings may contain owner names and addresses obtained from State Motor Vehicle Registration Records. The use of such motor vehicle registration data for any other purpose is a violation of law in several states. Accordingly, you are urged to limit the use of this listing to the follow-up necessary to complete this campaign. Any dealer not receiving a computer listing with the campaign bulletin has no involved vehicles currently assigned.
OWNER NOTIFICATION
Owners will be notified of this campaign on their vehicles by Chevrolet Motor Division (see copy of owner letter included with this bulletin). owner letter mailings will be staggered through the month of November.
DEALER CAMPAIGN RESPONSIBILITY
Dealers are to service all vehicles subject to this campaign at no charge to owners, regardless of mileage, age of vehicle, or ownership, from this time forward.
Whenever a vehicle subject to this campaign is taken into your new or used vehicle inventory, or it is in your dealership for service in the future, you should take the steps necessary to be sure the campaign correction has been made before reselling or releasing the vehicle.
Owners of vehicles recently sold from your new vehicle inventory are to be contacted by the dealer, and arrangements made to make the required correction according to instructions contained in this bulletin.
PARTS INFORMATION
Parts required to complete this campaign are to be obtained from General Motors Service Parts Operations (GMSPO). To ensure these parts will be obtained as soon as possible, they should be ordered from GMSPO on a "C.I.O." order with no special instruction code, but on an advise code (2).
Quantity/ Part Number Description Vehicle ----------- -------------------------- --------- 22578167 Primary Latch Assembly 1
22579922 Kit - Hood Latch Components 1 (Corsica Only): - Secondary Hood Latch Assy. - Latch Support Bracket W/ Label - Instruction Sheet
22579923 Kit - Hood Latch Components 1 (Beretta Only): - Secondary Hood Latch Assy. - Latch Support Bracket W/ Label - Instruction Sheet
01052349 Lubricant (or equivalent) As Required
INSTRUCTIONAL VIDEO
Each dealer will be shipped an instructional video tape for this campaign. This tape demonstrates the service procedure described on the following pages. Mechanics should be certain to view this tape prior to attempting to perform this procedure.
Each video tape package is being furnished to dealers at no charge and will be mailed to dealers the week of October 7, 1991. This video tape will be in a blue sleeve and labeled "1987-88 L-Car Hood Latch System Replacement Procedure".
SERVICE PROCEDURE
Corsica Procedure:
1. Open hood and support using support rod.
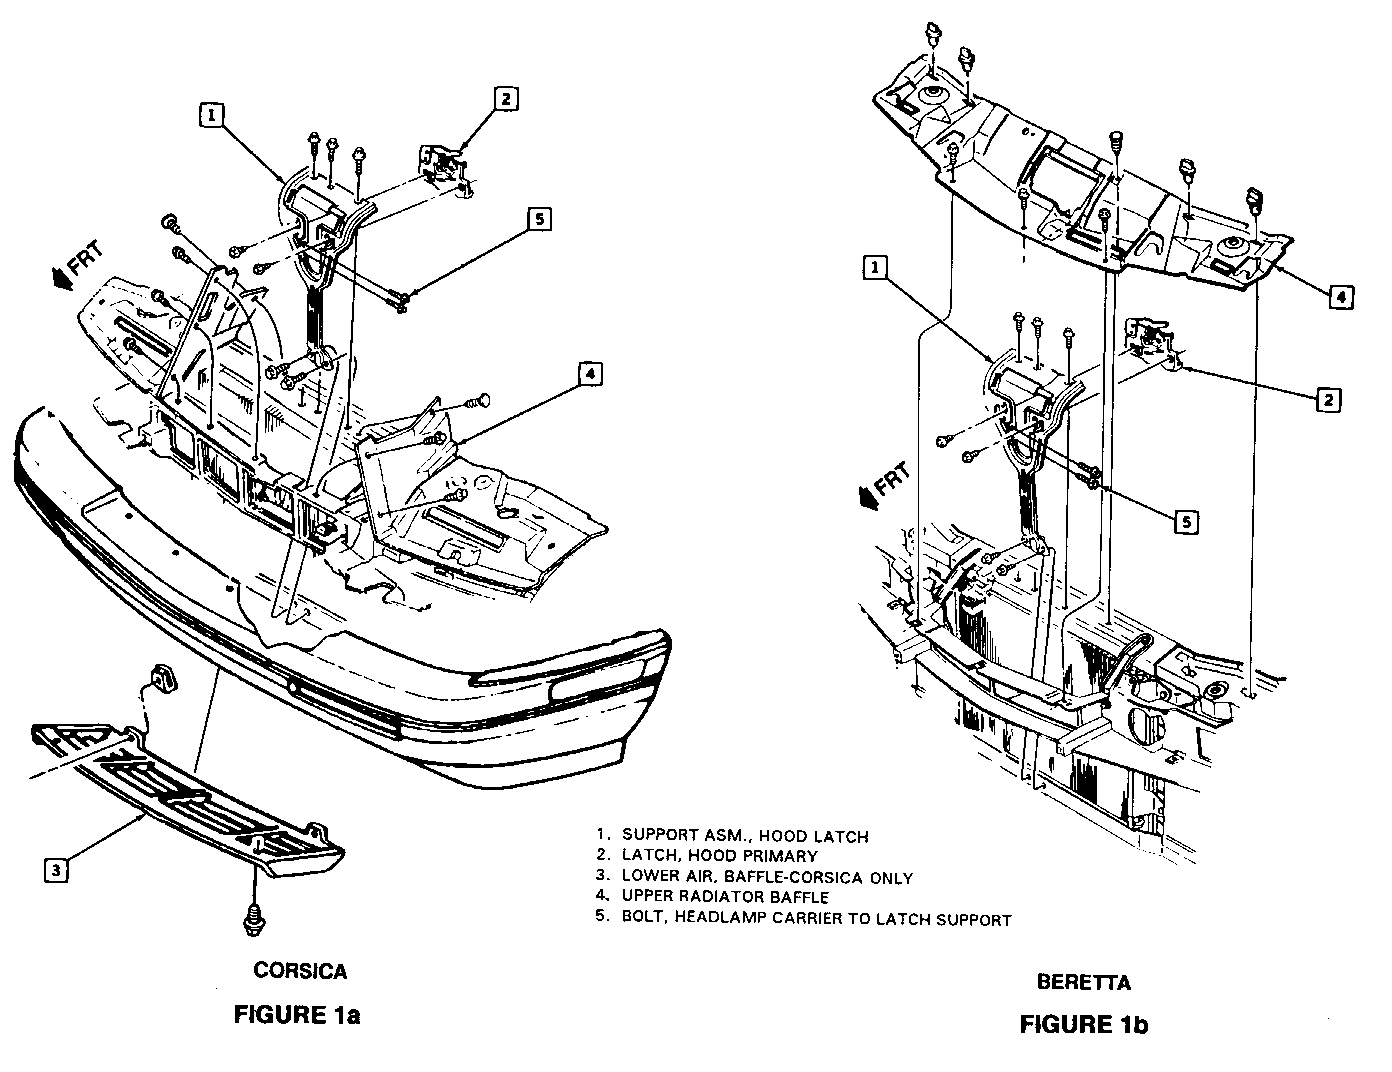
2. Remove lower air baffle (see Figure la, page 5).
3. Remove two (2) latch-support-to-lower-tie-bar screws.
4. Remove two (2) hex head screws and one (1) push-in retainer from LH (driver's side) upper radiator baffle. move inner portion of baffle to gain access to hood release cable and two (2) latch- support-to-headlamp-carrier screws.
5. Remove three (3) hex head screws and 1 push-in retainer from RH (passengers side) upper radiator baffle and move inner portion of RH baffle clear. This allows access to the primary latch mounting bolts if adjustment is required later in this procedure (see Figure la, page 5).
6. Disconnect hood release cable from primary latch assembly.
7. Remove two (2) latch-support-to-headlamp-carrier screws.
8. Remove three (3) latch-support-to-upper-tie-bar screws (some vehicles may have only two (2) screws at this location).
9. Remove hood latch support and primary latch assembly from vehicle.
10. Remove primary latch assembly from hood latch support bracket. Save two (2) attaching bolts for attaching new primary latch assembly to new hood latch support bracket.
11. Remove two (2) "U" nuts from old hood latch support bracket and install them onto new hood latch support bracket (old hood latch support bracket and primary latch assembly will not be reused).
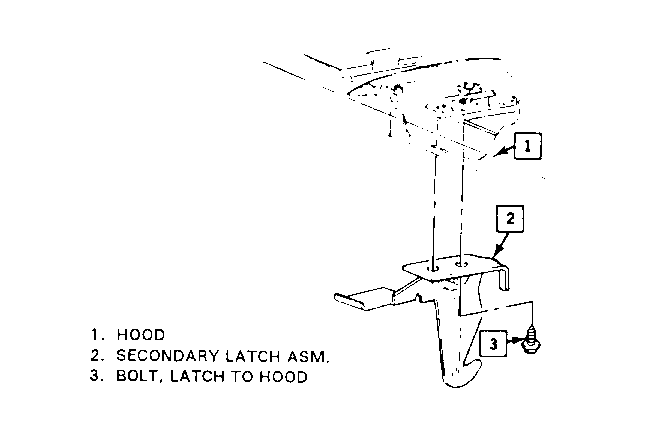
12. Remove secondary hood latch assembly (will not be reused). See Figure 2, page 6.
13. Loose assemble new primary latch assembly to new hood latch support using bolts previously removed.
14. Install new hood latch support bracket with loose-assembled primary hood latch assembly using previously removed screws. Torque all screws to 10 Nm. (89 lb. in.).
15. Re-install two (2) headlamp carrier-to-latch-support screws. Tighten to 10 Nm. (89 lb. in.).
16. Re-connect hood release cable to primary latch assembly.
17. Adjust primary hood latch assembly as required to provide correct hood alignment.
18. Torque primary hood latch assembly bolts to 27 Nm.(20 lb. ft.).
19. Loose assemble new secondary hood latch assembly to hood using two (2) previously removed bolts.
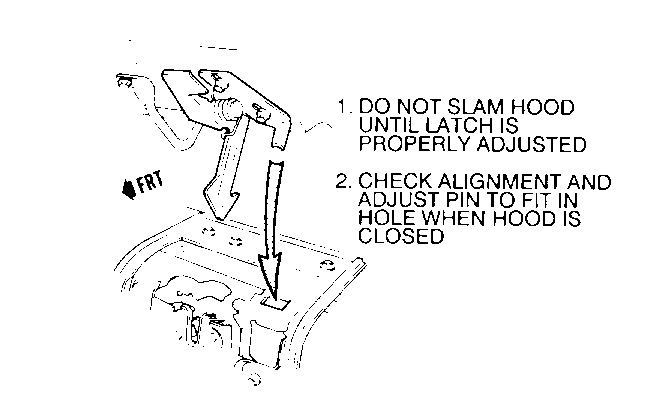
NOTICE: The new secondary hood latch must be properly aligned before attempting to close hood by slamming it or letting it drop into closed position. Failure to have secondary latch properly aligned before attempting to forcefully close hood may result in damage to hood, secondary hood latch assembly, and hood latch support bracket. See Figure 3 (page 6) or instruction label on new latch support bracket.
20. While slowly lowering hood, visually check alignment of new secondary latch. Secondary latch assembly must be aligned so pin fits into hole in hood latch support bracket when hood is closed (see Figure 3 (page 6) or label on hood latch support bracket). Adjust secondary latch as required for proper alignment and tighten two (2) attaching bolts to 10 Nm. (89 lb. in.). After tightening bolts, check for proper alignment before letting hood slam. Do not re-install set screw previously removed.
21. Remove small instruction label from new hood latch support bracket.
22. Check hood latches for proper operation:
- Close hood completely by 'dropping' hood from 1211 to 18".
- Release hood primary latch using interior hood release lever/handle.
- Check for secondary latch engagement by lifting partially open hood. Secondary latch should keep hood from opening until secondary latch release lever is depressed.
- If secondary latch is not properly aligned, adjust as required and re-check hood latches for proper operation.
23. Re-install lower air baffle and upper radiator baffle.
24. Install Campaign Identification Label.
Beretta Procedure:
1. Open hood and support using hood support rod.
2. Remove two (2) push-in retainers, three (3) hex head screws, and loosen four (4) thumb screw retainers from upper radiator baffle. Remove upper radiator baffle (see Figure lb, Page 5).
NOTICE: All seven (7) hood latch support bracket attaching screws can be removed and re-installed from top side of vehicle after upper radiator air baffle is removed.
3. Disconnect hood release cable from primary latch assembly.
4. Remove two (2) latch-support-to-lower-tie-bar screws.
5. Remove two (2) latch-support-to-headlamp-carrier screws.
6. Remove three (3) latch-support-to-upper-tie-bar screws (some vehicles may have only two (2) screws at this location).
7. Remove primary latch assembly from hood latch support bracket. Save two (2) attaching bolts for attaching new primary latch assembly to new hood latch support bracket.
8. Remove two (2) "U" nuts from old hood latch support bracket and install them onto new hood latch support bracket (old hood latch support bracket and primary latch assembly will not be reused).
9. Remove secondary hood latch assembly (will not be reused). See Figure 2, page 6.
10. Loose assemble new primary latch assembly to new hood latch support using bolts removed previously.
11. Install hood latch support bracket with loose-assembled primary hood latch assembly to car using the previously removed screws. Torque all screws to 10 Nm. (89 lb. in.).
12. Re-install two (2) headlamp-carrier-to-latch-support screws. Tighten to 10 Nm. (89 lb. in.).
13. Re-connect hood release cable to primary latch assembly.
14. Adjust primary hood latch assembly as required to provide correct hood alignment.
15. Torque two (2) primary hood latch assembly bolts to 27 Nm. (20 lb. ft.).
16. Loose assemble new secondary hood latch assembly to hood using two (2) screws removed previously.
NOTICE: New secondary hood latch must be properly aligned before attempting to close hood by slamming it or letting it drop into closed position. Failure to have secondary latch properly aligned before attempting to forcefully close hood may result in damage to hood, secondary hood latch assembly, and hood latch support bracket. See Figure 3 (page 6) or instruction label on new latch support bracket
17. While slowly lowering hood, visually check alignment of new secondary latch. Secondary latch assembly must be aligned so pin fits into hole in hood latch support bracket when hood is closed (see Figure 3 (page 6) or label on hood latch support bracket) . Adjust secondary latch as required for proper alignment and tighten two (2) attaching bolts to 10 Nm. (89 lb. in.) . Check for proper alignment after tightening bolts before letting hood slam. Do not re-install set screw previously removed.
18. Remove small instruction label from new hood latch support bracket.
19. Check hood latches for proper operation:
- Close hood completely by 'dropping' hood from 12" to 18".
- Release hood primary latch using interior hood release lever/handle.
- Check for secondary latch engagement by lifting partially open hood. Secondary latch should keep hood from opening until secondary latch release lever is depressed.
If secondary latch is not properly aligned, adjust as required and re-check hood latches for proper operation.
20. Re-install upper radiator baffle.
21. Install Campaign Identification Label.
CAMPAIGN IDENTIFICATION LABEL
Each vehicle corrected in accordance with the instructions outlined in this Product Campaign Bulletin will require a "Campaign Identification Label". Each label provides a space to include the five (5) digit dealer code of the dealer performing the campaign service. This information may be inserted with a typewriter or a ball point pen.
Each "Campaign Identification Label" is to be located on the radiator core support in an area which will be visible when the vehicle is brought in for periodic servicing by the owner. Additional "Campaign Identification Labels" can be obtained from DAC.
Apply "Campaign Identification Label" only on a clean, dry surface.
CLAIM INFORMATION
Submit a Product Campaign Claim with the information indicated on the next page:
* FAILED PARTS CC-FC LABOR LAB OTH REPAIR PERFORMED PC PART NO. ALLOW OP HRS HRS ----------------- -- -------- ----- ----- ----- --- --- Install New Latch 2 22579923 ** SK-00 V6880 0.7 0.1 Assy. - Beretta
Install New Latch 2 22579922 ** SK-00 V6881 0.7 0.1 Assy. - Corsica
* Campaign Administrative Allowance.
** The "Parts Allowance" should be the sum total of the current GMSPO Dealer Net price plus 30% of all parts required for the repair.
Dealers will automatically receive the correct labor and material allowance based on the labor operation performed.
Refer to the Chevrolet Claims Processing Manual for details on Product Campaign Claim Submission.
Dear Chevrolet Beretta/Corsica Owner:
This notice is sent to you in accordance with the requirements of the National Traffic and Motor Vehicle Safety Act.
REASON FOR THIS RECALL
General Motors has determined that a defect which relates to motor vehicle safety exists in certain 1987-88 Chevrolet Corsica and Beretta model vehicles. The secondary hood latch assemblies on some.of these vehicles is not properly adjusted and can result in the secondary latch becoming bent. A bent secondary hood latch can lead to a condition where full primary latch engagement is not attained.
If the secondary hood latch is not properly engaged and the primary hood latch was also not engaged, the hood could open unexpectedly. If this were to occur while the vehicle was in motion, the hood may contact the windshield, reducing the forward vision area of the driver, and a vehicle crash without prior warning could result.
WHAT WE WILL DO
To prevent this condition from occurring, your Chevrolet dealer will replace the primary hood latch assembly, the secondary hood latch assembly, and the latch support bracket on your Corsica or Beretta. This service will be performed for you at no charge.
WHAT YOU SHOULD DO
Please contact your Chevrolet dealer as soon as possible to arrange a service date and so the dealer may order the necessary parts for the repair. Instructions for making this correction have been sent to your dealer and parts are available. The labor time necessary to perform this service correction is approximately 45 Minutes. Please ask your dealer if you wish to know how much additional time will be needed to schedule and process your vehicle.
Your Chevrolet dealer is best equipped to obtain parts and provide service to ensure that your vehicle is corrected as promptly as possible. If, however, you take your vehicle to your dealer on the agreed service date, and they do not remedy this condition on that date or within five (5) days, we recommend you contact the Chevrolet Customer Assistance Center by calling 1-800-222-1020.
After contacting your dealer and the Customer Assistance Center, if you are still not satisfied that we have done our best to remedy this condition without charge and within a reasonable time, you may wish to write the Administrator, National Highway Traffic Safety Administration, 400 Seventh Street, S.W., Washington, D.C. 20590 or call 1-800-424-9393 (Washington D.C. residents use 366-0123).
The enclosed owner reply card identif ies your vehicle. Presentation of this card to your dealer will assist in making the necessary correction in the shortest possible time. If you have sold or traded your vehicle, please let us know by completing the postage paid reply card and returning it to us.
We are sorry to cause you this inconvenience; however, we have taken this action in the interest of your safety and continued satisfaction with our products.


General Motors bulletins are intended for use by professional technicians, not a "do-it-yourselfer". They are written to inform those technicians of conditions that may occur on some vehicles, or to provide information that could assist in the proper service of a vehicle. Properly trained technicians have the equipment, tools, safety instructions and know-how to do a job properly and safely. If a condition is described, do not assume that the bulletin applies to your vehicle, or that your vehicle will have that condition. See a General Motors dealer servicing your brand of General Motors vehicle for information on whether your vehicle may benefit from the information.
