WINDNOISE AT FRT/REAR DOORS DIAGNOSIS AND REPAIR

Model and Year: 1987-88 CORSICA
Front and/or rear door windnoise conditions on 1987-88 Corsica models can be improved by using the attached procedures.
Proper diagnosis can be made with a variety of tools and methods, including stethoscopes, dust guns, sonic instruments, etc. It is important to remember that windnoise can best be described as air leaking from the inside of the body outward while traveling at highway speeds. Turbulence or windrush is best described as air passing over and around body openings and moldings.
The recommended materials to be used with the following procedures are:
3M SUPER SILICONE SEALER - 08661 clear - 3 oz. tube 08662 black - 3 oz. tube
AMERICAN/DOMINION SURE SEAL SILICON SEALANT CZC clear - 12 oz. cartridge CDB black - 12 oz. cartridge LZC clear - 4 oz. tube LZB black - 4 oz. tube
PERMATEX RTV SILICONE ADHESIVE SEALANT 66C clear - 11 oz. cartridge 16C black - 11 oz. cartridge 66B clear - 3 oz. tube 16B black - 3 oz. tube
With the door open, door glass lowered and from the inboard side of the door:
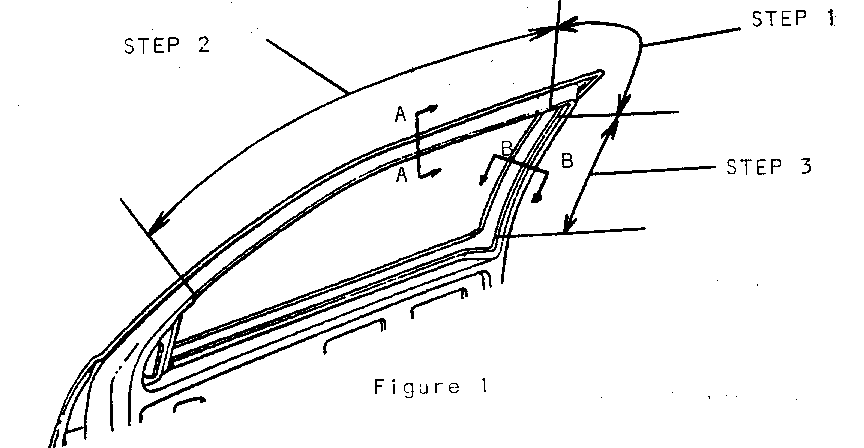
Step 1. Carefully peel the run channel flap away from the sheet metal and plastic guide. Carefully inject silicone rubber (clear or black) between the sheet metal, plastic guide and the run channel in the area shown in Figure 1, continue step 1 until slight squeeze out of material is seen. Allow the run channel flap to return to position.
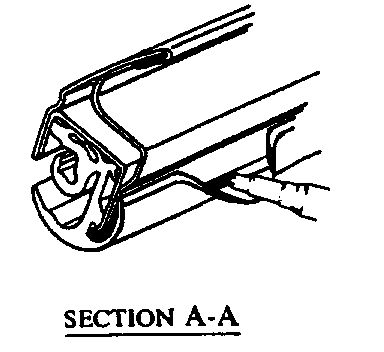
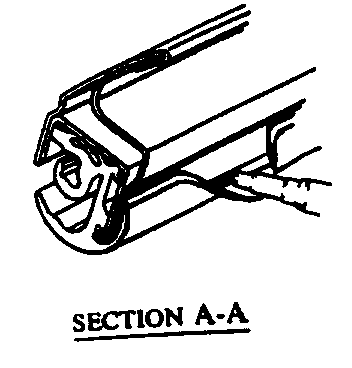
Step 2. Apply approximately a 1/4" bead of the same material between the outboard edge of the run channel and the inner edge of the door frame flange as shown in Section A-A. Apply the bead the full length of the frame as shown in Figure 1, Step 2.
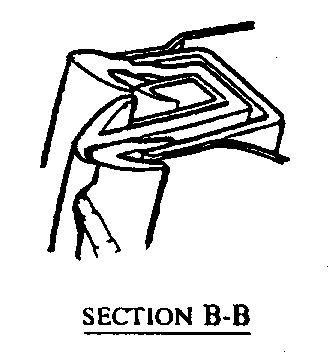
Step 3. Apply approximately a 1/8" bead of the same material between the inside surface of the run channel and the plastic guide as shown in Section B-B (Figure 3) and Figure 1, Step 3.
With the door open, door glass lowered and from the inboard side of the door:
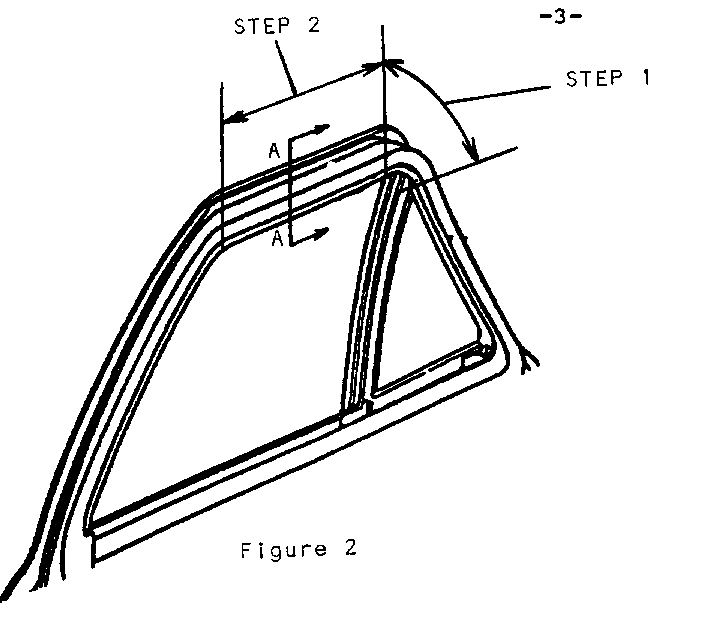
Step 1. Carefully pull the upper rear corner of the run channel down and forward to allow access to inject silicone rubber (clear or black) into the area between the run channel and stationary glass rubber at the top of the division post. Inject enough of the material to insure sealing of this area or until slight squeeze out is seen. Re- install the run channel into the corner area.
Step 2. Apply approximately a 1/4" bead of the same material between the outboard edge of the run channel and the inner edge of the door frame flange as shown in Section A-A (Figure 5). Apply the bead the full length of the upper frame portion as shown in Figure 4, Step 2.
Labor Operation Number: T1272 Rt. Ft. Labor Time: .2 Hours T1273 Left Ft. .2 Hours T1274 Rt. Rear .2 Hours T1275 Left Rear .2 Hours
General Motors bulletins are intended for use by professional technicians, not a "do-it-yourselfer". They are written to inform those technicians of conditions that may occur on some vehicles, or to provide information that could assist in the proper service of a vehicle. Properly trained technicians have the equipment, tools, safety instructions and know-how to do a job properly and safely. If a condition is described, do not assume that the bulletin applies to your vehicle, or that your vehicle will have that condition. See a General Motors dealer servicing your brand of General Motors vehicle for information on whether your vehicle may benefit from the information.
