MELTED ENGINE WIRING HARNESS (INSTALL REVISED CONDUIT)

Subject: MELTED WIRE HARNESS CONDUIT
Model and Year: 1990-91 CORSICA, BERETTA AND CAVALIER WITH 2.2L ENGINE
Condition: Some 1990 and 1991 "L" cars built prior to:
Wilmington MY150568
Linden ME132551
and 1990 through 1991 "J" cars may experience a melted engine wiring harness conduit above the starter motor as a result of engine manifold heat.
Cause: Under certain conditions where high ambient and engine operating temperatures are experienced, engine harness conduit may appear melted above the starter motor.
Correction: A revised routing, retention, and higher temperature conduit package, P/N 12125390 should be installed as follows:
Part is currently available from GMSPO.
WITH AIR CONDITIONING (C60)
Remove Or Disconnect:
1. Raise hood and install fender covers. 2. Negative battery cable. 3. Oil fill tube bolt and oil fill tube. 4. Oxygen sensor connector and oxygen sensor. 5. Wiring harness clamp above starter. 6. Release (2) harness clips. 7. Tape from harness near starter fusible links. 8. Carefully cut conduit approximately 10mm (3/8 in.) under lower alternator retainer and discard conduit. 9. Remove and discard retainer from upper air conditioning bracket. 10. Remove and discard conduit from pressure switch on compressor.
Install Or Connect
1. 100 mm (4 in.) piece of 6mm (1 /4 in.) diameter conduit on A/C pressure switch harness. 2. 555mm (22 in.) piece of 16mm (5/8 in.) diameter conduit on engine harness from under alternator to starter. 3. Tape both harness conduit ends securely. 4. Place original harness clamp on harness conduit 170mm (6 3/4 in.) from fusible links near starter. 5. Place metal retainer from service package 370mm (14 1/2 in.) from harness clamp onto harness conduit. 6. Secure with kit supplied push-in retainer. 7. Harness clamp bolt. Tighten to 13 N.m (1 0 lbs. ft.). 8. Coat oxygen sensor threads with anti-seize compound, P/N 5613695 or equivalent and tighten to 41 N.m (30 lbs. ft.). 9. Oil fill tube and bolt. Tighten bolt to 25 N.m (1 8 lbs. ft.) 10. Negative battery cable. 11. Hood.
Without Air Conditioning (C41)
Remove Or Disconnect
1. Raise hood and install fender covers. 2. Negative battery cable. 3. Oxygen sensor. 4. Oil fill tube bolt and oil fill tube. 5. Wiring harness clamp next to starter. 6. Release harness clips. 7. Tape from harness near starter fusible links. 8. Carefully cut conduit approximately 10mm (3/8 in.) under lower alternator retainer. 9. Remove conduit section from cut end to starter and discard.
Install Or Connect
1. Kit supplied 555mm (22 in.) piece of 16mm (5/8 in.) diameter conduit on engine harness from starter to lower alternator bracket. 2. Tape both harness conduit ends securely. 3. Place original harness clamp on harness conduit 170mm (6 3/4 in.) from fusible links near starter. 4. Place metal retainer from service package 330mm (1 3 in. ) from harness clamp onto harness conduit. 5. Secure with push-in retainer supplied with kit. 6. Harness clamp bolt. Tighten to 13 N.m (1 0 lbs. ft.). 7. Coat oxygen sensor threads with anti-seize compound, P/N 5613695 or equivalent and tighten to 41 N.m (30 lbs. ft.). 8. Oil fill tube and bolt. Tighten to 25 N.m (18 lbs. ft.). 9. Negative battery cable.
Labor Operation Number: T1753 Labor Time .6 Hours Trouble Code: 92
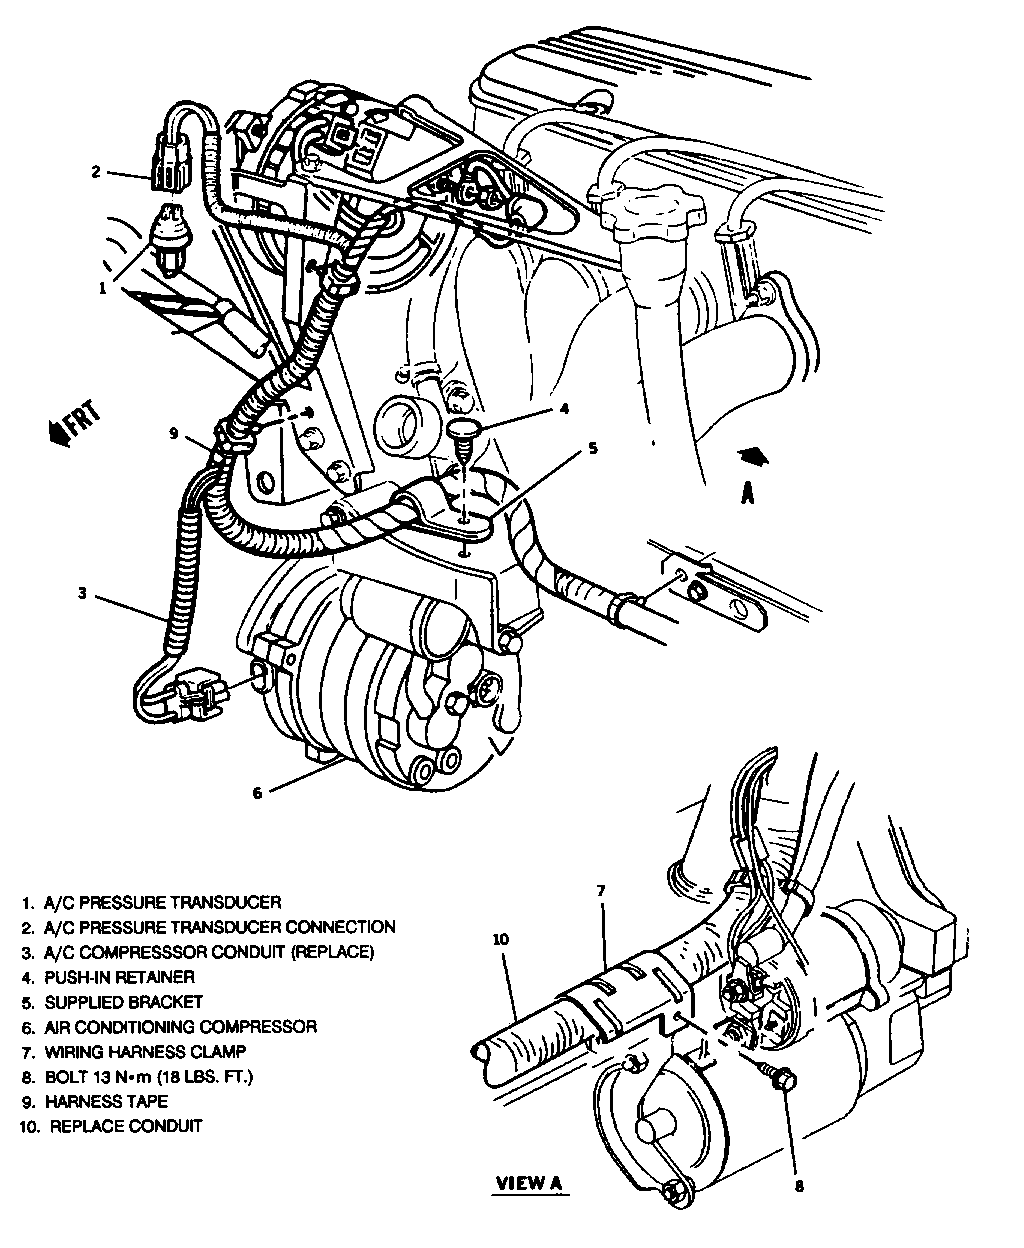
1. A/C PRESSURE TRANSDUCER 2. A/C PRESSURE TRANSDUCER CONNECTION 3. A/C COMPRESSOR CONDUIT (REPLACE) 4. PUSH-IN RETAINER 5. SUPPLIED BRACKET 6. AIR CONDITIONING COMPRESSOR 7. WIRING HARNESS CLAMP 8. BOLT 13 Nm (18 LBS. FT.) 9. HARNESS TAPE 10. REPLACE CONDUIT
(Refer to Figure 1)

General Motors bulletins are intended for use by professional technicians, not a "do-it-yourselfer". They are written to inform those technicians of conditions that may occur on some vehicles, or to provide information that could assist in the proper service of a vehicle. Properly trained technicians have the equipment, tools, safety instructions and know-how to do a job properly and safely. If a condition is described, do not assume that the bulletin applies to your vehicle, or that your vehicle will have that condition. See a General Motors dealer servicing your brand of General Motors vehicle for information on whether your vehicle may benefit from the information.
