SQUEAKS, RATTLES AND NOISES DIAGNOSTIC GUIDE

VEHICLES AFFECTED: 1984 Corvette
This bulletin is to provide a quick and easy reference for diagnosis of possible squeak and rattle conditions on the 1984 Corvette.
The 'Table of Contents' references the condition, the location and the bulletin page number.
TABLE OF CONTENTS
CONDITION & LOCATION PAGE NUMBERS -------------------- ------------ 1. Squeaks and Rattles Instrument Panel - 2, 3, 4 Driver's Side
2. Squeaks and Rattles Instrument Panel - 4, 5, 6 Centre
3. Squeaks and Rattles Instrument Panel - 6, 7 Passenger Side
4. Squeaks and Rattles Forward of the 7 Instrument Panel
5. Squeaks and Rattles - Doors 8, 9
6. Squeaks and Rattles Console Area 10, 11
7. Squeaks and Rattles Rear Compartment - 11, 12 Left Side
8. Squeaks and Rattles Rear Compartment 13, 14, 15, 16 Centre
9. Squeaks and Rattles Roof 14, 15, 16
SQUEAKS AND RATTLES INSTRUMENT PANEL DRIVER'S SIDE ------------------------------- CONDITION CORRECTION --------- ----------- Creak - ----- The Windshield Garnish Reinstall the moulding to obtain Moulding rubs againat the a slight clearance from the windshield. windshield or insulate with foam tape.
Squeak & Creak -
The Instrument Panel Pad is Reinstall the moulding or I.P. rubbing against the A-Pillar pad to obtain a slight clearance garnish Moulding. between the two or insulate with foam tape.
Squeak
The Windshield Wiper Blades Replace the wiper blades. are noisy.
Mousey Squeak While Turning The Steering Wheel ------------------ The S/C Seal is not lubed. Lightly lube each item. The hood to cowl bumper is rubbing against the hood assembly.
Rattle
The Instrument Panel braces Tighten the brace fastener. to the carrier are loose.
Metallic Rattle -
A extra bolt is rolling about Remove the bolt. in the cross body beam.
Rattle/Thump At the Base Of The A-Pillar --------------- The hood is not latched or Adjust the hood latch. The fit of the tension adjustment is the hood should be set with the incorrect. hood bumper low. Then the hood bumper should be adjusted upward to add slight pressure to the hood. The hood bumper should be lubricated.
Thump -
The windshield wiper blade Adjust the wiper travel at the wiper hits the A-Pillar. motor. Access is through the left cowl screen. Tinny Jungle - ------------ The back Plate on the I/P Tighten the cover plate. cluster assembly is loose.
Buzz
The LH A/C outlet Vanes are Replace the outlet assembly, loose. P/N 14046017.
The courtesy lamp on LH hush Use a double layer of black elect- panel is loose. rical tape on the edge of the hush panel opening to tighten the lamp fit.
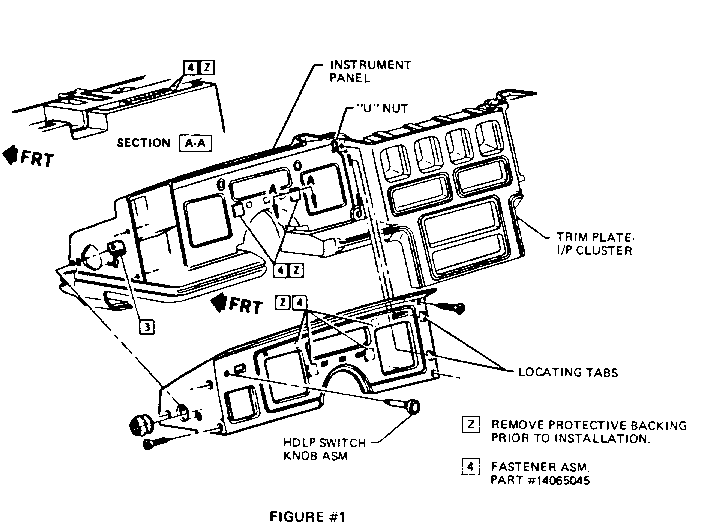
The Trim Panel Vibrates fore Make sure that the four Velcro and aft beating against the fasteners are located such that the I/P cluster assembly (see bezel will be secured to the I/P Figure No. 1) carrier. Some early vehicles will need the Velcro fasteners added. The Velcro should not overlap the lens covers. Also some vehicles will need the waxpaper removed from the adhesive on the fasteners. Fasteners P/N is 14065045.
Plastic Buzz -
The directional signal lens The Velcro fastener is overlapping on the I/P cluster assembly the lens. Reposition or replace is loose. the velcro fastener so that it is clear of the lens.
Itch & Creaks -
The I/P pad attachment Tighten the I/P screws. screws are loose.
Ticking Engine Noise
A stickey valve lifter or fuel Replace the lifter per shop injector is the cause. manual procedure.
2. SQUEAKS AND RATTLES CENTRE OF INSTRUMENT PANEL -------------------------- CONDITION CORRECTION --------- -----------
Squeak
The Engine Wire Harness and/or Bend the cable retainer forward positive battery cable rubs to obtain clearance. against the front floor panel.
Creak -
The windshield wiper stops rub Bend the stops to obtain slight against the glass. clearance.
The windshield wiper ramps Reposition the ramp slightly lower. (Bottom Side) contact the windshield.
Buzz
The information centre lens Secure the lens to the information is loose. centre by using clear two-sided trim tape.
The centre trim bezel Tighten the screws. screws are loose.
Clunking -
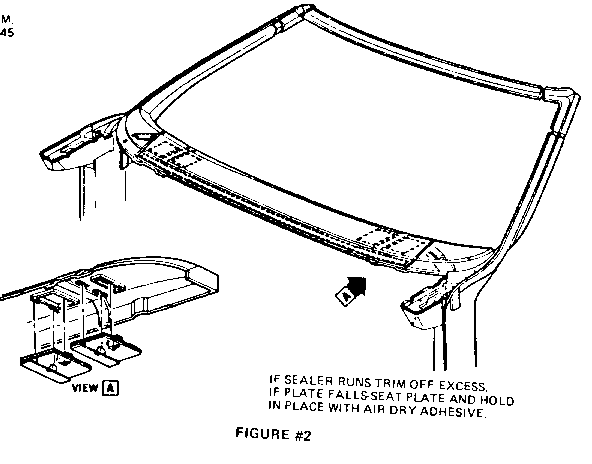
The windshield wiper trans- The prblem is because expandable mission link is hitting the sealer from P/N 14051109 sealer expandable sealer. plate has run. The sealer can be trimmed for clearance. On some cases, the plate may be loose. In such cases the plate should be repositioned and secured (see Figure #2) with air-dry adhesive.
Rattle -
The defroster assembly Tighten the screws. attaching screws are loose.
Tinny Rattle -
The I/P attaching brace(s) or Tighten the fasteners. the top plate in the radio assembly is loose.
Squeak & Creak -
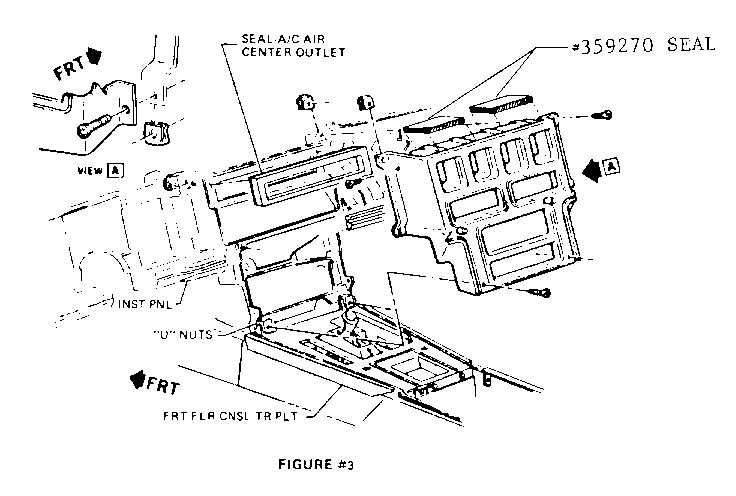
The top edge of the centre I/P Install two (2) strips of P/N trim panel rubs against the 359270 foam strips on the top bottom of the I/P pad. of the trim panel assembly to isolate the panel from the I/P. (see Figure No. 3).
3. SQUEAKS AND RATTLES INSTRUMENT PANEL PASSENGER'S SIDE ---------------------------------
CONDITION CORRECTION
Rattle & Buzz -
The vanity mirror wire Reroute the wire to obtain clearance connector is loose and rubs or tape the connector and wire to against the plastic A/C I/P stop the movement. outlet tube.
Rattle/Thump at Base of A-Pillar --------- The hood is not latched or the Adjust the hood latch for pruper the tension adjustment is function. Adjust the hood bumpers incorrect. to slightly load the hood.
Buzz -
The vanity mirrorlens is Tighten the lens by using a drop loose. of glue.
The RH A/C outlet Vanes are Replace the outlet with P/N loose. 14046018 deflector assembly.
Mousey Squeak -
The hood to cowl bumper is Lube the hood bumper. rubbing against the hood assembly.
Squeak & Creak-
The I/P pad is rubbing against Adjust either the moulding or the A-Pillar garnish moulding. the pad to obtain clearance.
Creak -
The windshield garnish moulding Adjust the moulding for slight is rubbing against the W/S. clearance or insulate with foam.
4. SQUEAKS AND RATTLES FORWARD OF INSTRUMENT PANEL ---------------------------
Clunk - Over Heavy Impacts -
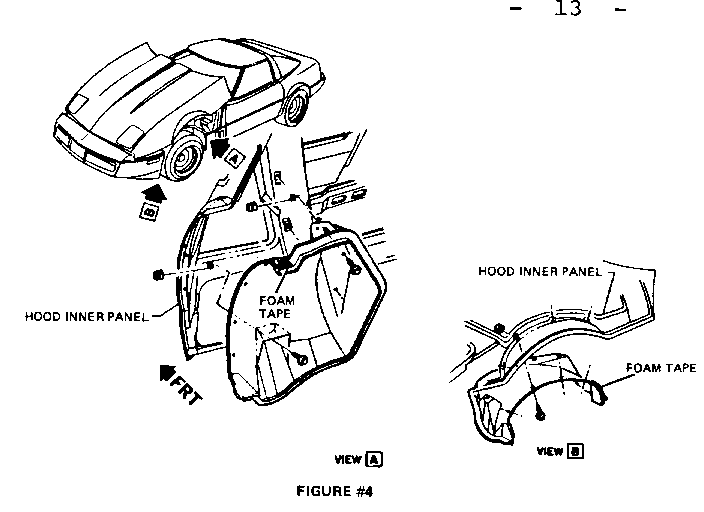
The wheelhouse upper panel Isolate the wheelhouse by adding hits the hood assembly. foam between the rear outboard surface of the wheelhouse and the hood inner (see Figure No. 4).
Buzz at 900 RPM -
The air cleaner assembly nuts Tighten the air cleaner nuts. are loose.
Thump -
the headlight assembly hits Move the vacuum line and tie it the cruise control vacuum down to the fuel canister lines. line and the wheelhouse Adjust the wheelhouse support to support during operation. obtain clearance.
SQUEAKS AND RATTLES DOORS -----
CONDITION CORRECTION
Buzz -
The door lock alide is loose; Fully install the slider. If the is flocking missing? flocking is missing then replace the slider with new, P/N 20380981, slider. Tinny Rattle - ------------- Loose rivets - door remote Use foam tape to restrict and dampen handle to inner panal. The the rods. One position is on the lock rods hit the plate raised channel in the hardware plate. assembly. The inner plate raps against the door panel at the forward lower corner.
Tapping Noise -
Loose wires and/or connectors Tape and/or rosebud the wires to are the cause. the door or to the door hardware plate.
Snap -
When opening the door there Lube the spring. is a shifting of the spring in the hinge assembly.
The interior door remote handle Reposition the door trim bezel to snaps on the trim bezel. provide clearance. In some cases, it will be necessary to reposition the door interior trim panel rearward before the trim bezel can be moved.
Squeak -
There is glass friction A wet glass condition - no action. against the inner draft strip.
There is minimum or no lube Lube the door handles. on the door handles.
The door hinge roller doesn't Lubricate the roller with penetrating rotate. lube.
The door hinge bushings are Replace the hinge assembly - upper worn. P/N 14043176, lower P/N 14043177.
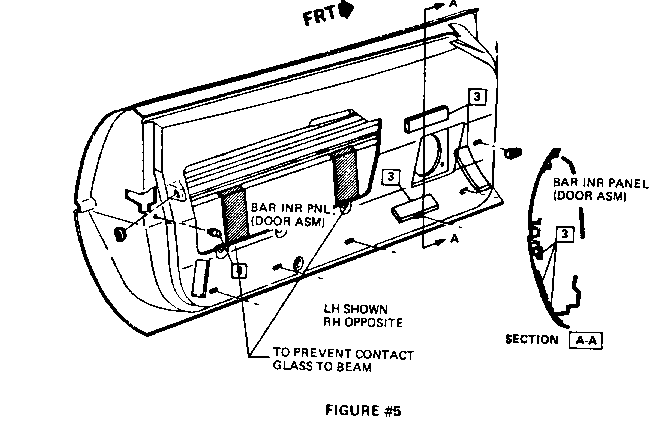
Clank With Door Class Down -
The door glass hits the side Add a double layer of P/N 3999572 the impact beam. foam (see Figure No. 5) insulator to two spots on the side impact beam.
6. SQUEAKS AND RATTLES CONSOLE AREA ------------- CONDITION CORRECTION --------- -----------
Jingle -
The transmission filler tube Adjust the filler if possible; if rattles against the underbody not isolate it with foam tape around on the right side of the tunnel. the tube.
Jingles -
The converter pipe is loose at Tighten the clamps. the forward clamp.
Clicking -
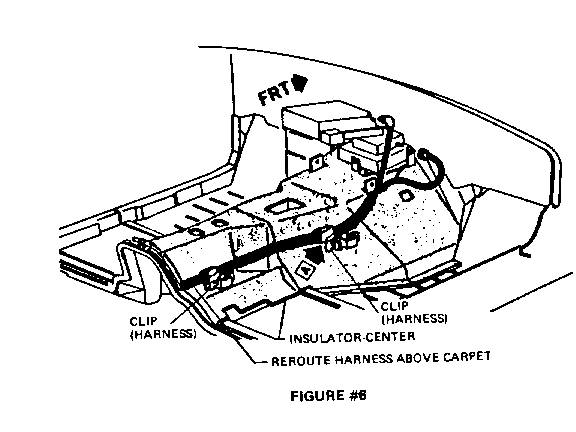
The power antenna cable is Re-Route the antenna cable between loose. the carpet and the floor insulator.
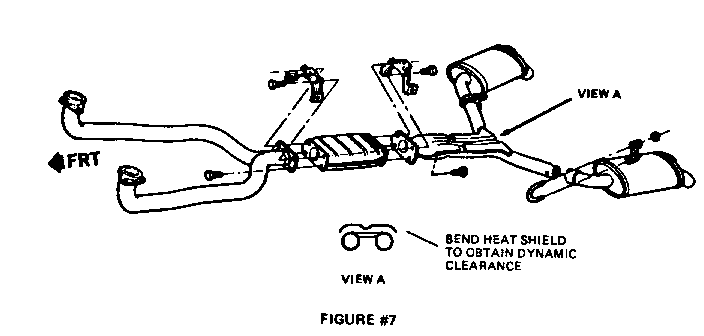
Tinny Buzz
The heat shield buzzes against Bend the shields as required to the exhaust pipe (2700 RPM). clear the converter flange or The heat shield contacts the exhaust pipe tie strap (just before transmission and/or the exhaust split above axle). Remember dynamic pipe heat shield. clearance (see Figure #7) is required
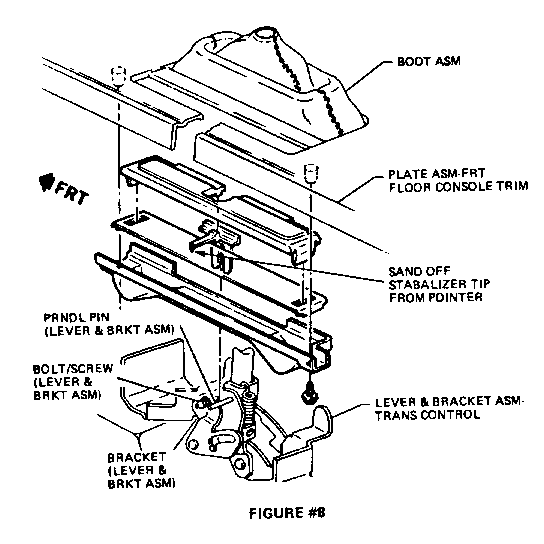
Squeak -
The shift pointer rubs against Sand the pointer rubbing surface the plastic lens. smooth. Sand off the stabilizer (see Figure No. 8) point on the bottom of the pointer point.
7. SQUEAKS AND RATTLES REAR COMPARTMENT - LEFT SIDE ----------------------------
CONDITION CORRECTION
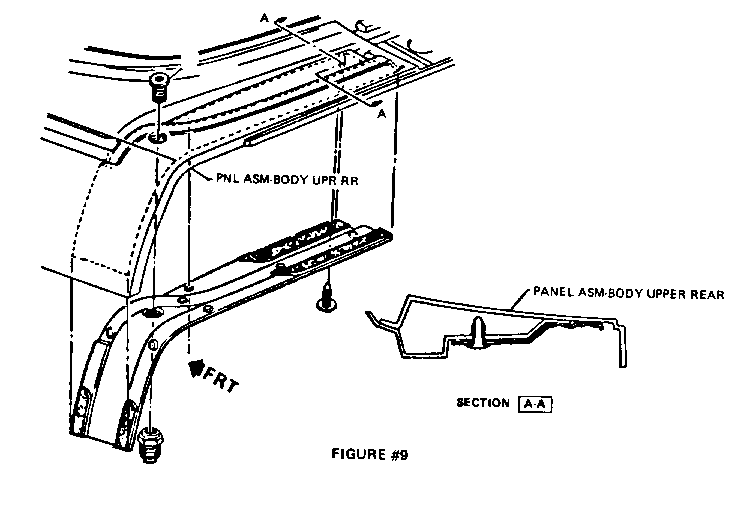
Tinny Jingle -
The power antenna shield Install foam tape to the flanges of contacts the body upper RR the antennd shield. The tape panel assembly. thickness should be sufficient to prevent contact of the shield to body (see Figure No. 9).
Mousey Squeak -
The seat back rubs against the Remove the vinyl binding and trim vinyl binding of RR side the carpet if appearance is poor. carpet assembly. This is a production fix.
Clicking or Metallic Rattle -
The rear tail lamp support Install P/N 14078683 LH or P/N bracket to the rear bumper 14078684 RH with pop rivets. retainer, and/or lamp mtg. plate is loose. The rear tail lamp support bracket to rear bumper support, and/or lamp mtg. plate is loose.
Clunk -
The power antenna cable and Isolate it with foam, especially relay slaps against the rear above rear speaker enclosure. floor panel.
The muffler is hitting the Adjust the muffler and the exhuast underbody. system for clearance.
Buzz -
The side garnish mouldings are Tighten the screws. loose.
The wires rub against the Isolate the wires with foam. Slip trim panel. the wires under the carpet retainer.
The trim bezel roof stowage Tighten the screws. bracket screws are loose.
Bang-Bang -
The antenna assembly hits Make sure that the antenna fasteners the body. are tight. On some early vehicles the antenna bracket was held on with only 1 stud. On these vehicles the antenna motor should be wrapped with foam. Secure the foam with a plastic tie strap.
SQUEAKS AND RATTLES CENTRE OF REAR COMPARTMENT -------------------------- CONDITION CORRECTION ---------- -----------
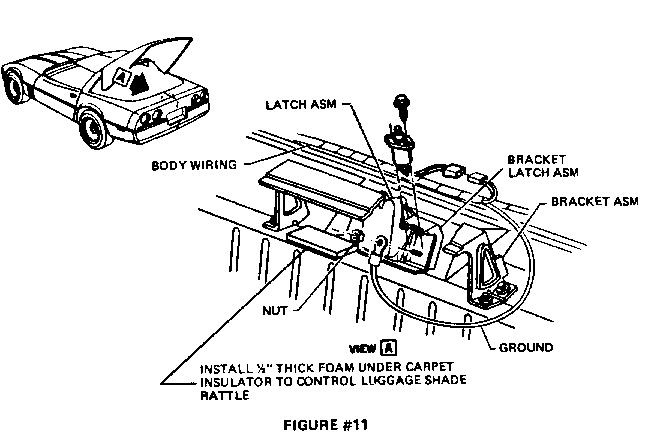
Rattles -
The security screen beaming Put 1/2 inch (12mm) thick foam under shakes against the rear trim the carpet in front of the hatch panel. latch support bracket (see Figure No. 11).
The parking brake equalizer Wrap it in foam. bangs against the underbody.
The rear trim panel has loose Tighten the screws. screws.
Gross - The gas struts hit Rotate the strut attachment the roof shingle when the roof slightly outboard to gain clearance is in stowed position.
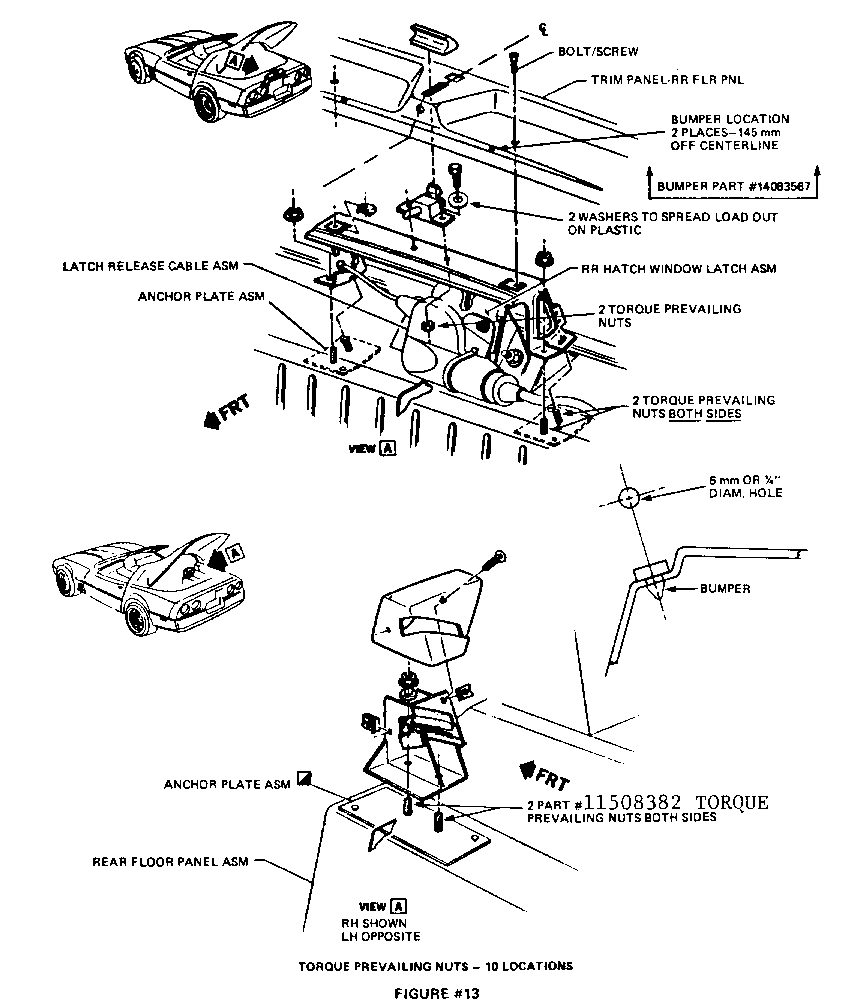
Metallic Rattle -
Stowed roof assembly - the rear Replace the nut with P/N 11508382 roof stowage bracket has loose torque prevailing nuts and add two screws. washers, P/N 11500322 to the latch assembly (see Figure No. 13).
Plastic Rattle -
The stowed roof assembly is Install two rubber bumpers, P/N hitting the rear garnish 14083567 on the rear garnish moulding. moulding (see Figure No. 13).
The fuel filler door outboard Bend the hinges to centre the door edges hit the roof upper panel in the opening or shim the entire and/or lower panel of door filler door assembly up 1mm (1/16 assembly. inch) using washers. This will affect the door flushness.
Buzz -
The roof stowage bracket to Tighten the handle. retainer handle is loose.
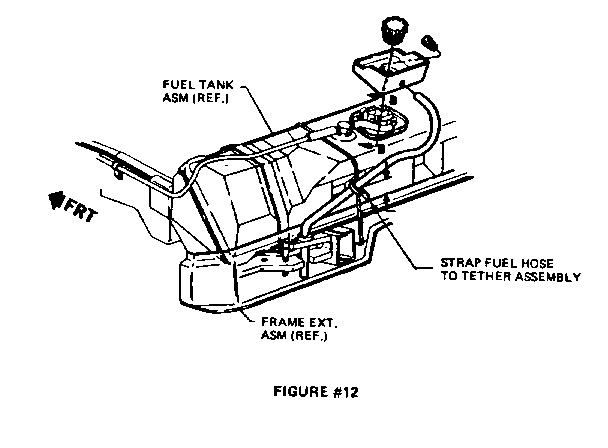
Thumper -
The fuel overflow hose hitting Strap the fuel filler hose to the the fuel tank. tether assembly. (see Figure 12).
Clicky-Clicky -
A loose wire harness sags above Tape wires and connectors to stop the wire license plate opening. the rattles. A loose hatch ajar wire connector raps against the antenna relay.
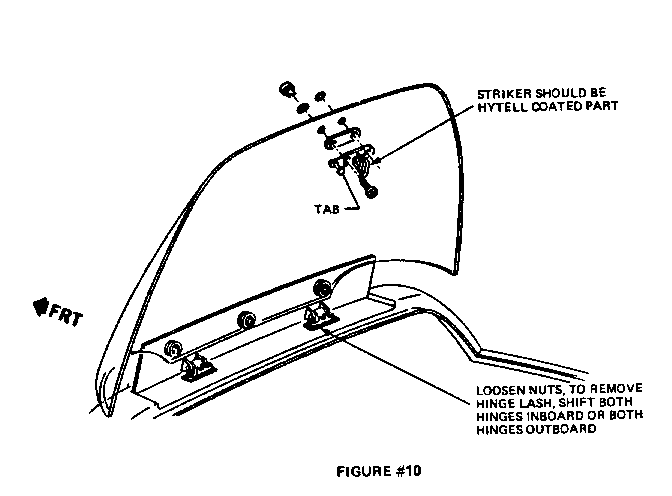
Heavey Metallic Clicking -
The hatch striker is worn. Replace the non-coated striker with P/N 14049028 hytel coated striker (see Figure No. 10).
Bang -
A loose stabilizer bar. Tighten the fasteners.
Squeak -
High Pitch - the brake rotor/ Bend the dust shield to clear the dust shield rubs. rotor.
Buzz -
A loose side garnish moulding - Tighten the screws. or loose trim on roof stowage bracket.
9. SQUEAKS AND RATTLES ROOF ----
CONDITION CORRECTION
Creak -
The Unibody contacts the upper Bend or grind the uniframe flanges roof assembly. to obtain clearance.
Gross Banging -
The removable roof assembly Tighten the customer bolts. is loose. Instruct the owner that the long end of the wrench must be used to obtain the proper torque. If the rattle persists, then tighten the roof bracket attachments also.
Metallic Rattle -
The cage nuts are loose. Tighten the attachments. The brackets in the frame of the acrylic roof assembly are loose.
Chucking
The hatch glass moves Remove the halo garnish trim and laterally on the hinge pins. shift the hinge attachments inboard or outboard to eliminate side play in hinges. (Both hinges inboard or outboard). See Figure No. 10).
General Motors bulletins are intended for use by professional technicians, not a "do-it-yourselfer". They are written to inform those technicians of conditions that may occur on some vehicles, or to provide information that could assist in the proper service of a vehicle. Properly trained technicians have the equipment, tools, safety instructions and know-how to do a job properly and safely. If a condition is described, do not assume that the bulletin applies to your vehicle, or that your vehicle will have that condition. See a General Motors dealer servicing your brand of General Motors vehicle for information on whether your vehicle may benefit from the information.
