WINDOW REGULATOR REPLACEMENT PROCEDURE AND P/N'S LISTED

Model and Year: 1984-1986 CORVETTE
This revised dealer bulletin cancels and replaces 86-17 dated December 1985 which should be destroyed. This reissue reflects changes in part numbers only.
Conditions which in the past required complete window regulator replacements on Corvettes, can now be repaired by either replacing the complete regulator or servicing the existing regulator with component parts.
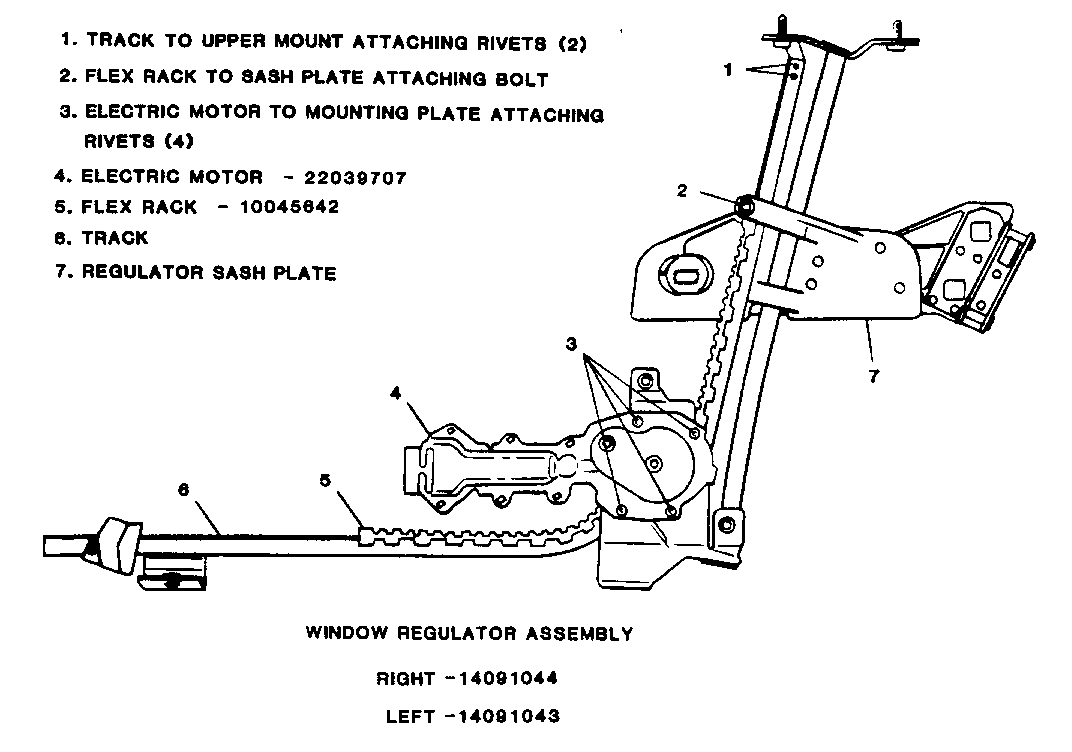
This bulletin contains part numbers and procedures for the replacement of the electric motor and plastic flex rack of the window regulator assembly (Items 4 and 5, Figure 1).
Regulator conditions encountered on vehicles built prior to September, 1984 or that have flex rack tracks which are not chrome, (Item 6, Figure 1;) but are yellow or gold in color, or dull metal finish, require replacement of complete regulator assembly.
Conditions encountered on vehicles built after August, 1984 or regulators with chrome flex rack tracks (Item 6, Figure 1) may be repaired with com- ponent parts (electric motors and or revised flex racks, Items 4 and 5, Figure 1).
The recommended procedure for replacement of the electric motor is as follows:
1. Remove regulator assembly from door and place on a clean work surface.
2. Using an electric drill. motor and 4mm (5/32") drill bit, drill out four (4) attaching rivets that retain the electric window motor to the lower mounting place (location 3, Figure 1).
3. Remove the motor from the regulator assembly and transfer the plastic drive gear to the new motor.
4. Clean the lower mounting plate of all metal shavings prior to motor installation.
5. Apply lubricant (GM P/N 105'349 or equivalent) to the drive gear, flex rack, track and gear housing on the lower mounting plate.
6. Install the new motor to the mounting plate using four (4) 4 mm X 10 mm (5/32" X 3/8") rivets (location 3, Figure 1).
7. Using an external power source, operate the regulator to insure quiet, free operation.
8. Reinstall regulator into door and align door glass as necessary.
The recommended procedure for replacement of the plastic flex rack gear is as follows:
1. Remove regulator assembly from door and place on a clean work surface.
2. Using an electric drill motor and 4mm (5/32") drill bit, drill out the two (2) track to upper mounting plate attaching rivets (location 1, Figure 1).
3. Remove the Allen head type bolt (location 2, Figure 1) retaining the flex rack to the regulator sash plate. It will be necessary to hold the attachment nut on the underside of the sash plate to prevent it from rotating.
4. Lift track away from upper mounting plate and carefully pull track away from guide tube in order to disengage the flex rack and track from the sash plate opening at location 2, Figure 1.
5. Remove the old flex rack completely from the track by using the window motor and an external power source.
6. Clean track of all metal shavings prior to new flex rack installation.
7. Lubricate both sides of the new flex rack with P/N 1052349 or equivalent.
8. Slide the flex rack onto the track until engaged with motor gear. Use the motor with an external power source to pull the remaining flex rack onto the track.
9. Locate the flex rack and track into the sash plate opening at location 2, Figure 1. Apply Loctite Thread Sealer to the bolt threads prior to reinstalling the Allen type bolt at location 2 Figure I to prevent loosening from vibration.
10. Locate and fasten track to the upper mounting plate using two (2) 4mm X 10mm (5/32" x 3/8") rivets (location 1, Figure 1).
11. Using an external power source, operate the regulator to insure quiet, free operation.
12. Reinstall regulator assembly into door and align glass as necessary.
LABOR OPERATIONS AND TIMES:
Regulator, Front Door Window Replace Right Power C0182 1.7 Left Power C0183 1.7 Add: A to replace flex rack .3
Motor, Power Window Replace Right Power N3314 1.7 Left Power N3315 1.7
General Motors bulletins are intended for use by professional technicians, not a "do-it-yourselfer". They are written to inform those technicians of conditions that may occur on some vehicles, or to provide information that could assist in the proper service of a vehicle. Properly trained technicians have the equipment, tools, safety instructions and know-how to do a job properly and safely. If a condition is described, do not assume that the bulletin applies to your vehicle, or that your vehicle will have that condition. See a General Motors dealer servicing your brand of General Motors vehicle for information on whether your vehicle may benefit from the information.
