SERVICE MAN. UPDATE SEC.9J A/B REV. SIR DIAGNOSTIC PROCEDURE

Subject: SIR DIAGNOSTICS AND PROCEDURES TO PREVENT CODES 16 AND 26 DUE TO CORROSION REVISED
Model and Year: 1990 CORVETTE ------------------------------------------------------------------------------
Some 1990 Corvettes have set SIR Sensor Codes 16 and 26. The DERM has detected an unacceptably high resistance between the SIR sensor and the frame rail, most likely due to a buildup of corrosion on the mounting surfaces. New service procedures have been developed to remove the corrosion and help prevent it from building up again. Diagnostic charts and removal and installation procedures, revised to address the corrosion issue, are attached. Please use these new procedures for all 1990 Corvette SIR Code 16 and Code 26 situations you encounter.
IMPORTANT! - The corrosion condition and repair procedures apply only to 1990 Corvette; 1991 and subsequent vehicles do not set sensor codes due to this condition.
The new procedures require the use of a special grease (P/N 12345579) and two external-tooth lock washers (P/N 11501869 - 8 mm, P/N 121753 - 6 mm) for the sensor mounting bolts.
Parts are currently available from GMSPO.
Along with the new procedures, please remember the following:
1. The "SIR Diagnostic System Check" in Section 9J-A must be the starting point of any SIR diagnostics. The "SIR Diagnostic System Check" will verify proper "INFL REST" warning lamp operation and will lead you to the correct chart to diagnose any SIR faults. Bypassing these procedures may result in extended diagnostic time, incorrect diagnosis, and incorrect parts replacement.
2. If both Code 15 and 16 (or 25 and 26) are set, use the Code 16(26) diagnosis chart first. Then, if Code 15(25) resets after the Code 16(26) is corrected, perform the Code 15(25) diagnosis.
3. To clear 1990 Corvette SIR codes, use the Tech 1 (part number T1 or 94-00101-A) with the 1991 Body Systems Cartridge (TKO4040A) and 1990 Dual UART/SIR Adapter (TA00065). The 1991 Body Systems Cartridge must be used because the 1990 Body Systems Cartridge has no SIR code-clearing capabilities for the 1990 Corvette.
If the Tech 1, cartridge, and adapter are not available, codes can be cleared by grounding Terminal "K" of the ALDL connector as called out below under "ALDL Code-Clearing Technique". If using the ALDL procedure, be sure to follow it completely and exactly; codes can be difficult to clear using this method if the procedure is not carefully followed.
4. If the ignition is turned "ON" while any part of the l99O Corvette SIR system is disconnected, a code will set and remain set, even if the component is reconnected, until cleared by the technician.
Labor Operation C8813 (Left Sensor) Labor Operation C8812 (Right Sensor)
Use applicable labor time guide for labor hours.
ALDL CODE-CLEARING TECHNIQUE
When using this code-clearing technique, a digital wristwatch can be quite helpful. The timing sequence discussed below is very important to successfully clearing codes. The watch can help you with timing the 3-second intervals more exactly.
1.Turn ignition "OFF".
2. Ground ALDL terminal "K".
3. Turn ignition "ON".
4. Wait for codes to begin flashing (approximately 5 seconds). When codes begin flashing, unground ALDL terminal "K" for 3 seconds +/- 1/2 second.
5. After ungrounding terminal "K" as described in Step 4, ground it again for 3 seconds +/- 1/2 second.
6. Unground ALDL terminal "K", and wait 10 seconds. Before turning ignition "OFF", verify that Code 12 flashes six (6) times. If Code 12 does not flash six (6) times, codes have not been cleared properly. Begin clearing procedure again starting with Step 1.
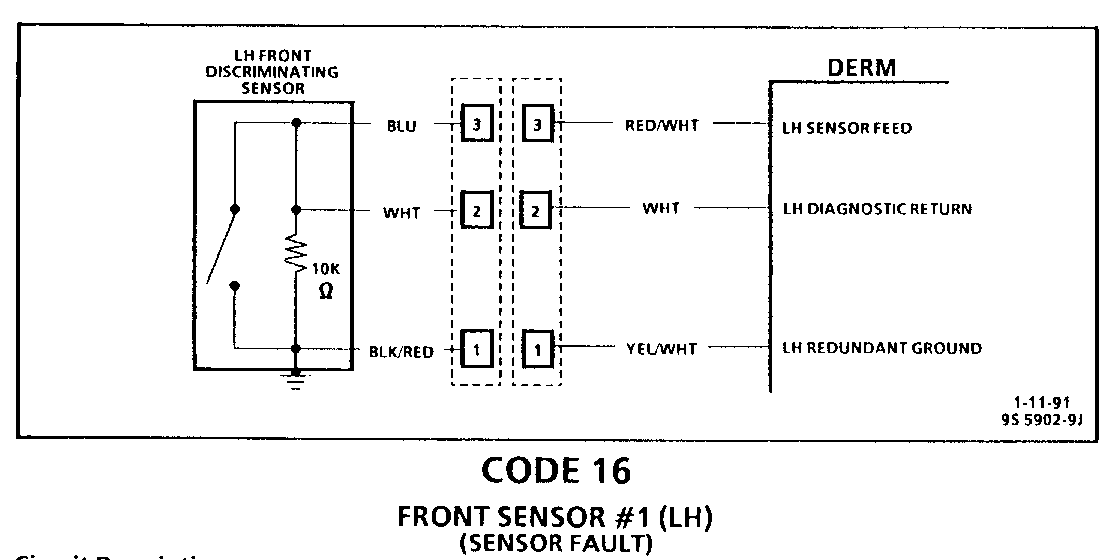
CODE 16 FRONT SENSOR #1 (LH) (SENSOR FAULT) --------------
Circuit Description:
In a frontal crash of sufficient force, the Front Discriminating Sensor Switch closes, providing a path to ground for the deployment loop current. The sensor contains additional circuitry, used by the DERM for diagnostics.
If the DERM measures more than a certain resistance value between the redundant ground circuit and the DERM's own ground, Code 16 will set. This code will also set if the DERM measures less than a certain resistance between the sensor feed circuit and B + or the diagnostic return circuit and B +.
Test Description:
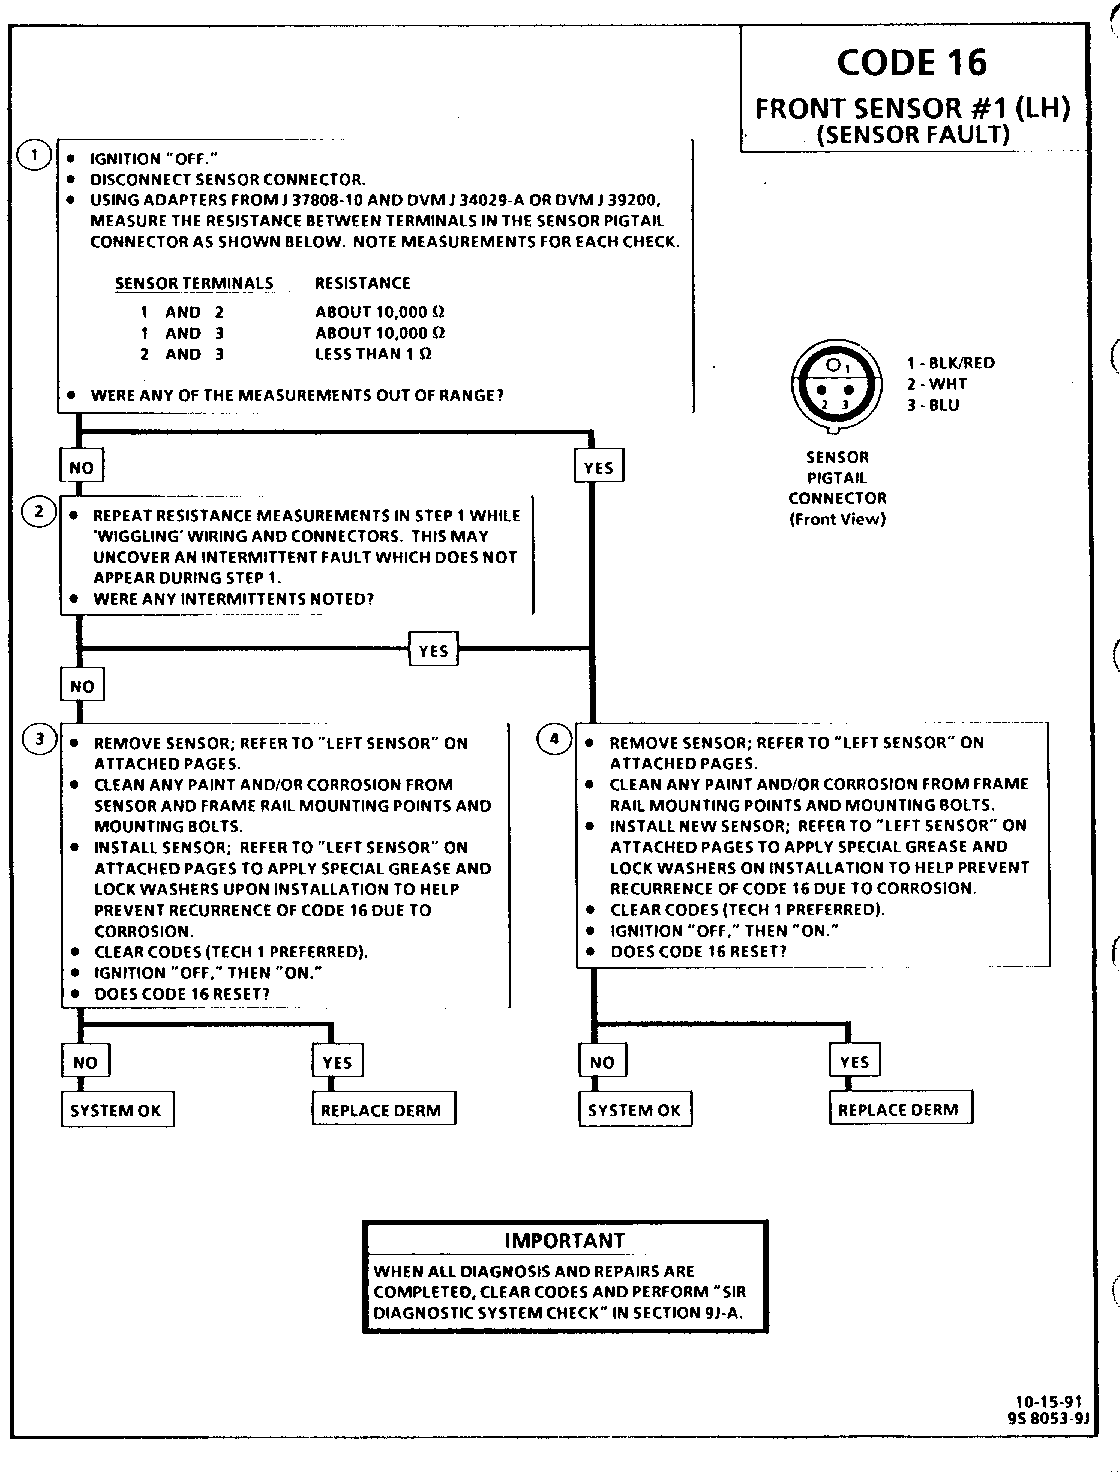
Numbers below refer to circled numbers on the diagnostic chart.
1. Checks to see if the sensor and its wiring are within correct specifications.
2. Attempts to induce a hidden intermittent.
3. Cleans corrosion from sensor and Mounting areas, and installs special service items to help eliminate corrosion from building up again. Corrosion could cause an unacceptably-high resistance between the sensor case and frame rail ground, setting Code 16.
4. Replaces bad sensor found in Step 1. Also installs special service items to help prevent sensor-to-frame rail corrosion from occurring with the new sensor.
Diagnostic Aids:
If a Code 16 has set, a Code 15 may also be set. Repair the Code 16 first. Then, if Code 15 resets, use the Code 15 diagnostic chart.
Severe corrosion under the sensor mounting bracket may cause a Code 16. Refer to "Left Sensor" on attached pages to remove sensor, inspect for corrosion, and correct corrosion if found. "Left Sensor" also instructs on use of special grease and washers to help prevent recurrence of Code 16 due to corrosion.
The Fasten Seat Belt indicator will stay "ON" continuously when an SIR code has been set.
If power is applied to the SIR system while any component is not properly connected, an additional code will be set for the disconnected SIR component.
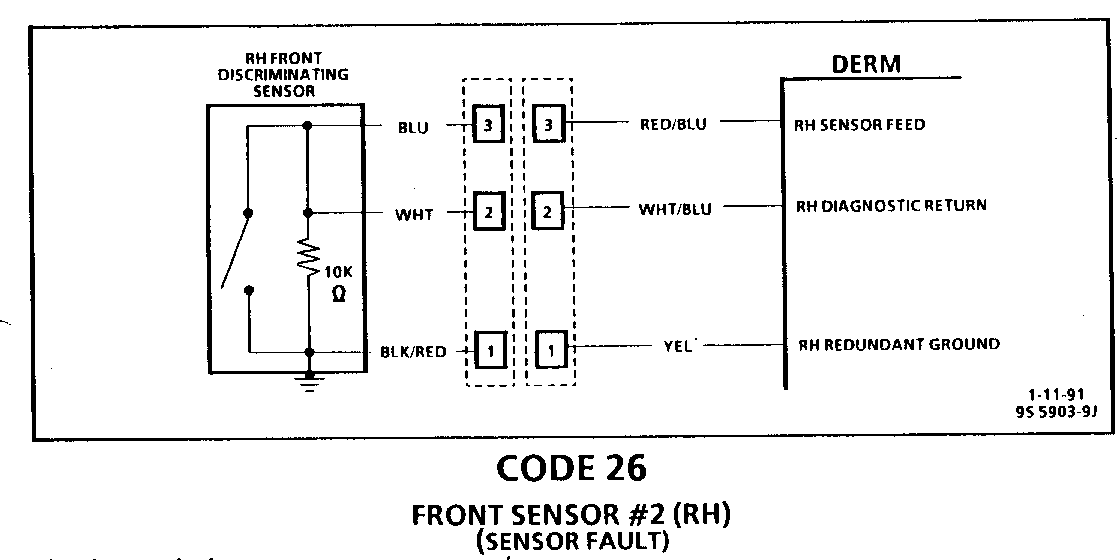
CODE 26 FRONT SENSOR #2 (RH) (SENSOR FAULT) ---------------
Circuit Description:
In a frontal crash of sufficient force, the Front Discriminating Sensor switch closes, providing a path to ground for the deployment loop current. The sensor contains additional circuitry, used by the DERM for diagnostics.
If the DERM measures more than a certain resistance value between the redundant ground circuit and the DERM's own ground, Code 26 will set. This code will also set if the DERM measures less than a certain resistance between the sensor feed circuit and B + or the diagnostic return circuit and B +.
Test Description:
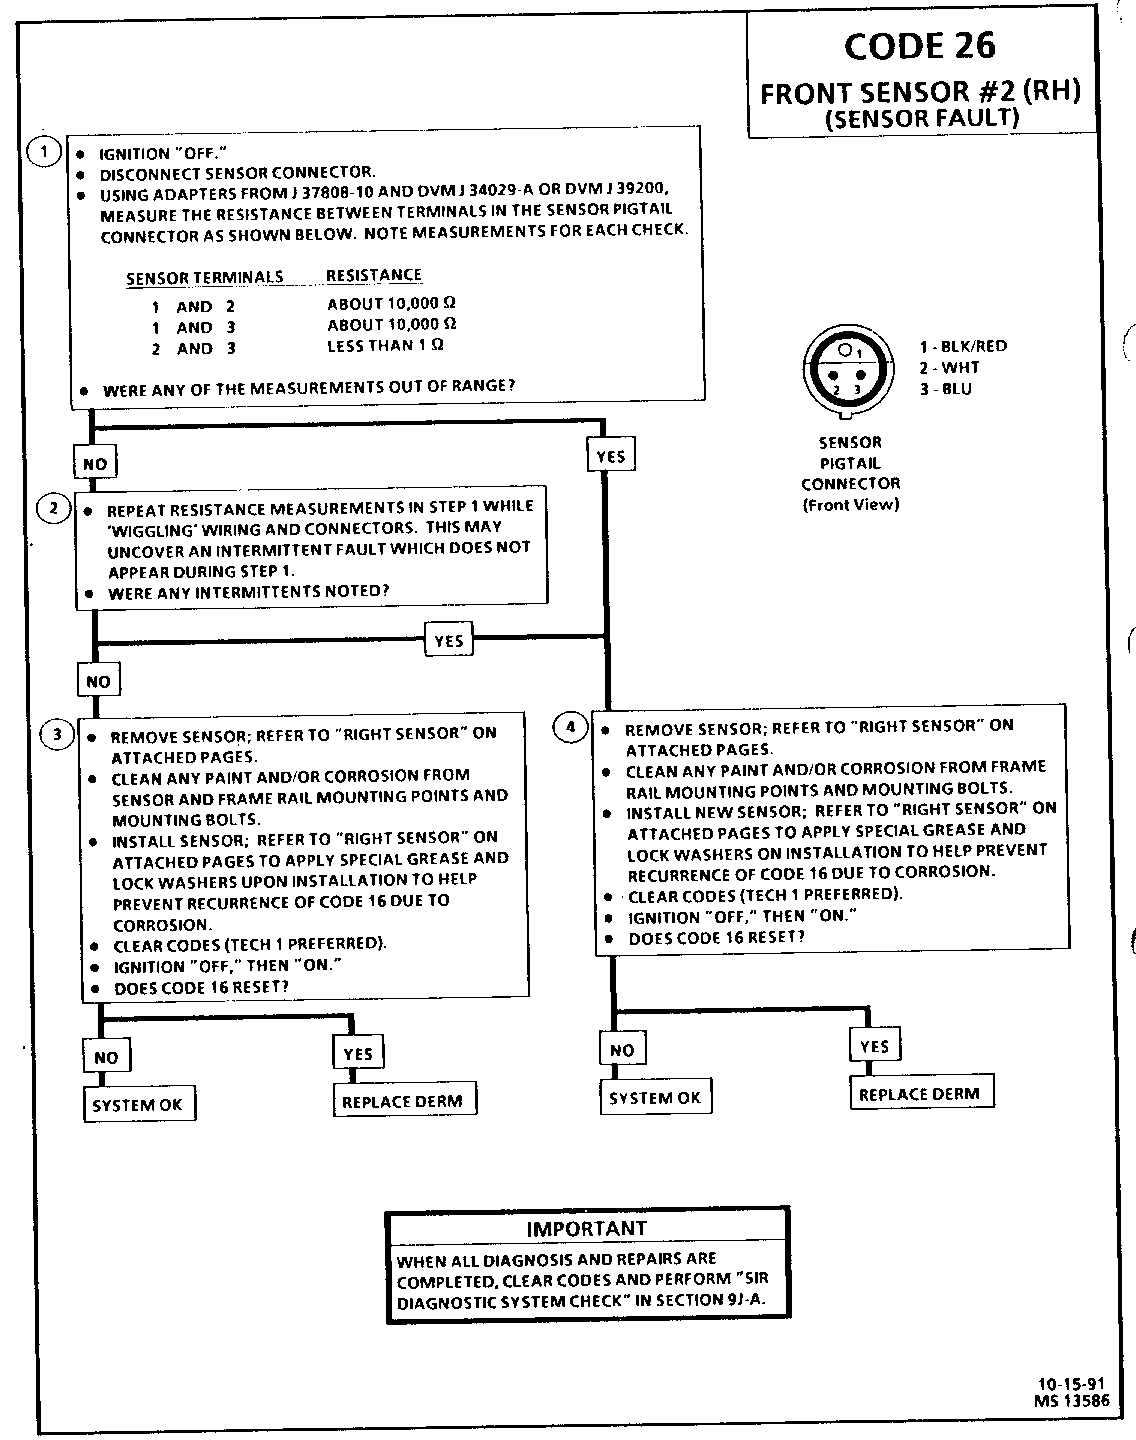
Numbers below refer to circled numbers on the diagnostic chart.
1. Checks to see if the sensor and its wiring are within correct specifications.
2. Attempts to induce a hidden intermittent.
3. Cleans corrosion from sensor and mounting areas, and installs special service items to help eliminate corrosion from building up again. Corrosion could cause and unacceptably-high resistance between the sensor case and frame rail ground, setting Code 26.
4. Replaces bad sensor found in Step 1. Also installs special service items to help prevent sensor-to- frame rail corrosion from occurring with the new sensor.
Diagnostic Aids:
If a Code 26 has set, a Code 25 may also be set. Repair the Code 26 first. Then, if Code 25 resets, use the Code 25 diagnostic chart.
Severe corrosion under the sensor mounting bracket may cause a Code 26. Refer to "Right Sensor" on attached pages to remove sensor, inspect for corrosion, and correct corrosion if found. "Right Sensor" also instructs on use of special grease and washers to help prevent recurrence of Code 26 due to corrosion.
The Fasten Seat Belt indicator will stay "ON" continuously when an SIR code has been set.
If power is applied to the SIR system while any component is not properly connected, an additional code will be set for the disconnected SIR component.
FORWARD DISCRIMINATING SENSORS Figures 1 & 2 ------------- Caution should be used to assure proper location of sensors to the front frame rails. The keying of the sensors to the frame rails through the differently sized mounting bolt holes in the sensor mounting plate should never be modified in the field.
CAUTION:
-------- Be very careful when handling a sensor. Never strike or jar a sensor. If you do, it could cause deployment and result in personal injury or improper operation of the Supplemental Inflatable Restraint (SIR) system. All sensor mounting bolts must be carefully torqued to assure proper sensor operation. Never power up the SIR system when any sensor is not rigidly attached to the vehicle, since the sensor is easily activated when not attached and could result in a deployment.
LEFT SENSOR
CAUTION:
-------- The following procedures must be followed in the order listed to temporarily disable the Supplemental Inflatable Restraint (SIR) system and prevent false diagnostic codes from setting. Failure to follow this procedure could result in possible air bag deployment, personal injury, or unneeded SIR system repairs.
Remove or Disconnect
1. Turn ignition switch "OFF."
2. Left sound insulator; refer to INSTRUMENT PANEL, GAGES, & CONSOLE (SECTION 8C).
3. Connector Position Assurance (CPA) and yellow two-way SIR connector at base of steering column.
4. Battery; refer to BATTERY (SECTION 6D1).
5. ECM and support; refer to DRIVEABILITY AND EMISSIONS 9SECTION 6E3).
6. Sensor mounting bolts.
7. Sensor electrical connection from retainer; disconnect connection.
8. Sensor from vehicle.
IMPORTANT
----------
Clean
- Sensor mounting bracket surface, frame rail mounting surface, and mounting bolts and holes to remove any paint or corrosion that might interfere with a good electrical ground.
CAUTION
-------- - Proper operation of the sensors and Supplemental inflatable Restraint (SIR) system requires that repairs to the vehicle structure return it to its original production configuration. Deployment requires, at a minimum, replacement of the DERM, both forward discriminating sensors, the SIR Coil Assembly, and the Inflator Module. Any visible damage to the sensors, DERM, and/or the DERM mounting brackets requires replacement, and the steering wheel must be dimensionally inspected, whether deployment occurred or not.
Install or Connect
1. Apply a thin layer of special grease P/N 12345579 to the frame rail mounting surface and the mounting flange of the sensor. Do not apply the grease to the mounting bolts or holes.
2. Forward discriminating sensor, with arrow pointing toward front of vehicle.
3. External tooth lock washers, P/N 11501869 (8 mm) and 121753 (6 mm) to mounting bolts.
4. Sensor mounting bolts. Ensure that washers are between bolt head and senor mounting flange, not between mounting flange and frame rail.
Tighten
- Front (13 mm head) bolt to 25 N.m (19 lb. ft.) - Rear (10 mm head) bolt to 14 N.m (125 lb. in.)
5. Sensor electrical connection, then clip completed connection into retainer.
6. ECM and support; refer to DRIVEABILITY AND EMISSIONS (SECTION 6E3).
7. Battery; refer to BATTERY (SECTION 6D1).
8. Yellow two-way SIR connector at base of steering column and Connector Position Assurance (CPA).
9. Left sound insulator; refer to INSTRUMENT PANEL, GAGES & CONSOLE (SECTION 8C).
10. Perform "SIR Diagnostic System Check" as outlines in SIR SYSTEM DIAGNOSIS (SECTION 9JA).
RIGHT SENSOR
CAUTION
-------- The following procedures must be followed in the order listed to temporarily disable the Supplemental Inflatable Restraint (SIR) system and prevent false diagnostic codes from setting. Failure to follow this procedure could result in possible air bag deployment, personal injury, or unneeded SIR system repairs.
Remove or Disconnect
1. Turn ignition switch "OFF."
2. Left sound insulator; refer to INSTRUMENT PANEL, GAGES & CONSOLE (SECTION 8C).
3. Connector Position Assurance (CPA) and yellow two-way SIR connector at base of steering column.
4. Six front right-side rocker panel retaining screws.
5. Right-side front fender "grill panel" retaining bolts, remove fender.
6. Peel back rear portion of wheelhouse-to-hood seal.
7. Right-side lower wheelhouse retaining bolts; remove lower wheelhouse.
8. Two front windshield washer reservoir retaining bolts.
9. Loosen remaining washer reservoir bolt; rotate reservoir to access sensor.
10. Sensor mounting bolts.
11. Sensor electrical connection from retainer; disconnect connection.
12. Sensor from vehicle.
IMPORTANT
Clean ----- - Sensor mounting bracket surface, frame rail mounting surface, and mounting bolts and holes to remove any paint or corrosion that might interfere with a good electrical ground.
CAUTION:
--------- - Proper operation of the sensors and Supplemental Inflatable Restraint (SIR) system requires that repairs to the vehicle structure return it to its original production configuration. Deployment requires, at a minimum, replacement of the DERM, both forward discriminating sensors, the SIR coil Assembly, and the Inflator Module. Any visible damage to the sensors, DERM, and/or the DERM mounting brackets requires replacement, and the steering wheel must be dimensionally inspected, whether deployment occurred or not.
- Proper operation of the forward discriminating sensor requires the sensor be rigidly attached to the vehicle structure and that the arrow on the sensor be pointing toward the front of the vehicle.
Install or Connect
1. Apply a thin layer of special grease P/N 12345579 to the frame rail mounting surface and the mounting flange of the sensor. Do not apply the grease to the mounting bolts or holes.
2. Forward discriminating sensor, with arrow pointing toward front of vehicle.
3. External tooth lock washers, P/N 11501869 (8 mm) and 121753 (6 mm) to mounting bolts.
4. Sensor mounting bolts. Ensure that washers are between bolt head and sensor mounting flange, not between mounting flange and frame rail.
Tighten
- Front (13 mm head) bolt to 25 N.m (19 lb. ft.) - Rear (10 mm head) bolt to 14 N.m (125 lb. ft.)
5. Sensor electrical connection, then clip completed connection into retainer.
6. Position windshield washer reservoir; install retaining bolts.
Tighten
- Reservoir mounting screws to 10 N.m (89 lb. in.)
7. Lower wheelhouse and retaining bolts.
Tighten
- Wheelhouse to "U"-nut bolts to 6 N.m (54 lb. in.). - Wheelhouse to frame member bolts to 9 N.m (80 lb. in.).
8. Reposition wheelhouse -to-hood seal.
9. Right-side front fender ("grill panel"); install retaining bolts.
10. Six front right-side rocker panel retaining screws.
11. Yellow two-way SIR connector at base of steering column and Connector Position Assurance (CPA).
12. Left sound insulator; refer to INSTRUMENT PANEL, GAGES & CONSOLE (SECTION 8C).
13. Perform "SIR Diagnostic System Check" as outlined in SIR SYSTEM DIAGNOSIS (SECTION 9JA).


General Motors bulletins are intended for use by professional technicians, not a "do-it-yourselfer". They are written to inform those technicians of conditions that may occur on some vehicles, or to provide information that could assist in the proper service of a vehicle. Properly trained technicians have the equipment, tools, safety instructions and know-how to do a job properly and safely. If a condition is described, do not assume that the bulletin applies to your vehicle, or that your vehicle will have that condition. See a General Motors dealer servicing your brand of General Motors vehicle for information on whether your vehicle may benefit from the information.
