CAMPAIGN: OPTI-SPARK DISTRIB. REPLACE WITH NEW PART NUMBER

Subject: OPTI-SPARK DISTRIBUTOR
Models: 1992 Chevrolet Corvette w/LT1 Engine
TO: ALL GENERAL MOTORS DEALERS:
General Motors of Canada has determined that certain 1992 Chevrolet Corvettes with LT1 engines (VIN Code "P") have been equipped with Opti-Spark distributors which may develop a faulty low-resolution pulse signal. This condition may cause a "no-start" engine stall condition, along with a "Service Engine Soon" light (Code 16).
To correct this condition, dealers are to replace the distributor.
Owners of SOLD vehicles involved in this campaign are being contacted by the General Motors of Canada Customer Assistance Centre (CAC) on a Branch-by-Branch basis. Due to initial parts availability, campaign parts will only be made available as owners are contacted by CAC and only for their vehicles (see the Parts Information Section for additional details).
VEHICLES INVOLVED:
Involved are certain 1992 Chevrolet Corvettes with LT1 engines built within the following VIN breakpoints:
Year Model Plant Plant Code From Through 1992 Chev. Corvette Bowling Green "5" N5100001 N5107664
ALL affected vehicles have been identified by the VIN listing provided to involved dealers with this bulletin. Any dealer not receiving a listing was not shipped any of the affected vehicles. Dealers will be notified by DCS when the contacts by CAC will begin in their Branch. DEALERS SHOULD NOT CONTACT OWNERS OR ORDER CAMPAIGN PARTS UNTIL DEALERS ARE NOTIFIED BY DCS.
DEALER CAMPAIGN RESPONSIBILITY:
Dealers are to perform this campaign on all involved vehicles at no charge to owners, regardless of kilometres traveled, age of vehicle, or ownership, from this time forward.
Whenever a vehicle subject to this campaign is taken into your new or used vehicle inventory, or it is in your dealership for service, you are to ensure the campaign correction has been made before selling or releasing the vehicle.
Owners of vehicles recently sold from your new vehicle inventory are to be contacted by the dealer, and arrangements made to make the required modification according to instructions contained in this bulletin.
CAMPAIGN PROCEDURE:
Refer to Section 4 of the Service Policies and Procedures Manual for the detailed procedure on handling Product Campaigns. Dealers are requested to complete the campaign on all transfers as soon as possible.
OWNER NOTIFICATION:
Owners will be notified of this campaign on their vehicles by GM Oshawa. As parts become available, the GM Customer Assistance Centre will be contacting owners and instructing them to schedule an appointment for their vehicle. CAC may also inform the customers of involvement in Recall Campaign 2N03 (Lower Trim Panel/Brake Pedal Interference). Owner letters will also be sent after all Branch contacts have been attempted by CAC within each Branch (see copy of owner letter included with this bulletin).
PARTS INFORMATION:
Due to initial limited parts availability, parts for this program will be made available as owners are contacted by the Customer Assistance centre (CAC) and only for their vehicles. Customer contacts by CAC will be made on a Branch-by-Branch basis related to the number of vehicles in that Branch. Dealers will be advised by DCS when the customers in their Branch are being contacted by CAC. Parts will be made available to dealers in the contacted Branch so customers may schedule appointments for their vehicles.
Parts required to complete this Campaign are to be obtained from General Motors Service Parts Operations (GMSPO). To ensure these parts will be obtained as soon as possible, they should be ordered from GMSPO as a VIP. ALL ORDERS WILL REQUIRE A VIN FOR PROCESSING. Orders received without a VIN will be cancelled automatically with the following message: "Order cancelled, VIN required."
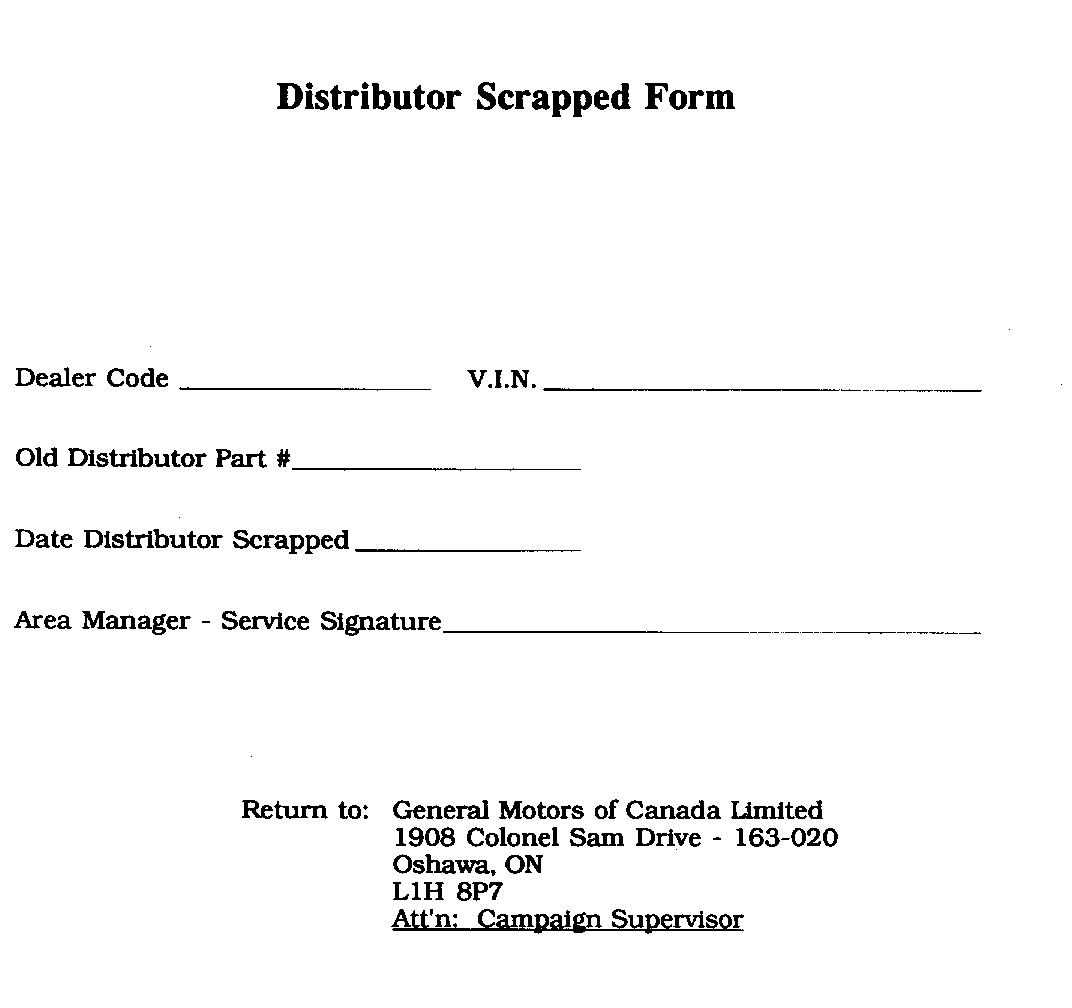
NOTICE: ALL REPLACED DISTRIBUTORS MUST BE SCRAPPED UNDER THE SUPERVISION OF THE AREA MANAGER - SERVICE. PLEASE FILL OUT ATTACHED "DISTRIBUTOR SCRAPPED FORM" AND HAVE THE AREA MANAGER - SERVICE SIGN AND RETURN TO THE ADDRESS SHOWN ON THE FORM.
Part Number Description Quantity/Vehicle ----------- ----------- ---------------- 10457158 Distributor Kit 1
Coolant 8 litres (Mix 50/50 to yield 16 litres)
PARTS AND LABOUR CLAIM INFORMATION:
Credit for the campaign work performed will be paid upon receipt of a properly completed campaign claim card or DCS transmission in accordance with die following:
Repair Code Description Time Allowance ----------- ----------- -------------- 2A Install New Distributor 2.5
6A Costs associated with providing customer a courtesy vehicle (rental), and/or for towing or flat-bedding a vehicle to the dealership for the recall repair.
Time allowance includes 0.1 hour for dealer administrative detail associated with this campaign. Parts credit will be based on dealer net plus 30% to cover parts handling. An allowance of $13.50 has been included in Repair Code 2A for coolant.
SERVICE PROCEDURE:
DISASSEMBLY PROCEDURE
1. Disconnect negative battery cable.
2. Disconnect intake air temperature (IAT) sensor harness connector.
3. Remove air intake duct and air cleaner assembly.
4. Drain coolant from engine as follows:
A. Remove pressure cap from radiator surge tank when engine is cool by:
(1) Slowly rotating cap counterclockwise to detent (do not press down while rotating).
(2) Wait until any residual pressure (indicated by a hissing sound) is relieved.
(3) After all hissing stops, press down on cap while continuing to rotate counter-clockwise.
B. Open radiator drain valve located at bottom of right-hand radiator end tank.
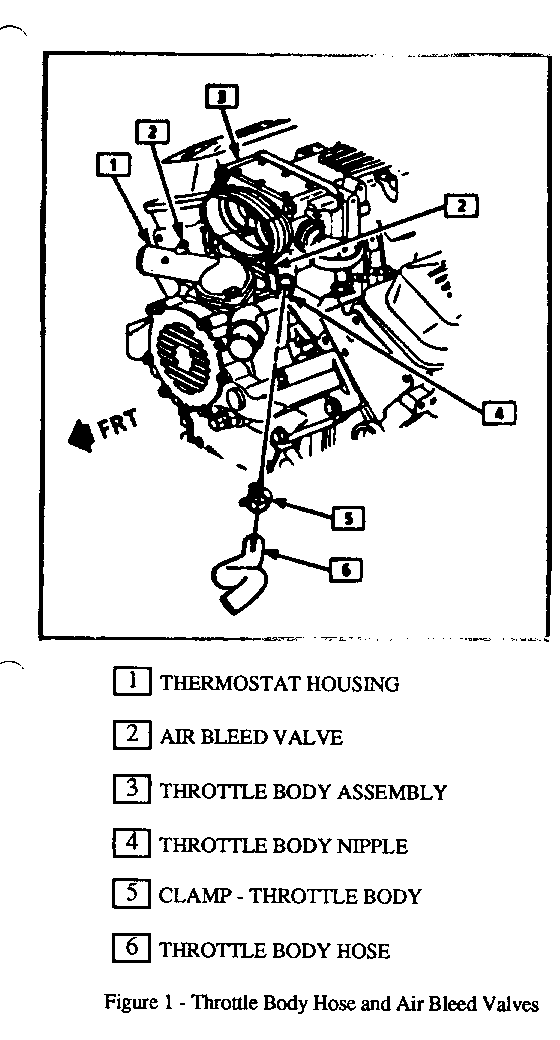
C. Open air bleed valves on thermostat housing and throttle body unit (refer to Figure 1,).
D. Remove engine knock sensors from lower right-hand and left-hand sides of block.
NOTICE: A large amount of coolant is still left in system after radiator petcock has been opened and coolant has been allowed to drain out. This fluid will drain out of the engine block when the knock sensors are removed during coolant drain, flush and refill procedures. Take proper precautions to avoid contact with excessive amounts of coolant during coolant drain, flush and refill procedures.
E. Allow system to drain completely.
5. Disconnect upper and lower radiator hoses and heater hoses from coolant pump.
6. Relieve serpentine belt tension using long 5/8 inch box wrench to rotate tensioner. Belt need only be removed from alternator pulley.
7. Disconnect ECM coolant sensor connector and harness retainer on front of pump.
8. Remove drive belt tensioner bolt and tensioner.
9. Remove coolant pump by removing six bolts securing coolant pump to engine block.
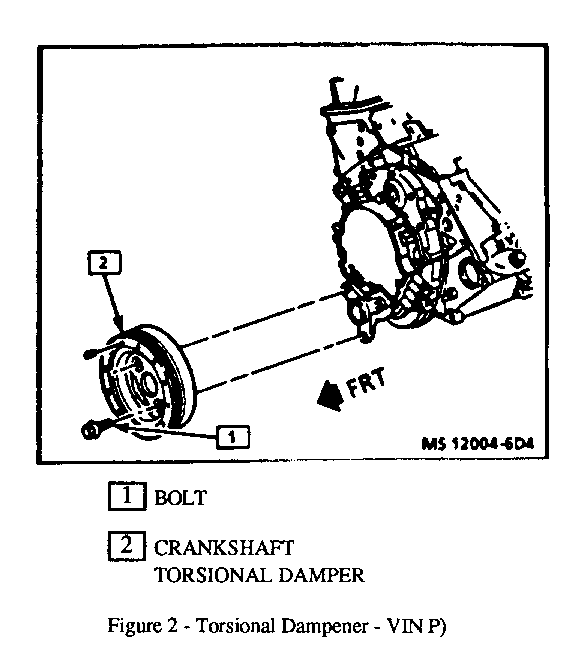
10. Remove three crankshaft torsional damper bolts and damper (refer to Figure 2,).
11. Disconnect spark plug (secondary) cables from distributor. Twist each boot 1/2 tum before removing, and pull only on boot to remove wire from distributor.
12. Disconnect four-terminal connector from distributor.
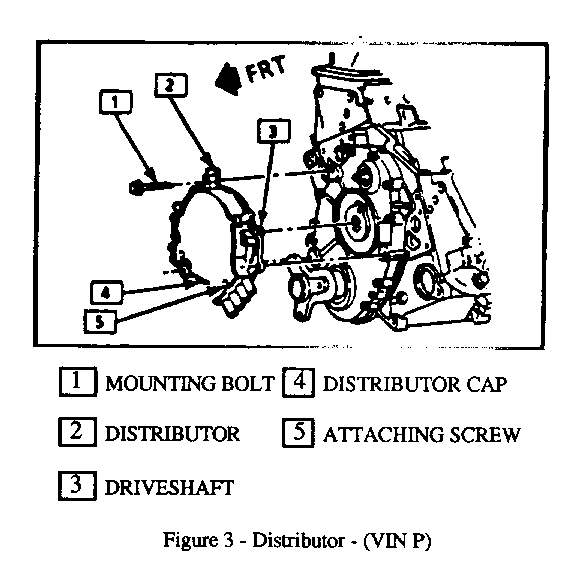
13. Remove three distributor mounting bolts. Pull distributor forward until drive shaft disengages from engine. Mark top surface of shaft to denote location during reassembly (refer to Figure 3,).
REASSEMBLY PROCEDURE
1. Install distributor shaft into distributor. Turn shaft until mark is on top.
2. Install distributor and shaft assembly into engine. Tighten distributor bolts to 11 N.m (8 lb. ft.).
3. Connect four-terminal ECM connector to distributor.
4. Connect spark plug cables to distributor.
5. Install torsional damper to engine. Tighten damper bolt to 81 N.m (60 lb. ft.).
6. Install pump to engine (DO NOT FORCE PUMP ONTO ENGINE):
A. Clean engine block and coolant pump thoroughly.
B. Inspect 0-rings on both pump shaft and drive assembly front cover for cracks and replace 0-rings if damaged.
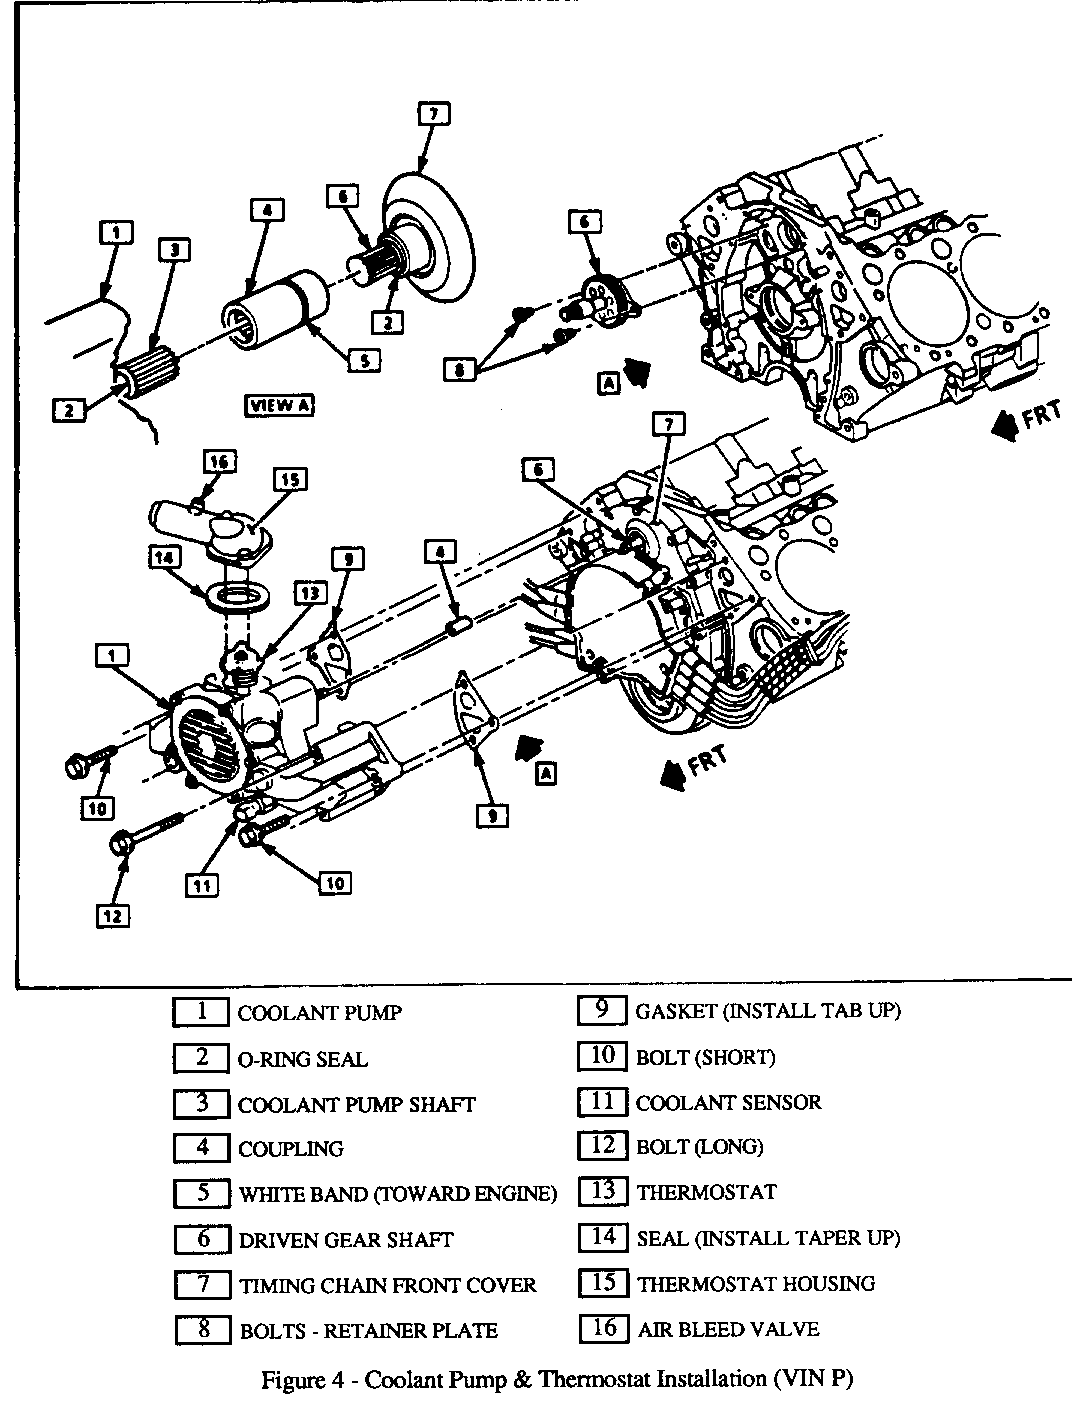
C. Apply light coat of grease to seals and splines before assembly of coupling to coolant pump. White band on coupling goes toward engine (refer to Figure 4,).
D. Install new gaskets with tabs up.
E. Tighten coolant pump attaching bolts to 41 N.m (30 lb. ft.).
7. Install belt tensioner to engine. Tighten tensioner attaching bolt to 33 N.m (24 lb. ft.).
8. Install serpentine belt. Use long 5/8 inch box wrench to rotate tensioner.
9. Install coolant sensor wire harness retainer to front of coolant pump and connect ECM coolant sensor connection.
10. Connect upper and lower radiator hose and heater hose to pump.
11. Close radiator drain valve and install engine knock sensors after lightly applying a SMALL amount of sealant to the threads of the knock sensors. DO NOT DIP KNOCK SENSORS IN SEALANT OR PUT SEALANT ON ENDS OF KNOCK SENSORS AS THIS WILL PREVENT THE KNOCK SENSORS FROM FUNCTIONING PROPERLY. Tighten knock sensors to 19 N.m (14 lb. ft.).
12. Open bleed valves on thermostat housing and throttle body.
13. Fill cooling system (using new coolant (8 litres) of a 50/50 mix to total 16 litres) through radiator surge tank until solid stream of coolant comes out bleed valves.
14. Close bleed valves and fill radiator surge tank until level is at the base of surge tank neck.
15. Install pressure cap.
16. Check level of coolant in recovery reservoir.
17. Install air cleaner and intake dust assembly.
18. Connect IAT electronic connection.
19. Clean off excess coolant from engine and compartment.
20. Connect negative battery cable. Tighten battery cable bolt to 15 N.m (1 1 lb. ft.).
21. Start engine, check for leaks and for proper coolant level.
22. Install Campaign Identification Label.
INSTALLATION OF CAMPAIGN IDENTIFICATION LABEL
Clean surface of radiator upper mounting panel and apply a Campaign Identification Label. Make sure the correct campaign number is inserted on the label. This will indicate that the campaign has been completed.
Dear General Motors Customer.
General Motors of Canada has determined that certain 1992 Chevrolet Corvettes with LT1 engines have been equipped with opti-spark distributors that may develop a faulty low resolution pulse signal. This condition may cause a "no-start" or engine stall condition, along with a "Service Engine Soon" light.
To correct this condition, the existing distributor in your vehicle will be replaced with a new updated part This service will be performed for you at no charge.
Please contact your GM dealer as soon as possible to arrange a service date.
If parts are required, ask your dealer for details regarding their availability. If parts are not in stock, they can be ordered before scheduling your service date.
This letter identifies your vehicle. Presentation of this letter to your dealer will assist their Service personnel in completing the necessary correction to your vehicle in the shortest possible time.
Subsequent to contacting your dealer, further assistance, if required, may be obtained from our Customer Assistance Centre, toll free, by calling 1-800-263-3777 (English), or 1-800-263-7854 (French).
We are sorry to cause you this inconvenience; however, we have taken this action in the interest of your continued satisfaction with our products.
Customer Support Department General Motors of Canada Limited
General Motors bulletins are intended for use by professional technicians, not a "do-it-yourselfer". They are written to inform those technicians of conditions that may occur on some vehicles, or to provide information that could assist in the proper service of a vehicle. Properly trained technicians have the equipment, tools, safety instructions and know-how to do a job properly and safely. If a condition is described, do not assume that the bulletin applies to your vehicle, or that your vehicle will have that condition. See a General Motors dealer servicing your brand of General Motors vehicle for information on whether your vehicle may benefit from the information.
