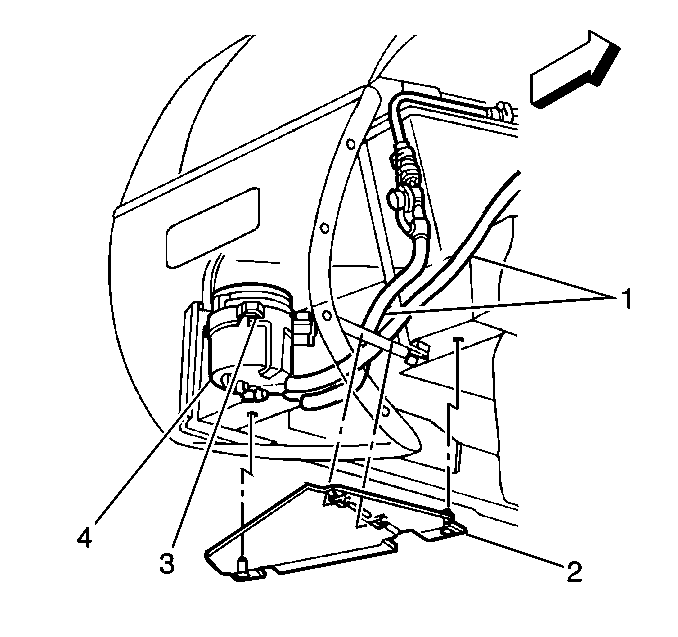
For 1990-2009 cars only
Removal Procedure
- Raise the vehicle.
- Remove the right rear tire.
- Remove the access panel (2).
- Disconnect the hoses from the canister (1).
- Remove the canister (4) from the canister bracket (3).
- Remove the canister from the vehicle (4).

Installation Procedure
- Install the new canister to the vehicle (4).
- Install the canister bracket (3).
- Connect the hoses to the canister (1).
- Install the access panel (2).
- Install the right rear tire.
- Lower the vehicle.

EVAP System Cleaning Procedure
- Turn the ignition off.
- Remove the purge solenoid and the vacuum switch from the vehicle.
- Lightly tap the purge solenoid and the vacuum switch on a clean work area looking for carbon particles or carbon dust exiting either of the vacuum ports.
- If no carbon release is evident, reinstall the components and continue with published service manual DTC procedures.
- If carbon is being released from either component, continue with this service procedure.
- Remove the charcoal canister from the vehicle.
- Ensure the main cylinder valve is turned off on the EVAP purge/pressure diagnostic station J 41413.
- Disconnect the black hose that connects the nitrogen cylinder to the cart J 41413 at the pressure regulator by unscrewing the knurled nut on the regulator.
- Using a section of vacuum line, connect one end over the open fitting of the J 41413 pressure regulator.
- Turn on the main nitrogen cylinder valve and connect the remaining end to the purge solenoid end of the EVAP purge line at the vehicle. Continue to blow any debris from the purge line for 15 seconds.
- Return the EVAP Pressure/Purge Diagnostic Station J 41413 to its original condition by re-installing the black hose disconnected in step 8.
- Replace the EVAP purge solenoid, the charcoal canister, and the EVAP vacuum switch, with new components.
- Manifold vacuum vehicles proceed with published service manual diagnostics.
- Connect a scan tool and display data parameter EVAP vacuum switch.
- Start the engine and allow to reach operating temperature.
- Open throttle until engine speed reaches 2000 RPM.
- If the EVAP vacuum switch changes state Go to Step 19.
- If vacuum switch does not change state repair low source vacuum condition by performing a complete throttle body service including cleaning of the purge port(s) and Go to Step 14.
- If EVAP vacuum switch does change state, proceed with published service manual diagnostics.
- Connect the EVAP diagnostic cart J 41413 to the vehicle EVAP service port and turn the four position switch to Purge.
- Start the engine and allow to reach operating temperature.
- Open throttle until engine speed reaches 2000 RPM.
- Note the H20 vacuum gauge on the EVAP cart. Vacuum should read greater then 15 inches of H2O.
- If vacuum is less then 15 inches H2O, perform a complete throttle body service including cleaning of the purge port(s) as outlined in the service manual and Go to Step 20.
- If vacuum is greater then 15 inches H2O, continue with published service diagnostics.
