On-Vehicle Procedure
Important:
• Before attempting the Fuel Tank Leak Check place a dry chemical
(Class B) fire extinguisher near the work area. • Before removing the fuel tank for a suspected leak, make sure
the fuel hoses are not leaking onto the fuel tank. Also, make sure fuel is
not leaking around the fuel sender gasket.
The only checks possible on vehicle are a visual inspection of the tank, and a leak check of the fuel tank bladder. If fuel is leaking from the tank, replace the tank and check for leaks.
- Disconnect the negative battery cable.
- Relieve the fuel system pressure. Refer to the Fuel Pressure Relief Procedure.
- Drain the fuel tank. Refer to Draining Fuel Tank.
- Remove the filler door bezel attaching screws and the bezel.
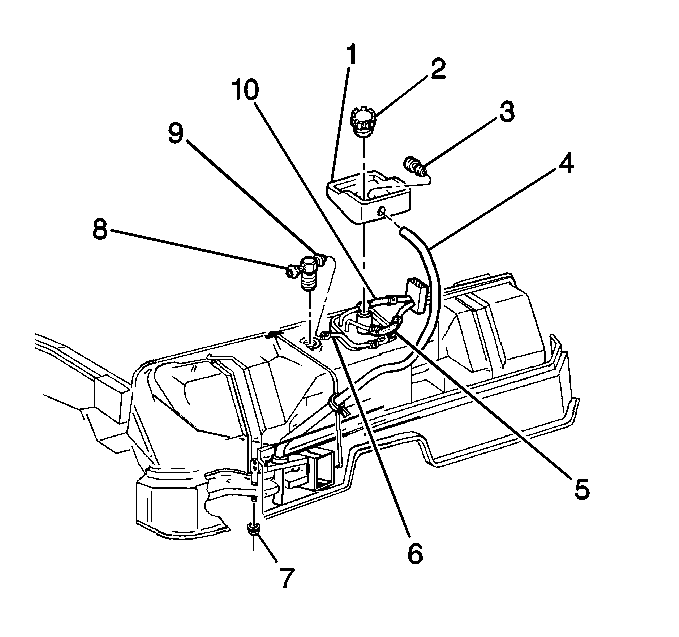
- Lift the fuel tank filler pipe housing (1) and disconnect the drain hose (4) from the nipple (3).
- Remove the fuel tank filler pipe housing (1).
- Disconnect the fuel feed hose (10) and cap the pipe on the fuel sender assembly.
- Disconnect the EVAP hose (6) between the fuel sender assembly and the fuel tank TEE fitting at the TEE.
- Plug the EVAP hose (6) and cap the open end of the TEE fitting (9).
- Disconnect the EVAP hose to the canister from the other side of the TEE fitting (8).
- Connect a piece of hose to the open end of the TEE fitting (8) and place the other end into a container of water.
- Install the fuel filler cap (2).
- Disconnect the fuel return hose (5) from the fuel sender assembly.
- Apply 7-10 kPa (1-1½ psi) air pressure to the fuel return pipe on the fuel sender assembly. Continuous air bubbles appearing in the container indicate a leak in the bladder. A short burst of air bubbles is common at the start.
- Replace the fuel tank if the bladder is leaking. Refer to Fuel Tank Replacement.
Off-Vehicle Procedure
Important:
• The Off-Vehicle Leak Check requires two sources of regulated air
pressure. • Install the fuel sender assembly and the fuel filler cap on the
fuel tank before performing the following check.
- Cap the fuel feed pipe and the EVAP pipe on the fuel sender assembly.
- Cap one end of the fuel tank TEE fitting.
- Connect a piece of hose to the open end of the TEE fitting and place the other end into a container of water.
- Tighten the fuel filler cap.
- Apply 7-10 kPa (1-1½ psi) air pressure to the fuel return pipe on the fuel sender assembly.
- Release the air supply and submerge the tank in water or apply soap solution to the outside of the tank.
- Reapply 7-10 kPa (1-1½ psi) air pressure to the hose connected to the TEE fitting. Air bubbles indicate a leak in the metal tank. Replace the fuel tank if it is leaking. Refer to Fuel Tank Replacement.
- Release the air pressure from the hose connected to the TEE fitting.
- Release the air pressure from the fuel return pipe on the fuel sender assembly.
| • | Continuous air bubbles appearing from the container indicate a leak in the bladder. A short burst of bubbles is common at the start. Replace the fuel tank if the bladder is leaking. Refer to Fuel Tank Replacement. |
| • | If no or only a short burst of bubbles appear, continue with the check. |
Notice: Apply equal air pressure to the fuel return pipe on the fuel sender assembly before applying air pressure to the vent TEE opening or the bladder may be damaged.
Notice: Release the air pressure from the hose connected to the TEE fitting before releasing the pressure from the fuel return pipe on the fuel sender assembly or the bladder may be damaged.
