Removal Procedure (Air Filter Element)
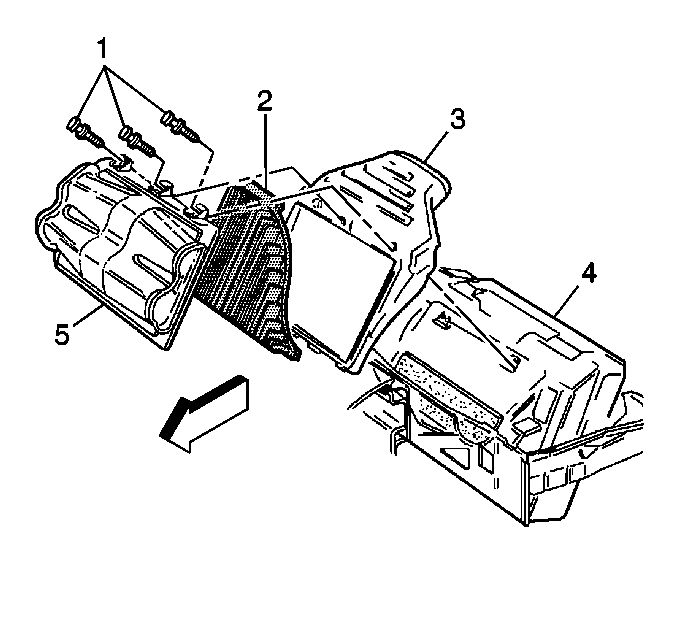
- Remove the fasteners (1) from the air cleaner cover (5).
- Lift the entire air cleaner assembly to remove the air filter element (2).
- Inspect the air filter element (2) for dust, dirt, water, and clean or replace if required. Refer to Section OB.
Installation Procedure
- Install the air filter element (2) into the air cleaner housing (3).
- Position the air cleaner assembly to the upper radiator support (4).
- Connect the fasteners (1) to the air cleaner cover (5).
Tighten
Tighten the fasteners to 1.15 N·m (8 lb in).
Removal Procedure (Air Filter Assembly)
- Remove the outside fasteners (2) from the air cleaner duct assembly.
- Remove the clamp from inter air intake duct.
- Remove the inter air intake duct from the air cleaner assembly.
- Remove the air cleaner assembly (5, 2, 3) from the upper radiator support (4).
Notice: If the mass air flow (MAF) sensor is installed backwards, the system will go rich. An arrow cast into the plastic portion of the sensor indicates proper air flow direction. The arrow must point toward the engine.

Installation Procedure
- Install the Pre-assembly fasteners to the air cleaner assembly (1).
- Position the air cleaner assembly to the upper radiator support (4).
- Secure the air cleaner assembly to the radiator support.
- Connect the clamp assembly to the front of the inter air intake duct and install on air cleaner duct assembly. Force duct forward until the duct assembly flange contacts the forward edge of the duct, air cleaner assembly.
Notice: Verify that the radiator air deflector is in position before installing an air cleaner assembly. Improper installation may allow water intrusion which could damage the engine.
Tighten
Tighten to 1.15 N·m (8 lb In).
Notice: Clamp assembly tension adjustment screw should be located on the side of the intake duct for optimum clamp force. This is important for proper sealing.
Tighten
Tighten the front clamp assembly inter air intake duct (2) to the Air
cleaner assembly to 3.4 N·m (30 lb in)
