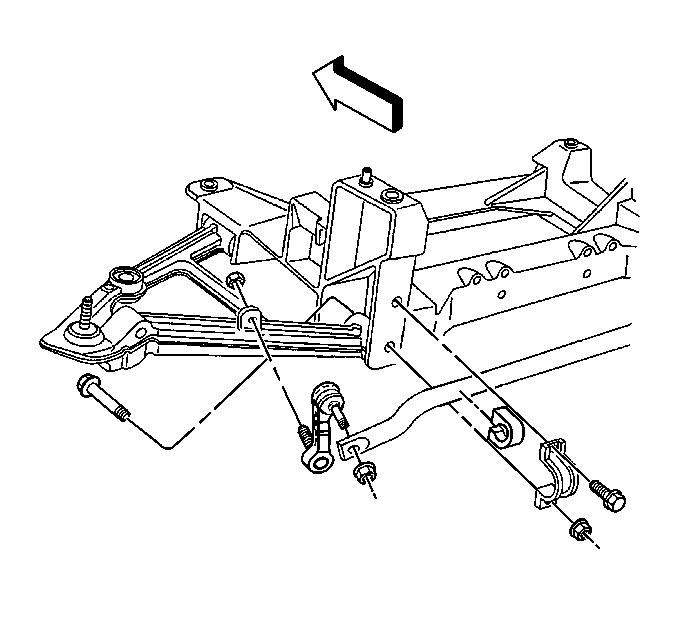
Removal Procedure
- Raise and support the vehicle. Refer to Lifting and Jacking the Vehicle in General Information.
- Remove the tire and wheel assemblies. Refer to Wheel Removal in Tires and Wheels.
- Remove the stabilizer shaft link nuts from the lower control arms.
- Remove the stabilizer shaft bracket retaining the shaft to the crossmember.
- Remove the stabilizer shaft from the vehicle.
- Remove the stabilizer shaft link nuts and links from the shaft.
- Remove the stabilizer shaft insulators from the shaft.
Installation Procedure
- Install the stabilizer shaft insulators onto the shaft.
- Install the stabilizer shaft links and link nuts onto the shaft.
- Install the stabilizer shaft into the vehicle.
- Install the stabilizer shaft insulator clamps onto the stabilizer shaft and the crossmember.
- Install the stabilizer shaft links onto the lower control arms.
- Install the tire and wheel assemblies. Refer to Wheel Removal in Tires and Wheels.
- Lower the vehicle.
Tighten
Tighten the Stabilizer shaft insulator clamp bolts to 65 N·m
(49 lb ft).
Notice: Use the correct fastener in the correct location. Replacement fasteners must be the correct part number for that application. Fasteners requiring replacement or fasteners requiring the use of thread locking compound or sealant are identified in the service procedure. Do not use paints, lubricants, or corrosion inhibitors on fasteners or fastener joint surfaces unless specified. These coatings affect fastener torque and joint clamping force and may damage the fastener. Use the correct tightening sequence and specifications when installing fasteners in order to avoid damage to parts and systems.
Tighten
Tighten the Stabilizer shaft link nuts to 72 N·m (53 lb ft).
