Notice: If the display flashes FULL during the recovery process and the unit
shuts off, the unit tank is full. An empty tank must be installed in order
to accommodate any additional refrigerant before proceeding to the next step
in this procedure. Charging other vehicles may help to lower the amount of
refrigerant in the unit tank.
Refrigerant Recovery and Recycling
Tools Required
| • | J 39500-B A/C
Refrigerant Recovery, Recycling, and Recharging (ACR4) System |
| • | J 39500-50 23 kg
(50 lb) Refillable Recovery Tank |
Important: Use only the J 39500-50
23 kg (50 lb) Refillable Recovery Tank designed for
the ACR4. The unit overfill limitation mechanism has been specifically calibrated
for use with this tank, and the tank valving is specifically set up for use
with this unit.

- Connect a battery charger to the vehicle battery in order to prevent battery
drain.
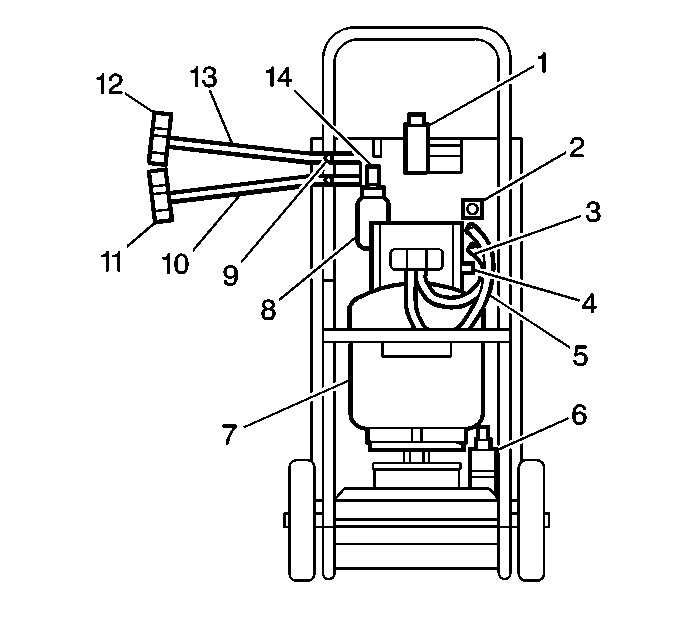
- Attach the high side (red) hose (13) with the quick disconnect
coupler (12) to the high side refrigerant service valve fitting.
- Open the coupler valve.
- Attach the low side (blue) hose (10) with the quick disconnect
coupler (11) to the low side refrigerant service valve on the evaporator tube.
- Open the coupler valve.

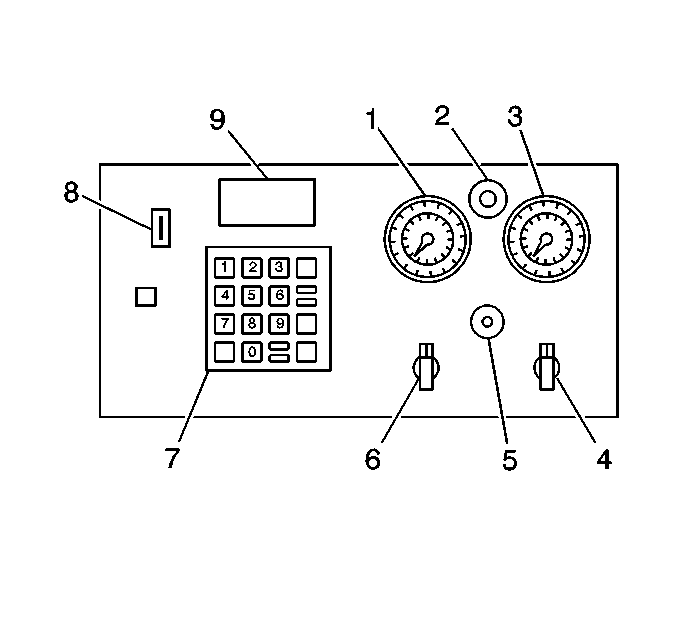
- Inspect the pressure reading at the high (3) and low (1) side gages on the
ACR4 control panel.
Important: If the pressure readings are low, there is no refrigerant in the system.
Do not continue with the recovery operation. Air will be drawn into the tank.
- Open the high (4) and low (6) side valves on the control panel.
- Open both the red LIQUID and the blue GAS (vapor) valves on the
tank.

- Drain the unit oil catch bottle (6).
| 9.1. | Slowly open the oil drain valve (2). |
| 9.2. | Drain any oil from the oil catch bottle (6) at the bottom of the
unit. |
| 9.3. | Close the oil drain valve (2). |
| 9.5. | Return the oil catch bottle (6) to the unit. |
- Plug the unit into the appropriate voltage outlet.

- Turn on the unit MAIN POWER switch (1).
- Start the engine.
- Turn on the A/C.
- Allow the engine to run for one minute with the A/C running in
order to stabilize the system.
- Turn the ignition to OFF and then to RUN.
- Turn the blowers to HIGH in order to speed the recovery rate.
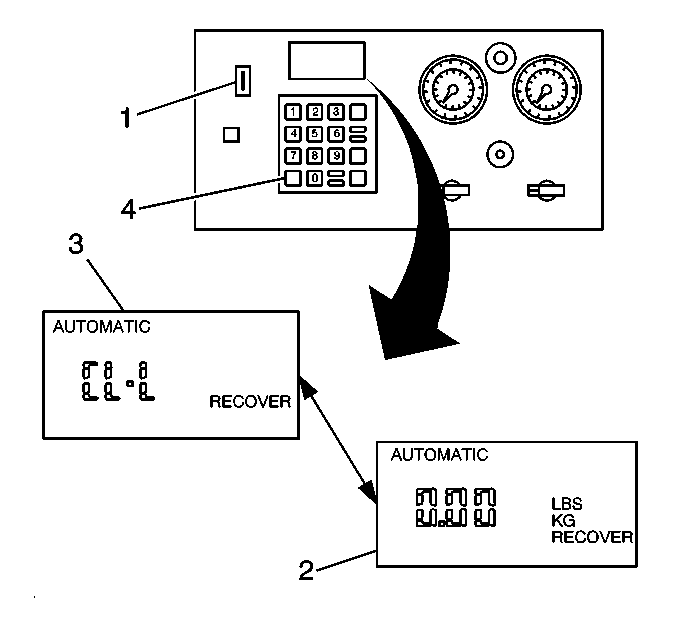
- To begin the recovery procedure Press RECOVER (4) on the ACR4
keypad.
| • | The unit will clear itself of refrigerant before recovery begins. |
| • | CL-L will appear on the display (3). |
| • | The cleaning process takes from 1-3 minutes to complete. |
| • | The unit will then automatically start the recovery. |
| • | The control panel display will show that the unit is in the RECOVER
mode of the AUTOMATIC CYCLE (3). |
| • | The weight of the refrigerant being recovered will be displayed
(2). |
| | Important: A small amount of PAG oil might be removed with the refrigerant during
recovery. The ACR4 separates the refrigerant from the oil.
The OIL/OZ (OIL/GMS) flashing is a reminder to drain the recovered oil.
The display will read CPL, then alternate the weight of the refrigerant
with OIL/OZ or OIL/GMS.
|
| • | The compressor shuts off automatically when the initial recovery
has occurred at about 57 kPa (17 in Hg) vacuum. |

- Slowly open the drain valve (2).
| 18.1. | Drain the oil into the calibrated oil catch bottle (6) at the
bottom of the unit. |
| 18.2. | Close the drain valve after all of the oil is completely drained. |
| 18.3. | Record the amount of oil removed. |
| 18.4. | Dispose of the oil. |

- Inspect the LOW SIDE GAGE (1) on the control panel:
| • | If the A/C System has maintained a vacuum, the recovery procedure
is complete. |
| • | The pressure rises above 0, there is more refrigerant in the system.
Press the HOLD/CONT key in order to recover the additional refrigerant. Repeat
as needed. |


