Removal Procedure
Tools Required
J 42058 Frame Adapter
Clamp
Notice: When replacing panels that involve servicing stationary glass, refer
to GM Service Bulletin no. 43-9-48 before performing any priming or refinishing.
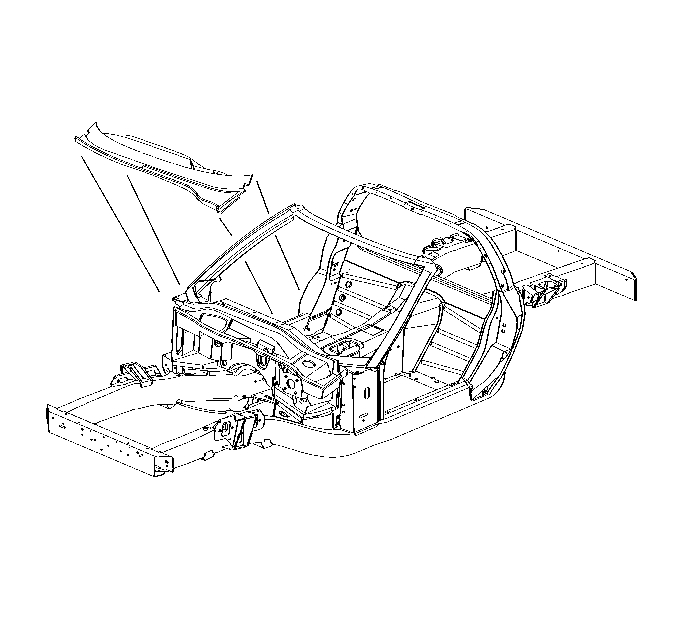
- Remove the following panels and components to gain access to the windshield
assembly:
| • | Instrument panel assembly |
- Visually inspect for damage to the frame rails or wheelhouse mounting
areas.
- Restore as much of the damage as possible to specifications using
three-dimensional measuring procedures. Use J 42058
if pulling and straightening of the vehicle are required.
- Remove and relocate wiring as necessary to avoid damage.
Notice: Use care to not damage the plenums. If they are damaged during the removal
process, they should be replaced.
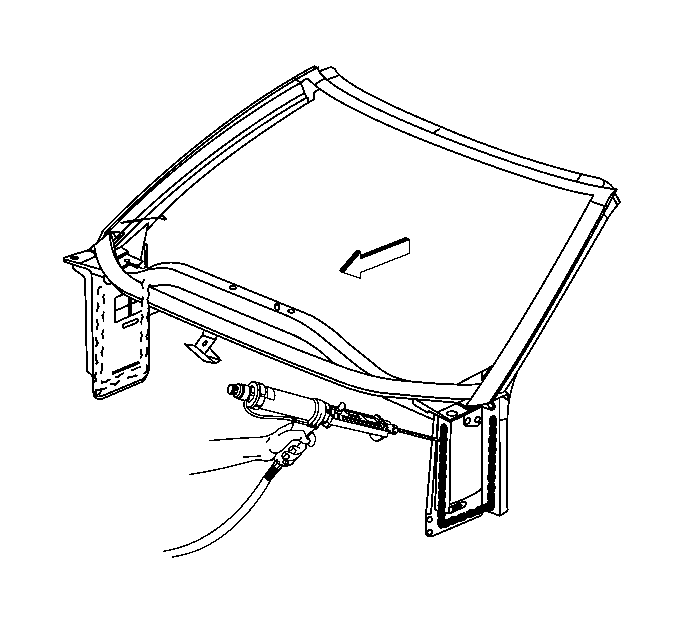
- Drill out the close-end rivets securing the upper plenum to the windshield
frame.
| 5.1. | Apply heat to the upper plenum side of the bond area. |
| 5.2. | Pry up on the panel to remove it. |
- Apply heat and pry as necessary to break the windshield frame
loose from the lower plenum.
- From inside the vehicle, remove all hardware attaching the instrument
panel supports to the windshield frame assembly.
- Remove bolts attaching cross-car brace.
- Heat and break loose adhesive bonds.
- Remove brace from vehicle.
- Remove bolts attaching windshield frame to the front hinge pillars.
- Remove damaged windshield frame.
Installation Procedure
- Remove all remaining adhesive.
- Scuff all bonding surfaces to ensure proper adhesion.
- Clean and prepare all bonding surfaces as necessary.
- Prime all bare metal surfaces with DP90, or an equivalent anti-corrosion
primer. Do not top-coat any bonding surface.
- Apply adhesive to the bonding surfaces of the new windshield frame and install.
- Bolt the windshield frame service part to the front pillars.
Important: Use US Chemical and Plastics 82007B System 2000 Structural Adhesive,
a PLIOGRIP® Adhesive manufactured by Ashland Chemical Company, or equivalent.
Note the 30 minute working time and 2½ to 3 hour cure time.
- Apply adhesive to attach lower plenum to windshield frame, drill holes
and use close-end rivets (GM part number 94184, or equivalent)
to hold plenum secure while adhesive cures.
- Apply adhesive to the area that the cross-car brace bonds to the
center tunnel assembly, and install brace and bolt into place.
- Attach all instrument panel supports to the windshield frame assembly
service part.

- Apply adhesive to the upper plenum and install using close-end rivets in factory
locations, to hold in place while adhesive cures.
- Prime bare metal areas with DP90, or an equivalent anti-corrosion
primer.
| • | Do not combine paint systems. |
| • | Always refer to paint manufacturer's recommendation. |
- Install all related panels and components.
