Antenna Cable Strap Replacement w/ Noise Suppression Shield
Removal Procedure
- Remove the screws retaining the LH inner taillamp.
- Remove the LH inner taillamp.
- Remove the screws retaining both of the RH taillamps.
- Remove both of the RH taillamps.
- Disconnect the antenna electrical connector from the rear body wiring harness.
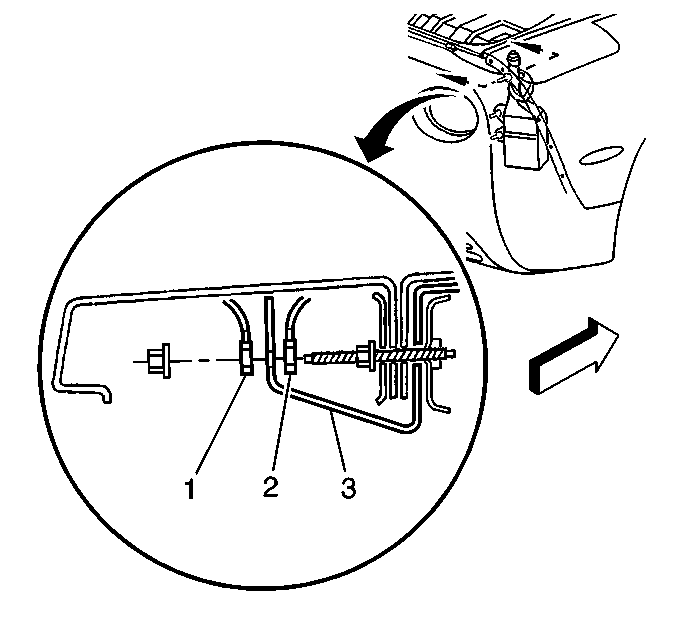
- Remove the nut retaining the antenna cable strap (1), antenna shield strap (3) and antenna short braided ground strap (2) to the rear fascia retaining stud, then reposition the straps.
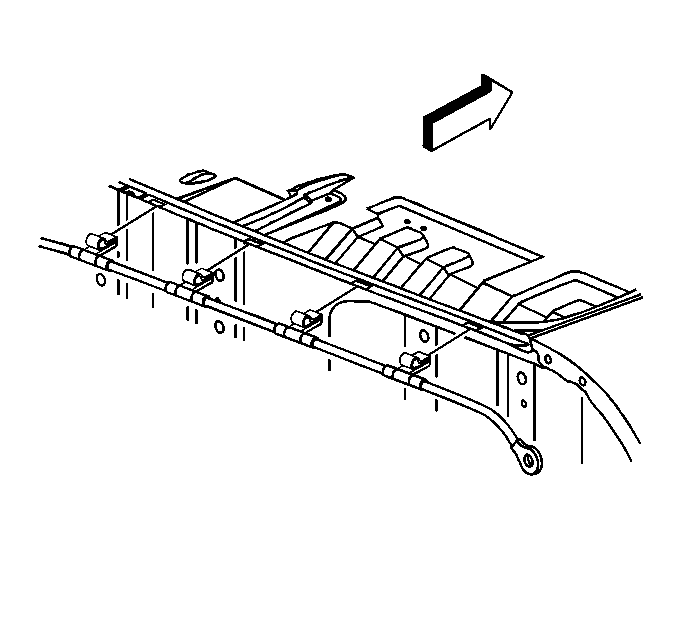
- Beginning from the RH side, release the antenna cable strap retaining clips from the rear compartment flange.
- Remove the antenna strap from the vehicle.


Important: Take note of the positioning of the antenna cable strap retaining clips to the rear compartment flange, prior to removal.
Installation Procedure
- Install the antenna cable strap to the vehicle.
- Beginning from the RH side, align and secure the antenna cable strap retaining clips to the rear compartment flange.
- Install the antenna short braided ground strap (2), then the antenna shield strap (3), then the antenna cable strap (1), to the rear fascia retaining stud.
- Install the nut retaining the straps to the rear fascia retaining stud.
- Connect the antenna electrical connector to the rear body wiring harness.
- Install both of the RH taillamps.
- Install the screws retaining both of the RH taillamps.
- Install the LH inner taillamp.
- Install the screws retaining the LH inner taillamp.


Important: The sequence listed for installing the antenna short braided ground strap, the antenna shield strap and the antenna cable strap must be followed to assure good connections over time.
Notice: Use the correct fastener in the correct location. Replacement fasteners must be the correct part number for that application. Fasteners requiring replacement or fasteners requiring the use of thread locking compound or sealant are identified in the service procedure. Do not use paints, lubricants, or corrosion inhibitors on fasteners or fastener joint surfaces unless specified. These coatings affect fastener torque and joint clamping force and may damage the fastener. Use the correct tightening sequence and specifications when installing fasteners in order to avoid damage to parts and systems.
Important: Use care to not twist and damage the antenna shield strap when tightening the retaining nut.
Tighten
Tighten the antenna short braided ground strap, shield strap and cable
strap retaining nut to 5.8 N·m (51 lb in).
Tighten
Tighten the taillamp retaining screws to 2 N·m (18 lb in).
Tighten
Tighten the taillamp retaining screws to 2 N·m (18 lb in).
Antenna Cable Strap Replacement Convertible
Removal Procedure
- Remove the screws retaining the left inner tail lamp.
- Remove the left inner tail lamp.
- Remove the screws retaining both of the right tail lamps.
- Remove both of the right tail lamps.
- Raise and suitably support the vehicle. Refer to Lifting and Jacking the Vehicle in General Information.
- Remove the right rear tire and wheel assembly. Refer to Tire and Wheel Removal and Installation in Tires and Wheels.
- Remove the right rear wheelhouse filler panel. Refer to Wheelhouse Panel Replacement in Body Rear End.
- Disconnect the antenna electrical connector from the rear body wiring harness.
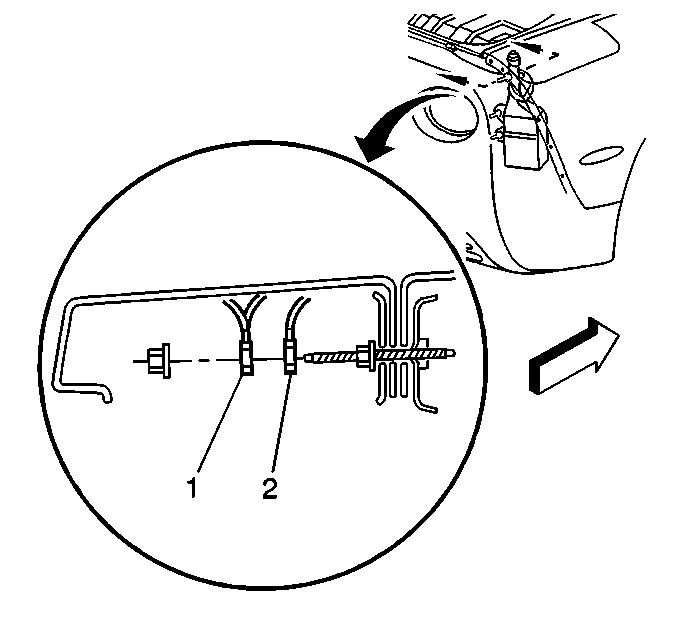
- Remove the nut retaining the antenna dual cable strap (1), and the antenna short braided ground strap (2) to the rear fascia retaining stud, then reposition the straps.
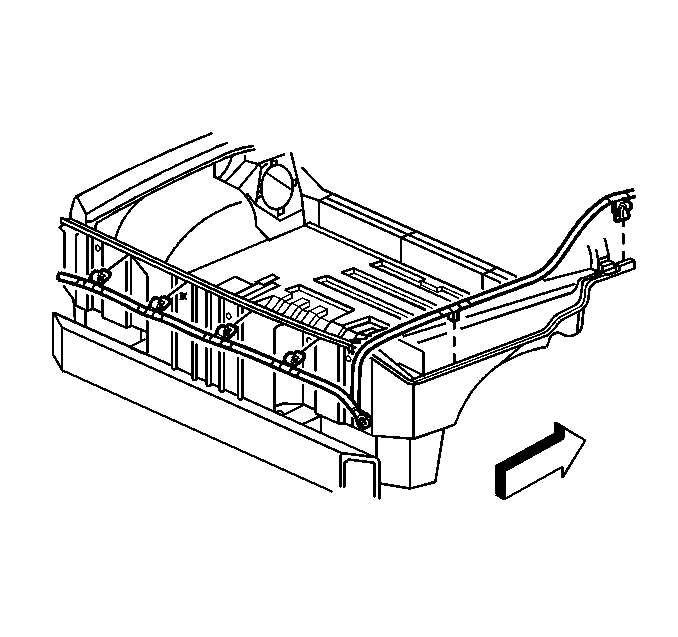
- Beginning from the right side, release the antenna dual cable strap retaining clips from the rear compartment flange.
- Remove the antenna strap from the vehicle.

Important: Use care not to twist and damage the ground straps when removing the retaining nut.

Important: Take note of the positioning of the antenna dual cable strap retaining clips to the rear compartment flange, prior to removal.
Installation Procedure
- Install the antenna dual cable strap to the vehicle.
- Beginning from the right side, align and secure the antenna dual cable strap retaining clips to the rear compartment flange.
- Install the right rear wheelhouse filler panel. Refer to Wheelhouse Panel Replacement in Body Rear End.
- Install the right rear tire and wheel assembly. Refer to Tire and Wheel Removal and Installation in Tires and Wheels.
- Lower the vehicle.
- Install the antenna short braided ground strap (2), then the antenna dual cable strap (1) to the rear fascia retaining stud.
- Install the nut retaining the straps to the rear fascia retaining stud.
- Connect the antenna electrical connector to the rear body wiring harness.
- Install both of the right tail lamps.
- Install the screws retaining both of the right tail lamps.
- Install the left inner tail lamp.
- Install the screws retaining the left inner tail lamp.


Notice: Use the correct fastener in the correct location. Replacement fasteners must be the correct part number for that application. Fasteners requiring replacement or fasteners requiring the use of thread locking compound or sealant are identified in the service procedure. Do not use paints, lubricants, or corrosion inhibitors on fasteners or fastener joint surfaces unless specified. These coatings affect fastener torque and joint clamping force and may damage the fastener. Use the correct tightening sequence and specifications when installing fasteners in order to avoid damage to parts and systems.
Notice: Do NOT twist or damage the ground straps when you tighen the retaining nut.
Tighten
Tighten the retaining nut to 5.8 N·m (51 lb in).
Tighten
Tighten the tail lamp retaining screws to 2 N·m (18 lb in).
Tighten
Tighten the tail lamp retaining screws to 2 N·m (18 lb in).
