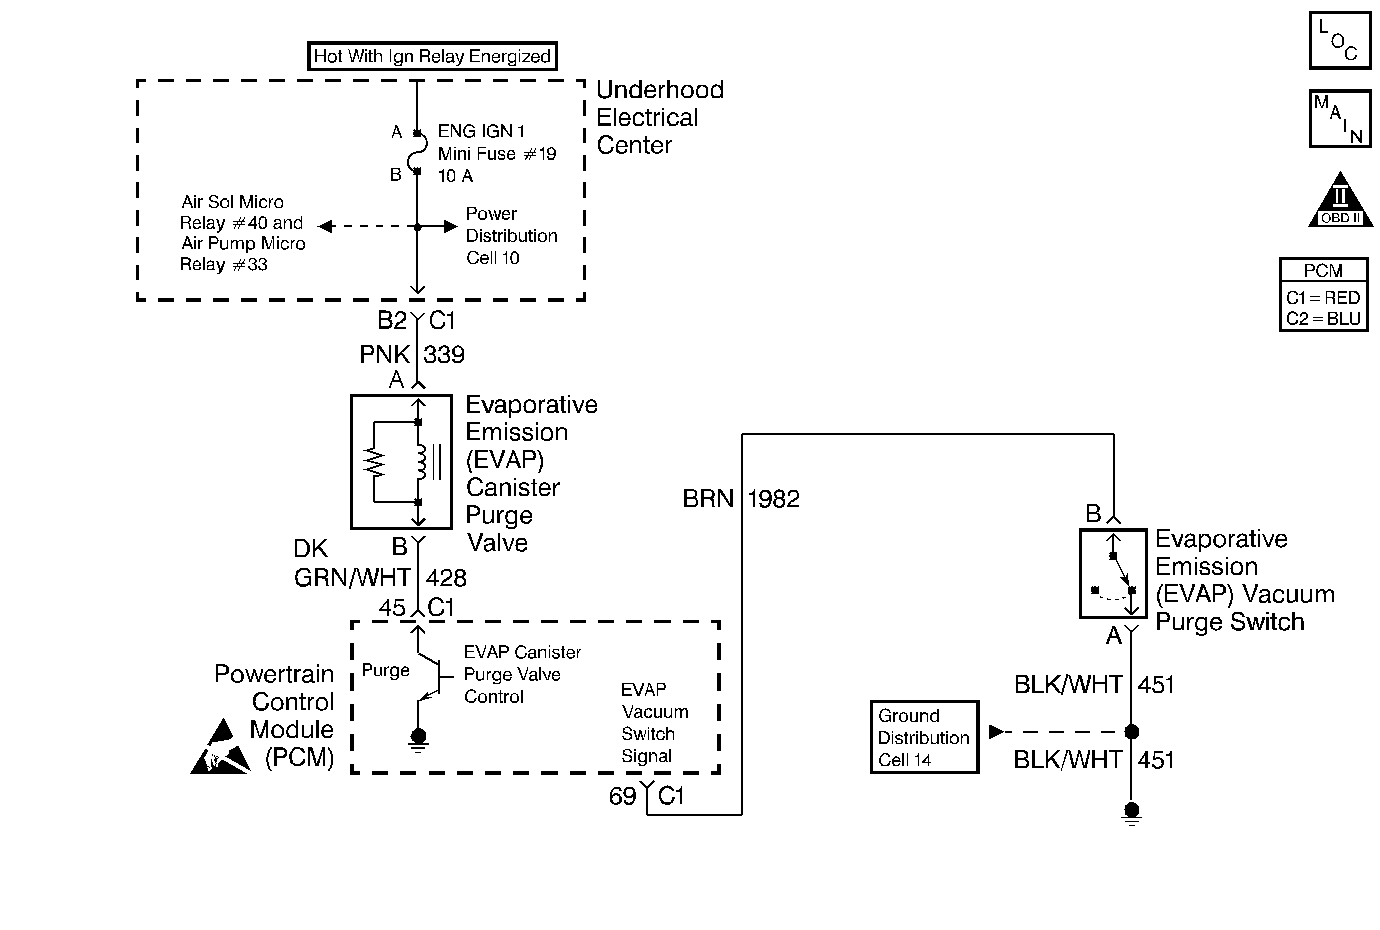
Circuit Description
The EVAP vacuum switch is a normally closed switch connected to ground. The EVAP vacuum switch is mounted in the vacuum line between the EVAP canister and the EVAP solenoid. The PCM supplies 12 volts to the EVAP vacuum switch. When the PCM commands the EVAP canister purge solenoid valve open (purge ON) and the engine vacuum draws the evaporative emissions from the canister, the EVAP vacuum switch opens (signal voltage high) providing feedback to the PCM that the EVAP system is operating. When the PCM commands purge OFF, the EVAP vacuum switch closes (signal voltage low) confirming purging has ceased.
Conditions for Running the DTC
| • | DTCs P0107, P0108, P0112, P0113, P0117, P0118, P0125, P0443, P1120, P1220, P1221, P1441 are not set. |
| • | ECT is less than 115°C (239°F) |
| • | IAT is greater than 3°C (37°F) when first started, but less than 80°C (176°F) when operating. |
| • | The difference between ECT and IAT is not greater than 10°C (18°F) at engine start up. |
| • | Engine speed is between 800 and 3000 RPM |
| • | TP Angle is between 8% and 60% |
| • | MAP is greater than 15 kPa |
| • | BARO is greater than 75 kPa |
| • | Purge duty cycle is above 90% |
Conditions for Setting the DTC
| • | The PCM detects low signal voltage on the EVAP vacuum switch signal circuit when the PCM is commanding purge. |
| • | The fault exist for 5 seconds. |
Action Taken When the DTC Sets
| • | The PCM illuminates the malfunction indicator lamp (MIL) on the second consecutive ignition cycle that the diagnostic runs and fails. |
| • | The PCM records the operating conditions at the time the diagnostic fails. The first time the diagnostic fails, the PCM stores this information in the Failure Records. If the diagnostic reports a failure on the second consecutive ignition cycle, the PCM records the operating conditions at the time of the failure. The PCM writes the conditions to the Freeze Frame and updates the Failure Records. |
Conditions for Clearing the MIL/DTC
| • | The PCM turns OFF the malfunction indicator lamp (MIL) after 3 consecutive ignition cycles that the diagnostic runs and does not fail. |
| • | A last test failed, or current DTC, clears when the diagnostic runs and does not fail. |
| • | A history DTC clears after 40 consecutive warm-up cycles, if no failures are reported by this or any other emission related diagnostic. |
| • | Use a scan tool in order to clear the MIL and the DTC. |
Diagnostic Aids
Important: Remove any debris from the PCM\TAC module connector surfaces before servicing the PCM\TAC module. Inspect the PCM\TAC module connector gaskets when diagnosing/replacing the modules. Ensure that the gaskets are installed correctly. The gaskets prevent contaminate intrusion into the PCM\TAC modules.
Before replacing any components, visually/physically check for the following:
| • | Mis-routed harness |
| • | Rubbed through wire insulation |
| • | Broken wire inside the insulation |
| • | Kinked or damaged vacuum hoses |
| • | Physically damaged system components |
| • | Inspect components and vacuum lines for traces of carbon or other contaminants. The presence of foreign material may be causing a restriction in the system or preventing the solenoid valve from closing properly. Either condition may cause a DTC to set. |
For an intermittent, refer to Symptoms .
Test Description
The numbers below refer to the step numbers on the diagnostic table.
Step | Action | Value(s) | Yes | No | ||||
|---|---|---|---|---|---|---|---|---|
1 | Did you perform the Powertrain On-Board Diagnostic (OBD) System Check? | -- | ||||||
|
Important: If DTC P0443 is set, refer to that DTC first.
Does the scan tool indicate the EVAP vacuum switch has No Purge? | -- | |||||||
3 |
Does the scan tool indicate Purge when the solenoid is commanded ON? | -- | Refer to Diagnostic Aids | |||||
4 |
Does the vacuum gauge indicate close to normal engine vacuum when the solenoid is commanded ON? | -- | ||||||
5 | Disconnect the EVAP vacuum switch harness connector. Does the scan tool indicate Purge? | -- | ||||||
6 |
Does the DMM indicate infinite resistance? | -- | ||||||
7 | Disconnect the vacuum harness from the EVAP canister purge solenoid valve and connect a vacuum gauge to the manifold side of the vacuum harness. Is normal manifold vacuum indicated? | -- | ||||||
8 |
Is vacuum indicated when the EVAP canister purge solenoid valve is ON? | -- | ||||||
9 | Replace the EVAP vacuum switch. Refer to Evaporative Emission Purge Vacuum Switch Replacement . Refer to Evaporative Emission System Cleaning for cleaning procedure of EVAP system before replacing the EVAP vacuum switch. Is the action complete? | -- | -- | |||||
10 | Check connections at the PCM. Was a problem found and corrected? | -- | -- | |||||
11 |
Important:: Program the replacement PCM. Refer to Powertrain Control Module/Throttle Actuator Control Module Replacement . Replace the PCM. Is the action complete? | -- | -- | |||||
12 | Repair the signal circuit for a short to ground. Is the action complete? | -- | -- | |||||
13 | Check for the following conditions:
Was a problem found and corrected? | -- | ||||||
14 | Repair the restricted, kinked or leaking hose between the EVAP solenoid and the EVAP vacuum switch, Refer to Evaporative Emission System Cleaning for cleaning procedure of EVAP system. Is the action complete? | -- | -- | |||||
15 | Replace the EVAP solenoid. Refer to Evaporative Emission Canister Purge Solenoid Valve Replacement . Refer to Evaporative Emission System Cleaning for cleaning procedure of EVAP system before replacing the EVAP solenoid. Is the action complete? | -- | -- | |||||
16 |
Does the scan tool indicate that this test ran and passed? | -- | ||||||
17 | Select the Capture Info option and the Review Info option using the scan tool. Does the scan tool display any DTCs that you have not diagnosed? | -- | Go to the applicable DTC table | System OK |
