SMU - Revised Vacuum Brake Booster Replacement Procedure

| Subject: | Revised Vacuum Brake Booster Replacement Procedure |
| Models: | 1999-2001 Chevrolet Corvette |
| with Telescoping Steering Column (RPO N37) |
This bulletin is being issued to revise the Vacuum Brake Booster Replacement procedure in the Hydraulic Brakes sub-section of the Service Manual. Please replace the current information in the Service Manual with the following information.
The following information has been updated within SI2000. If you are using a paper version of this Service Manual, please make a reference to this bulletin on the affected page.
Vacuum Brake Booster Replacement (1999)
Removal Procedure
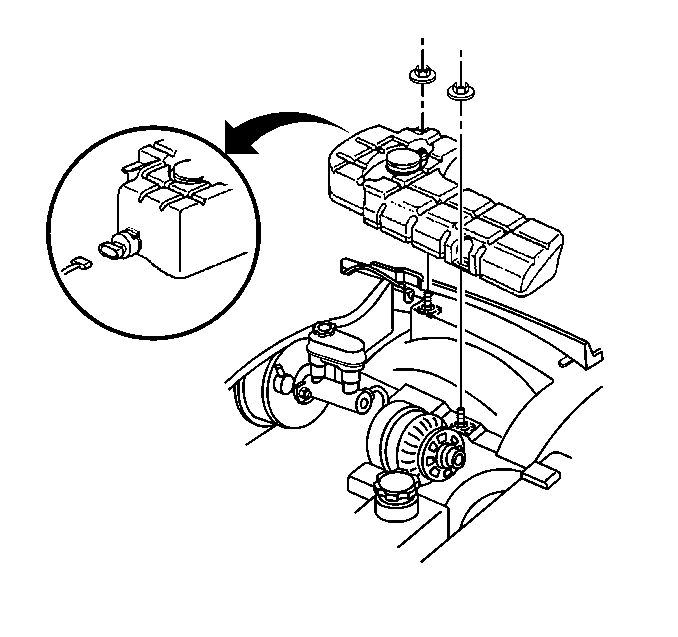
- Remove the washer solvent container retaining nuts.
- Lift the washer solvent container from the left wheelhouse.
- Disconnect the electrical connections and the washer hose from the container.
- Plug the washer pump outlet.
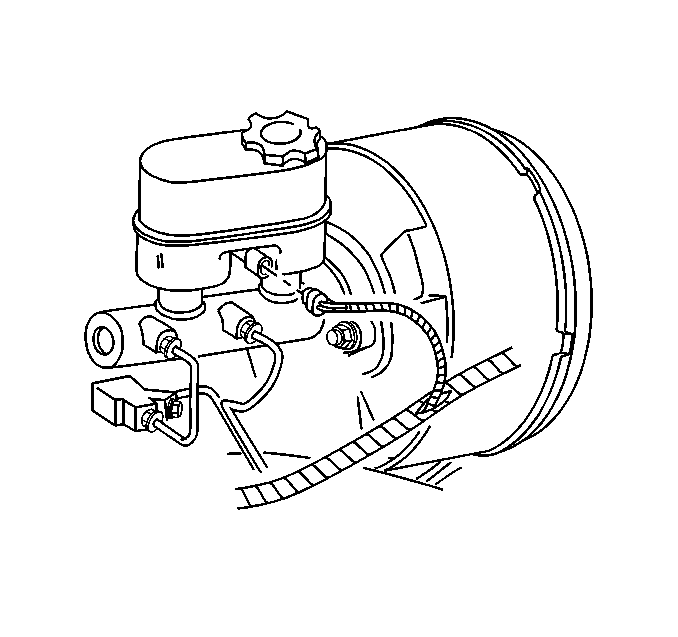
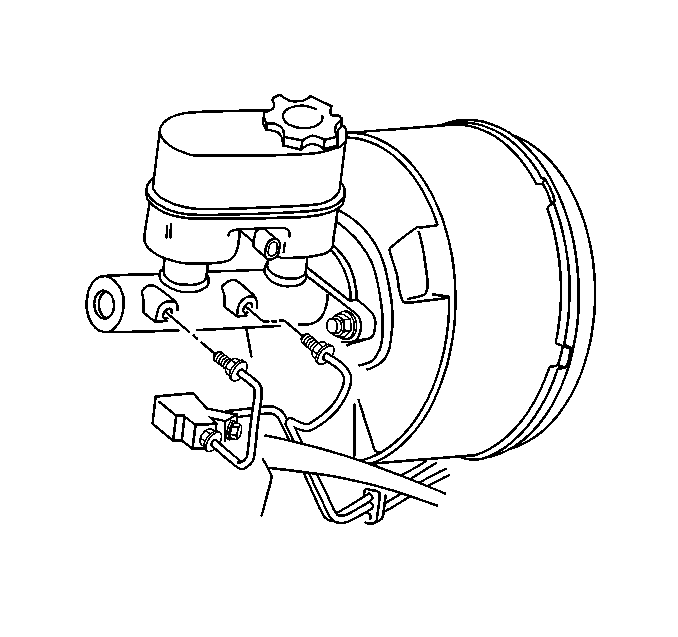
- Disconnect the electrical connector from the brake fluid level switch.
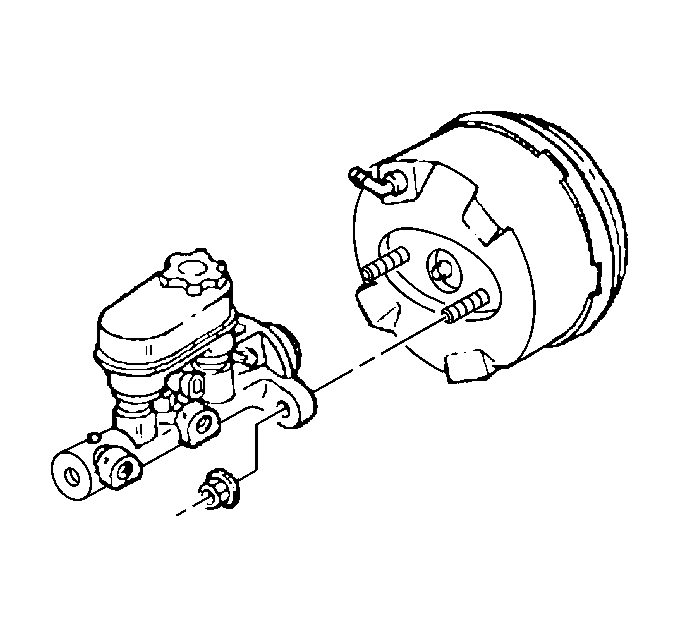
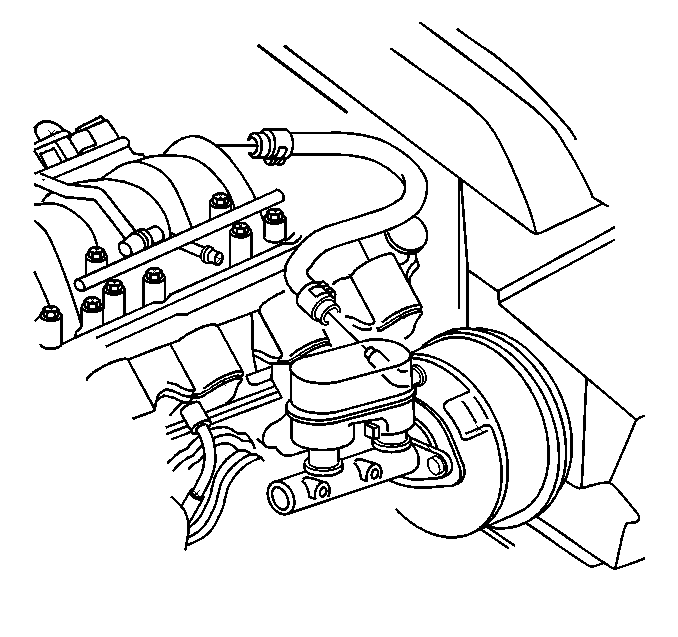
- Remove the brake pipes from the master cylinder.
- Remove the nuts securing the master cylinder to the brake booster.
- Remove the master cylinder from the brake booster.
- Disconnect the brake booster vacuum check valve hose from the booster.
- Remove the instrument panel lower trim panel. Refer to Trim Panel Replacement - Knee Bolster in Instrument Panel, Gauges and Console.
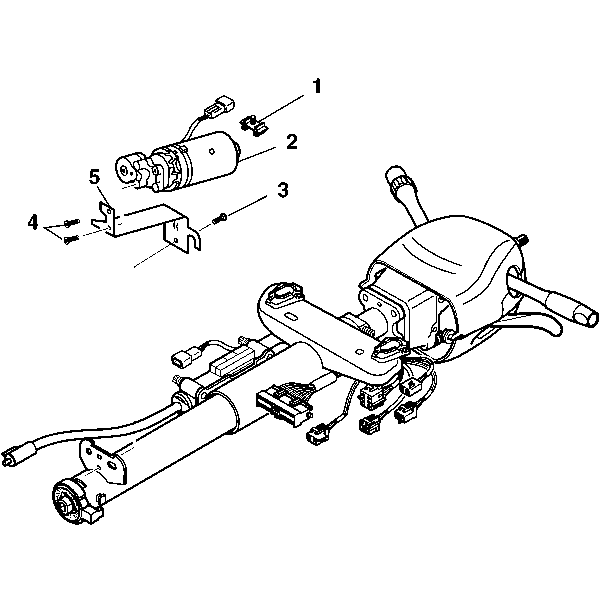
- Remove the screw (3) from the telescoping column motor mounting bracket (5), if equipped.
- Position the motor assembly to the right of the steering column.
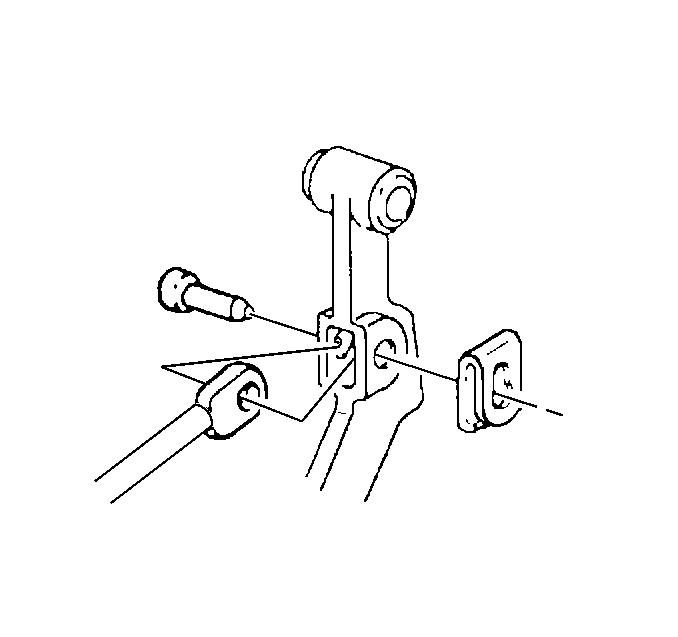
- Remove the input push rod retaining clip and pin from the brake pedal.
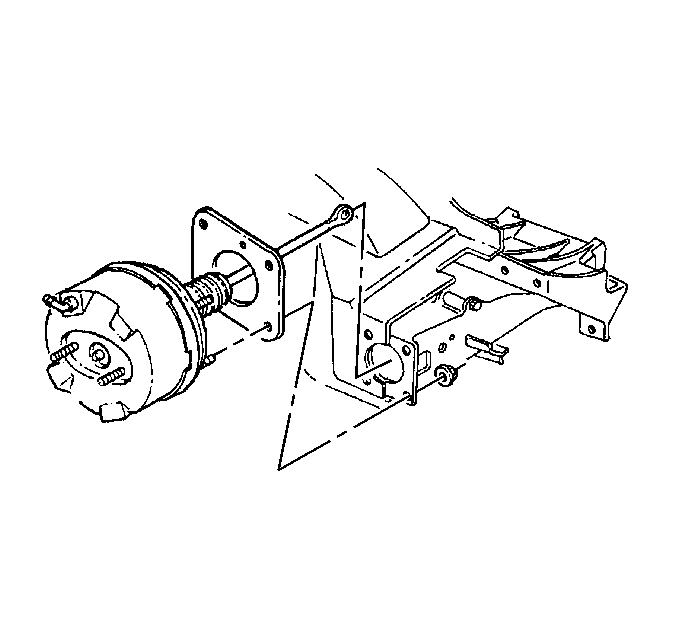
- Remove the brake booster mounting nuts and washers from the studs.
- Remove the brake booster and seal from the front of dash.
- Inspect the booster seal and sealing surfaces for damage. Replace if necessary.
Installation Procedure
- Lubricate all friction parts with Delco Brake Lube ([GM P/N 12377969 (in Canada use 10953439)], or equivalent.
- Install the seal and brake booster to the front of dash.
- Install brake booster mounting nuts and washers on to the studs.
- Lubricate the input push rod pin with Delco Brake Lube [GM P/N 12377969 (in Canada use 10953439)].
- Install the brake booster pushrod, brake pedal pin, washer, and retainer to the brake pedal. Verify proper engagement of the retainer to the brake pedal by rotating the retainer.
- Reposition the telescoping column motor assembly to the steering column, if equipped.
- Install the screw (3) to the motor mounting bracket (5).
- Install the instrument panel lower trim panel. Refer to Trim Panel Replacement - Knee Bolster in Instrument Panel, Gauges and Console.
- Connect the brake booster vacuum check valve hose to the brake booster.
- Install the master cylinder to the brake booster.
- Install the master cylinder retaining nuts.
- Install the brake pipes to the master cylinder.
- Connect the electrical connector to the brake fluid level switch.
- Connect the electrical connector and the washer hose to the washer solvent container.
- Install washer solvent container to the wheelhouse.
- Install the washer solvent container retaining nuts.
- Bleed brake system as necessary. Refer to Hydraulic Brake System Bleeding.
Notice: Refer to Fastener Notice in Cautions and Notices.
Tighten
Tighten the brake booster mounting nuts to 27 N·m (19 lb ft).
Tighten
Tighten the screw to 7 N·m (62 lb in)
Tighten
Tighten the master cylinder retaining nuts to 29 N·m (21 lb ft).
Tighten
Tighten the brake pipe tube nuts to the master cylinder to 24 N·m
(17 lb ft).
Tighten
Tighten the washer solvent container nuts to 7.5 N·m (66 lb in).
Vacuum Brake Booster Replacement (2000)
Removal Procedure
- Remove the washer solvent container retaining nuts.
- Lift the washer solvent container from the left wheelhouse.
- Disconnect the electrical connections and the washer hose from the container.
- Plug the washer pump outlet.
- Disconnect the electrical connector from the brake fluid level switch.
- Remove the brake pipes from the master cylinder.
- Remove the nuts securing the master cylinder to the brake booster.
- Remove the master cylinder from the brake booster.
- Disconnect the brake booster vacuum check valve hose from the booster.
- Remove the instrument panel lower trim panel. Refer to Trim Panel Replacement - Knee Bolster in Instrument Panel, Gauges and Console.
- Remove the input push rod retaining clip and pin from the brake pedal.
- Remove the screw (3) from the telescoping column motor mounting bracket (5), if equipped.
- Position the motor assembly to the right of the steering column.
- Remove the brake booster mounting nuts and washers from the studs.
- Remove the brake booster and seal from the front of dash.
- Inspect the booster seal and sealing surfaces for damage. Replace if necessary.
Installation Procedure
- Lubricate all friction parts with Delco Brake Lube [GM P/N 12377969 (in Canada use 10953439)], or equivalent.
- Install the seal and brake booster to the front of dash.
- Install brake booster mounting nuts and washers on to the studs.
- Lubricate the input push rod pin with Delco Brake Lube [GM P/N 12377969 (in Canada use 10953439)].
- Install the brake booster pushrod, brake pedal pin, washer, and retainer to the brake pedal. Verify proper engagement of the retainer to the brake pedal by rotating the retainer.
- Reposition the telescoping column motor assembly to the steering column, if equipped.
- Install the screw (3) to the motor mounting bracket (5).
- Install the instrument panel lower trim panel. Refer to Trim Panel Replacement - Knee Bolster in Instrument Panel, Gauges and Console.
- Connect the brake booster vacuum check valve hose to the brake booster.
- Install the master cylinder to the brake booster.
- Install the master cylinder retaining nuts.
- Install the brake pipes to the master cylinder.
- Connect the electrical connector to the brake fluid level switch.
- Connect the electrical connector and the washer hose to the washer solvent container.
- Install washer solvent container to the wheelhouse.
- Install the washer solvent container retaining nuts.
- Bleed brake system as necessary. Refer to Hydraulic Brake System Bleeding.
Notice: Refer to Fastener Notice in Cautions and Notices.
Tighten
Tighten the brake booster mounting nuts to 27 N·m (19 lb ft).
Tighten
Tighten the screw to 7 N·m (62 lb in)
Tighten
Tighten the master cylinder retaining nuts to 29 N·m (21 lb ft).
Tighten
Tighten the brake pipe tube nuts to the master cylinder to 24 N·m
(17 lb ft).
Tighten
Tighten the washer solvent container nuts to 7.5 N·m (66 lb in).
Vacuum Brake Booster Replacement (2001)
Caution: Refer to Battery Disconnect Caution in Cautions and Notices.
Removal Procedure
- Disconnect the battery negative cable. Refer to Battery Negative Cable Disconnect/Connect Procedure in Engine Electrical.
- Remove the washer solvent container retaining nuts.
- Lift the washer solvent container from the left wheelhouse.
- Disconnect the electrical connections and the washer hose from the container.
- Plug the washer pump outlet.
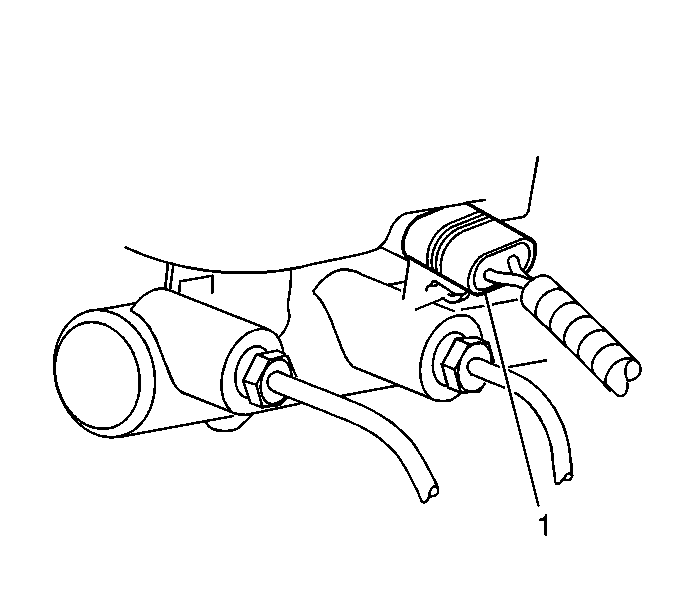
- Disconnect the electrical connector (1) from the brake fluid level sensor.
- Remove the nuts securing the master cylinder to the brake booster.
- Remove the master cylinder from the brake booster without disconnecting the brake pipes and position the master cylinder aside.
- Disconnect the brake booster vacuum hose from the booster check valve.
- Remove the instrument panel lower trim panel. Refer to Trim Panel Replacement - Knee Bolster in Instrument Panel, Gages, and Console.
- Remove the retainer, washer, brake pedal pin, and brake booster pushrod from the brake pedal.
- Remove the screw (3) from the telescoping column motor mounting bracket (5), if equipped.
- Position the motor assembly to the right of the steering column.
- Remove the brake booster mounting nuts and washers from the booster studs.
- In order to remove the booster from the cowl, perform the following steps:
- Remove the brake booster and seal from the cowl.
- Inspect the booster seal and sealing surfaces for damage. Replace the seal if necessary.
Important: The brake booster is retained to the cowl with push-on nuts.
| • | In order to release the booster mounting studs from the push-on nuts, move booster from side to side. |
| • | Pull the booster straight out. |
Installation Procedure
- Install the seal and brake booster to the front of dash.
- Install brake booster mounting nuts and washers to the booster studs.
- Install the brake booster pushrod, brake pedal pin, washer, and retainer to the brake pedal. Verify proper engagement of the retainer to the brake pedal by rotating the retainer.
- Reposition the telescoping column motor assembly to the steering column, if equipped.
- Install the screw (3) to the motor mounting bracket (5).
- Install the instrument panel lower trim panel. Refer to Trim Panel Replacement - Knee Bolster in Instrument Panel, Gages, and Console.
- Connect the brake booster vacuum hose to the brake booster check valve.
- Install the master cylinder to the brake booster.
- Install the master cylinder mounting nuts.
- Connect the electrical connector (1) to the brake fluid level sensor.
- Connect the electrical connector and the washer hose to the washer solvent container.
- Install washer solvent container to the wheelhouse.
- Install the washer solvent container retaining nuts.
- Connect the battery negative cable. Refer to Battery Negative Cable Disconnect/Connect Procedure in Engine Electrical.
- Program the transmitters. Refer to Transmitter Programming in Keyless Entry.
Notice: Refer to Fastener Notice in Cautions and Notices.
Tighten
Tighten the brake booster mounting nuts to 27 N·m (19 lb ft).
Tighten
Tighten the screw to 7 N·m (62 lb in)
Tighten
Tighten the master cylinder mounting nuts to 29 N·m (21 lb ft).
Tighten
Tighten the washer solvent container retaining nuts to 7.5 N·m(66 lb in).
