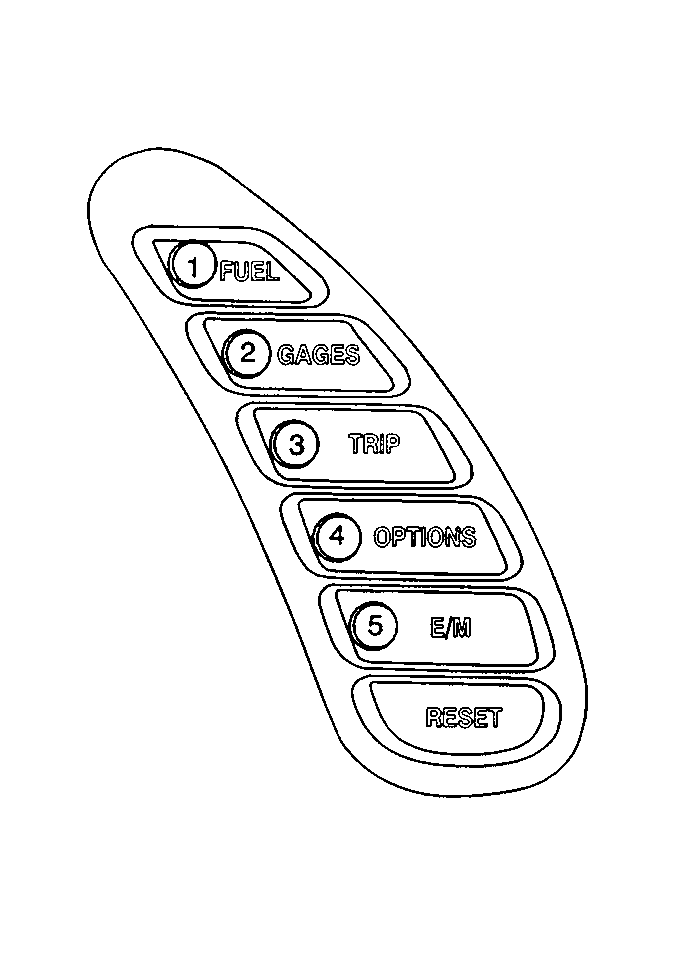
This vehicle is equipped with an on-board diagnostic display feature capable displaying DTCs. By selecting specific buttons on the IPC, DTCs are displayed on the IPC 20 character display unit. This feature allow DTCs to be read or cleared without the use of a scan tool. When the diagnostic mode is first entered, the IPC will enter into an automatic display sequence and will display all systems that communicate on the serial data line. After each system is displayed, the IPC will display the number of DTCs (current or history) for that system. The manual diagnostic mode may be selected at any time during the automatic DTC display sequence by pressing any button on the DIC except the E/M button. In the manual diagnostic mode, you can manually select what module to display. In this mode, DTCs are only displayed for a specific module and will not proceed to the next until requested. Both diagnostic mode displays will also indicate if the DTC is a current DTC (malfunction present now) or a history DTC (malfunction has occurred, but is not present now) with a C or an H, respectively. Diagnostics will automatically be exited if no DIC buttons are pressed for 60 seconds.
Entering On-Board Diagnostics
To enter the Diagnostic Display function perform the following steps:
- Turn ON the ignition switch, with the engine OFF.
- Press the RESET button to acknowledge any warning messages present.
- Press the OPTIONS button on the Driver Information Center (DIC) and hold.
- While holding the OPTIONS button press the FUEL button 4 times within a 5 second period.
- System will first enter automatic display mode followed by the manual display mode.
Automatic Display DTC Mode
The automatic display feature allows you to read each module DTC display function in an automatic display sequence. Each system module DTC will be displayed for 3 seconds followed by a 1 second pause before the next DTC is displayed in an automatic sequence. If no DTC information is available from the system currently displayed on the IPC, the IPC will display NO CODES for that system. If there is a communications problem between any system, the IPC will display NO COMM when the IPC is trying to communicate with that system. When all DTCs have been displayed for all systems, the IPC will display NO MORE CODES for 2 seconds before entering the manual mode. At any time during the automatic display function, the manual display feature can be activated by pressing any button on the DIC except the E/M button. The E/M button is used to completely exit the DIAGNOSTICS mode at any time.
Manual Display DTC Mode
The manual display feature allows you to manually select each module DTC display function. The manual mode will automatically be entered after the automatic DTC display sequence is complete, or can be entered at any time during the automatic mode by pressing any button on the DIC except the E/M (E/M button is used to exit the DIAGNOSTIC mode at any time). When the manual mode is selected, the IPC will display the MANUAL DIAGNOSTICS mode message for 2 seconds, or until any button on the DIC except the E/M is pressed. After the MANUAL DIAGNOSTICS mode message is displayed, the IPC will display the first system abbreviation and quantity of codes stored for that system, then the IPC will wait for further instructions. The buttons on the DIC provide the following functions when operating the on-board diagnostic feature in the manual mode:
DIC Button Functions

DIC Button | Function |
|---|---|
1. FUEL | Previous DTC |
2. GAGES | Next DTC |
3. TRIP | Previous System |
4. OPTIONS | Next System |
5. E/M | Exit Diagnostics |
RESET | Clear DTCs |
In both diagnostic modes, systems will be displayed in the following order:
| • | PCM (Powertrain Control Module) |
| • | TCS (Traction Control System) |
| • | RTD (Real Time Damping) (with F45 option) |
| • | BCM (Body Control Module) |
| • | SDM (Sensing and Diagnostic Module) |
| • | IPC (Instrument Panel Cluster) |
| • | RADIO (Radio) |
| • | HVAC (Heater, Ventilation and Air Conditioning) (with CJ2 option) |
| • | LDCM (Left Door Control Module) |
| • | RDCM (Right Door Control Module) |
| • | SCM (Seat Control Module) (with AAB option) |
| • | RFA (Remote Function Actuation) (known as the remote control door lock receiver (RCDLR)) |
Exiting On-Board Diagnostics
In order to exit On-Board diagnostics press the E/M button.
