Special Policy Adjustment - Electronic Column Lock System

| Subject: | 05081 -- SPECIAL POLICY ADJUSTMENT - ELECTRONIC COLUMN LOCK SYSTEM |
| Models: | 1997-2004 CHEVROLET CORVETTE EQUIPPED WITH A MANUAL TRANSMISSION (MM6/M12) |
| 1997-2000 CHEVROLET CORVETTE EQUIPPED WITH AUTOMATIC TRANSMISSION - EXPORT VEHICLES ONLY |
| 2001-2004 CHEVROLET CORVETTE EQUIPPED WITH AUTOMATIC TRANSMISSION - EUROPEAN EXPORT VEHICLES ONLY |
BEFORE PERFORMING THIS REPAIR, VERIFY THAT RECALL 04006 HAS BEEN PERFORMED ON THE VEHICLE (LABOR CODES V1144, V1145, V1153). IF THE REPAIR WAS NOT PERFORMED, PERFORM THE REPAIR IN RECALL BULLETIN 04006C, AND SUBMIT THE CLAIM USING THE APPROPRIATE RECALL LABOR CODE.
Condition
Some customers of 1997-2004 Chevrolet Corvettes equipped with a manual transmission (MM6/M12); 1997-2000 Chevrolet Export Corvettes equipped with an automatic transmission; and 2001-2004 Chevrolet European Export Corvettes equipped with an automatic transmission may have a condition where the column lock may fail to unlock the steering column when the vehicle is started.
Special Policy Adjustment
This special policy covers the condition described above until February 29, 2008, regardless of ownership. The repairs will be made at no charge to the customer.
For vehicles covered by Vehicle Service Contracts, all eligible claims with repair orders on or after February 8, 2006, are covered by this special policy and must be submitted using the labor operation codes provided with this bulletin. Claims with repair orders prior to February 8, 2006, must be submitted to the Service Contract provider.
Vehicles Involved
Involved are certain 1997-2004 Chevrolet Corvettes equipped with a manual transmission (MM6/M12) and 1997-2004 Chevrolet export Corvettes equipped with an automatic transmission built within the following VIN breakpoints:
Year | Division | Model | From | Through |
|---|---|---|---|---|
1997 | Chevrolet | Corvette | V5100002 | V5109705 |
1998 | Chevrolet | Corvette | W5100026 | W5130977 |
1999 | Chevrolet | Corvette | X5100004 | X5133278 |
2000 | Chevrolet | Corvette | Y5100002 | Y5133592 |
2001 | Chevrolet | Corvette | 15100005 | 15135601 |
2002 | Chevrolet | Corvette | 25100002 | 25135762 |
2003 | Chevrolet | Corvette | 35100003 | 35135460 |
2004 | Chevrolet | Corvette | 45100001 | 45132433 |
Parts Information
For U.S.: Parts required to complete this special policy are to be obtained from General Motors Service Parts Operations (GMSPO).
Part Number | Description | Qty/ Vehicle |
|---|---|---|
89023816 | Harness Kit, Strg Whl Theft Dtrnt Lk Shorting (US Vehicles Only) | 1 |
For Canada & IPC: Parts required to complete this special policy will be determined as you go through the diagnostic table. When it is determined which part(s) will be required, they are to be obtained from General Motors Service Parts Operation (GMSPO).
Customer Notification
General Motors will notify customers of this special policy on their vehicles (see copy of typical customer letter included with this bulletin - actual divisional letter may vary slightly).
Service Procedure
For U.S. Vehicles Only:
The following service procedure provides instructions for disconnecting the electric column lock (ECL) on U.S. vehicles.
Important: DO NOT use this procedure on Canadian or export vehicles.
| • | J 1859-A Steering Wheel Puller |
| • | J 42120 Steering Wheel Puller Legs |
| • | J 23653 SIR, Steering Column Lock Plate Compressor |
| • | J 42137 Cam Orientation Plate Adaptor |
Important: Disregard all instruction sheets that may be in the harness kit, and follow the instructions provided in this service procedure.
- Turn the steering wheel so that the vehicle's front wheels are pointing straight ahead.
- Turn the ignition switch to the OFF position.
- Open the hood and disconnect the negative battery cable.
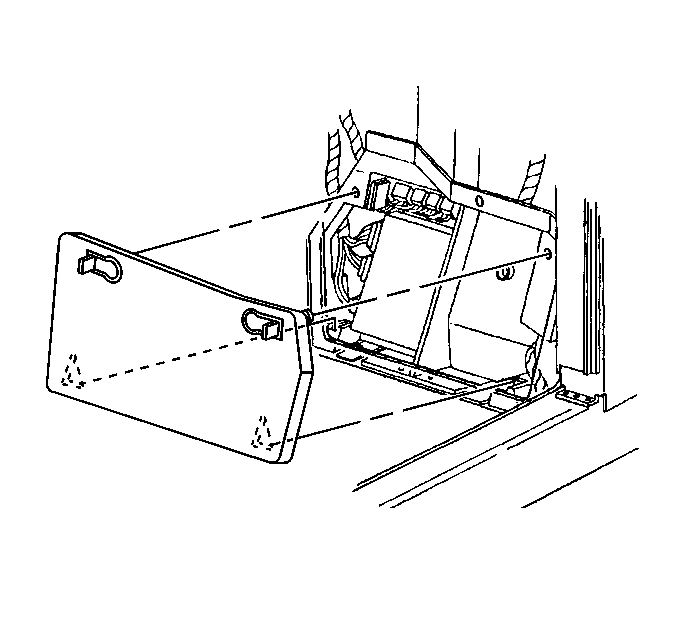
- Disengage the upper latches on the front floor kick-up panel on the passenger side.
- Lift the kick-up panel's lower edge out of the slots in the relay bracket.
- Remove the SDM fuse from the IP fuse block located behind the kick-up panel that was just removed.
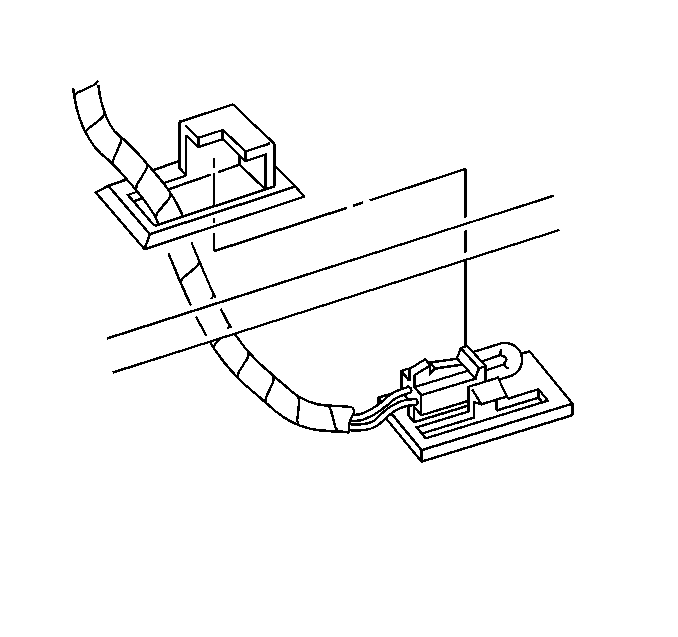
- Using a flat-bladed tool, carefully pry the IP courtesy lamp assembly from the driver's side lower closeout panel.
- Remove the push-on retaining nut from the steering column bracket stud.
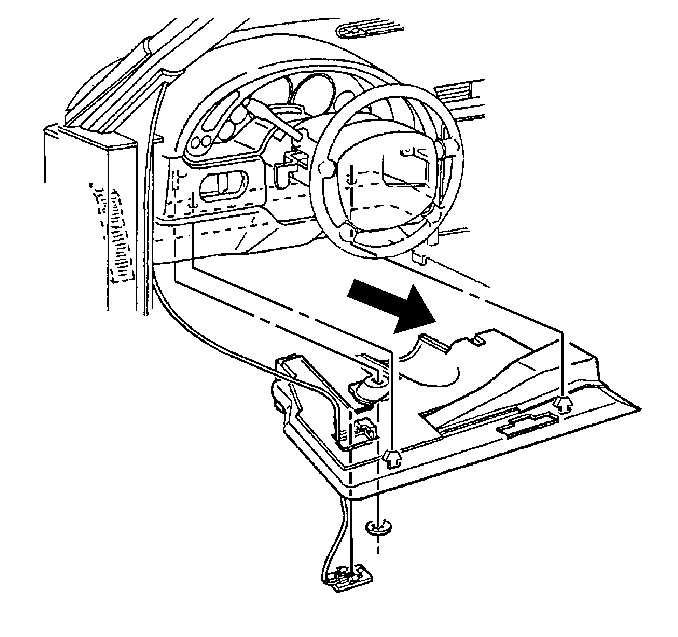
- Release the driver's side lower closeout panel push-in retainers from the IP lower support beam.
- Insert the IP courtesy lamp assembly up through the opening in the closeout panel.
- Lower and remove the closeout panel. Release the notch, in the right-hand forward edge of the closeout panel, from the tab on the accelerator pedal bracket.
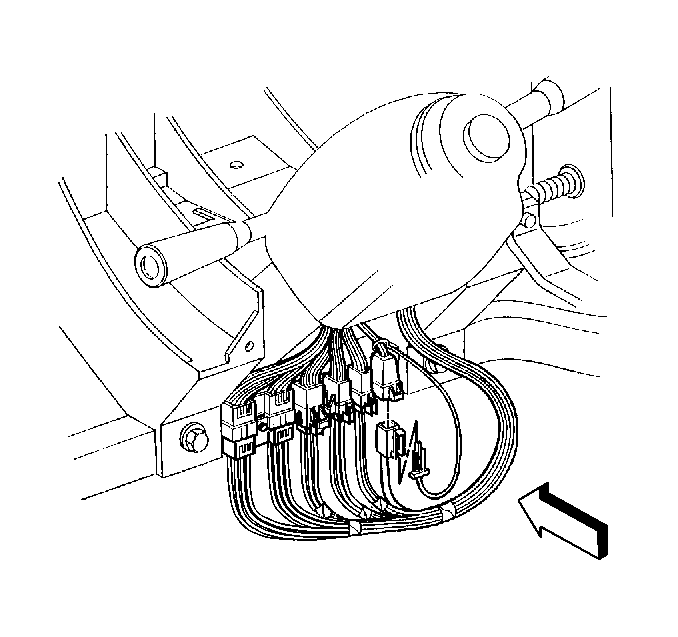
- Remove the connector position assurance (CPA) from the driver's yellow 2-way air bag connector located at the base of the steering column and disconnect the connector.
- Remove the CPA from the passenger yellow 2-way air bag connector, also located at the base of the steering column, and disconnect the connector.
- Remove the screws attaching the driver's inflator module to the steering wheel (3) and pull the module away from the steering wheel.
- Disconnect the SIR electrical connector (2) from the backside of the module, the horn wiring harness connector (6) from the steering column, and the ground wire (5) from the steering column. Remove the module.
- Remove the nut attaching the steering wheel to the column and discard the nut.
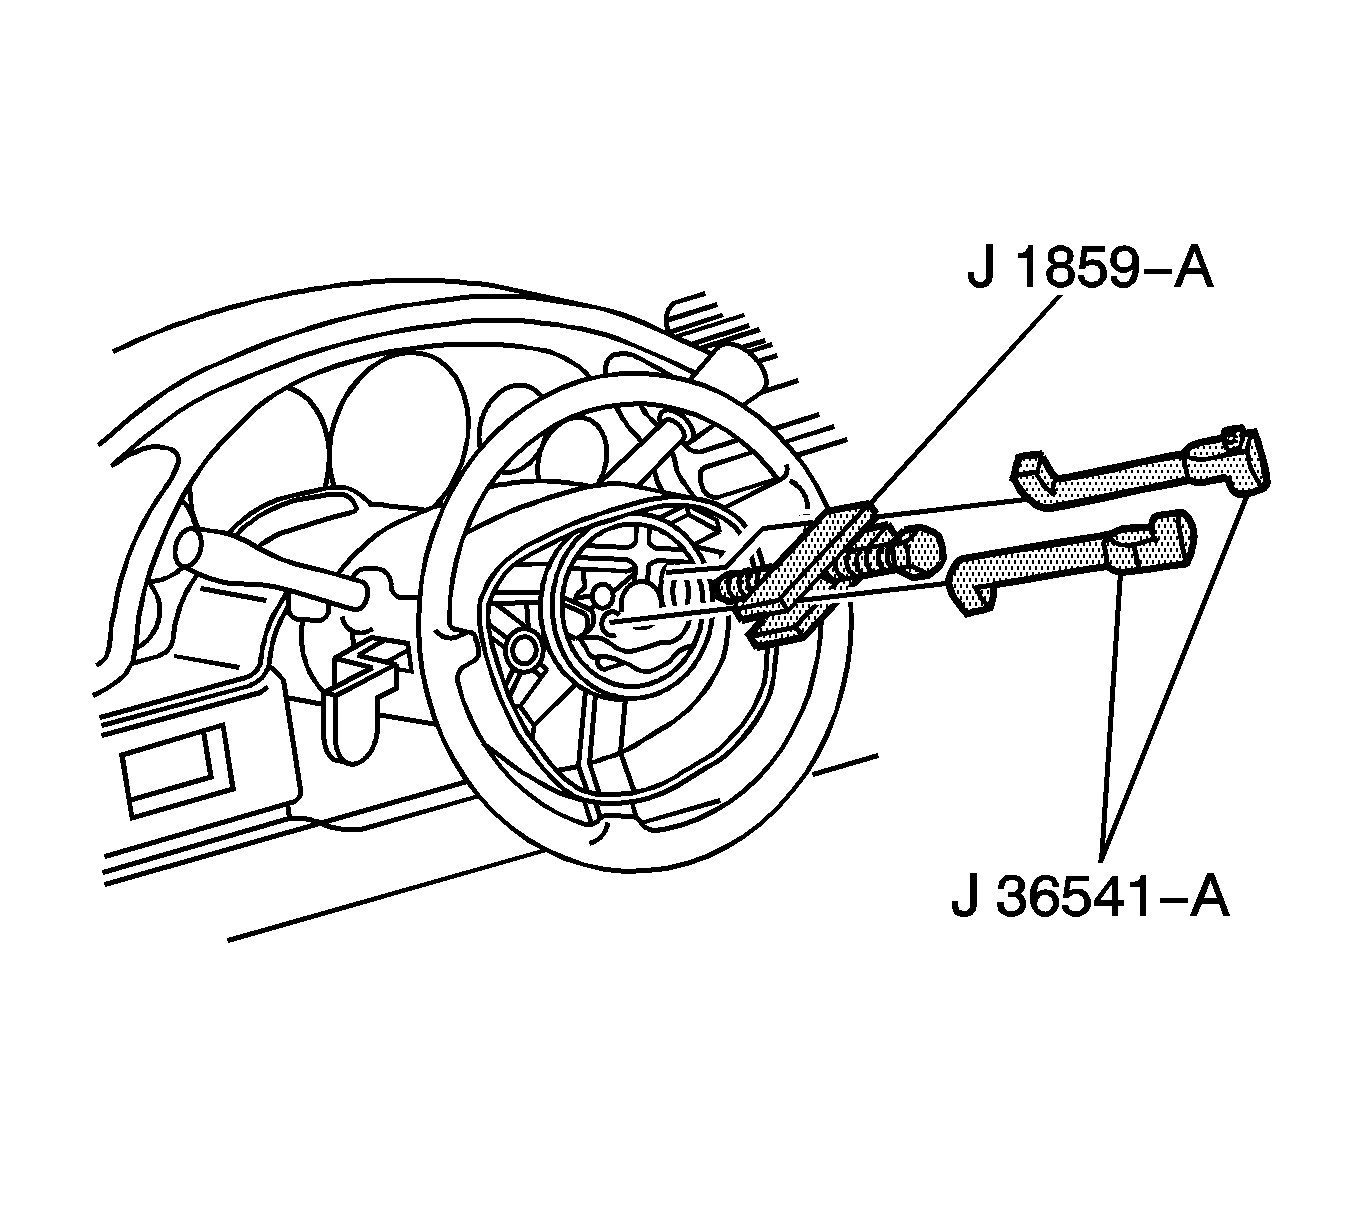
- Using tool J 1859-A, Steering Wheel Puller, and J 42120, Steering Wheel Puller Legs, remove the steering wheel from the column.
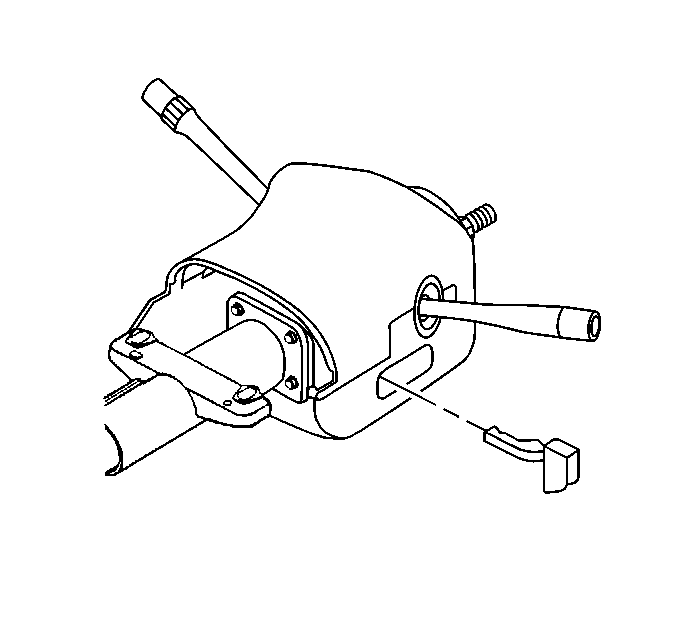
- Using a small flat-bladed screwdriver, release the locking tab from the tilt lever handle and pull the lever straight out.
- Using a small flat-bladed screwdriver, pry the lower edge of the combination fog lamp/trunk release switch to release the locking tab. Disconnect the electrical connector from the switch. Repeat this step on the inside air temperature grill located to the right side of the steering column.
- Remove the driver's side knee bolster trim panel retaining screw, located behind the area where the combination fog lamp/trunk release switch is installed. Repeat this step on the screw located in the inside air temperature cavity.
- Remove the driver's side knee bolster trim panel lower retaining screws.
- Grasp the trim panel at the side edges and firmly pull rearward to release the locking tabs and remove the panel.
- If equipped, disconnect the electrical connector from the inside air temperature sensor.
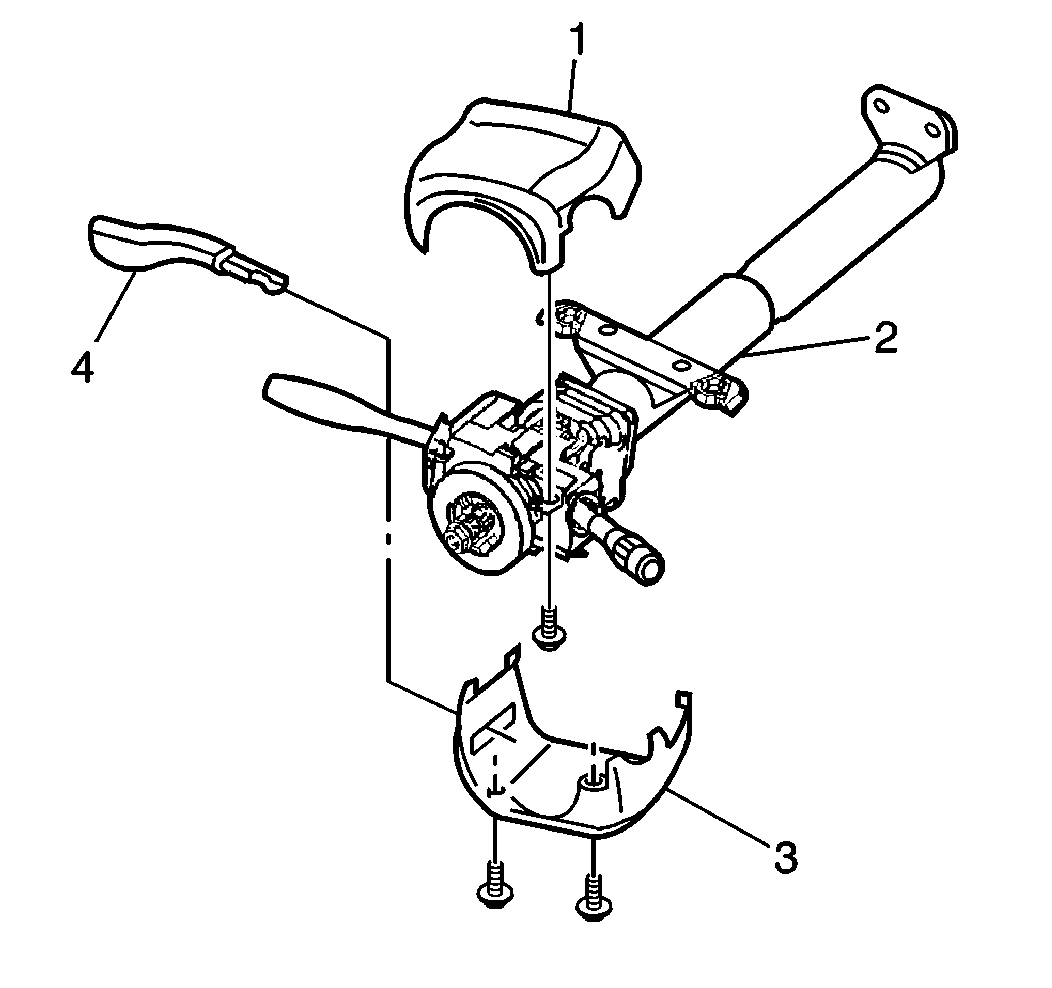
- Remove the two screws that attach the lower steering column cover (3) to the upper (1).
- Remove the one screw that attaches the upper steering column cover to the column and remove the upper cover.
- Remove the snap ring and SIR coil from the steering column.
- Using J 23653-SIR (2), remove the retaining ring and the lock plate (1) and discard both.
- Align and position the cam orientation plate (1), included in the kit, on the steering column shaft.
- Using J 23653-SIR (2) and J 42137 (1), install the cam orientation plate and the new retaining ring included in the recall kit. The cam orientation plate replaces the lock plate removed in the previous step.
- Position the SIR coil on the steering column and install the snap ring.
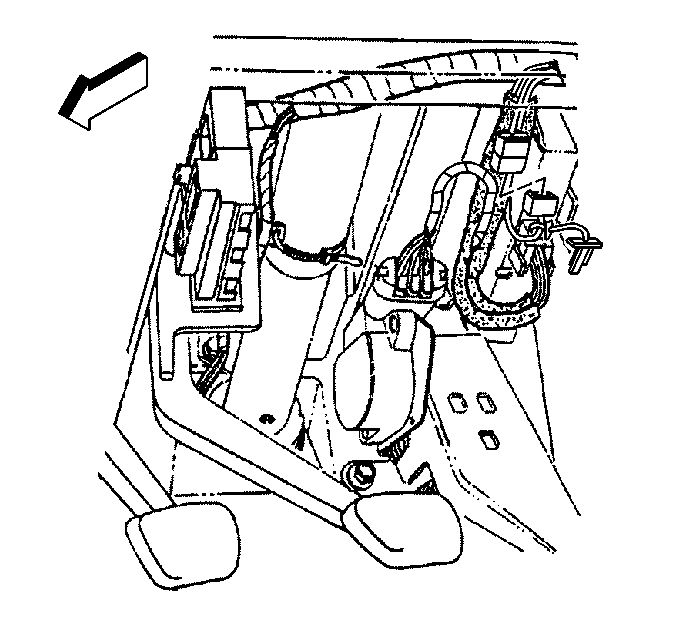
- Disconnect the electrical connector from the ECL, located on the right lower side of the steering column.
- Attach the NEW relay (1) and harness, included in the kit, to the left IP brace as shown and secure with plastic tie straps.
- Route the NEW relay harness over the knee bolster.
- Connect one end of the NEW relay harness into the connector on the ECL. Connect the other end on the NEW relay harness into the connector that was disconnected from the ECL in Step 31.
- Install the upper steering column cover and install the attaching screw.
- Install the lower steering column and attaching screws.
- If equipped, connect the electrical connector to the inside air temperature sensor located on the knee bolster trim panel.
- Install the knee bolster trim panel and press firmly to engage the locking tabs.
- Install the lower retaining screws and the screws located behind the combination fog lamp/trunk release switch, and the inside air temperature sensor grill.
- Connect the electrical connector to the combination fog lamp/trunk release switch and install the assembly into the opening in the IP. Press firmly to secure. Repeat this step on the inside air temperature sensor grill.
- Slide the tilt lever in the steering column until the locking tab clicks into place.
- Remove the inflatable restraint module retaining screws from the steering wheel.
- Position, align, and press the steering wheel onto the steering column shaft.
- Install a NEW steering wheel set nut on the steering column shaft.
- Install the retaining screws removed from the steering wheel into the backside of the inflatable restraint module.
- Position the inflatable restraint module to the steering wheel and connect the SIR electrical connector, the horn wiring harness connector to the steering column, and the ground wire to the column.
- Install the inflatable restraint module on the steering wheel by pushing on both the right and left sides of the module until the retaining screws snap into place.
- Connect the passenger yellow 2-way air bag connector located at the base of the steering column, and install the CPA.
- Connect the driver's yellow 2-way air bag connector located at the base of the steering column, and install the CPA.
- Position the driver's side lower closeout panel below the IP and install the courtesy lamp.
- Raise the closeout panel to the IP and engage the push-in retainers to the IP lower support beam.
- Align the right-hand forward edge of the panel to the tab on the accelerator pedal bracket. Push up to secure.
- Install the push-on retaining nut to the steering column bracket stud.
- Install the SDM fuse.
- Position the kick-up panel to the opening in the floor and insert the lower tabs into the slots in the multi-use bracket.
- Close the panel and latches.
- Connect the negative battery cable and close the hood.
- Verify that the ECL and relay are synchronized:
- Start the engine and verify that the steering column in unlocked.
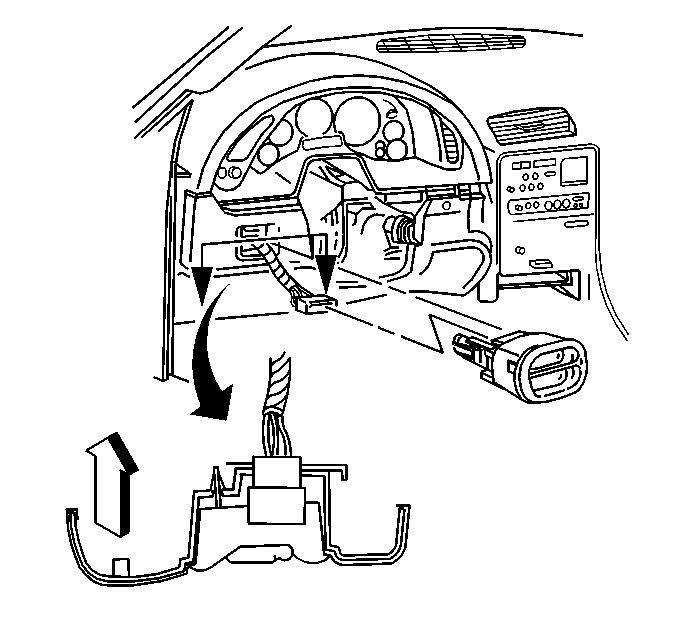
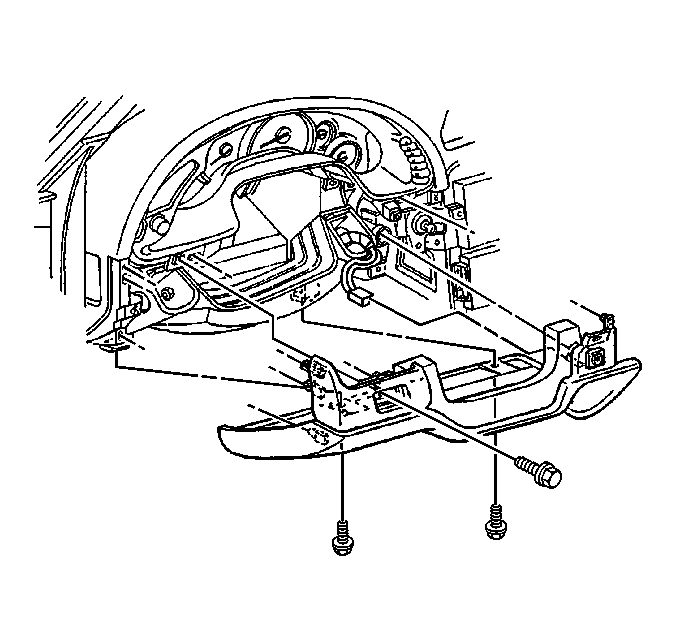
Important: When removing the driver's side knee bolster trim panel as described below, care must be taken not to damage the console trim plate as the knee bolster trim panel tucks in behind the console trim plate.
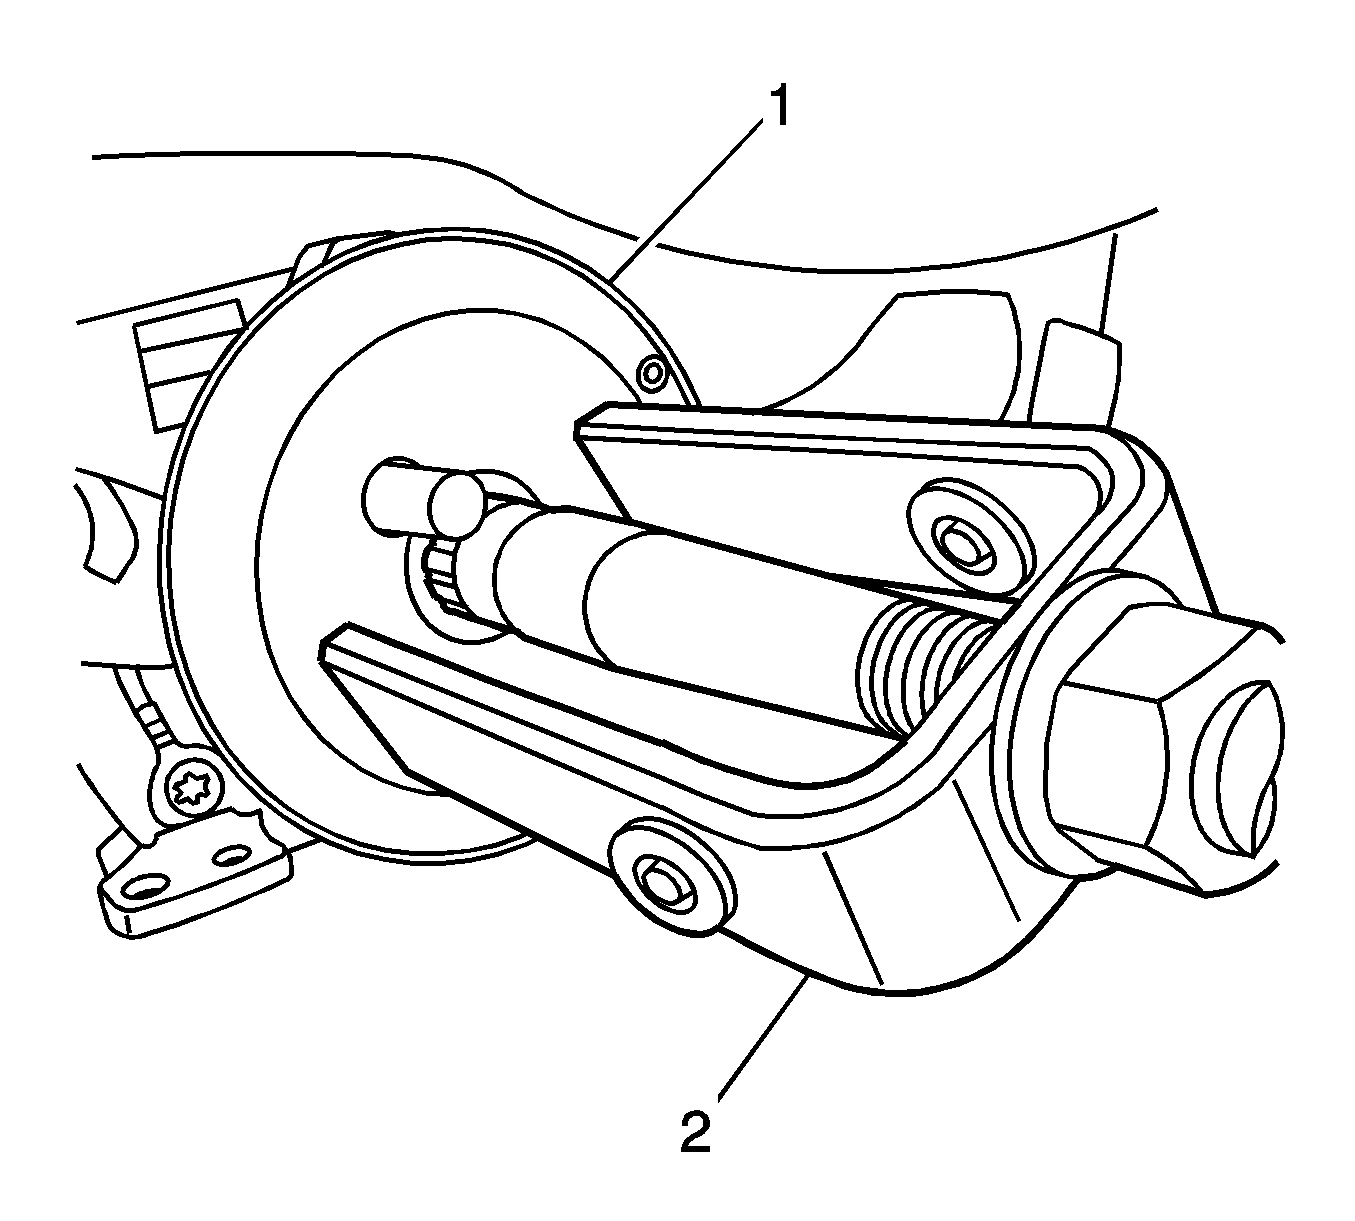
Notice: Tool J 23653-SIR MUST be used when removing the retaining ring and lock plate in the next step.
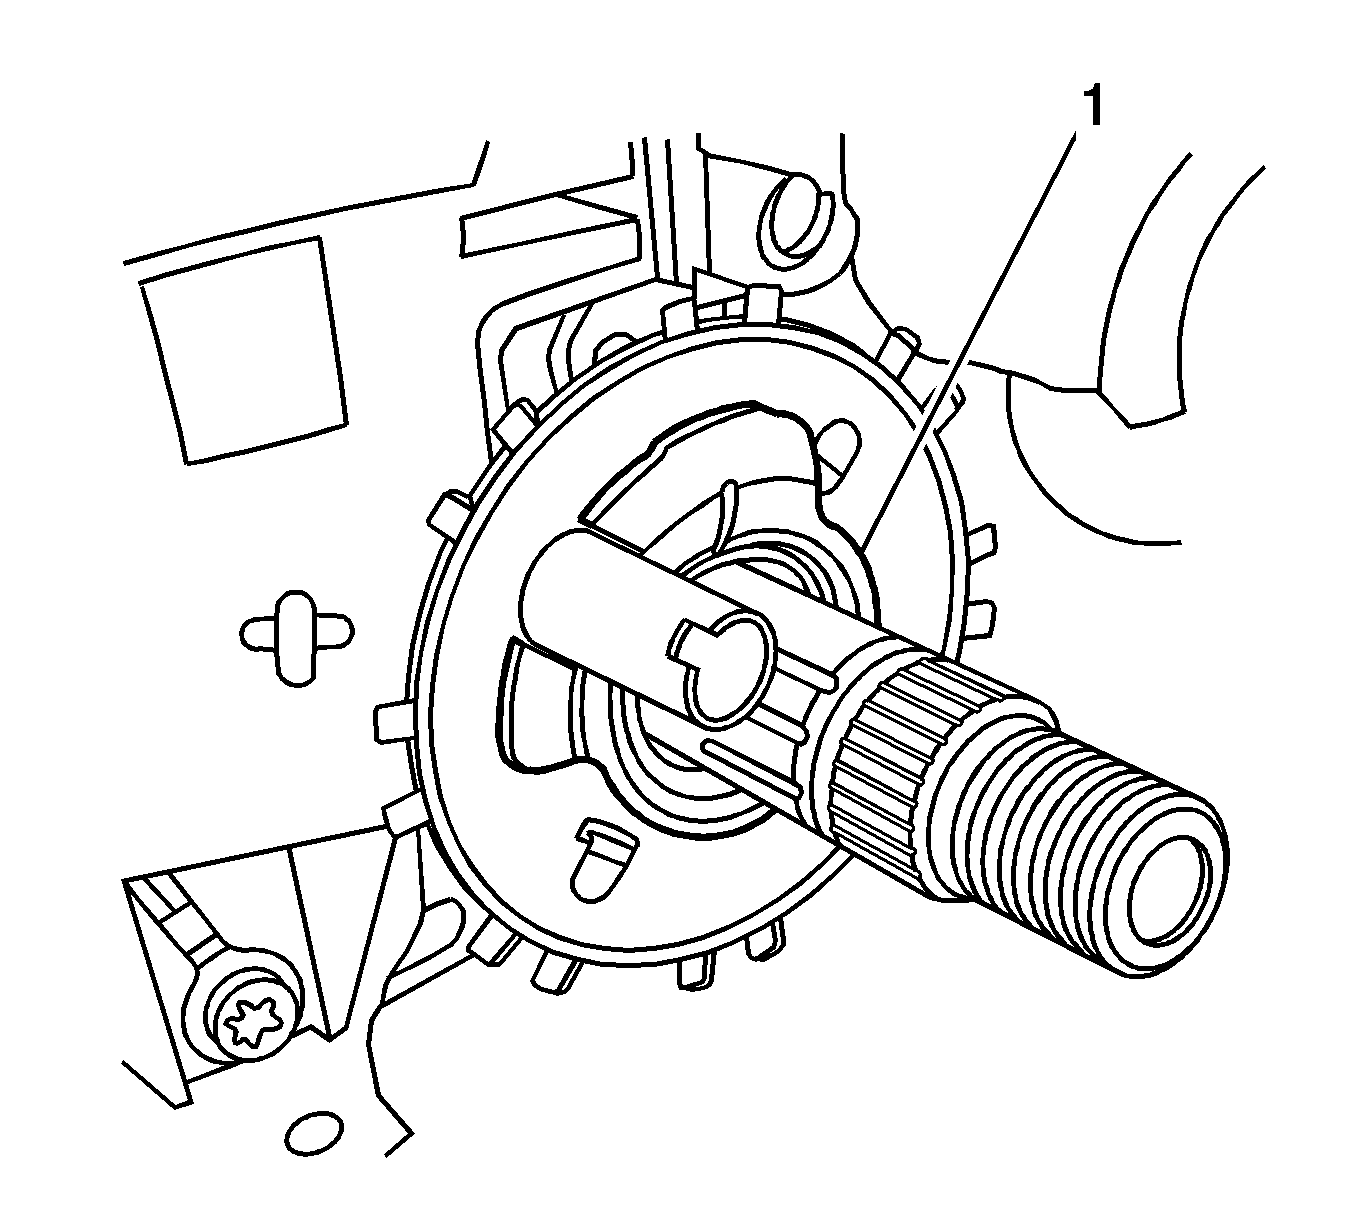
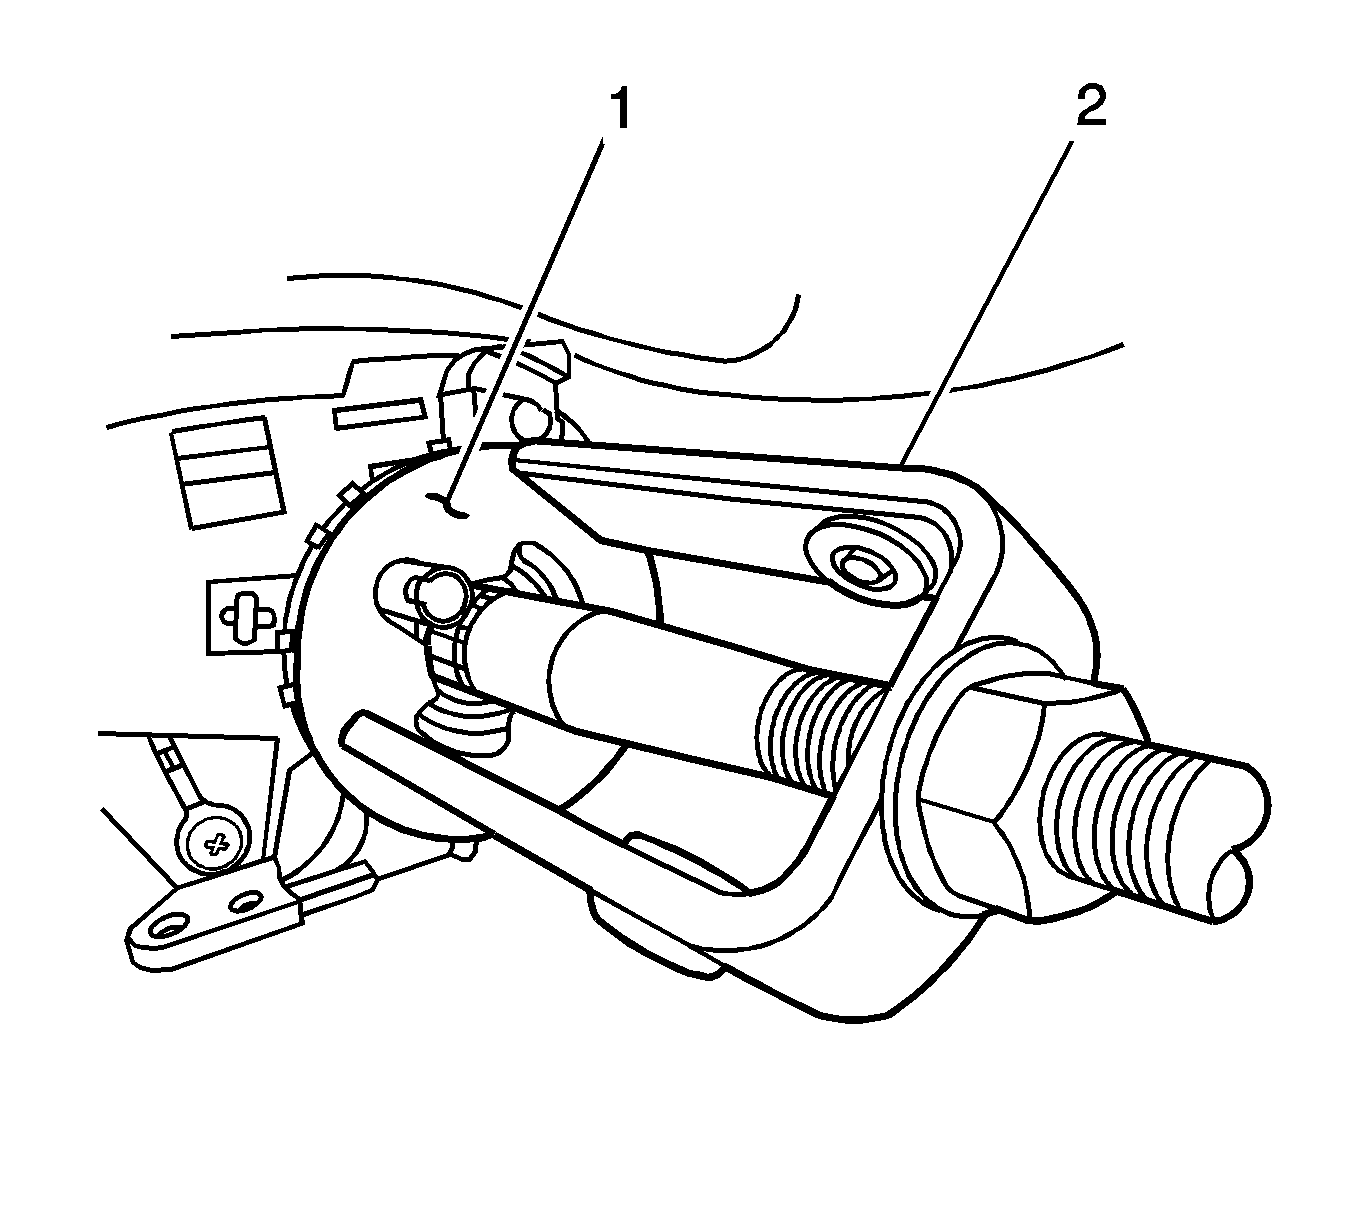
Notice: When installing the cam orientation plate in the next step, a NEW retaining ring must be used. Do not reuse the original retaining ring.
Notice: J 23653-SIR and J 42137 MUST be used when installing the cam orientation plate and new retaining ring in the next step. Failure to use these tools may result in damage to the cam orientation plate, retaining ring or steering column components.
Important: The connectors on the NEW relay harness are specific and MUST be connected correctly in the next steps. When connected the new connection becomes J165/P165.
Tighten
Tighten the screw to 1.9 N·m(17 lb in).
Tighten
Tighten the screws to 4 N·m(35 lb in).
Tighten
Tighten the screws to 1.8 N·m(16 lb in).
Tighten
Tighten the nut to 41 N·m(30 lb ft).
Tighten
Tighten the screws to 6 N·m(53 lb in).
Depending on the position of the relay and the ECL bolt, when the key (ignition switch) is first turned to the ON position, you may receive the message "Pull Key and Wait 10 Sec."
| • | If you do NOT receive this message, the ECL and relay ARE synchronized. No further action is required. |
| • | If you DO receive this warning message, the ECL and relay are NOT synchronized. To synchronize, turn the ignition switch to the OFF position and REMOVE THE KEY from the switch (lock cylinder). Wait a MINIMUM of 10 seconds, re-insert the key, and turn to the ON position. From this point on, the ECL and relay should be synchronized. |
For Canadian and Export Vehicles Only:
The following service procedure provides instructions for diagnosing the column lock condition. In SI, follow the referenced documents below and repair as indicated.
Model Year | Document Title | Document Number |
|---|---|---|
1997 | Steering Column Lock Malfunction | 197530 |
1998 | Steering Column Lock Malfunction | 222605 |
1999 | Steering Column Lock Malfunction | 399700 |
2000-2004 | Electronic Column Lock Does Not Unlock | 844926 |
Claim Information
For vehicles repaired under the terms of this special policy, submit a claim with the information indicated below:
Repair Performed | Part Count | Part No. | Parts Allow | CC-FC | Labor Op | Labor Hours | Net Item |
|---|---|---|---|---|---|---|---|
Install Harness Kit (U.S. Only) | 1 | -- | * | MK-95 | T5638 | 0.6 | N/A |
Diagnose (Canada & Export Only) | 0 | -- | * | MK-95 | T5639 | 0.3 | N/A |
Add: Wiring Repair | 0 |
|
|
|
| 0.2 |
|
Add: Replace Steering Column Lock Relay | 1 |
|
|
|
| 0.2 |
|
Add: Replace Ignition Switch | 1 |
|
|
|
| 0.7 |
|
Add: Replace Steering Wheel Lock Plate | 1 |
|
|
|
| 0.6 |
|
Add: Replace BCM | 1 |
|
|
|
| 0.6 |
|
Customer Reimbursement (Canadian & Export Dealers/US CAC) | N/A | N/A | N/A | MK-95 | T5640 | 0.2 | ** |
* The "Parts Allowance" should be the sum total of the current GMSPO Dealer net price plus applicable Mark-Up or Landed Cost Mark-Up (for Export) for parts required needed to complete the repair. ** The amount identified in the "Net Item" column should represent the customer reimbursement amount. | |||||||
Letter for U.S. Customers
February 2006Dear General Motors Customer:
As the owner of a Chevrolet Corvette, your satisfaction with our product is very important to us.
This letter is intended to make you aware that some 1997-2004 model year Chevrolet Corvette vehicles may have a condition where the steering column lock fails to unlock the steering column when the vehicle is started. This steering lock condition will cause a message to appear in the DIC display telling you to pull the key and wait 10 seconds. It will also shut off the fuel supply if you attempt to drive the vehicle while the steering column is locked.
This is not a recall . Do not take your vehicle to your Chevrolet dealer as a result of this letter unless you believe that your vehicle has the condition as described above.
What We Have Done
General Motors is providing owners with additional protection in the event that the steering column fails to unlock when the vehicle is started. If this condition occurs on your Corvette, the condition will be repaired for you at no charge until February 29, 2008.
What You Should Do
Repairs and adjustments qualifying under this special coverage must be performed by a General Motors dealer. Keep this letter with your other important glove box literature for future reference.
If you have any questions or need any assistance, just contact your dealer or the appropriate Customer Assistance Center at the number listed below. The Customer Assistance Center’s hours of operation are from 8:00 AM to 11:00 PM, EST, Monday through Friday.
Division | Number | Text Telephones (TTY) |
|---|---|---|
Chevrolet | 1-800-630-2438 | 1-800-833-2438 |
Guam | 1-671-648-8650 |
|
Puerto Rico - English | 1-800-496-9992 |
|
Puerto Rico - Español | 1-800-496-9993 |
|
Virgin Islands | 1-800-496-9994 |
|
We are sorry for any inconvenience you may experience; however we have taken this action in the interest of your continued satisfaction with our products.
General Motors Corporation
Enclosure
05081
Letter for Canadian and Export CustomersDear General Motors Customer:
As the owner of a 1997-2004 model year Chevrolet Corvette, your satisfaction with our product is very important to us.
In the past, your Chevrolet Corvette was involved in a column lock recall (recall 04006). If you have not had the repair performed on your vehicle, we encourage you to contact your dealer to schedule an appointment for this repair as soon as possible.
If you have had the repair performed and experience a condition where the steering column lock fails to unlock the steering column when the vehicle is started, please contact your dealer for further diagnosis and repair. This steering lock condition will cause a message to appear in the DIC display telling you to pull the key and wait 10 seconds. It will also shut off the fuel supply if you attempt to drive the vehicle while the steering column is locked.
This is not a recall. Do not take your vehicle to your General Motors dealer as a result of this letter unless you believe that your vehicle has the condition as described above. To address the above mentioned condition, General Motors is providing owners with additional protection in the event that the steering column fails to unlock when the vehicle is started. If this condition occurs on your Chevrolet Corvette, the condition will be repaired for you at no charge until February 29, 2008.
Repairs and adjustments qualifying under this special coverage must be performed by a General Motors dealer. You may want to call the service department at your dealer to find out how long they will need to have your vehicle so that you may schedule the appointment at a time that is convenient for you. This will also allow your dealer to order parts if they are not already in stock. Keep this letter with your other important glove box literature for future reference.
If you have already paid to have this special policy condition corrected and you have not received reimbursement under a Vehicle Service Contract, and the repair was performed before February 8, 2006, you should contact your dealer as you may be eligible to receive reimbursement. Please provide your dealer with your original paid receipts or invoices verifying the repair, the amount charged, proof of payment, the date of payment of those charges, and proof of ownership of the vehicle at the time of the repair. Reimbursement may be limited to the amount the repair would have cost if completed by an authorized General Motors dealer. Your request for reimbursement, including the information and documents mentioned above, must be received by your dealer by February 28, 2007.
We are sorry for any inconvenience you may experience; however we have taken this action in the interest of your continued satisfaction with our products.
Customer Support Department
General Motors of Canada Limited
05081
