Callout
| Component Name
|
|
Notice: Refer to Fastener Notice in the Preface section. Fastener Tightening Specifications:
Refer to
Fastener Tightening Specifications
.
|
Number One Bow Hydraulic Cylinder Replacement
Caution: Refer to Eye Protection Caution in the Preface section.
Caution: Refer to Folding Top Hydraulic Pressure Caution in the Preface section.
Caution: Refer to Servicing Electrical Components Caution in the Preface section.
Notice: Refer to Cylinder Hoses Notice in the Preface section.
Preliminary Procedures
- Remove side rail weatherstrip and retainer. Refer to
Folding Top Weatherstrip, Retainer Replacement
.
- Place a protective covering over the interior and the adjacent body panels.
|
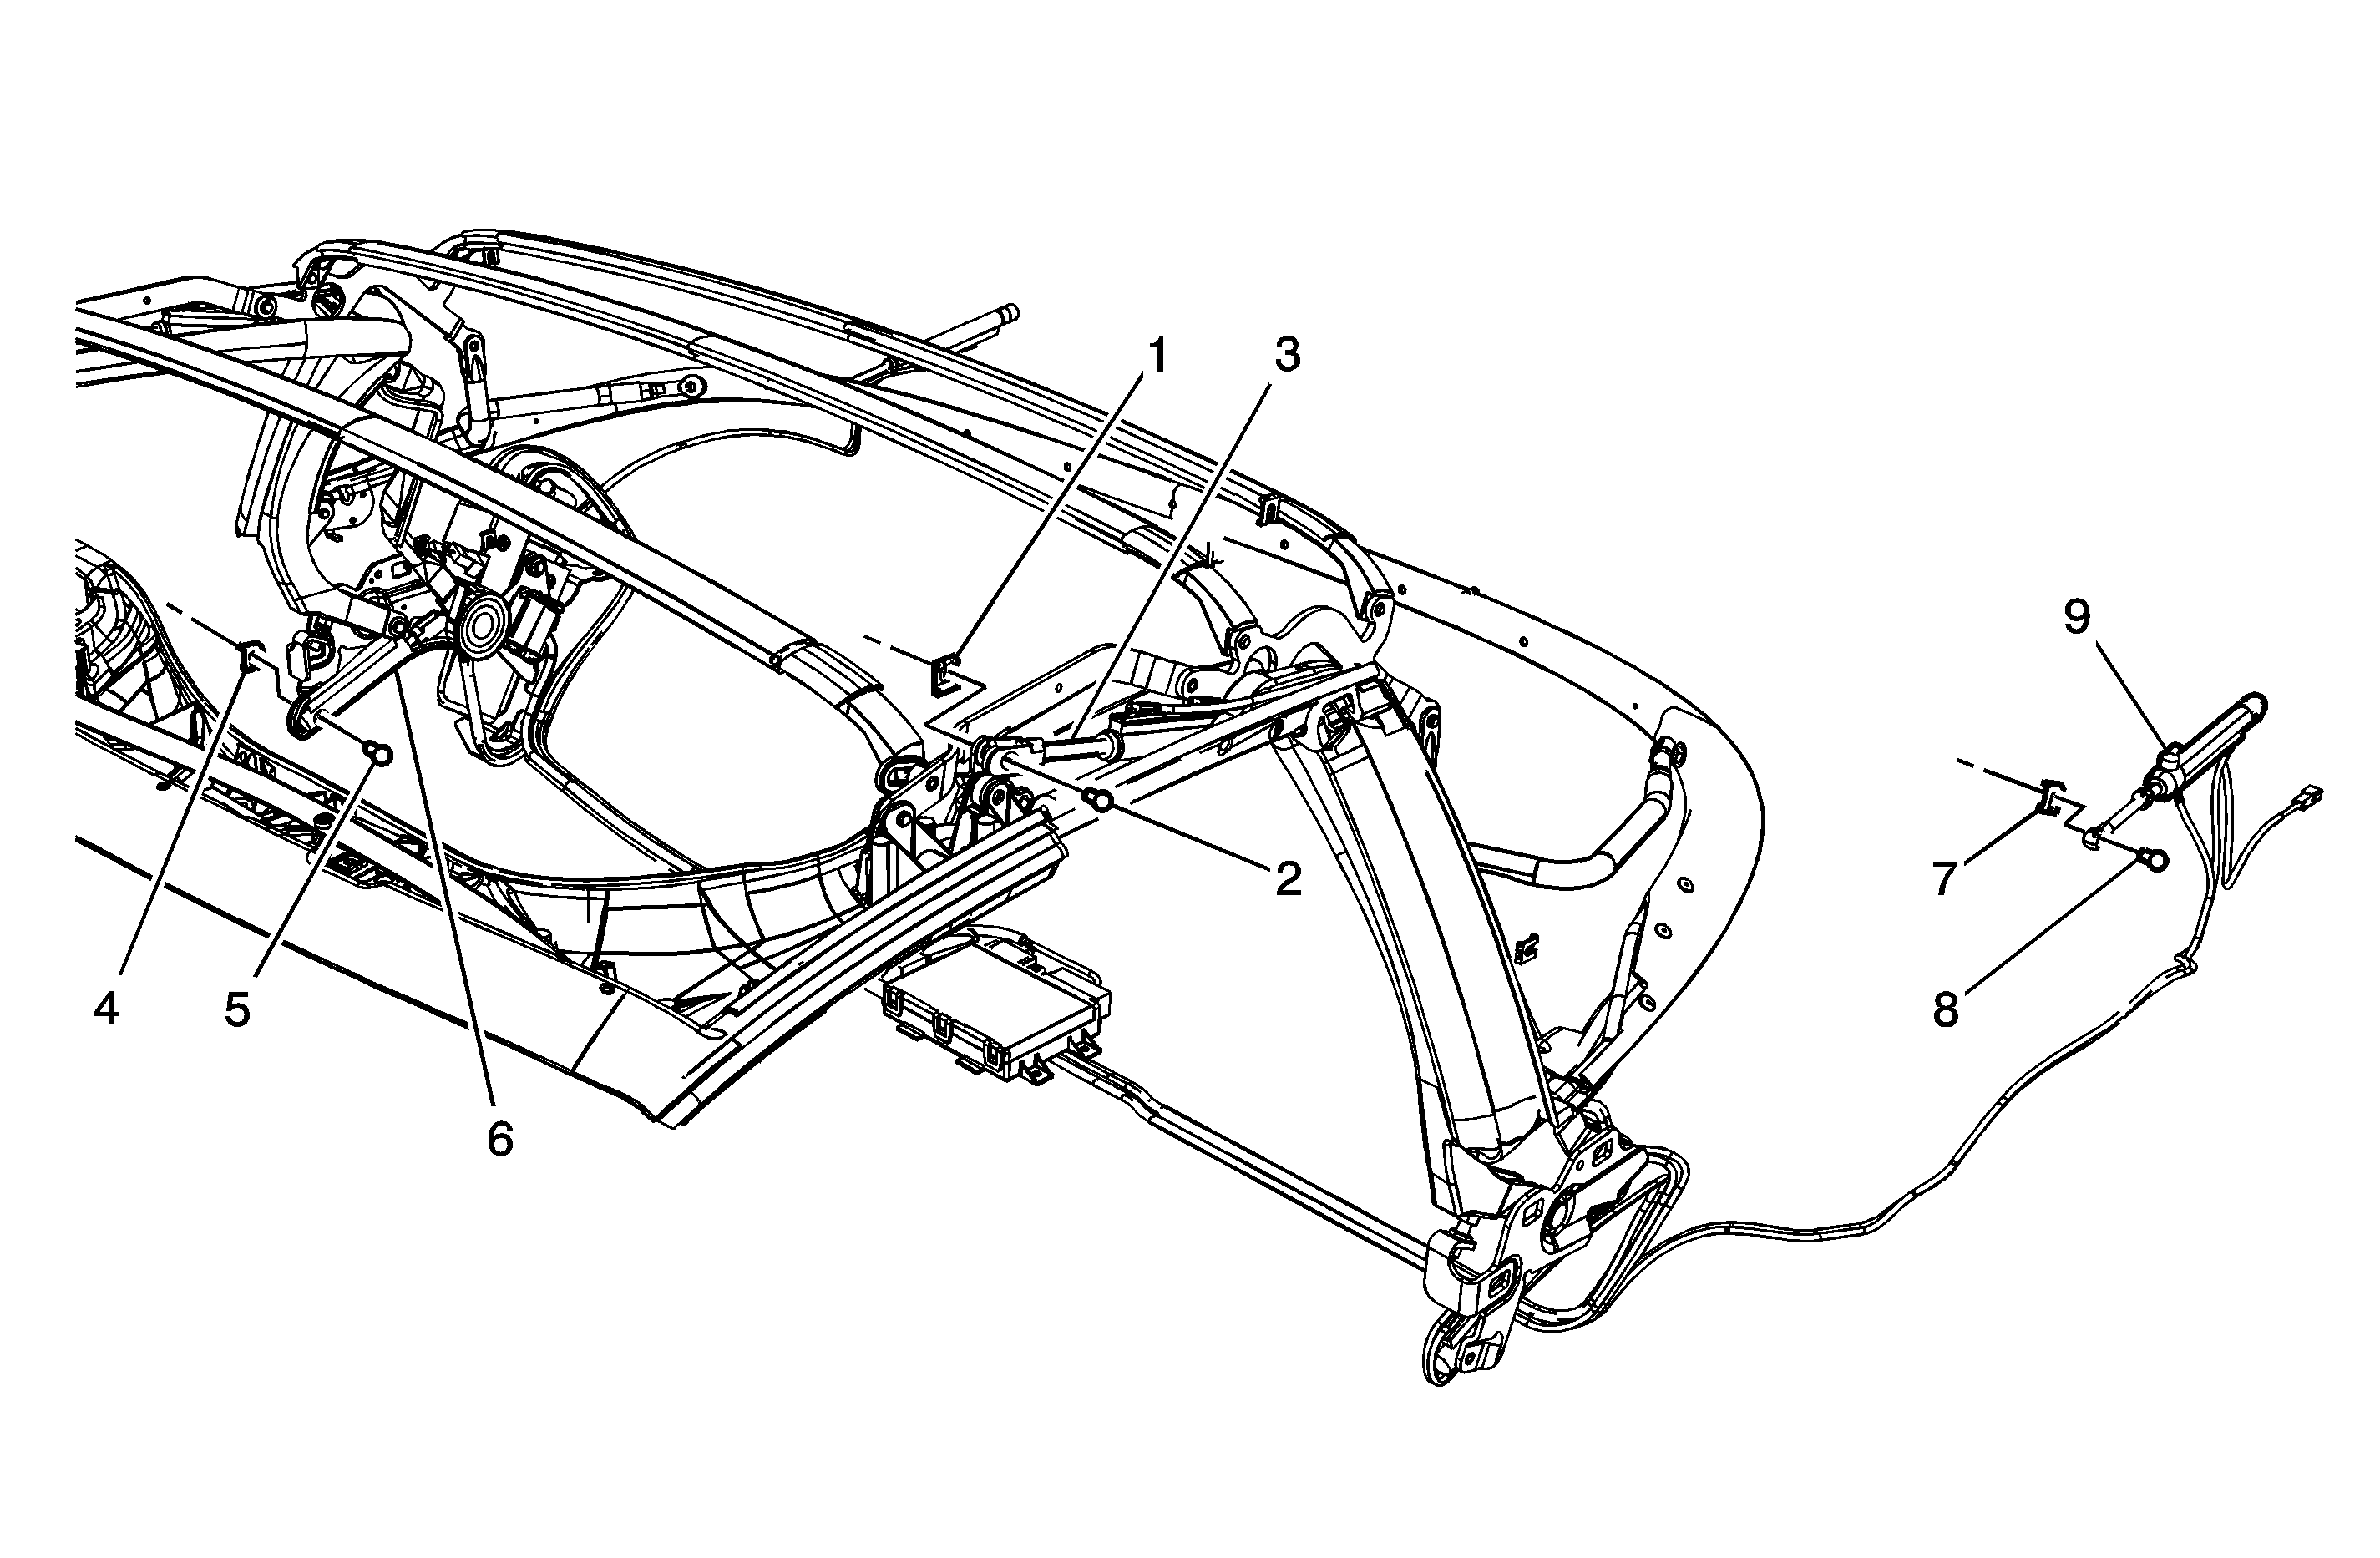
1
| Number One Bow Hydraulic Cylinder Spring Flex Clip (Qty: 2)
Tip
| • | Do not reuse spring flex clip. Replace spring flex clip after disassembly. |
| • | Use a small flat-bladed tool to lift the retainer spring flex clip. |
|
2
| Number One Hydraulic Cylinder Link Pin (Qty: 2)
|
3
| Number One Bow Hydraulic Cylinder
Tip
- Once the cylinder hose or the port plug has been removed, do NOT move the cylinder rod. This will cause fluid to squirt out of the ports.
- Before disconnecting the cylinder hoses, have the replacement cylinder ready.
- Install a new O-ring onto the cylinder hose.
- Install the hose into the cylinder port. Press down on the hose until the hose is fully seated in the cylinder.
- Install a new cylinder hose retainer clip. Inspect the retainer clip to ensure that the clip is fully seated around the hose.
- Inspect the fluid level and add fluid as needed. Refer to
Folding Top Fluid Addition
.
|
Main Hydraulic Cylinder Replacement
Caution: Refer to Eye Protection Caution in the Preface section.
Caution: Refer to Folding Top Hydraulic Pressure Caution in the Preface section.
Caution: Refer to Servicing Electrical Components Caution in the Preface section.
Preliminary Procedures
- Remove the rear compartment side carpet. Refer to
Rear Compartment Rear Center Trim Panel Carpet Replacement
.
- Place a protective covering over the interior and the adjacent body panels.
|
4
| Number Three Link Spring Flex Clip (Qty: 3)
Tip
| • | Do not reuse spring flex clip. Replace spring flex clip after disassembly. |
| • | Use a small flat-bladed tool to lift the retainer spring flex clip. |
|
5
| Main Cylinder Link Pin (Qty: 2)
|
6
| Main Hydraulic Cylinder
Tip
- Once the cylinder hose or the port plug has been removed, do NOT move the cylinder rod. This will cause fluid to squirt out of the ports.
- Before disconnecting the cylinder hoses, have the replacement cylinder ready.
- Install a new O-ring onto the cylinder hose.
- Install the hose into the cylinder port. Press down on the hose until the hose is fully seated in the cylinder.
- Install a new cylinder hose retainer clip. Inspect the retainer clip to ensure that the clip is fully seated around the hose.
- Inspect the fluid level and add fluid as needed. Refer to
Folding Top Fluid Addition
.
|
Stowage Lid Hydraulic Cylinder Replacement
Caution: Refer to Eye Protection Caution in the Preface section.
Caution: Refer to Folding Top Hydraulic Pressure Caution in the Preface section.
Caution: Refer to Servicing Electrical Components Caution in the Preface section.
Preliminary ProcedurePlace a protective covering over the interior and the adjacent body panels.
|
7
| Stowage Lid Cylinder Spring Flex Clip (Qty: 2)
Tip
| • | Do not reuse spring flex clip. Replace spring flex clip after disassembly. |
| • | Use a small flat-bladed tool to lift the retainer spring flex clip. |
|
8
| Stowage Lid Cylinder Pin (Qty: 2)
|
9
| Stowage Lid Hydraulic Cylinder
Tip
- Once the cylinder hose or the port plug has been removed, do NOT move the cylinder rod. This will cause fluid to squirt out of the ports.
- Before disconnecting the cylinder hoses, have the replacement cylinder ready.
- Install a new O-ring onto the cylinder hose.
- Install the hose into the cylinder port. Press down on the hose until the hose is fully seated in the cylinder.
- Install a new cylinder hose retainer clip. Inspect the retainer clip to ensure that the clip is fully seated around the hose.
- Inspect the fluid level and add fluid as needed. Refer to
Folding Top Fluid Addition
.
|

