Differential Replacement RPO KNR
Tools Required
J 42055 Drivetrain Support Fixture
Removal Procedure
- Disconnect the negative battery cable.
- Raise and suitably support the vehicle. Refer to Lifting and Jacking the Vehicle.
- Remove the rear tire and wheel assemblies. Refer to Tire and Wheel Removal and Installation.
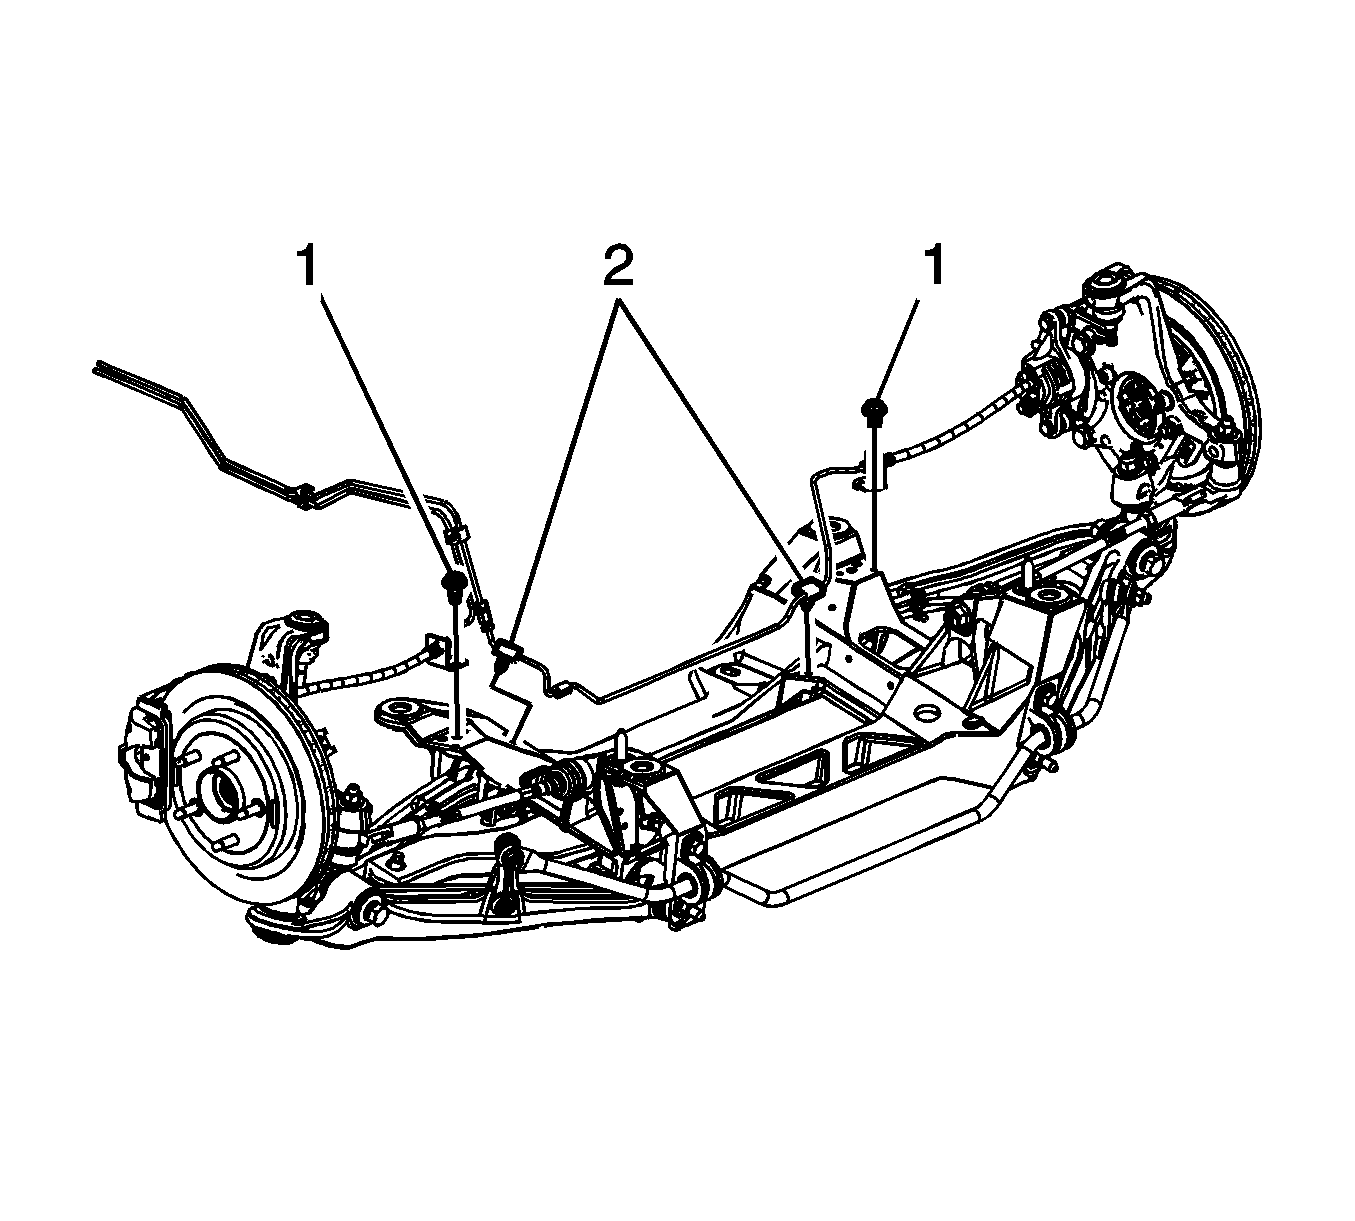
- Remove the bolts (1) securing the brake hydraulic line and hose bracket to the suspension crossmember.
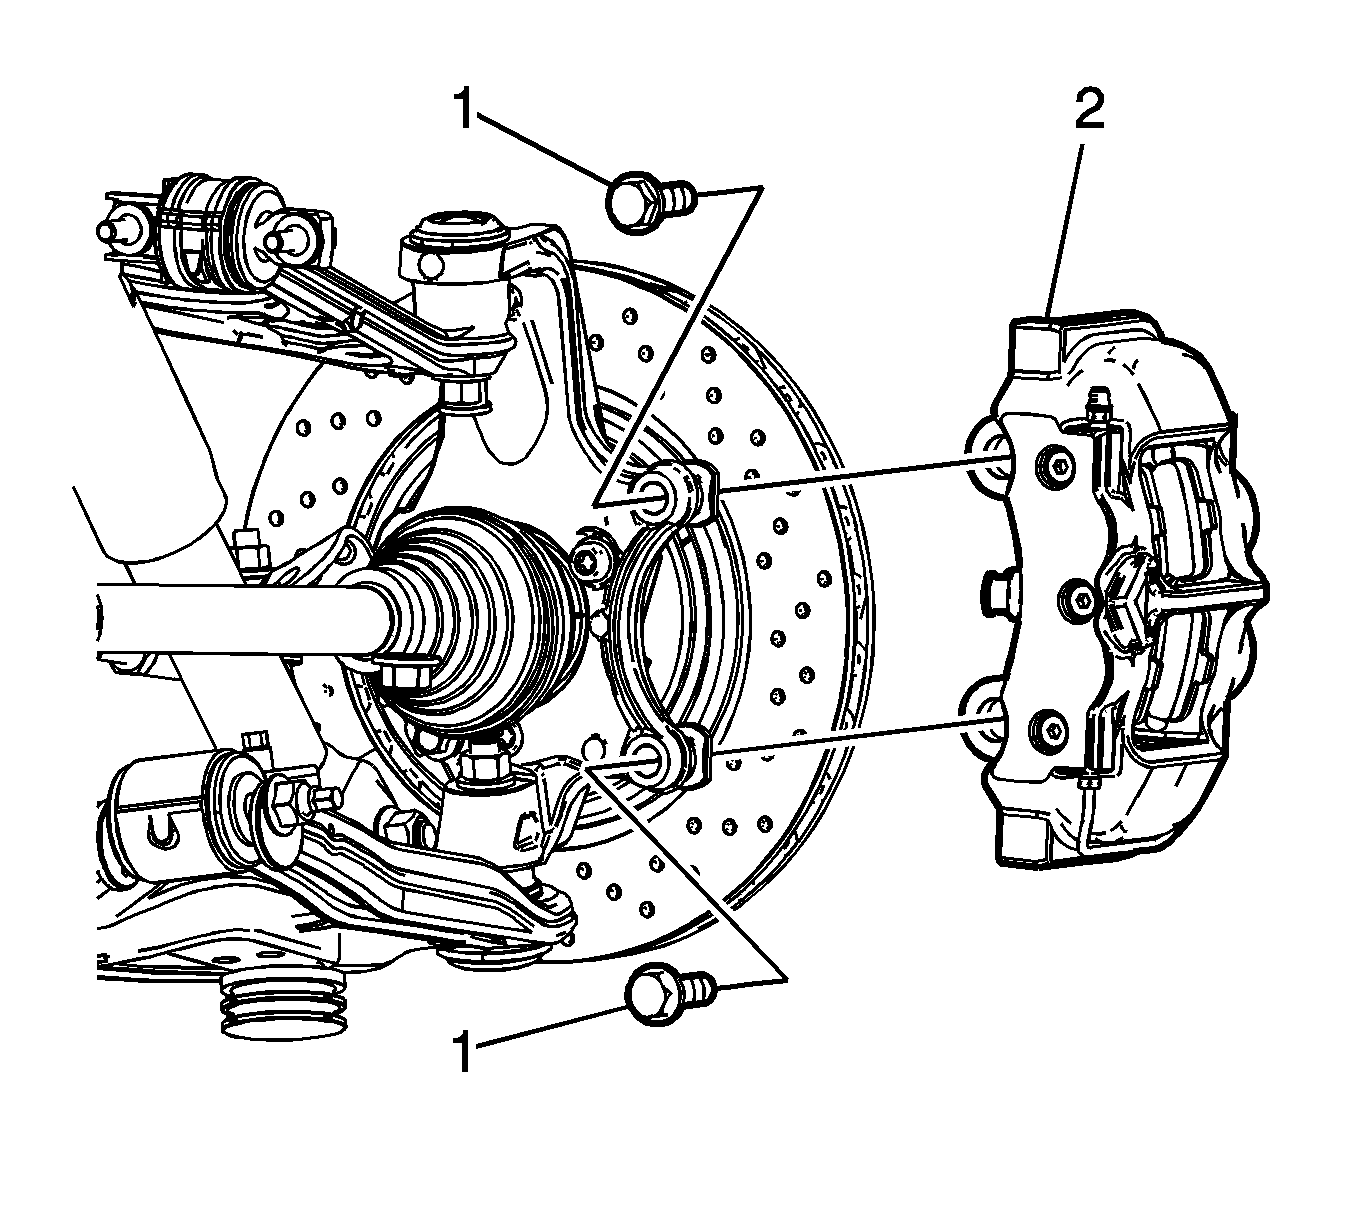
- Remove the bolts (1) securing the rear brake calipers (2) to the rear knuckles.
- Slide the caliper forward, away from the knuckle and rotor.
- Disconnect the wheel speed sensor electrical wire harness from the wheel speed sensor.
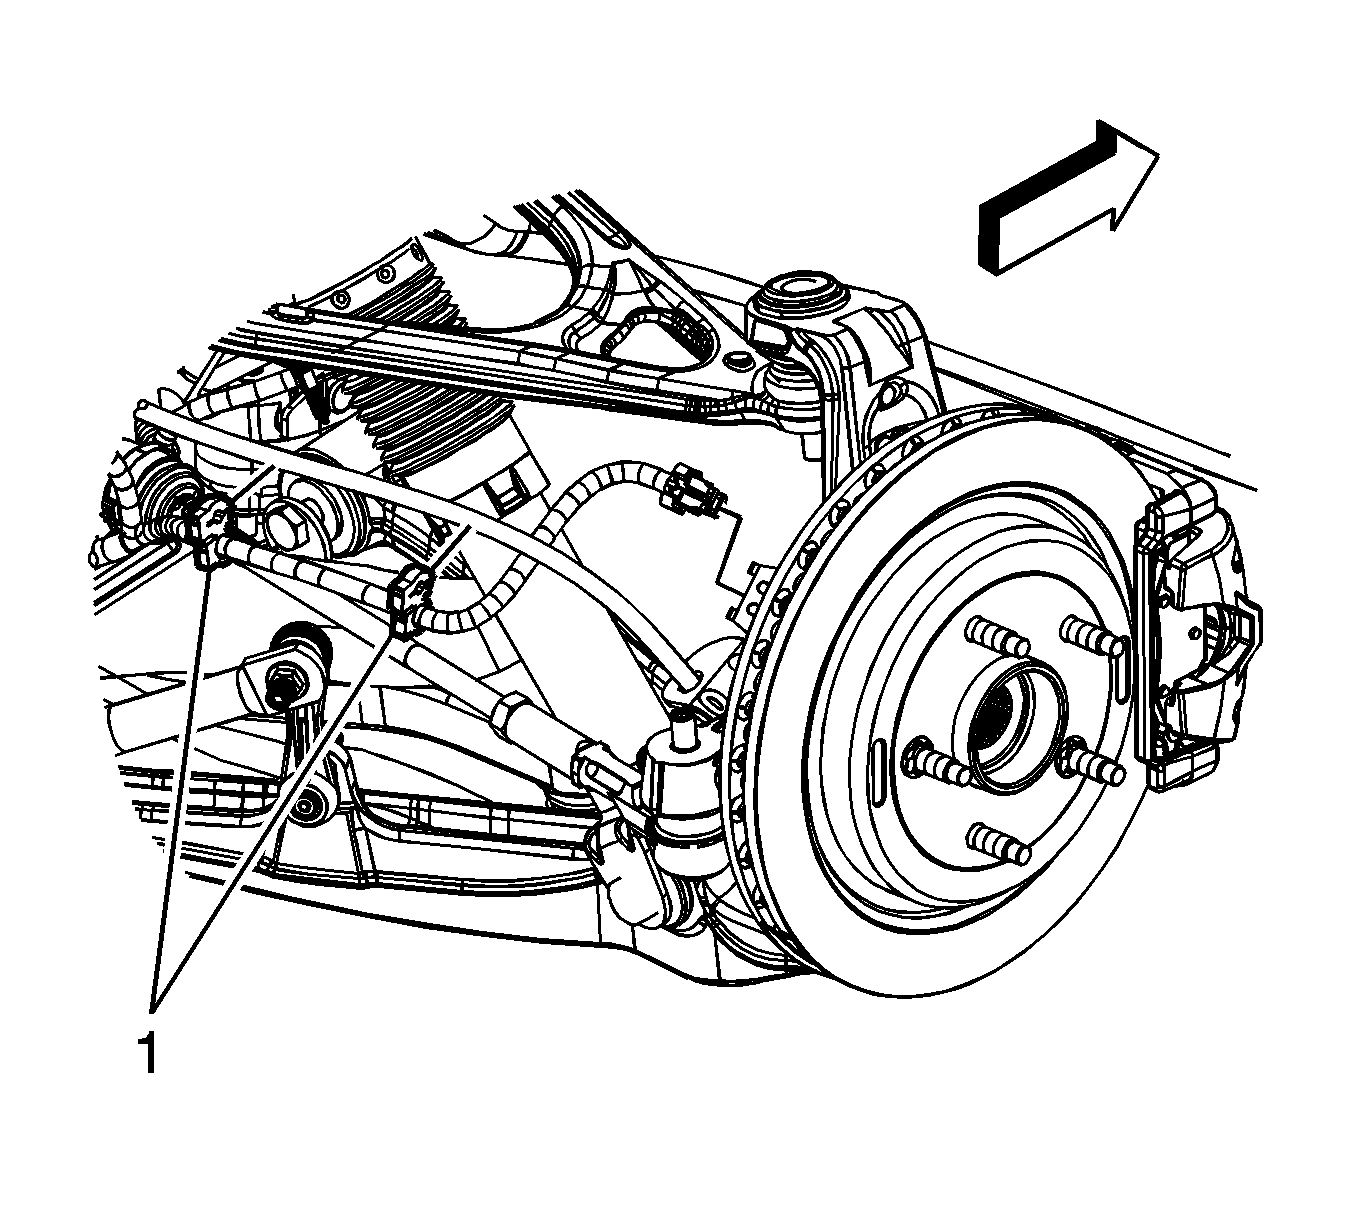
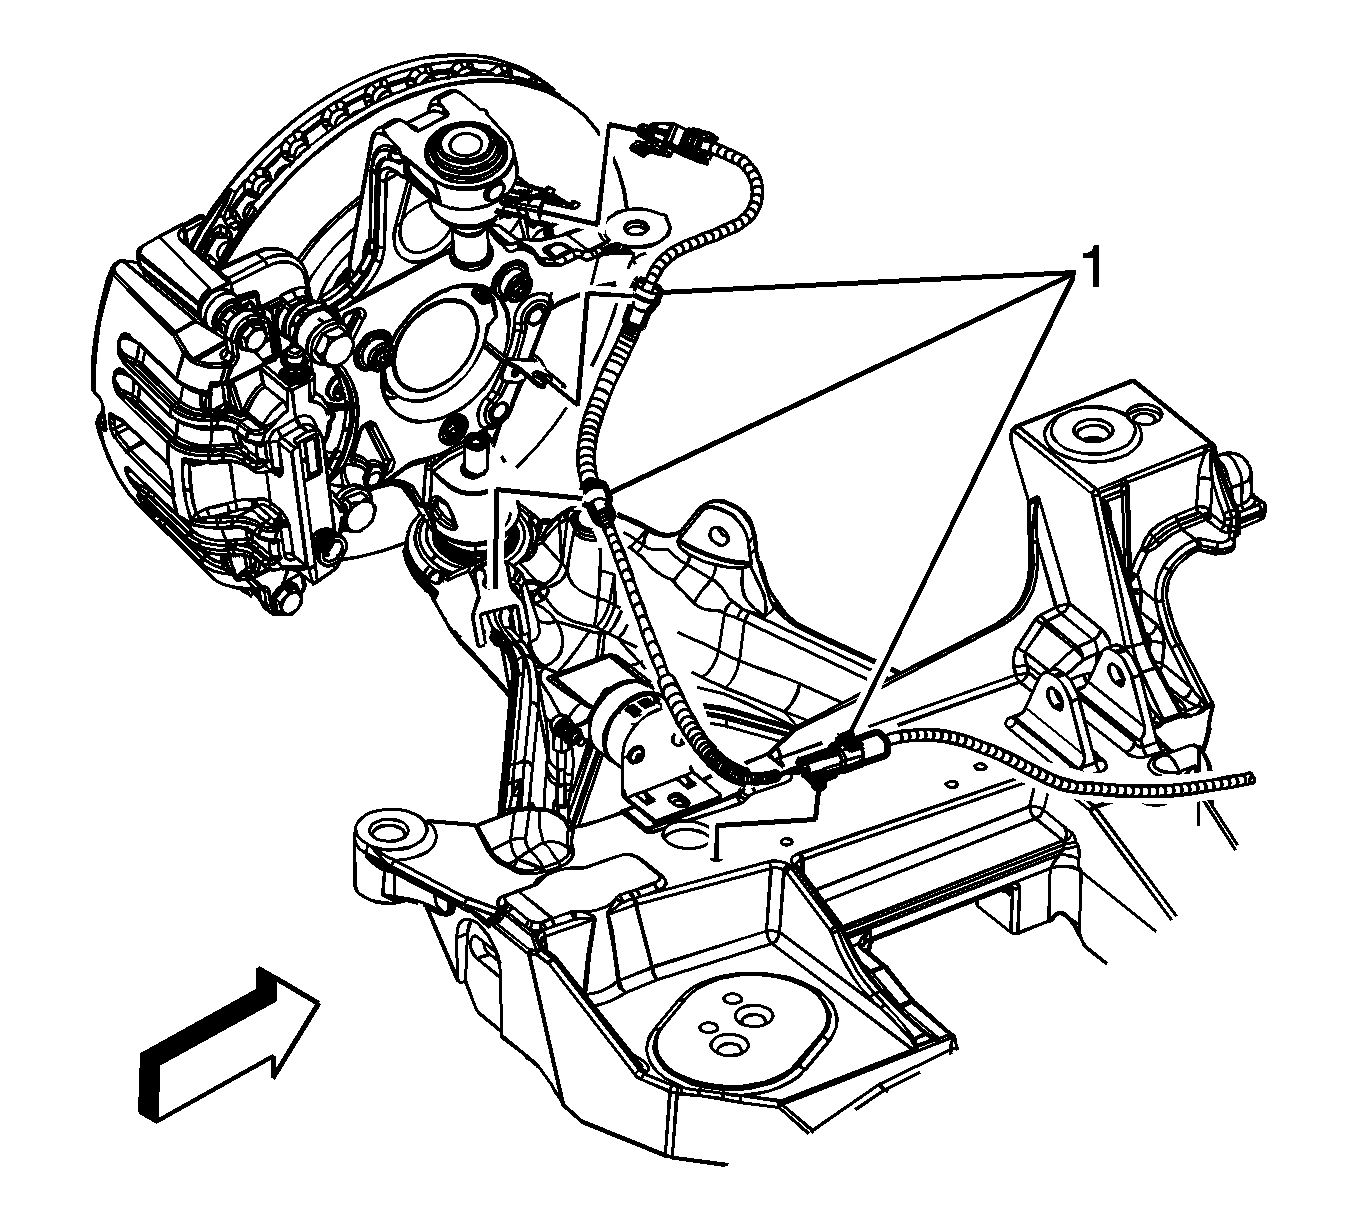
- Disconnect the retainers (1) securing the wheel speed sensor harness to the park brake cables.
- Remove the wheel speed sensor harness from the suspension crossmember. Each harness is secured in three places (1).
- Route the sensor harnesses away from the suspension crossmember.
- Disconnect the park brake cables from the actuator levers.
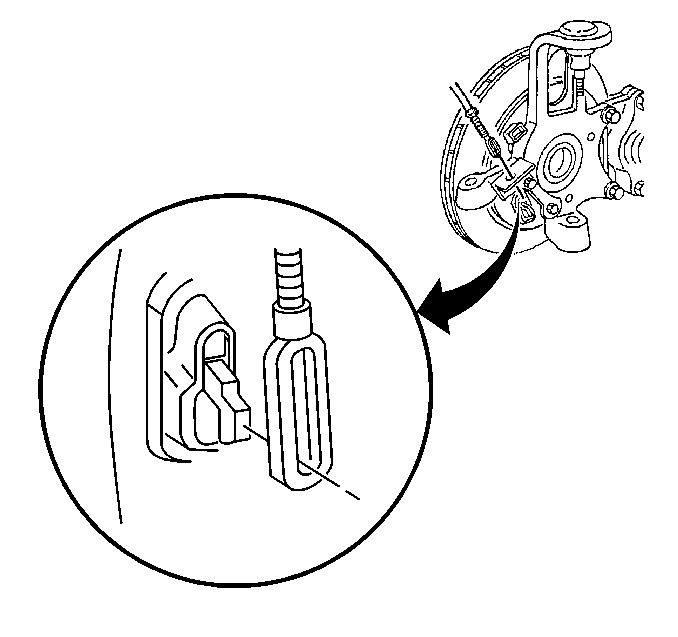
- Pull the park brake cable housing out of the park brake cable brackets attached to the knuckle.
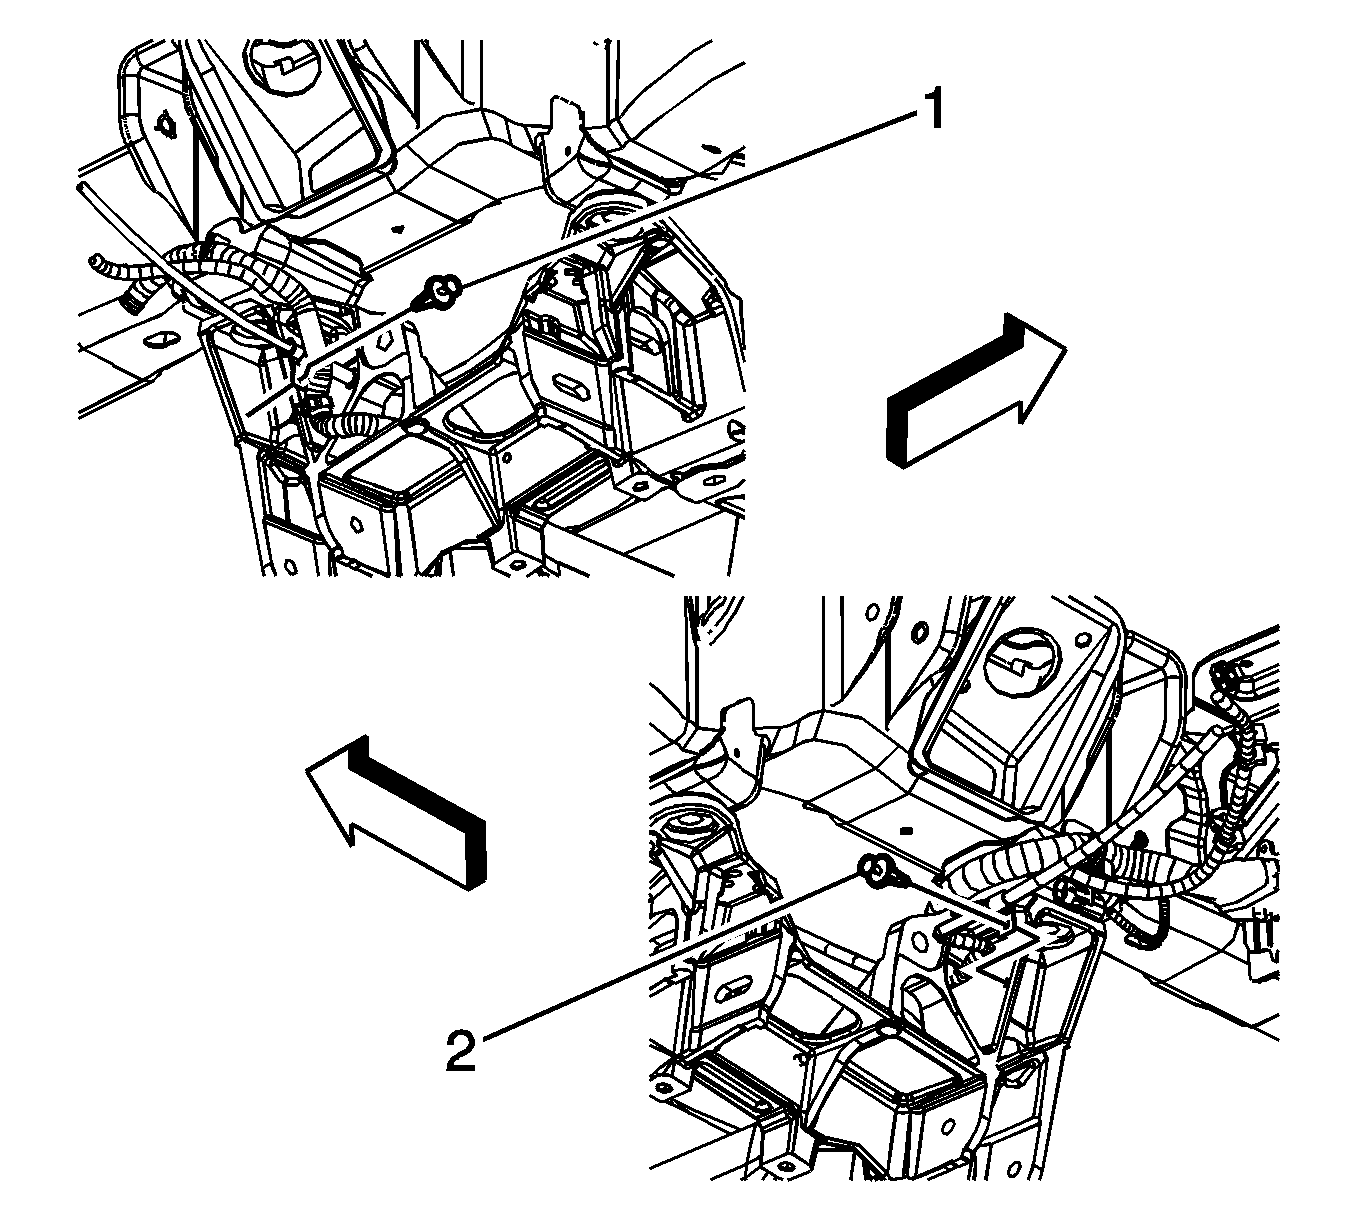
- Remove the push pins retaining the right (1) and left (2) park brake cables to the suspension crossmember.
- Route the park brake cables away from the suspension crossmember.
- Remove the rear suspension position sensors if equipped. Refer to Electronic Suspension Rear Position Sensor Replacement.
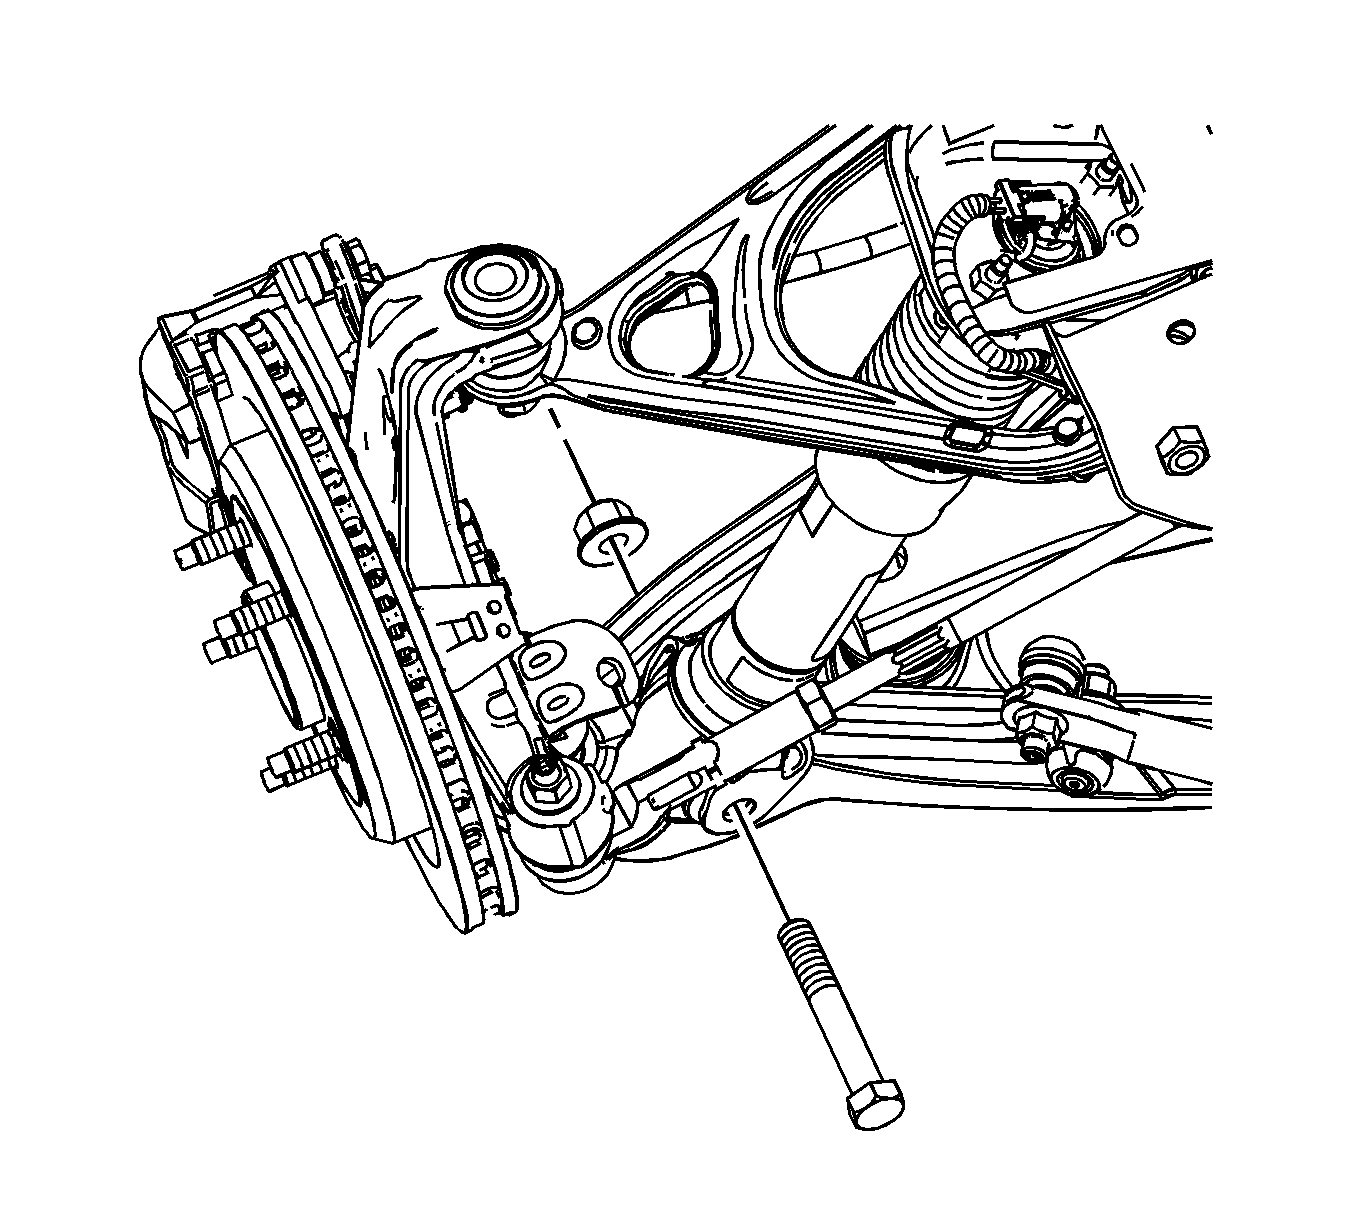
- Position an adjustable tall jack stand under the lower control arm near the ball joint location.
- Raise the jack stand to reduce the transverse spring load on the lower control arm.
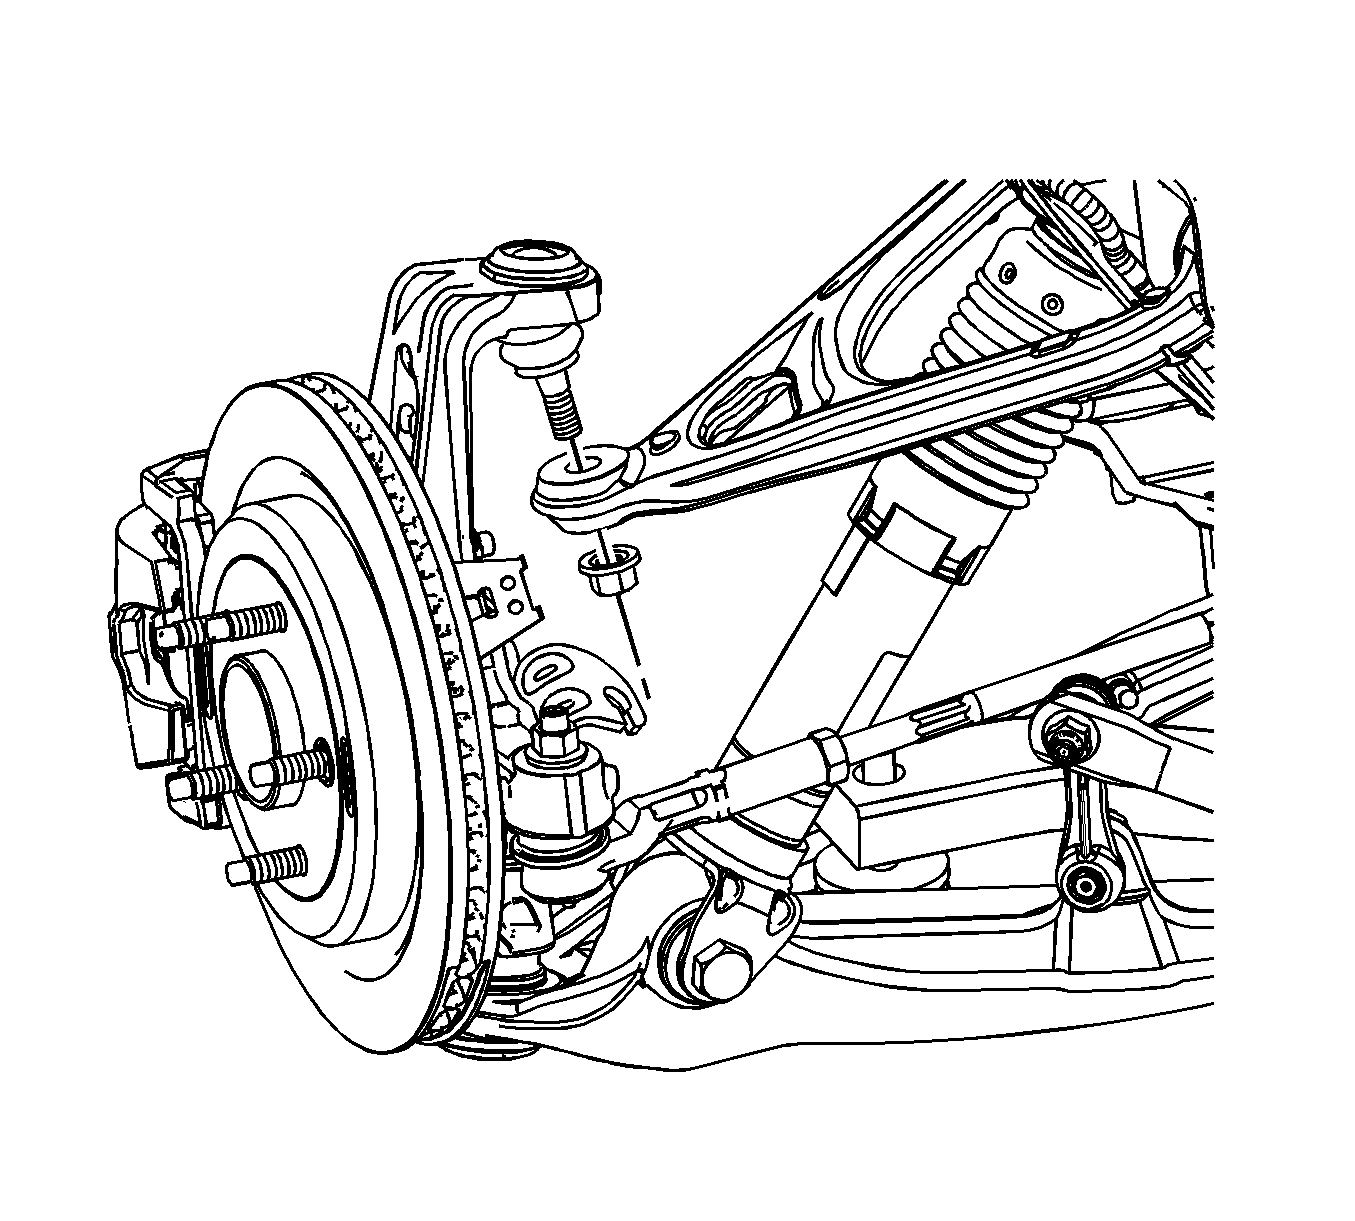
- Remove the nut from the upper ball joint stud.
- Separate the upper ball joint stud from the suspension knuckle. Refer to Rear Axle Upper Control Arm Replacement.
- Remove the lower shock absorber bolt and nut.
- Lower the tall jack stand supporting the lower control arm.
- Position the knuckle away from the upper control arm.
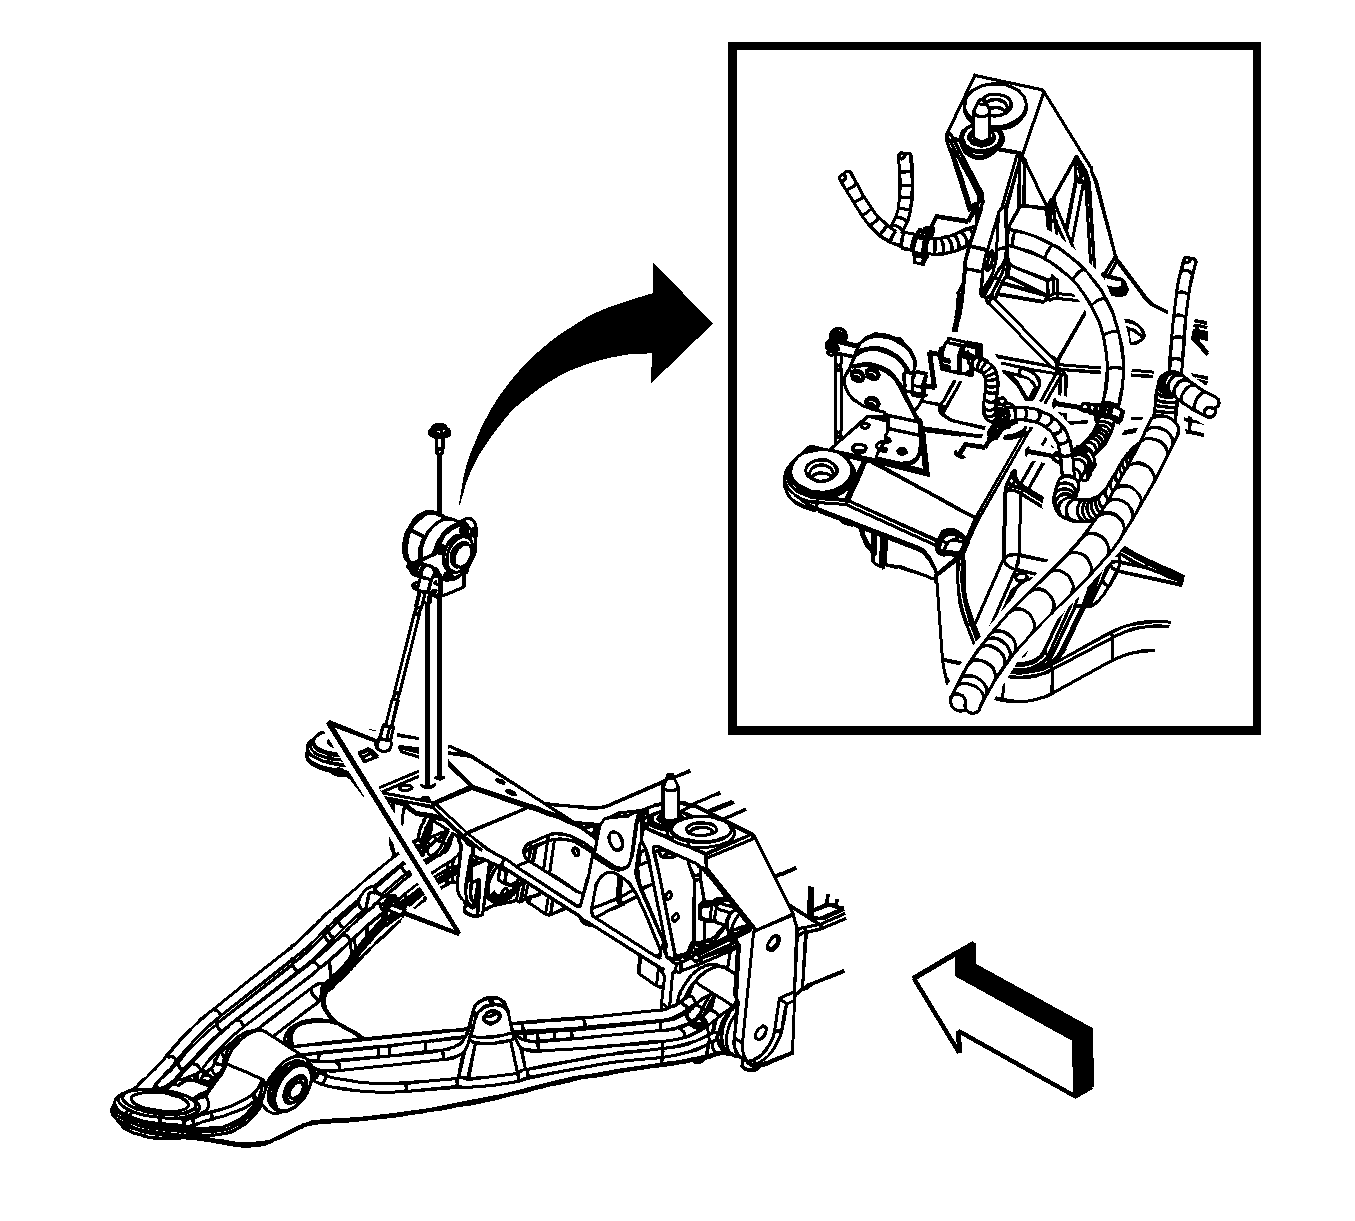
- Disconnect the inner axle joints (1) from the differential.
- Position the knuckle away from the upper control arm.
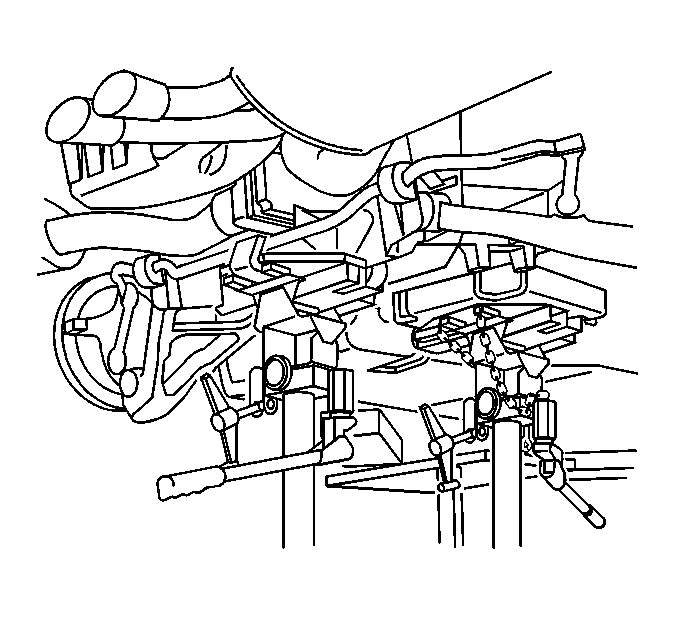
- Position a tall jack stand under the front cradle to support the weight of the front of the vehicle on the hoist.
- Position a tall jack stand under the front of the transmission.
- Position a transmission jack under the suspension crossmember.
- Route a safety strap over the suspension crossmember, but under the brake pipe to secure the rear suspension crossmember to the transmission jack.
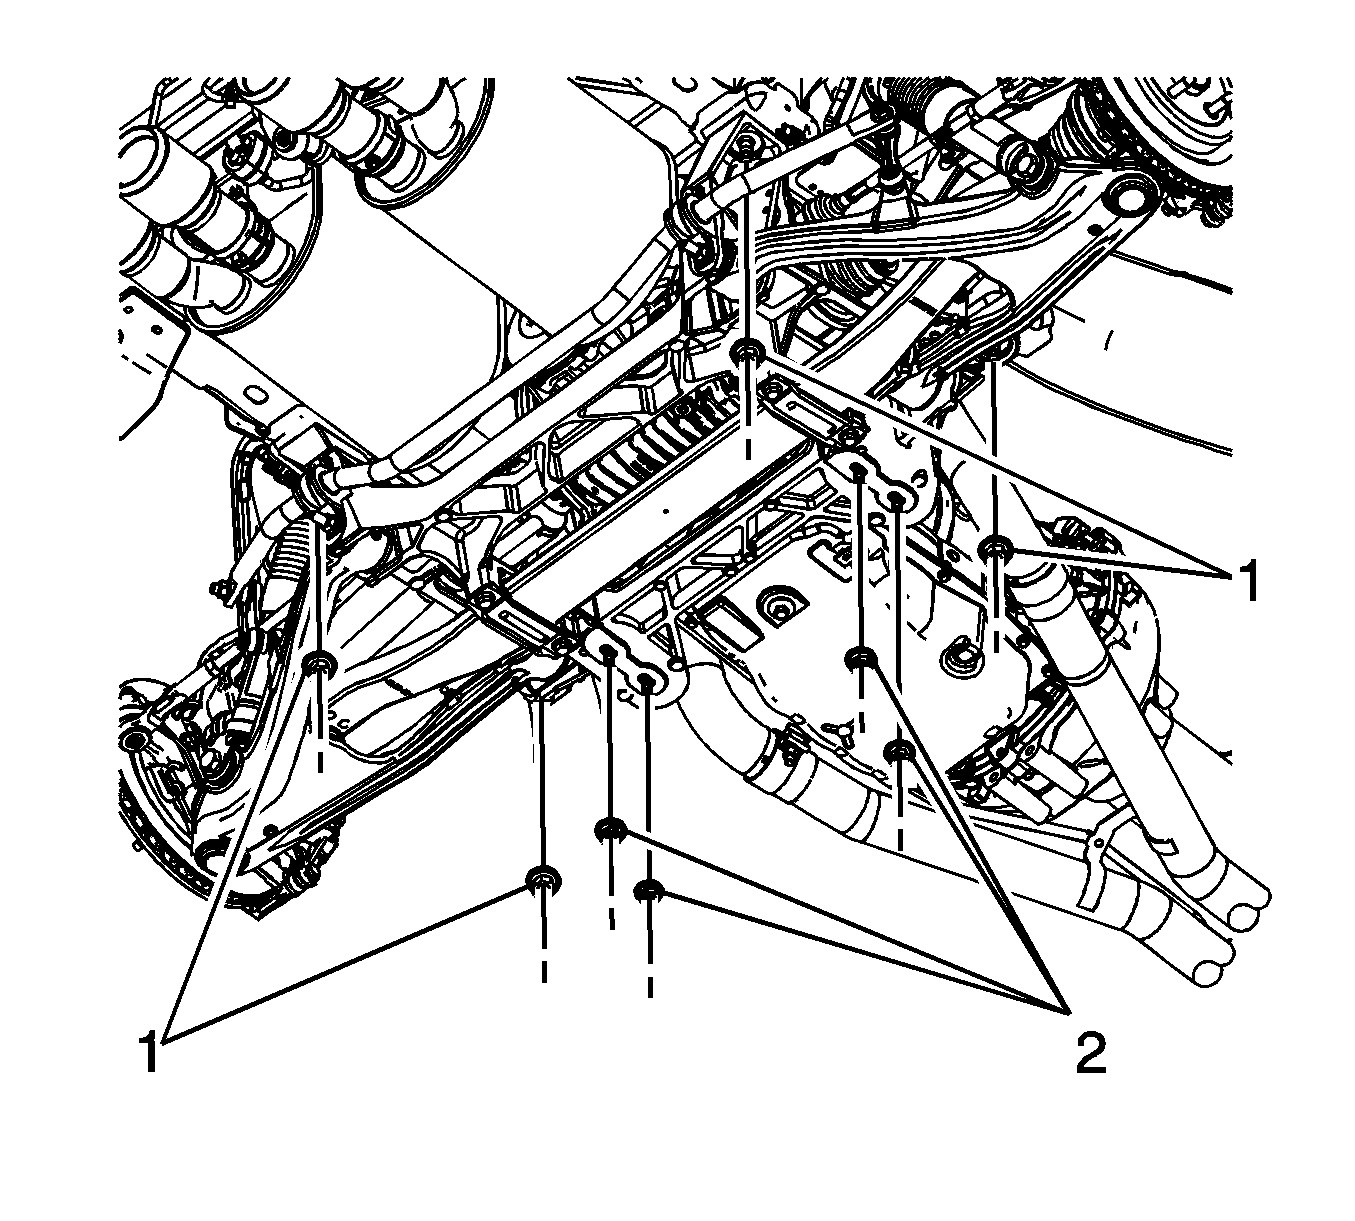
- Using HAND TOOLS ONLY, remove the lower nuts (2) securing the rear mounts to the crossmember.
- Using HAND TOOLS ONLY, Remove the nuts (1) from the rear crossmember bolts.
- Lower the rear crossmember approximately 35mm.
- Disconnect the plastic brake pipe retainers (2) from the crossmember.
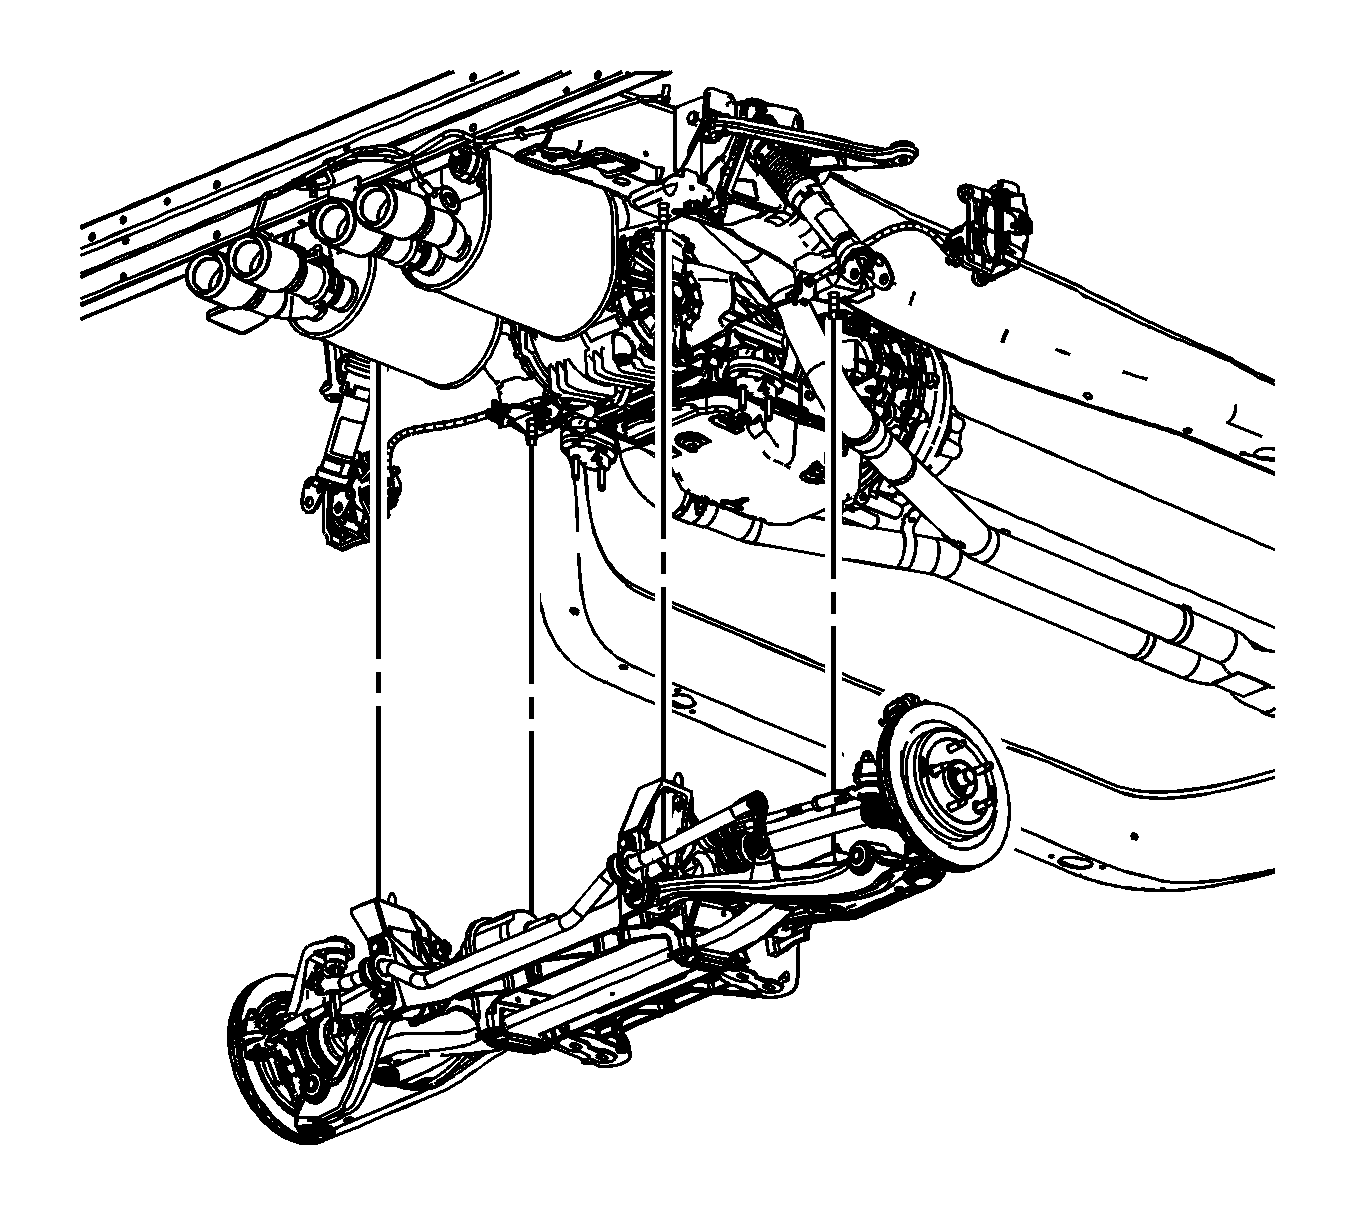
- Lower the rear suspension crossmember from the vehicle. This assembly includes the suspension crossmember, lower control arms, transverse leaf spring, rear stabilizer bar and links, knuckles, outer and inner tie rod ends, rotors, hubs, and drive axle assemblies.
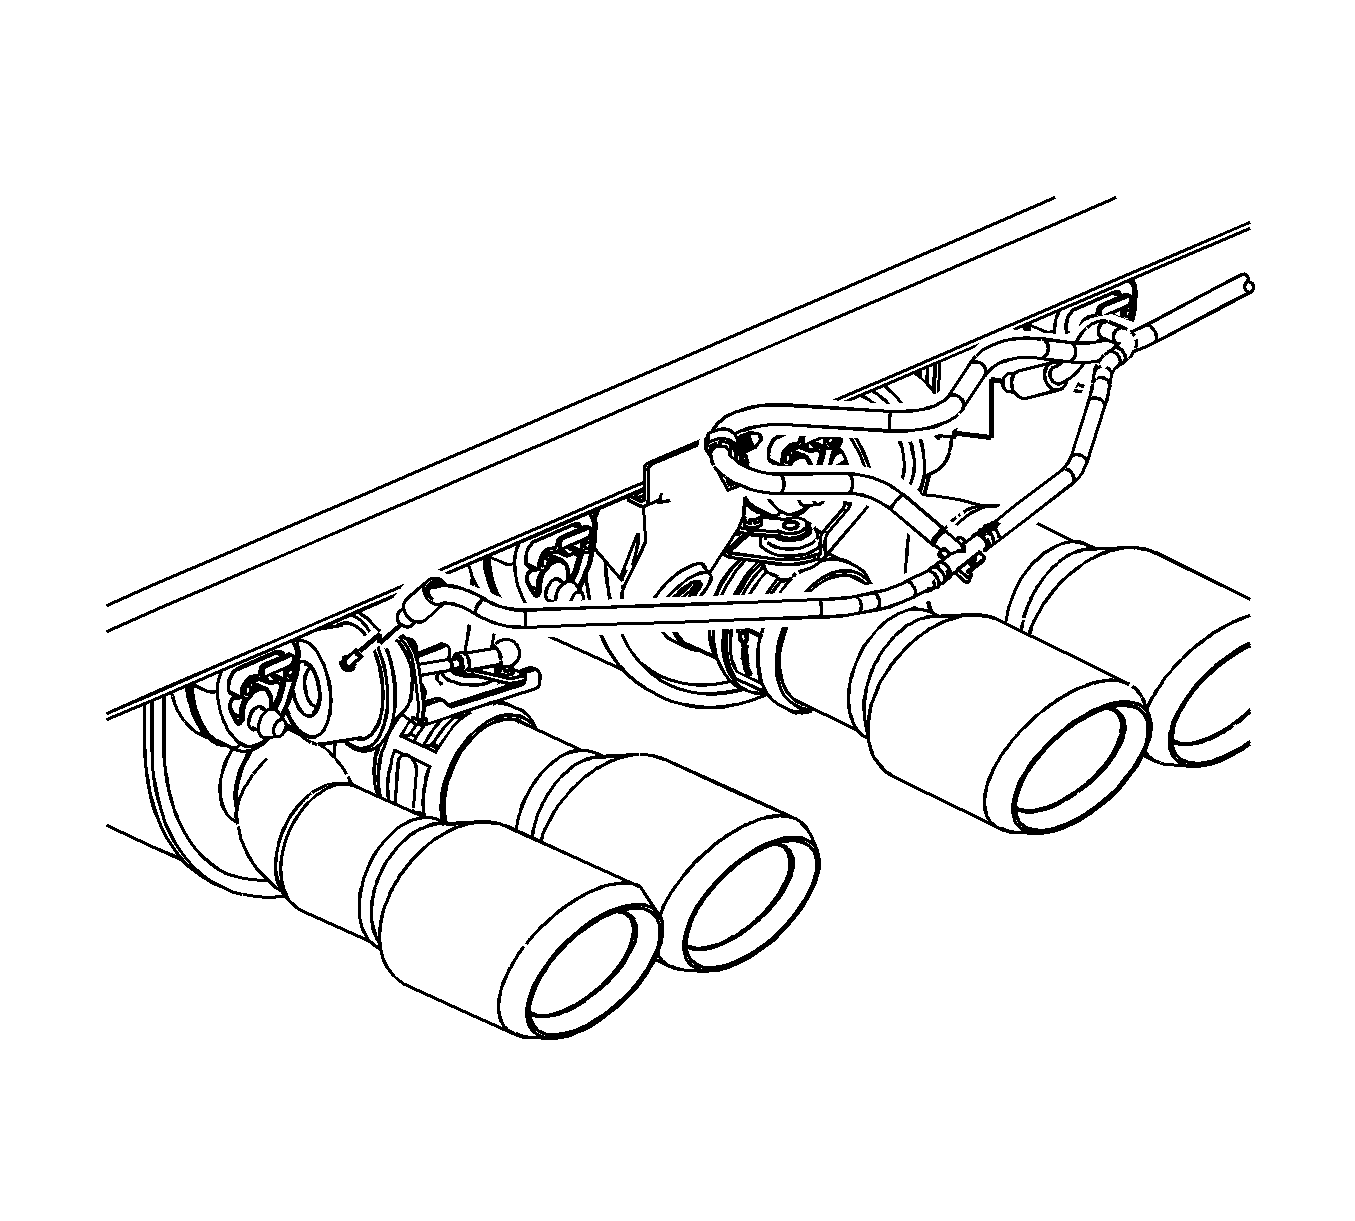
- Disconnect the vacuum lines from the rear muffler valves, if equipped.
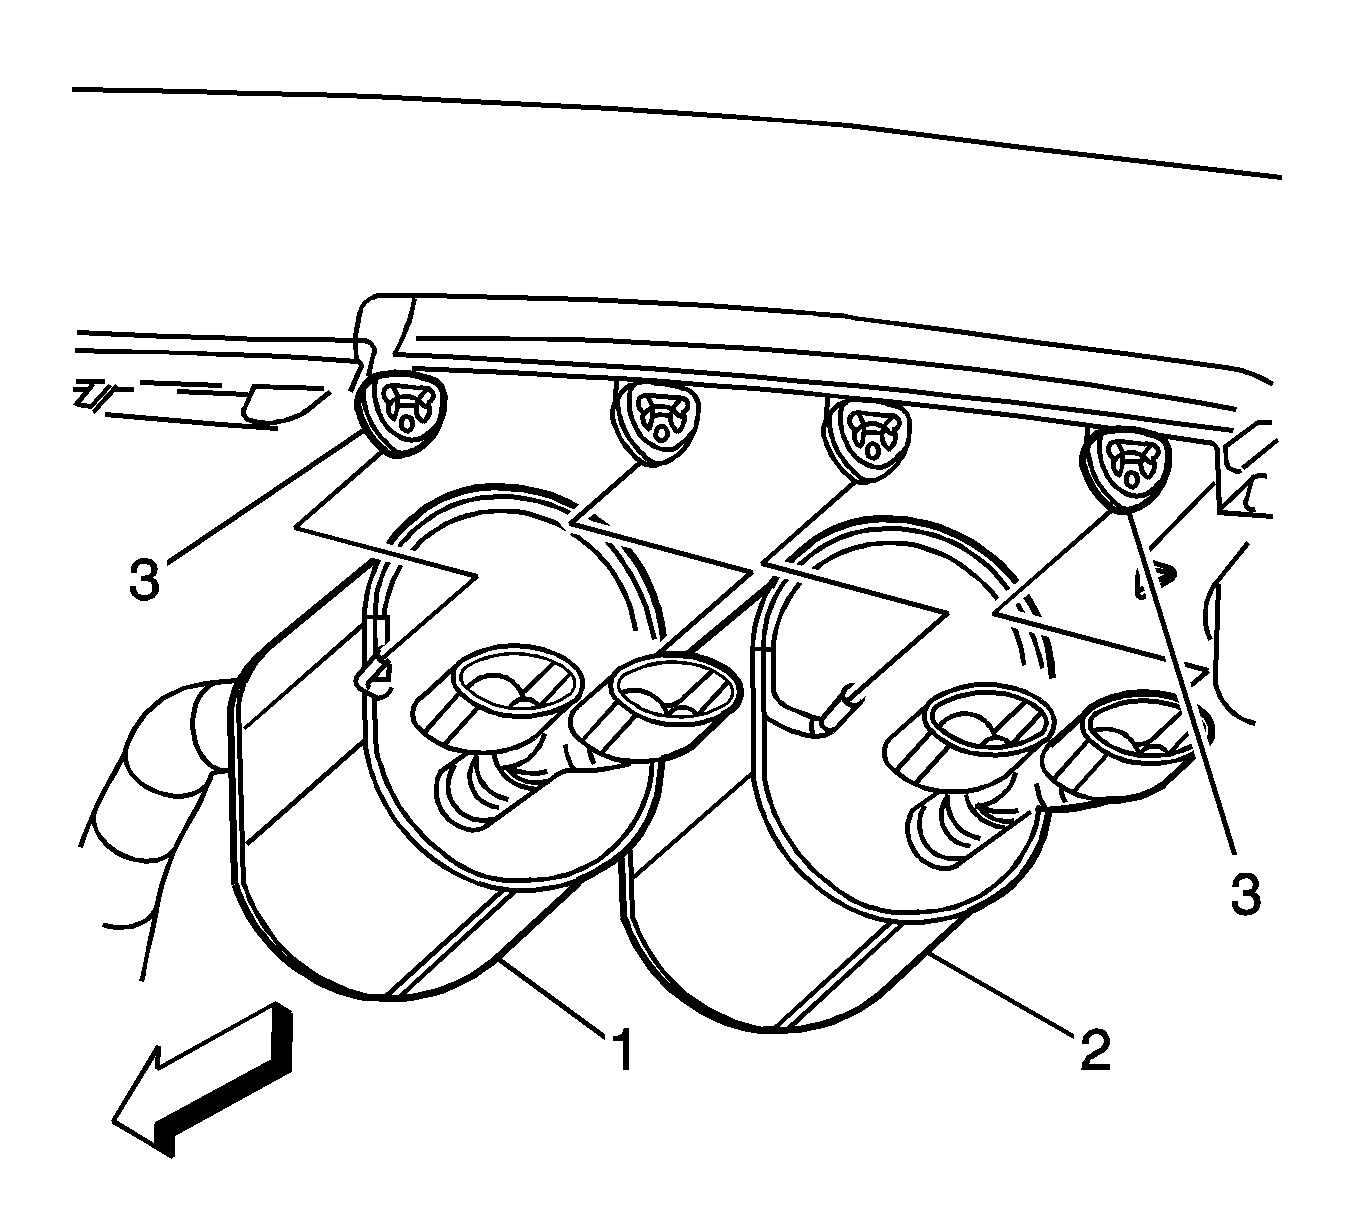
- Disconnect the muffler/tailpipe assemblies from the rubber isolators (3) at the rear of the mufflers.
- Remove the intermediate pipe. Refer to Intermediate Pipe Replacement.
- Remove the left muffler/tailpipe assembly (1).
- Using the hoist, raise the vehicle approximately 50 mm (2 in).
- Remove the right muffler/tailpipe assembly (2).
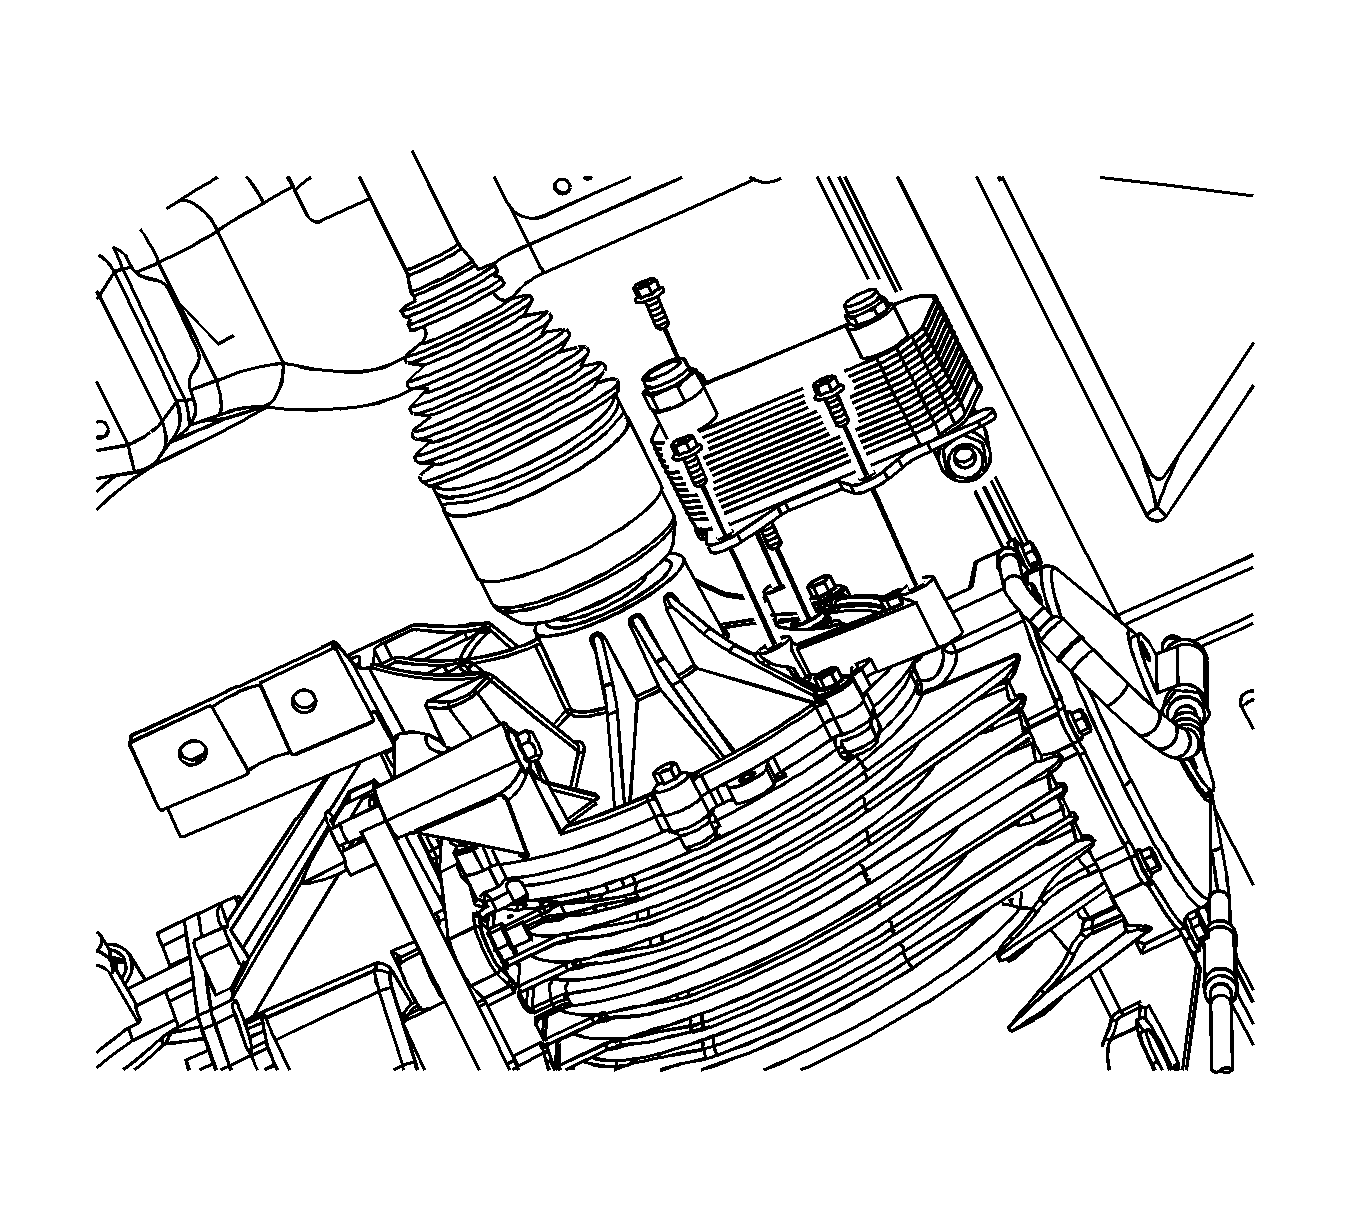
- Remove the retaining clip securing the differential cooler pipe to the differential cooler, if equipped. Place a drip pan under the oil cooler to catch any differential oil.
- Remove the bolts securing the differential oil cooler to the differential. Refer to Differential Oil Cooler Replacement.
- Position the differential oil cooler and pipes outboard and away from the differential. Secure the cooler out of the way.
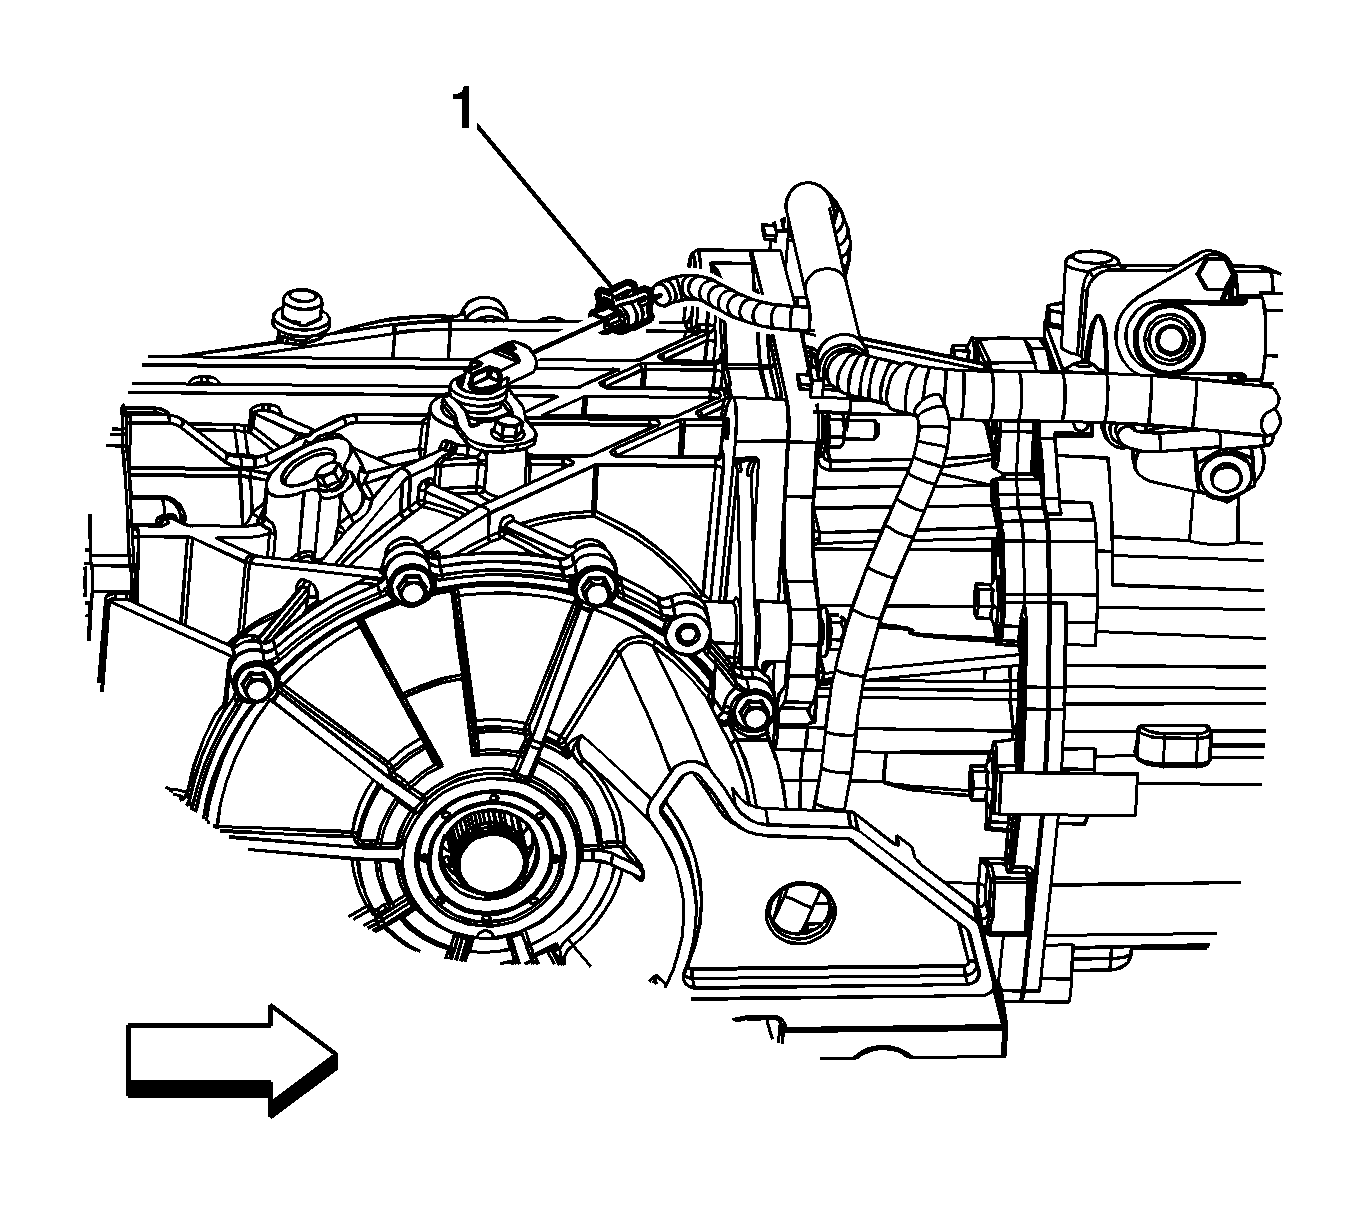
- Disconnect the vehicle speed sensor (VSS) connector (1) from the top of the differential.
- Disconnect the VSS wiring harness retainers from the differential studs at the top of the differential.
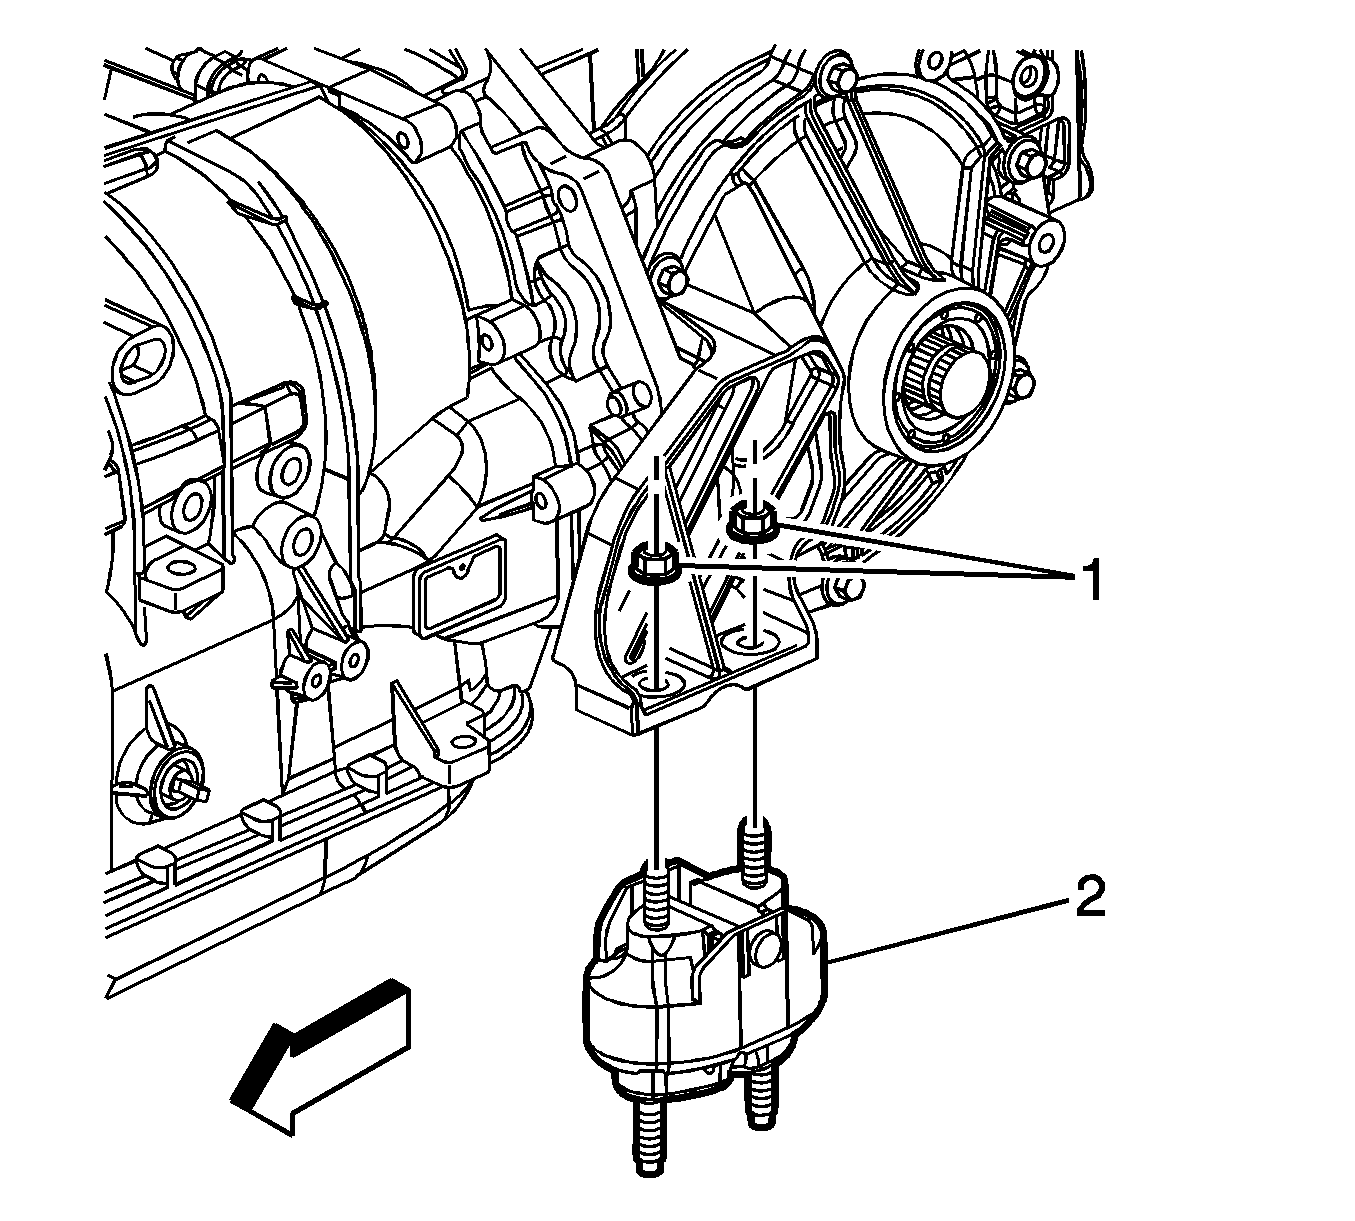
- Remove the nuts (1) securing the rear mounts to the differential.
- Remove the mounts (2) from the differential.
- Reposition the hydraulic brake line forward and away from the differential.
- Assemble the J 42055 .
- Install the J 42055 to a transmission jack.
- Position and firmly secure the J 42055 with the transmission jack to the differential.
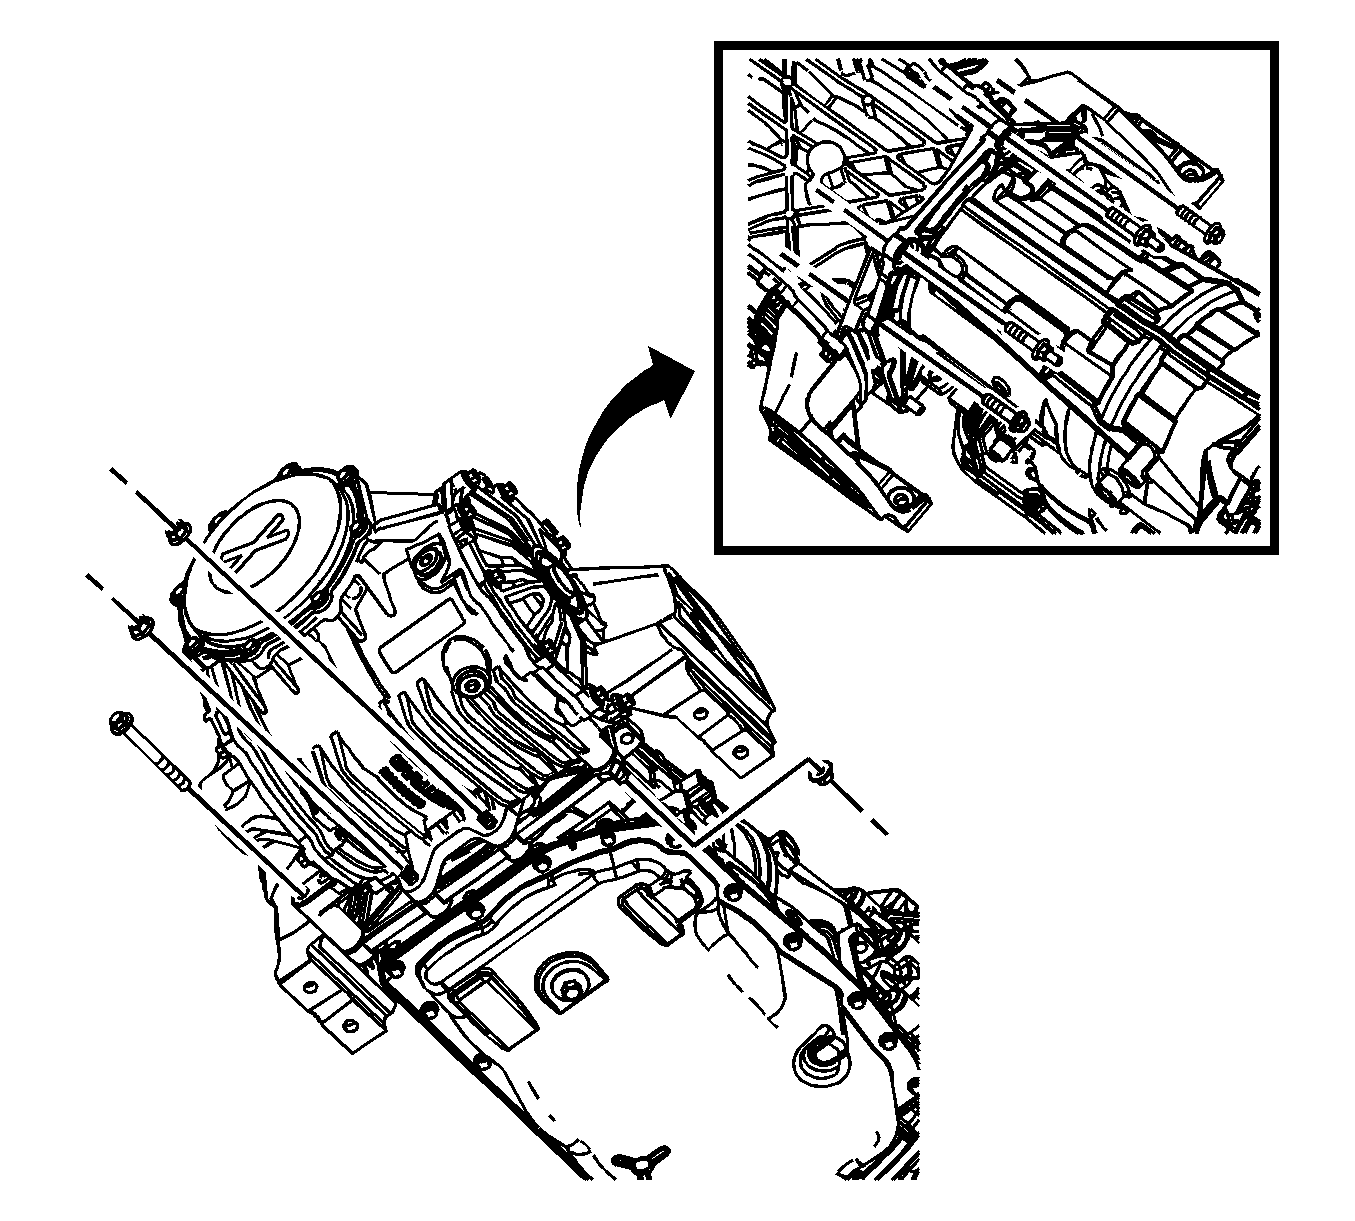
- Remove the fasteners securing the differential to the transmission.
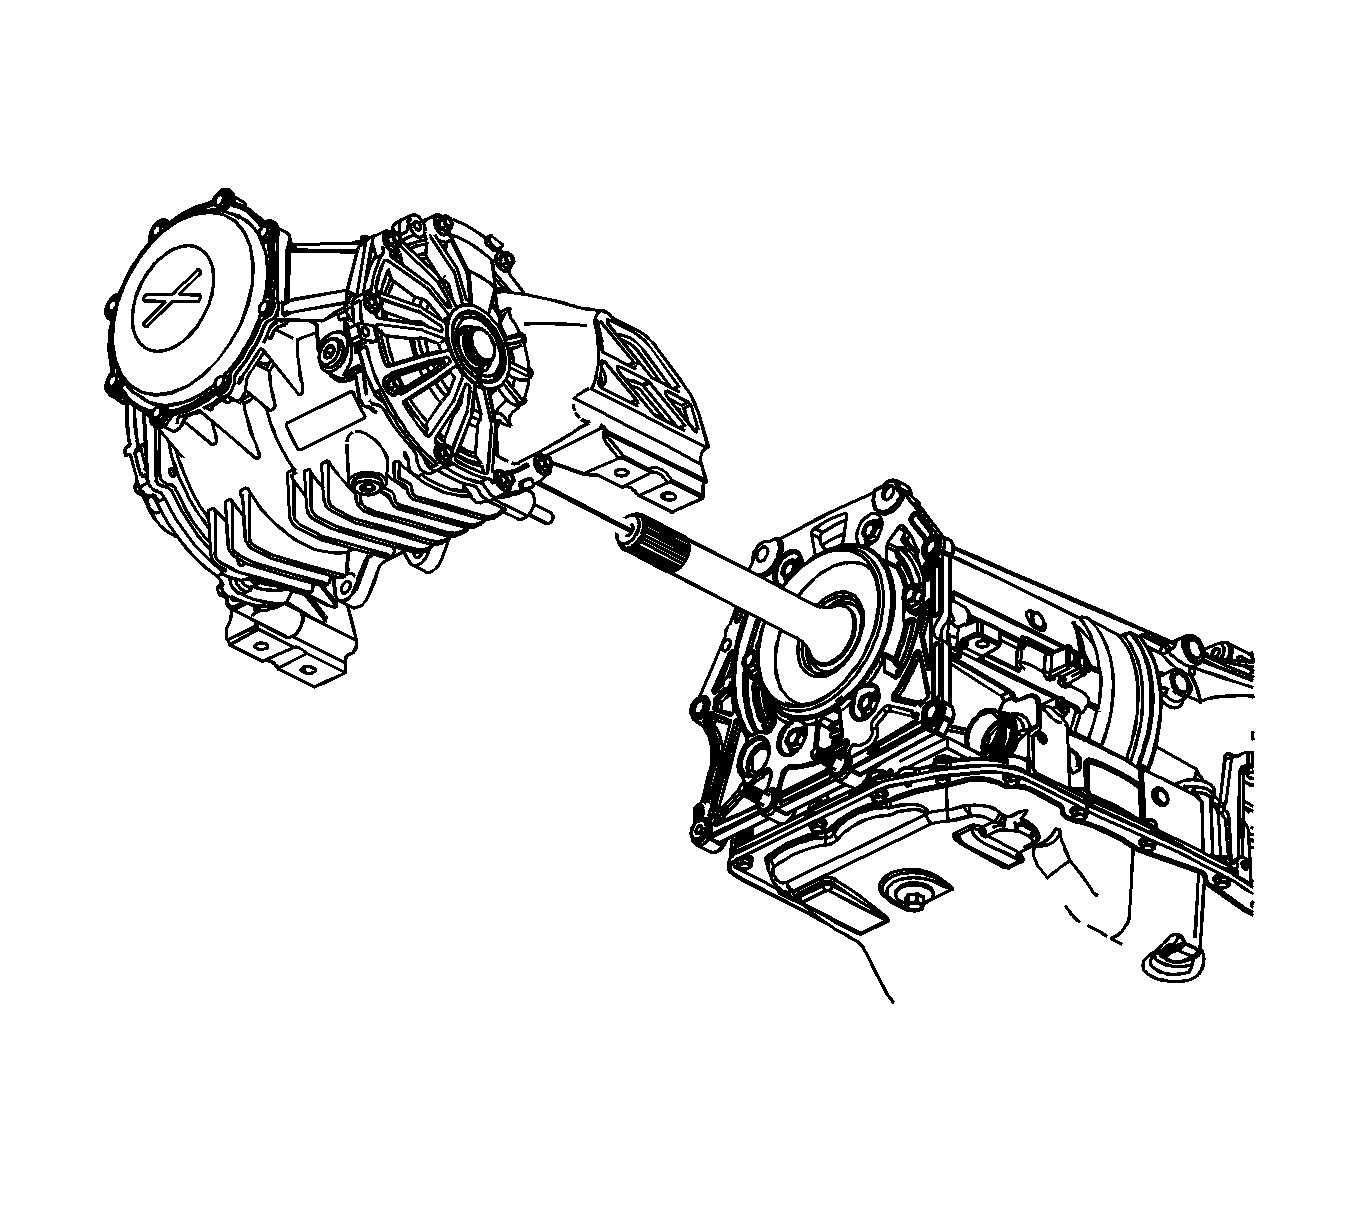
- Using the transmission jack, carefully slide the differential rearward from the transmission.
- After the differential has cleared the output shaft of the transmission, the differential can be lowered using the transmission jack.
Caution: Refer to Battery Disconnect Caution in the Preface section.
Important: Support the caliper. Do NOT allow the brake caliper to hang from the brake hose.

Installation Procedure
- SLOWLY slide the differential to the transmission.
- Install the differential to transmission bolts and nuts.
- Remove the J 42055 from the differential.
- Position the hydraulic brake line rearward to the original position below the differential.
- Install the mounts (2) to the differential.
- Install the nuts (1) securing the rear mounts to the differential.
- Install the vehicle speed sensor (VSS) electrical wiring harness retainers to the differential studs at the top of the differential.
- Connect the VSS connector (1) to the top of the differential.
- Install the differential cooler, if equipped. Refer to Differential Oil Cooler Replacement.
- Install the intermediate pipe. Refer to Intermediate Pipe Replacement.
- Install the right (2) muffler/tailpipe assembly.
- Install the left (1) muffler/tailpipe assembly.
- Connect the muffler/tailpipe rubber isolators (3) to the rear of the mufflers.
- Connect the vacuum lines to the rear muffler valves, if equipped.
- Raise the rear crossmember assembly to the vehicle.
- Connect the plastic brake pipe retainers (2) to the suspension crossmember.
- Finish raising the crossmember.
- Using HAND TOOLS ONLY, install NEW rear suspension crossmember mounting nuts (1).
- Using HAND TOOLS ONLY, Install the nuts (2) securing the rear mounts to the suspension crossmember.
- Connect the inner axle joints (1) to the differential.
- Position an adjustable tall jack stand under the lower control arm near the ball joint location.
- Raise the jack stand to reduce the transverse spring load on the lower control arm.
- Connect the upper ball joint to the suspension knuckle. Refer to Rear Axle Upper Control Arm Replacement.
- Install the shock absorber lower mounting bolt and nut. Refer to Shock Absorber Replacement.
- Remove the tall jack stand supporting the lower control arm.
- Install the rear suspension position sensors if equipped. Refer to Electronic Suspension Rear Position Sensor Replacement.
- Install the park brake cables to the suspension crossmember.
- Install the push pins retaining the right (1) and left (2) park brake cables to the suspension crossmember.
- Install the park brake cable housing to the park brake cable brackets attached to the knuckle.
- Connect the park brake cables to the actuator levers.
- Install the wheel speed sensor harnesses to the suspension crossmember.
- Install the wheel speed sensor harness to the suspension crossmember. Each harness is secured in three places (1).
- Connect the retainers (1) securing the wheel speed sensor harness to the park brake cables.
- Connect the wheel speed sensor harness connectors.
- Remove the bolts (1) securing the rear brake calipers (2) to the rear knuckles.
- Remove the bolts (1) securing the brake hydraulic line and hose bracket to the suspension crossmember.
- Install the rear tire and wheel assemblies. Refer to Tire and Wheel Removal and Installation.
- Lower the vehicle.
- Connect the negative battery cable.
- Program the transmitters. Refer to Transmitter Programming.
Notice: Refer to Fastener Notice in the Preface section.
Tighten
Tighten the bolts and nuts to 50 N·m (37 lb ft).
Tighten
Tighten the nuts to 50 N·m (37 lb ft).
Important: Only use NEW crossmember mounting nuts
Tighten
Tighten the nuts to 110 N·m (81 lb ft).
Tighten
Tighten the lower differential mount nuts to 50 N·m (37 lb ft).
Tighten
Tighten the negative battery cable bolt to 15 N·m (11 lb ft).
Differential Replacement W/O RPO KNR
Tools Required
J 42055 Drivetrain Support Fixture
Removal Procedure
- Disconnect the negative battery cable.
- Raise and suitably support the vehicle. Refer to Lifting and Jacking the Vehicle .
- Remove the rear tire and wheel assemblies. Refer to Tire and Wheel Removal and Installation .
- Remove the bolts (1) securing the brake hydraulic line and hose bracket to the suspension crossmember.
- Remove the bolts (1) securing the rear brake calipers (2) to the rear knuckles.
- Slide the caliper forward, away from the knuckle and rotor.
- Disconnect the wheel speed sensor electrical wire harness from the wheel speed sensor.
- Disconnect the retainers (1) securing the wheel speed sensor harness to the park brake cables.
- Remove the wheel speed sensor harness from the suspension crossmember. Each harness is secured in three places (1).
- Route the sensor harnesses away from the suspension crossmember.
- Disconnect the park brake cables from the actuator levers.
- Pull the park brake cable housing out of the park brake cable brackets attached to the knuckle.
- Remove the push pins retaining the right (1) and left (2) park brake cables to the suspension crossmember.
- Route the park brake cables away from the suspension crossmember.
- Remove the rear suspension position sensors if equipped. Refer to Electronic Suspension Rear Position Sensor Replacement .
- Position an adjustable tall jack stand under the lower control arm near the ball joint location.
- Raise the jack stand to reduce the transverse spring load on the lower control arm.
- Remove the nut from the upper ball joint stud.
- Separate the upper ball joint stud from the suspension knuckle. Refer to Rear Axle Upper Control Arm Replacement .
- Remove the lower shock absorber bolt and nut.
- Lower the tall jack stand supporting the lower control arm.
- Position the knuckle away from the upper control arm.
- Disconnect the inner axle joints (1) from the differential.
- Position the knuckle away from the upper control arm.
- Position a tall jack stand under the front cradle to support the weight of the front of the vehicle on the hoist.
- Position a tall jack stand under the front of the transmission.
- Position a transmission jack under the suspension crossmember.
- Route a safety strap over the suspension crossmember, but under the brake pipe to secure the rear suspension crossmember to the transmission jack.
- Using HAND TOOLS ONLY, remove the lower nuts (2) securing the rear mounts to the crossmember.
- Using HAND TOOLS ONLY, Remove the nuts (1) from the rear crossmember bolts.
- Lower the rear crossmember approximately 35mm.
- Disconnect the plastic brake pipe retainers (2) from the crossmember.
- Lower the rear suspension crossmember from the vehicle. This assembly includes the suspension crossmember, lower control arms, transverse leaf spring, rear stabilizer bar and links, knuckles, outer and inner tie rod ends, rotors, hubs, and drive axle assemblies.
- Disconnect the vacuum lines from the rear muffler valves, if equipped.
- Disconnect the muffler/tailpipe assemblies from the rubber isolators (3) at the rear of the mufflers.
- Remove the intermediate pipe. Refer to Intermediate Pipe Replacement .
- Remove the left muffler/tailpipe assembly (1).
- Using the hoist, raise the vehicle approximately 50 mm (2 in).
- Remove the right muffler/tailpipe assembly (2).
- Disconnect the vehicle speed sensor (VSS) connector (1) from the top of the differential.
- Disconnect the VSS wiring harness retainers from the differential studs at the top of the differential.
- Remove the nuts (1) securing the rear mounts to the differential.
- Remove the mounts (2) from the differential.
- Reposition the hydraulic brake line forward and away from the differential.
- Assemble the J 42055 .
- Install the J 42055 to a transmission jack.
- Position and firmly secure the J 42055 with the transmission jack to the differential.
- Remove the fasteners securing the differential to the transmission.
- Using the transmission jack, carefully slide the differential rearward from the transmission.
- After the differential has cleared the output shaft of the transmission, the differential can be lowered using the transmission jack.
Caution: Refer to Battery Disconnect Caution in the Preface section.
Important: Support the caliper. Do NOT allow the brake caliper to hang from the brake hose.
Installation Procedure
- SLOWLY slide the differential to the transmission.
- Install the differential to transmission bolts and nuts.
- Remove the J 42055 from the differential.
- Position the hydraulic brake line rearward to the original position below the differential.
- Install the mounts (2) to the differential.
- Install the nuts (1) securing the rear mounts to the differential.
- Install the vehicle speed sensor (VSS) electrical wiring harness retainers to the differential studs at the top of the differential.
- Connect the VSS connector (1) to the top of the differential.
- Install the intermediate pipe. Refer to Intermediate Pipe Replacement .
- Install the right (2) muffler/tailpipe assembly.
- Install the left (1) muffler/tailpipe assembly.
- Connect the muffler/tailpipe rubber isolators (3) to the rear of the mufflers.
- Connect the vacuum lines to the rear muffler valves, if equipped.
- Raise the rear crossmember assembly to the vehicle.
- Connect the plastic brake pipe retainers (2) to the suspension crossmember.
- Finish raising the crossmember.
- Using HAND TOOLS ONLY, install NEW rear suspension crossmember mounting nuts (1).
- Using HAND TOOLS ONLY, Install the nuts (2) securing the rear mounts to the suspension crossmember.
- Connect the inner axle joints (1) to the differential.
- Position an adjustable tall jack stand under the lower control arm near the ball joint location.
- Raise the jack stand to reduce the transverse spring load on the lower control arm.
- Connect the upper ball joint to the suspension knuckle. Refer to Rear Axle Upper Control Arm Replacement .
- Install the shock absorber lower mounting bolt and nut. Refer to Shock Absorber Replacement .
- Remove the tall jack stand supporting the lower control arm.
- Install the rear suspension position sensors if equipped. Refer to Electronic Suspension Rear Position Sensor Replacement .
- Install the park brake cables to the suspension crossmember.
- Install the push pins retaining the right (1) and left (2) park brake cables to the suspension crossmember.
- Install the park brake cable housing to the park brake cable brackets attached to the knuckle.
- Connect the park brake cables to the actuator levers.
- Install the wheel speed sensor harnesses to the suspension crossmember.
- Install the wheel speed sensor harness to the suspension crossmember. Each harness is secured in three places (1).
- Connect the retainers (1) securing the wheel speed sensor harness to the park brake cables.
- Connect the wheel speed sensor harness connectors.
- Remove the bolts (1) securing the rear brake calipers (2) to the rear knuckles.
- Remove the bolts (1) securing the brake hydraulic line and hose bracket to the suspension crossmember.
- Install the rear tire and wheel assemblies. Refer to Tire and Wheel Removal and Installation .
- Lower the vehicle.
- Connect the negative battery cable.
- Program the transmitters. Refer to Transmitter Programming .
Notice: Refer to Fastener Notice in the Preface section.
Tighten
Tighten the bolts and nuts to 50 N·m (37 lb ft).
Tighten
Tighten the nuts to 50 N·m (37 lb ft).
Important: Only use NEW crossmember mounting nuts
Tighten
Tighten the nuts to 110 N·m (81 lb ft).
Tighten
Tighten the lower differential mount nuts to 50 N·m (37 lb ft).
Tighten
Tighten the negative battery cable bolt to 15 N·m (11 lb ft).
