For 1990-2009 cars only
Cellular and Navigation Antenna Assembly Replacement Without Sunroof
Removal Procedure
- Remove the windshield garnish molding. Refer to Windshield Upper Garnish Molding Replacement in Interior Trim.
- Remove the sunshade from the headliner. Refer to Sunshade Replacement in Interior Trim.
- Remove the door edge molding from the door opening. Refer to Front Side Door Trim Panel Replacement in Doors.
- Lower the front corner of the headliner. Refer to Headlining Trim Panel Replacement in Interior Trim.
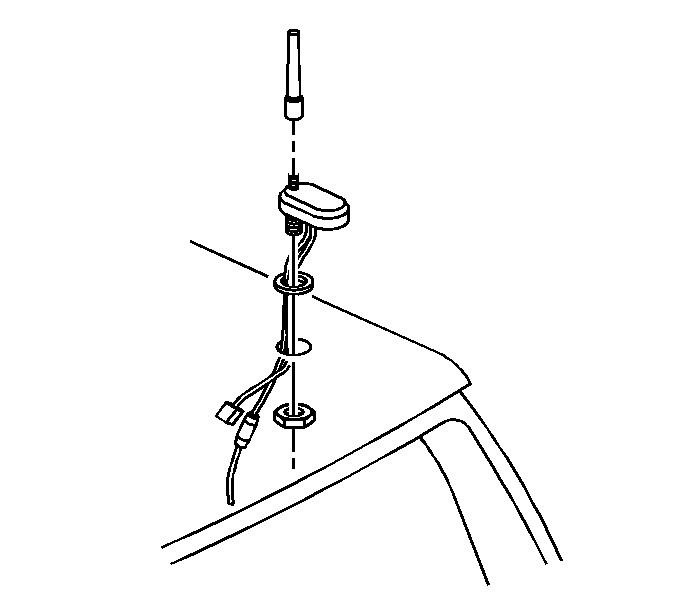
- Disconnect the wire harness from the roof antenna .
- Remove the antenna nut.
- Remove the antenna from the roof.

Installation Procedure
- Attach the antenna base to the roof and fasten the antenna nut.
- Connect the electrical connector to the antenna.
- Push the headliner back into place. Refer to Headlining Trim Panel Replacement in Interior Trim.
- Attach the sunshade to the headliner. Refer to Sunshade Replacement in Interior Trim.
- Attach the windshield garnish molding. Refer to Windshield Upper Garnish Molding Replacement in Interior Trim.
Notice: Refer to Fastener Notice in the Preface section.

Tighten
Tighten the nut to 2 N·m (18 lb in).

Cellular and Navigation Antenna Assembly Replacement With Sunroof
Removal Procedure
- Remove the OnStar® microphone. Refer to Mobile Telephone Microphone Replacement.
- Remove the reading lamp assembly. Refer to Reading Lamp Replacement .
- Lower the front corner of the headliner. Refer to Headlining Trim Panel Replacement.
- Disconnect the wire harness from the roof antenna .
- Remove the antenna nut.
- Remove the antenna from the roof.

Installation Procedure
- Attach the antenna base to the roof and fasten the antenna nut.
- Connect the electrical connector to the antenna.
- Push the headliner back into place. Refer to Headlining Trim Panel Replacement.
- Install the reading lamp. Refer to Reading Lamp Replacement .
- Install the OnStar® microphone. Refer to Mobile Telephone Microphone Replacement.
Notice: Refer to Fastener Notice in the Preface section.

Tighten
Tighten the nut to 2 N·m (18 lb in).

