For 1990-2009 cars only
Removal Procedure
Tools Required
J 36857 Engine Lift Bracket
- Drain the cooling sytem. Refer to Cooling System Draining and Filling in Engine Cooling.
- Evacuate the Air conditioning sytem. Refer to Refrigerant Recovery and Recharging in HVAC System-Manual.
- Remove the front battery from the vehicle. Refer to Battery Replacement in Engine Electrical.
- Disconnect the battery cables from the auxiliary battery. Refer to Battery Cable Replacement in Engine Electrical.
- Remove the engine cover from the vehicle. Refer to Engine Cover Replacement in Interior Trim.
- Remove the air intake duct from the vehicle.
- Remove the air cleaner from the vehicle. Refer to Air Cleaner Assembly Replacement in Engine Controls-6.5L.
- Remove the surge tank from the vehicle. Refer to Surge Tank (Diesel) Replacement in Engine Cooling.
- Remove the front bumper from the vehicle. Refer to Front Bumper Filler Replacement in Body Front End.
- Remove the grille assembly from the vehicle. Refer to Grille Replacement in Body Front End.
- Remove the auxiliary engine oil cooler from the vehicle. Refer to Auxiliary Engine Oil Cooler Replacement in Engine Cooling.
- Remove the A/C condenser from the vehicle. Refer to Condenser Replacement in HVAC Systems-Manual.
- Remove the radiator from the vehicle. Refer to Radiator Replacement in Engine Cooling.
- Remove the radiator support from the vehicle. Refer to Radiator Support Replacement in Body Front End.
- Remove the drive belt from the vehicle. Refer to Drive Belt Replacement .
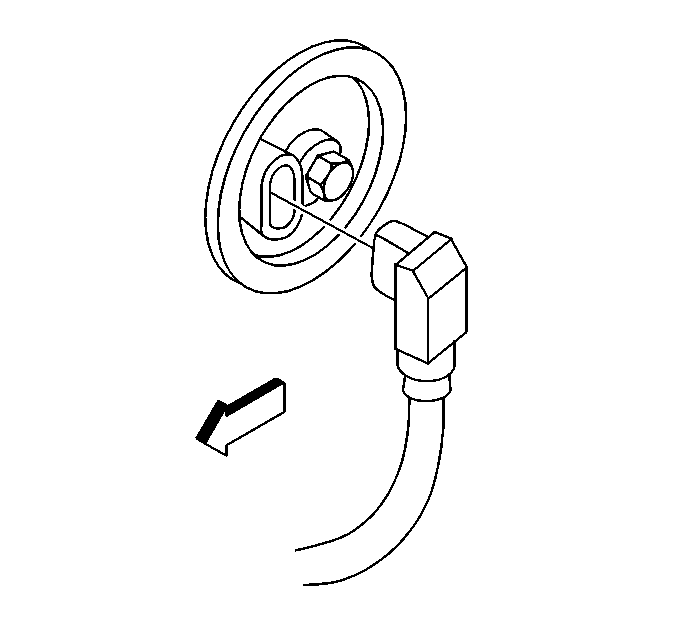
- Remove the fan clutch from the water pump. Refer to Fan Clutch Replacement in Engine Cooling.
- Remove the radiator hoses from the engine assembly. Refer to Radiator Hose Replacement in Engine Cooling.
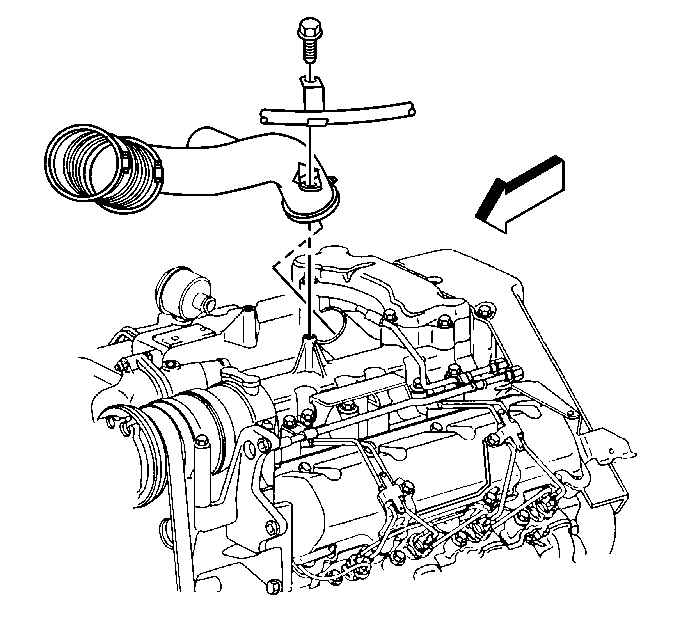
- Remove the engine oil fill tube. Refer to Oil Fill Tube Removal .
- Remove the engine oil level indicator and tube from the engine assembly. Refer to Oil Level Indicator and Tube Replacement .
- Remove the upper intake manifold from the engine block. Refer to Intake Manifold Replacement .
- Remove the engine wiring harness from the engine.
- Remove the lower intake manifold from the engine assembly. Refer to Intake Manifold Replacement .
- Remove the transmission oil level indicator from the engine assembly.
- Remove the ground wires from the engine assembly.
- Remove the turbocharger from the engine block. Refer to Turbocharger in Turbocharger.
- Remove the thermostat housing crossover from the engine assembly. Refer to Thermostat Housing Crossover Replacement in Engine Cooling.
- Remove the heater hoses from the vehicle. Refer to Heater Hoses Replacement in Engine Cooling.
- Remove the A/C compressor from the mounting bracket. Refer to Air Conditioning Compressor Replacement in HVAC Systems-Manual.
- Remove the auxiliary generator (if equipped ) from the mounting bracket. Refer to Auxiliary Generator Replacement in Engine Electrical.
- Remove the power steering pump from the mounting bracket. Refer to Power Steering Pump Replacement in Power Steering System.
- Remove the mounting bracket from the engine block.
- Remove the generator from the mounting bracket. Refer to Generator Replacement in Engine Electrical.
- Remove the vacuum lines to vacuum pump.
- Remove the mounting bracket from the engine block.
- Remove the exhaust manifolds (if needed). Refer to Exhaust Manifold Replacement .
- Remove the fuel injection pump from the engine block. Refer to Fuel Injection Pump Replacement in Engine Controls-6.5L.
- Raise the vehicle and support with safety stands.
- Disconnect the block heater electrical connector.
- Remove the starter from the engine block. Refer to Starter Motor Replacement in Engine Electrical.
- Remove the engine oil cooler lines from the engine block.
- Remove the transmission cooler lines from the retaining clips. Refer to Oil Cooler Hose/Pipe Replacement in Automatic Transmission-4L80E.
- Remove the flywheel inspection cover.
- Remove the bolts from the flywheel to the torque convertor.
- Remove the lower bolts from the transmission the engine block.
- Remove the nuts from the engine mount through bolts.
- Remove the safety stands and lower the vehicle.
- Support the transmission with a suitable support.
- Remove the upper bolts from the transmission to the engine.
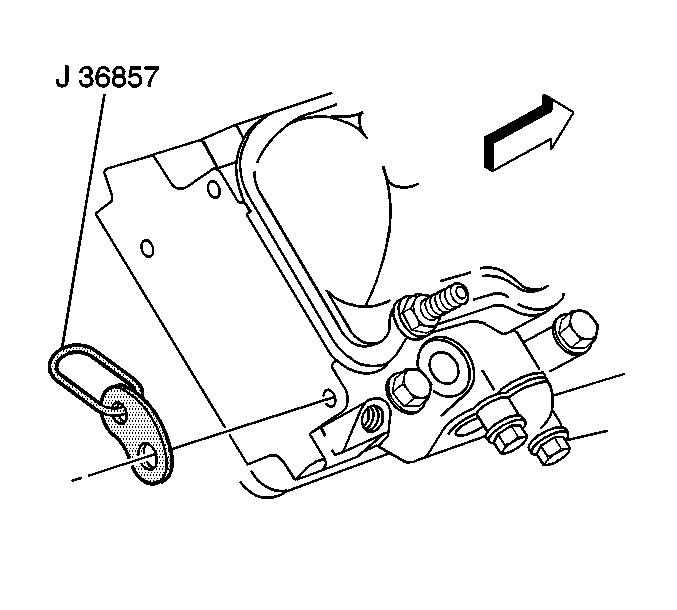
- Install the J 36857 on the right rear cylinder head.
- Install the J 36857 on the left front cylinder head.
- Install a suitable lifting device between the lifting brackets.
- Lift the engine just enough to remove the engine mount through bolts.
- Remove the engine assembly from the vehicle.
- Install the engine assembly on a suitable engine stand.
- Remove the lift brackets from the engine assembly.
Important: It maybe necessary to remove the flywheel from the crankshaft before installing the engine assembly on a suitable engine stand.
Installation Procedure
- Install the J 36857 to the right rear cylinder head.
- Remove the engine from the engine stand.
- Install the flywheel on the crankshaft.
- Lower the engine assembly on the engine mounts.
- Install the engine mount through bolts.
- Install the right and left lower bolt from the transmission to the engine block.
- Remove the lifting device from the engine assembly.
- Raise the vehicle and support with safety stands.
- Install the upper bolts from the transmission to the engine block.
- install the bolts from the flywheel to the torque convertor.
- install the nuts to the engine mount through bolts.
- Install the starter to the engine block. Refer to Starter Motor Replacement in Engine Electrical.
- Install the flywheel inspection cover to the transmission.
- Install the engine oil cooler lines to the engine block.
- Install the transmission oil cooler lines to the retaining clips. Refer to Oil Cooler Hose/Pipe Replacement in Automatic Transmission-4L80E.
- Reconnect the block heater electrical connector.
- Remove the safety stands and lower the vehicle.
- Install the fuel injection pump to the engine block. Refer to Fuel Injection Pump Replacement in Engine Controls-6.5L.
- Install the exhaust manifolds (if removed). Refer to Exhaust Manifold Replacement
- Install the mounting bracket for the A/C compressor.
- Install the mounting bracket for the generator.
- Install the vacuum lines to the vacuum pump.
- Install the generator to the mounting bracket. Refer to Generator Replacement in Engine Electrical.
- Install the power steering pump to the mounting bracket. Refer to Power Steering Pump Replacement in Power Steering System.
- Install thew auxiliary generator (if equipped) to the mounting bracket. Refer to Auxiliary Generator Replacement in Engine Electrical.
- Install the turbocharger to the engine block. Refer to Turbocharger in Turbocharger.
- Install the lower intake manifold to the engine block. Refer to Intake Manifold Replacement .
- Install the ground wires from the body to the engine block.
- Install the thermostat housing crossover to the engine assembly. Refer to Thermostat Housing Crossover Replacement in Engine Cooling.
- Install the heater hoses to the vehicle. Refer to Heater Hoses Replacement in Engine Cooling.
- Install the A/C compressor to the engine block. Refer to Air Conditioning Compressor Replacement in HVAC Systems-Manual.
- Install the engine wiring harness to the engine assembly.
- Install the upper intake manifold to the engine assembly. Refer to Intake Manifold Replacement .
- Install the transmission oil level indicator to the vehicle.
- Install the engine oil level indicator to the engine assembly. Refer to Oil Level Indicator and Tube Replacement .
- Install the engine oil filler tube. Refer to Oil Fill Tube Removal .
- Install the radiator hoses to the engine assembly. Refer to Radiator Hose Replacement in Engine Cooling.
- Install the A/C compressor to the mounting bracket. Refer to Condenser Replacement HVAC Systems-Manual.
- Install the clutch fan to the water pump. Refer to Fan Clutch Replacement in Engine Cooling.
- Install the drive belt on the pulleys. Refer to Drive Belt Replacement .
- Install the radiator support in the vehicle. Refer to Radiator Support Replacement in Body Front End.
- Install the radiator in the vehicle. Refer to Radiator Replacement in Engine Cooling.
- Install the A/C condenser in the vehicle. Refer to Condenser Replacement in HVAC Systems-- Manual.
- Install the auxiliary engine oil cooler. Refer to Auxiliary Engine Oil Cooler Replacement in Engine Cooling.
- Install the grille assembly to the vehicle. Refer to Grille Replacement in Body Front End.
- Install the front bumper to the vehicle. Refer to Front Bumper Filler Replacement in Body Front End.
- Install the surge tank in the vehicle. Refer to Surge Tank (Diesel) Replacement in Engine Cooling.
- Install the air cleaner in the vehicle. Refer to Air Cleaner Assembly Replacement in Engine Cooling.
- Install the air intake duct to the air cleaner.
- Connect the battery cables to the auxiliary battery. Refer to Battery Cable Replacement in Engine Electrical.
- Install the front battery in the vehicle. Refer to Battery Replacement in Engine Electrical.
- Fill the cooling system. Refer to Cooling System Draining and Filling in Engine Cooling.
- Recharge the A/C system. Refer to Refrigerant Recovery and Recharging in HVAC System-Manual.
- Perform the injection timing adjustment procedure. Refer to Injection Timing Adjustment in Engine Controls-6.5L.
- Perform the TDC offset timing procedure. Refer to TDC Offset Adjustment in Engine Controls-6.5L.
- Install the engine cover in the vehicle. Refer to Engine Cover Replacement in Interior Trim.
