Outside Rearview Mirror Shake or Vibration (Replace Outside Rearview Mirrors)

| Subject: | Outside Rearview Mirror Shake or Vibration (Replace Outside Rearview Mirrors) |
| Models: | 1996-2002 Chevrolet Express Van |
| 1996-2002 GMC Savana Van |
Condition
Some customers may comment on a vibration or shaking motion of the outside rearview mirror glass while driving. This condition may affect one or both of the outside mirrors, but is usually more prevalent on the driver's side.
Cause
The large body of the mirror amplifies any relative motion of the mirror to the door mount. There may be sufficient motion in the mirror mount point or at the break away hinge to cause the above concern.
Correction
Upgrade the vehicle to the revised style outside mirrors used on the current 2003 model year vehicle. To perform the upgrade, you will have to switch the terminal positions on the mirror side of the harness. The mirror mounts, however, will be a direct bolt-on replacement. When offering this service, you should notify the customer of the following items:
Notice: When performing the electrical portion of the retrofit procedure, you are to alter the terminal positions on the mirror side of the harness ONLY. Do not alter the vehicle side of the connector. Failure to follow this instruction may cause damage to the power mirror control switch and/or the vehicle wiring.
| • | The physical appearance of the replacement mirrors is different. You must replace both outside mirrors at the time of service. |
| • | The replacement mirrors are only available in a textured black finish. If the mirror being replaced shows signs of fading, it is advisable to also replace the outside mirror trim bezel (located ahead of the mirror) with the part number in the table below. Failure to replace this bezel on a sun faded vehicle will result in an unsightly color matching condition. Some highline or conversion vans may have been originally equipped with color matched (painted) mirrors. You should not attempt to paint the replacement mirror (see next item). |
| • | On vehicles originally equipped with painted mirrors, the triangular shaped outside mirror trim bezel or "shark fin" may also have been body colored. You may leave the existing painted bezel when replacing the mirror, or if the customer prefers, a bezel that matches the black color of the replacement mirror is available. The part number for the black bezel is included in the table below. Time for this procedure is allowed for in the labor operation below. |
Mirror Replacement Procedure
Perform this procedure on the driver's side mirror and then repeat from step 1 for the passenger side.
- Remove the side mirror interior garnish panel by pulling.
- If the vehicle is equipped with manual mirrors, remove the mirror backing nuts and remove the mirror from the vehicle and go to step 9. If the mirrors are power, continue below.
- Remove the interior door handle bezel.
- Remove the accessory switch console from the door panel trim. Disconnect the electrical connector.
- Remove the armrest screws and remove the door trim panel.
- Remove the top corner of the plastic water deflector near the rearview mirror. Pull back just enough of the deflector to facilitate removal of the mirror wire harness.
- Remove the mirror backing nuts and remove the mirror.
- With the new replacement mirror on the bench, make the following alterations to the mirror and refer to the illustration below. The connector labeled (1) is the way the new mirror harness will look out of the box. The second connector (2) is for reference and is the arrangement you should have after the terminal position changes below are completed.
- Install the replacement mirror to the door with three backing nuts. If mirrors are manual, go to step 14.
- Route the wiring harness through the water deflector and connect the harness to the inner door.
- Install the door panel trim and install two screws through the armrest.
- Install the accessory switch console to the door trim panel and connect the harness.
- Install the inner door handle bezel.
- Install the side mirror interior garnish panel by pushing until the clips are seated if replacement bezel is required.
Notice: When performing the electrical portion of the retrofit procedure, you are to alter the terminal positions on the mirror side of the harness ONLY. Do not alter the vehicle side of the connector. Failure to follow this instruction may cause damage to the power mirror control switch and/or the vehicle wiring.
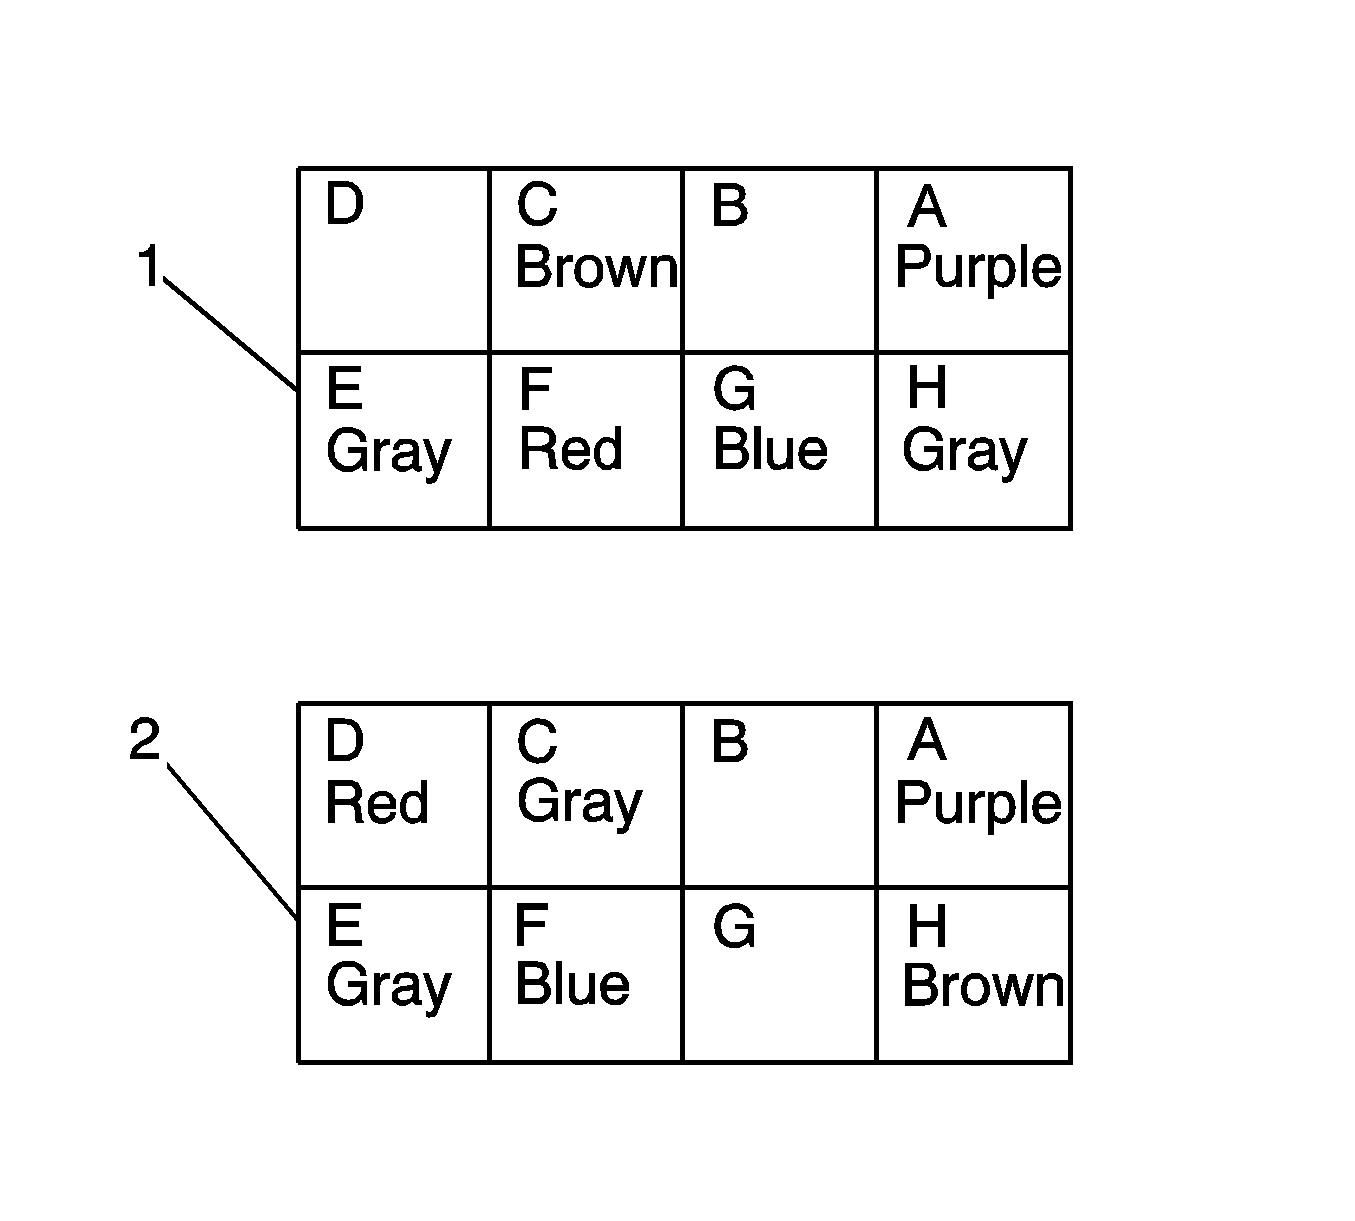
| • | Swap the Brown wire in Cavity C with the gray wire in Cavity H. |
| • | Move the Red wire from Cavity F to Cavity D. |
| • | Move the blue wire from Cavity G to Cavity F. |
Parts Information
Part Number | Description |
|---|---|
25753829 | Mirror, LH Manual |
25753830 | Mirror, RH Manual (convex) |
25753831 | Mirror, LH Electric |
25753832 | Mirror, RH Electric (convex) |
25753835 | Mirror, RH Manual (Flat) |
25753836 | Mirror, RH Electric (Flat) |
15736157 | Mirror, Exterior Trim Bezel -- LH |
15736158 | Mirror, Exterior Trim Bezel -- RH |
Parts are expected to be available from GMSPO February 21, 2003.
Warranty Information
For vehicles repaired under warranty, use:
Labor Operation | Description | Labor Time |
|---|---|---|
B6573 | Mirror, Outside Rear View - Replace (BOTH) | 0.5 hr |
Add | with power mirror (left) | 0.3 hr |
Add | with power mirror (right) | 0.3 hr |
The Add conditions are for bulletin use only and include time for altering each power mirror as required.
