Radiator Replacement Diesel
Special Tools
J 38185 Hose Clamp Pliers
Removal Procedure
Note: Always install a new set of insulators when replacing a radiator. Used insulators may be worn or too large for the new radiator. These conditions may cause the new radiator to be loose.
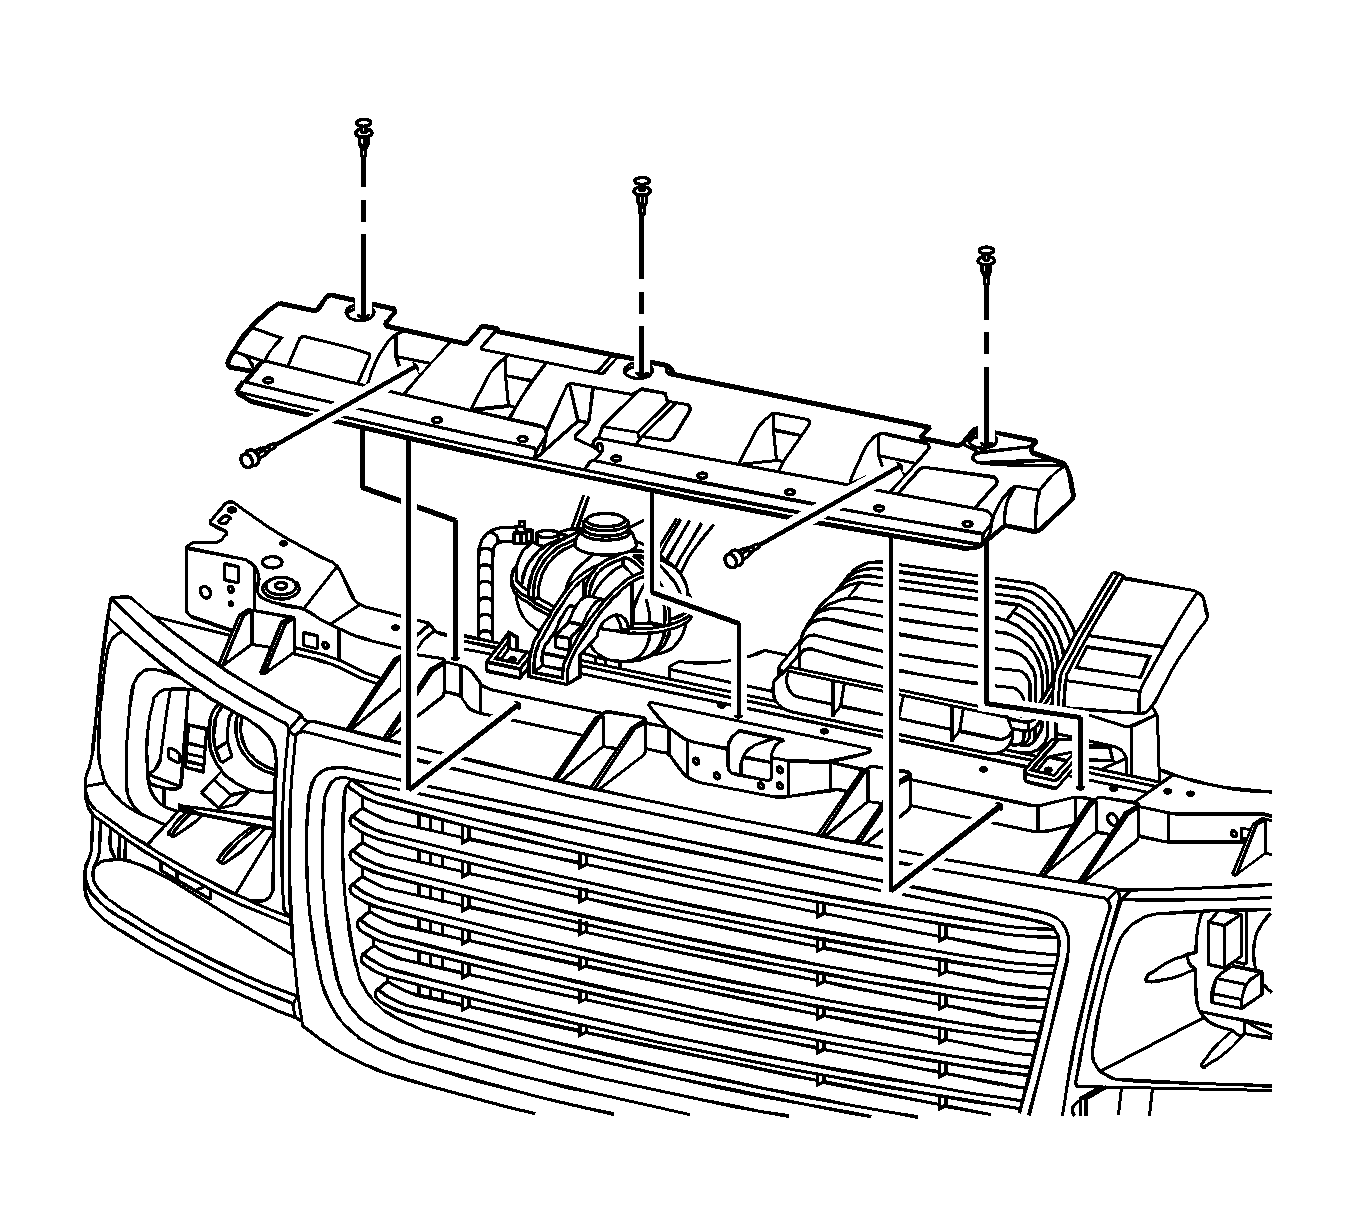
- Remove the air cleaner assembly. Refer to
Air Cleaner Assembly Replacement.
- Remove the upper radiator baffle.
- Remove the surge tank. Refer to
Radiator Surge Tank Replacement.
- Remove battery. Refer to
Battery Replacement.
- Remove the charged air cooler inlet hose/pipe. Refer to
Charged Air Cooler Hoses/Pipes Replacement.
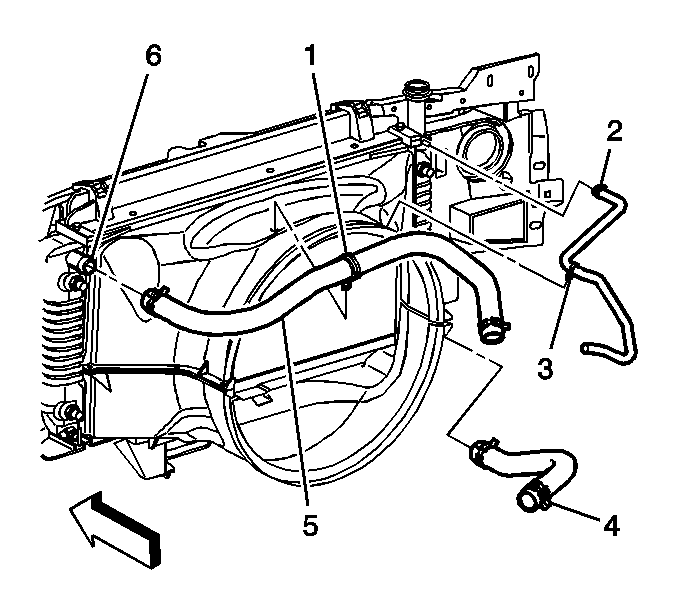
- Remove the clamp at the radiator inlet using the
J 38185 .
- Remove the radiator inlet hose (5) from the radiator.
- Remove the outlet heater hose clamp at the radiator using the
J 38185 .
- Remove the outlet heater hose (2) from the radiator.
- Remove the automatic transmission cooler lines. Refer to
Transmission Fluid Cooler Hose/Pipe Quick-Connect Fitting Disconnection and Connection for the 4L60-E/4L65-E/4L70-E transmissions or
Transmission Fluid Cooler Hose/Pipe Quick-Connect Fitting Disconnection and Connection for the 4L80-E/4L85-E transmissions.
- Remove the engine oil cooler lines. Refer to
Engine Oil Cooler Pipe/Hose Quick Connect Fitting.
- Remove the engine oil fill tube. Refer to
Oil Filler Tube Replacement.
- Remove intake manifold tube. Refer to
Intake Manifold Tube Replacement.
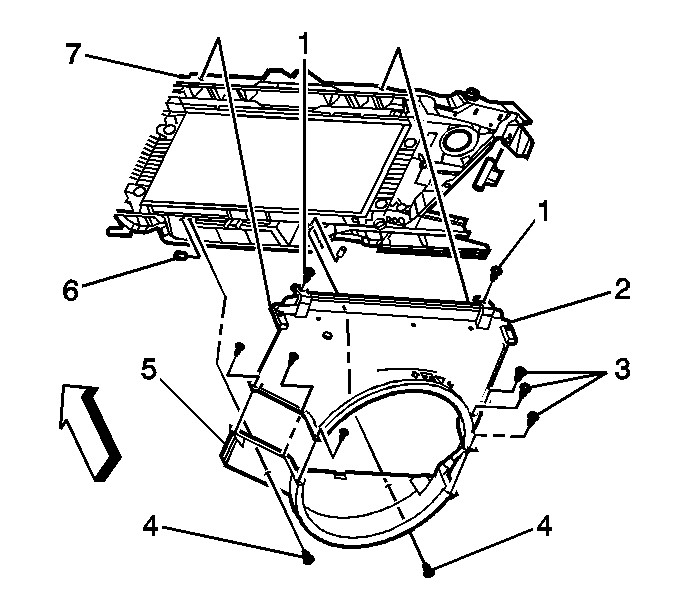
- Remove the upper radiator baffle.
Remove the fan shroud bolts (1) from the top of the radiator support.
- Remove the fan shroud bolts (3) from the sides of the fan shroud.
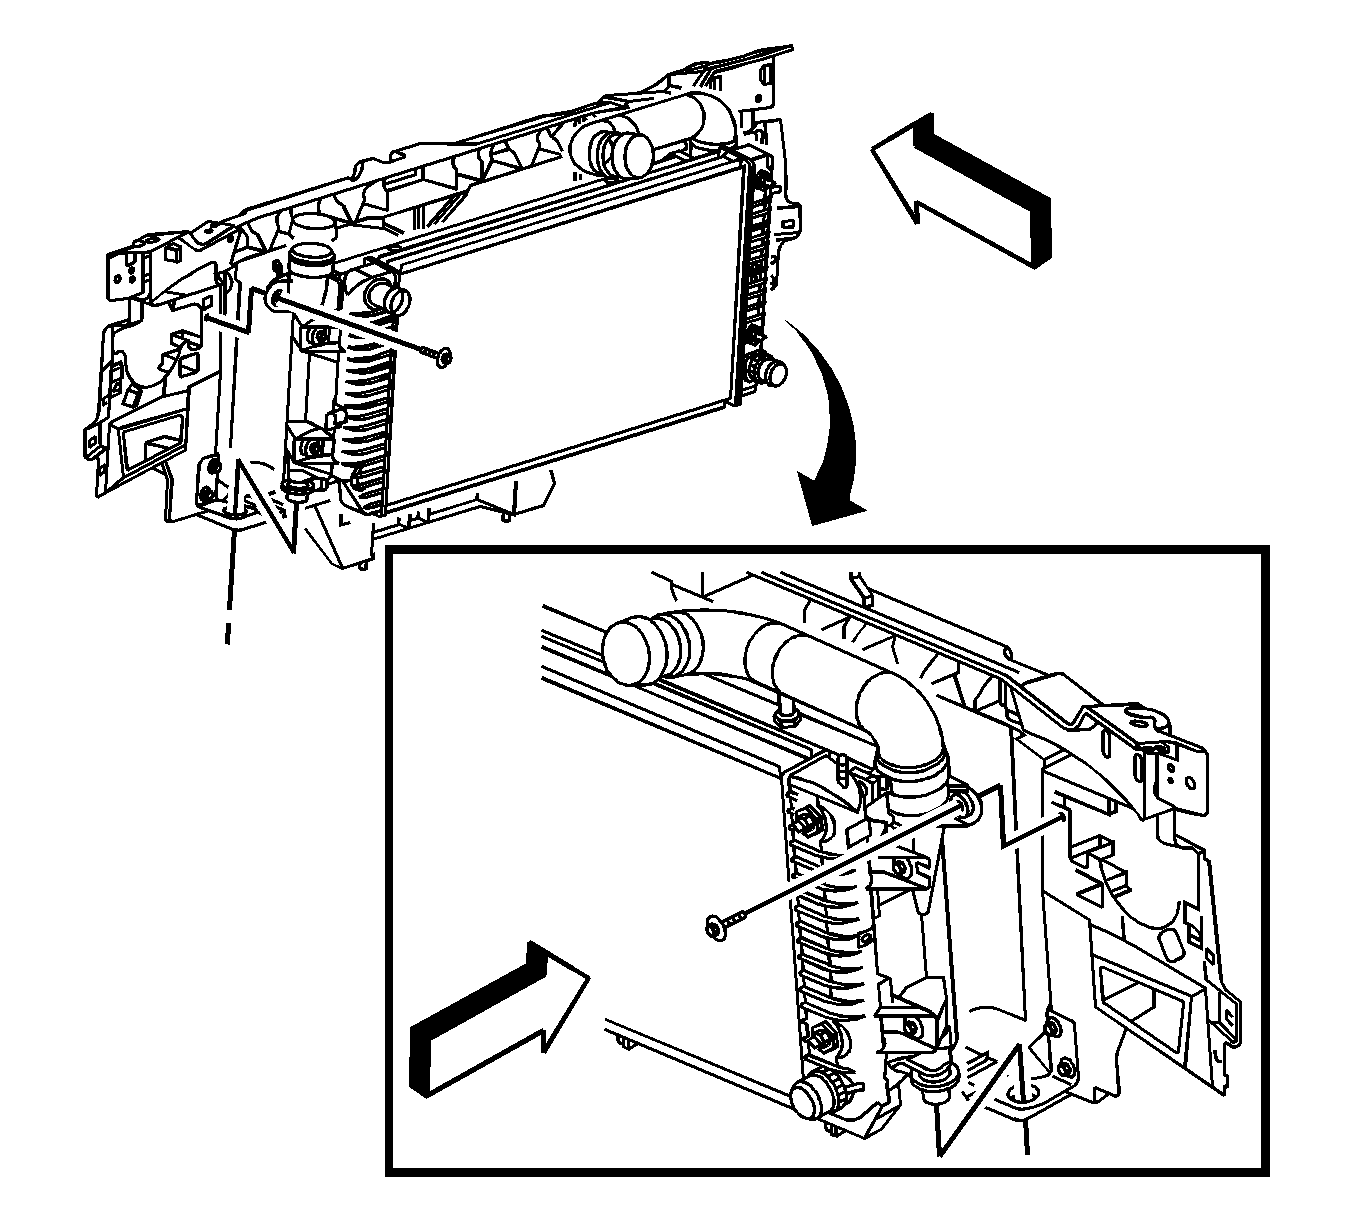
- Remove the radiator mounting bolts from the charged air cooler.
- Remove the charge air cooler bolts to core support.
- Remove the radiator and charge air cooler as assembly.
- Remove radiator bolts to charge air cooler.
- Remove the radiator insulators.
- Inspect the following components:
| • | Replace the components as necessary. |
Installation Procedure

- Install the radiator insulators.
Caution: Refer to Fastener Caution in the Preface section.
- Install the radiator to the charge air cooler and tighten the bolts to
6 N·m (53 lb in).
- Install the radiator and charge air cooler as an assembly.
- Install the radiator mounting bolts to the charged air cooler and tighten to
6 N·m (53 lb in).

- Install the fan shroud bolts (1) to the top of the radiator support and tighten to
6 N·m (53 lb in).
- Install the fan shroud bolts (3) to the sides of the fan shroud and tighten to
6 N·m (53 lb in).
- Install the engine oil cooler lines. Refer to
Engine Oil Cooler Pipe/Hose Quick Connect Fitting.
- Install the automatic transmission oil cooler lines. Refer to
Transmission Fluid Cooler Hose/Pipe Quick-Connect Fitting Disconnection and Connection for the 4L60-E/4L65-E/4L70-E transmissions or
Transmission Fluid Cooler Hose/Pipe Quick-Connect Fitting Disconnection and Connection for the 4L80-E/4L85-E transmissions.

- Install the radiator inlet hose (5) to the radiator.
- Install the hose clamp at the radiator inlet housing using the
J 38185 .
- Install the outlet heater hose (2).
- Install the outlet heater hose clamp using the
J 39529 .
- Install the intake manifold tube. Refer to
Intake Manifold Tube Replacement.
- Install oil fill tube.
Oil Filler Tube Replacement.
- Install the upper radiator baffle.
- Install the battery. Refer to
Battery Replacement.
- Install the charged air cooler hose/pipe. Refer to
Charged Air Cooler Hoses/Pipes Replacement.
- Install the surge tank assembly. Refer to
Radiator Surge Tank Replacement.
- Install the air cleaner assembly. Refer to
Air Cleaner Assembly Replacement.

- Install the upper radiator baffle.
- Inspect the automatic transmission fluid level. Refer to
Approximate Fluid Capacities.
- Inspect the engine oil level. Refer to
Approximate Fluid Capacities.
Radiator Replacement Gas
Special Tools
J 38185 Hose Clamp Pliers
Removal Procedure
Note: Always install a new set of insulators when replacing a radiator. Used insulators may be worn or too large for the new radiator. These conditions may cause the new radiator to be loose.
- Remove the air cleaner assembly. Refer to
Air Cleaner Assembly Replacement for the 4.8L, 5.3L, 6.0L, 6.2L, 7.0L engines or
Air Cleaner Assembly Replacement for the 4.3L engine.
- Remove the coolant recovery reservoir. Refer to
Coolant Recovery Reservoir Replacement.

- Remove the clamp at the radiator inlet using the
J 38185 .
- Remove the radiator inlet hose (5) from the radiator.
- Remove the outlet heater hose clamp at the radiator using the
J 38185 .
- Remove the outlet heater hose (2) from the radiator.
- Remove the automatic transmission cooler lines. Refer to
Transmission Fluid Cooler Hose/Pipe Quick-Connect Fitting Disconnection and Connection for the 4L60-E/4L65-E/4L70-E transmission or
Transmission Fluid Cooler Hose/Pipe Quick-Connect Fitting Disconnection and Connection for the 4L80-E/4L85-E transmission.
- Remove the engine oil cooler lines. Refer to
Engine Oil Cooler Pipe/Hose Quick Connect Fitting.

- Remove the fan shroud bolts (1) from the top of the radiator support.
- Remove the fan shroud bolts (3) from the sides of the fan shroud.
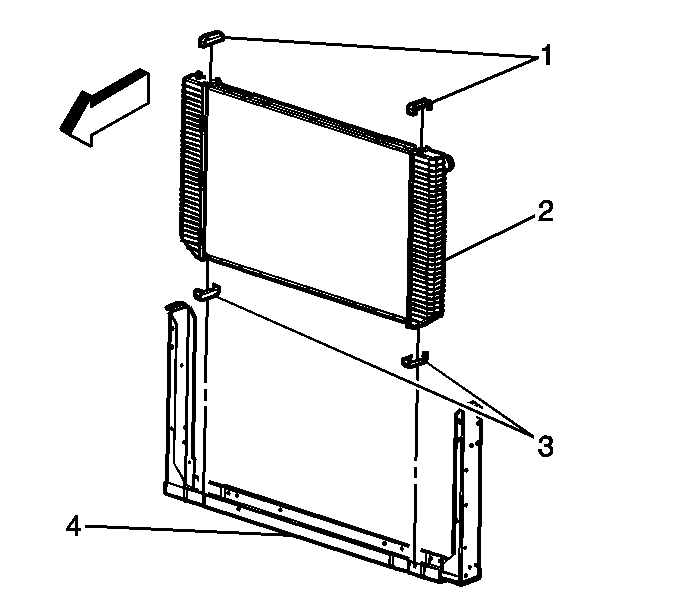
- Remove the radiator (2).
- Remove the radiator insulators (1, 3).
- Inspect the following components:
| • | Replace the components as necessary. |
Installation Procedure

- Install the radiator insulators (1, 3).
- Install the radiator (2).
Caution: Refer to Fastener Caution in the Preface section.

- Install the fan shroud bolts (1) to the top of the radiator support and tighten to
6 N·m (53 lb in).
- Install the fan shroud bolts (3) to the sides of the fan shroud and tighten to
6 N·m (53 lb in).
- Install the engine oil cooler lines. Refer to
Engine Oil Cooler Pipe/Hose Quick Connect Fitting.
- Install the automatic transmission oil cooler lines. Refer to
Transmission Fluid Cooler Hose/Pipe Quick-Connect Fitting Disconnection and Connection for the 4L60-E/4L65-E/4L70-E transmission or
Transmission Fluid Cooler Hose/Pipe Quick-Connect Fitting Disconnection and Connection for the 4L80-E/4L85-E transmission.

- Install the radiator inlet hose (5) to the radiator.
- Install the hose clamp at the radiator inlet housing using the
J 38185 .
- Install the outlet heater hose (2).
- Install the outlet heater hose clamp using the
J 39529 .
- Install the coolant recovery reservoir. Refer to
Coolant Recovery Reservoir Replacement.
- Install the air cleaner assembly. Refer to
Air Cleaner Assembly Replacement for the 4.8L, 5.3L, 6.0L, 6.2L, 7.0L engines or
Air Cleaner Assembly Replacement for the 4.3L engine.
- Inspect the automatic transmission fluid level. Refer to
Approximate Fluid Capacities.
- Inspect the engine oil level. Refer to
Approximate Fluid Capacities.


