Engine Oil Cooler Hose/Pipe Replacement LR4, LM7, LQ4
Removal Procedure
The optional oil cooler is either an integral part of the radiator or a separate unit placed in front of the radiator. The cooler lines and hoses are serviceable.
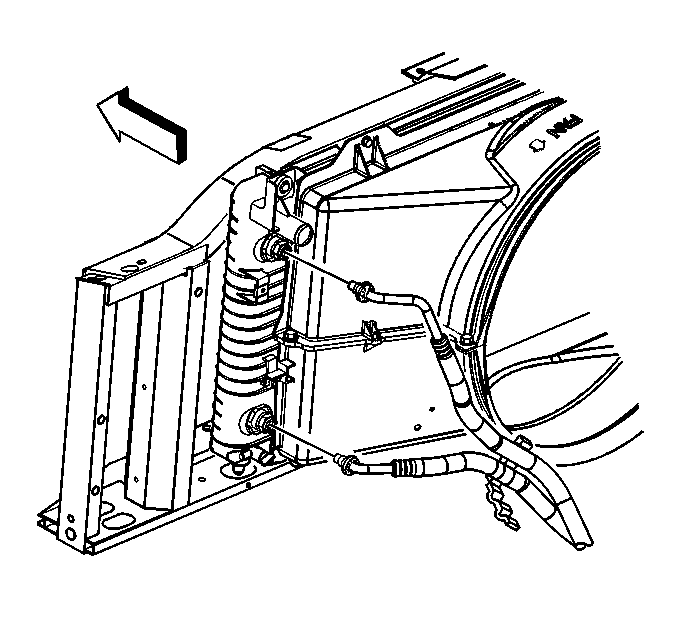
- Disconnect the cooler lines. Refer to Engine Oil Cooler Pipe/Hose Quick Connect Fitting Replacement.
- Open the oil cooler hose clip located on the lower fan shroud.
- Remove the oil cooler hoses from the clip.
- Gently, pull the oil cooler pipe fittings straight out from the radiator quick connect fittings.
- Raise and suitably support the vehicle. Refer to Lifting and Jacking the Vehicle.
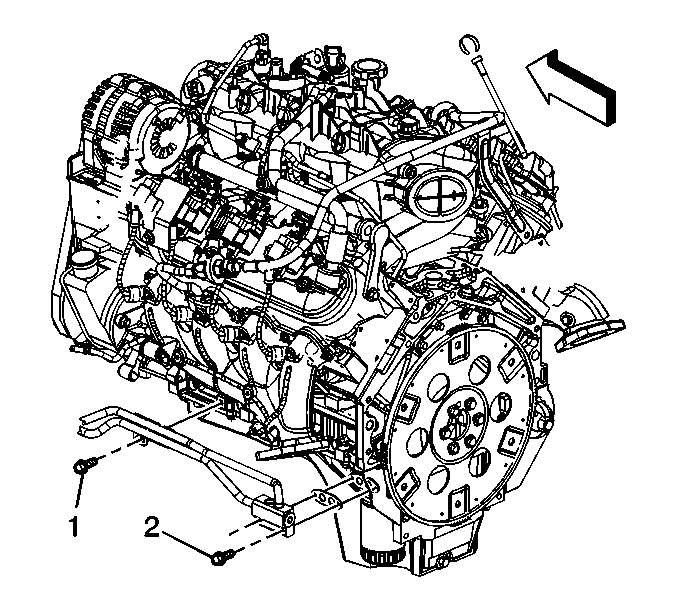
- Remove the oil cooler hose bracket bolt (1).
- Remove the oil cooler hose adapter bolts (2).
- Remove the oil cooler hose assembly and gasket.
- Discard the gasket.
- Inspect the fittings, connectors and cooler hoses for damage or distortion.


Installation Procedure
- Install the oil cooler hose assembly and a new gasket.
- Install the oil cooler hose adapter bolts (2) and tighten to 12 N·m (106 lb in).
- Install the oil cooler hose bracket bolt (1) and tighten to 25 N·m (18 lb ft).
- Install the oil cooler hoses to the hose clip on the fan shroud.
- Snap the oil cooler hose clip shut.
- Connect the oil cooler lines. Refer to Engine Oil Cooler Pipe/Hose Quick Connect Fitting Replacement.
- Pull back sharply on the cooler line in order to ensure that the cooler line is installed in the quick connect fitting.

Note: A distinct snap should be heard when assembling tube ends of the hose assembly to quick connectors. To ensure tube is fully inserted into the connector, check by giving tube a forceful pull.
Caution: Refer to Fastener Caution in the Preface section.


Note:
• Ensure the oil cooler line being installed has a plastic cap on the end that connects to the quick connect fitting. If no plastic cap exists, or the plastic cap is damaged, obtain a new cap. Install the cap on to the cooler line prior to cooler line
installation. • Do not use the plastic cap in order to install the cooler line into the fitting.
Engine Oil Cooler Hose/Pipe Replacement LU3
Removal Procedure
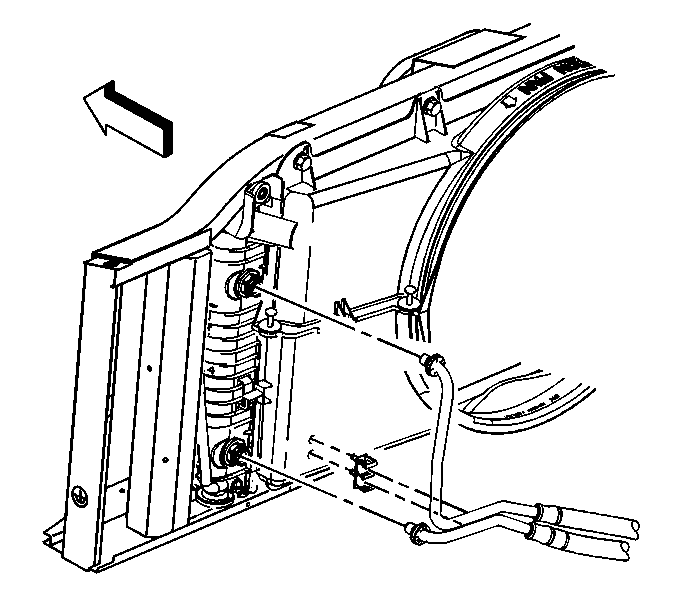
- Disconnect the oil cooler hose (1) from the radiator. Refer to Engine Oil Cooler Pipe/Hose Quick Connect Fitting Replacement
- Gently, pull the oil cooler pipe fittings straight out from the radiator quick connect fittings.
- Raise and suitably support the vehicle. Refer to Lifting and Jacking the Vehicle
- Remove the oil cooler hose bracket nut (1).
- Remove the oil cooler hose adapter nut (2).
- Remove the oil cooler hose assembly and seals.
- Discard the seals.
- Inspect the fittings, connectors and cooler hoses for damage or distortion.


Installation Procedure
- Install the oil cooler hose assembly and a new seals.
- Install the oil cooler hose adapter nut (2) and tighten to 12 N·m (106 lb in)
- Install the oil cooler hose bracket nut (1) and tighten to 25 N·m (18 lb ft)
- Connect the oil cooler hose (1) to the radiator. Refer to Engine Oil Cooler Pipe/Hose Quick Connect Fitting Replacement
- Pull back sharply on the cooler line in order to ensure that the cooler line is installed in the quick connect fitting.
Note: A distinct snap should be heard when assembling tube ends of the hose assembly to quick connectors. To ensure tube is fully inserted into the connector, check by giving tube a forceful pull.
Caution: Refer to Fastener Caution in the Preface section.


Note:
• Ensure the oil cooler line being installed has a plastic cap on the end that connects to the quick connect fitting. If no plastic cap exists, or the plastic cap is damaged, obtain a new cap. Install the cap on to the cooler line prior to cooler line
installation. • Do not use the plastic cap in order to install the cooler line into the fitting.
