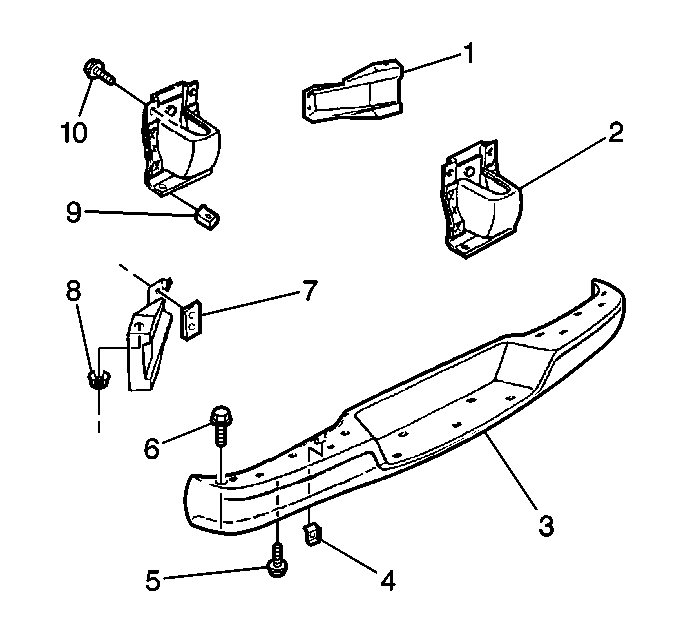
For 1990-2009 cars only
Removal Procedure
- Raise and support the vehicle with suitable safety stands. Refer to Lifting and Jacking the Vehicle.
- Remove the rear bumper step pad from the bumper. Refer to Rear Bumper Step Pad Replacement.
- Remove the rear bumper from the vehicle. Refer to Rear Bumper Replacement.
- Mark the location of the inner bumper brace to the bumper.
- Remove the nuts (8) that retain the outer bumper brace (1) to the frame.
- Remove the nuts and the bolts (6) that retain the outer bumper brace to the bumper.
- Remove the bolts (10) that retain the inner bumper brace (2) to the bumper.
- Remove the outer (1) then the inner (2) bumper brace from the frame and the bumper.

Installation Procedure
- Install the outer (1) then the inner (2) bumper brace to the frame and bumper.
- Align the inner bumper brace with the marks made prior to removal.
- Install the inner bumper brace retaining bolts to the bumper and tighten to 25 N·m (18 lb ft).
- Install the outer bumper brace retaining nuts and bolts (6) to the bumper and tighten to 50 N·m (37 lb ft).
- Install the outer bumper brace nuts (8) and stud plate (7) to the frame and tighten to 50 N·m (37 lb ft).
- Install the rear bumper to the vehicle. Refer to Rear Bumper Replacement.
- Install the rear bumper step pad to the bumper. Refer to Rear Bumper Step Pad Replacement.
- Lower the vehicle.

Caution: Refer to Fastener Caution in the Preface section.
