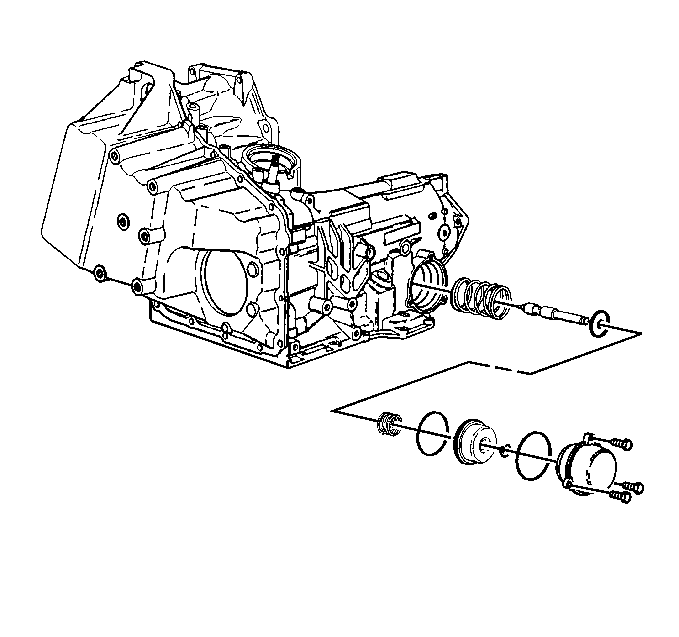
Removal Procedure
- Install the engine support fixture. Refer to Engine Support Fixture in Engine Mechanical - 3.4L or Engine Support Fixture in Engine Mechanical - 3.8L.
- Raise and support the vehicle. Refer to Lifting and Jacking the Vehicle in General Information.
- Remove and support the power steering gear. Refer to Steering Gear Replacement in Power Steering System.
- Remove the transaxle mount lower nuts. Refer to Transmission Mount Replacement .
- Remove the engine mount lower nuts. Refer to Engine Mount Replacement in Engine Mechanical - 3.4L or Engine Mount and Bracket Replacement in Engine Mechanical - 3.8L.
- Remove the power steering lines from the right side of the frame.
- Support the rear of the frame with a jackstand.
- Loosen the front frame bolts and remove the rear frame bolts. Refer to Frame Replacement in Frame and Underbody.
- Adjust the jackstand to lower the rear of the frame.
- Position a drain pan under the forward servo cover.
- Remove the servo cover bolts.
- Remove the forward servo cover.
- Remove the forward servo cover O-ring.
- Remove the servo piston assembly.
- Remove the servo spring.

Installation Procedure
- Install the spring.
- Install the piston assembly.
- Install the O-ring.
- Install the servo cover.
- Install the servo cover bolts.
- Remove the drain pan from under the forward servo cover.
- Adjust the jackstand in order to raise the rear of the frame.
- Install the frame bolts. Refer to Frame Replacement in Frame and Underbody.
- Remove the support from the rear of the frame.
- Install the power steering lines to the right side of the frame.
- Install the engine mount lower nuts. Refer to Engine Mount Replacement in Engine Mechanical - 3.4L or Engine Mount and Bracket Replacement in Engine Mechanical - 3.8L.
- Install the transaxle mount lower nuts. Refer to Transmission Mount Replacement .
- Install the power steering gear. Refer to Steering Gear Replacement in Power Steering System.
- Lower the vehicle.
- Remove the engine support fixture.
- Check and fill the transaxle as necessary.

Notice: Use the correct fastener in the correct location. Replacement fasteners must be the correct part number for that application. Fasteners requiring replacement or fasteners requiring the use of thread locking compound or sealant are identified in the service procedure. Do not use paints, lubricants, or corrosion inhibitors on fasteners or fastener joint surfaces unless specified. These coatings affect fastener torque and joint clamping force and may damage the fastener. Use the correct tightening sequence and specifications when installing fasteners in order to avoid damage to parts and systems.
Tighten
Tighten the bolts to 12 N·m (106 lb in).
Notice: Do not overfill the transmission. Overfilling will result in foaming, loss of fluid, and possible damage to the transmission.
