For 1990-2009 cars only
Rear Window Shelf Trim Panel Replacement Impala
Removal Procedure
- If the vehicle is equipped with a folding rear seat back, perform the following steps:
- If the vehicle is equipped with a fixed rear seat back, perform the following steps:
- Remove the rear upper quarter trim panel. Refer to Rear Quarter Upper Trim Panel Replacement .
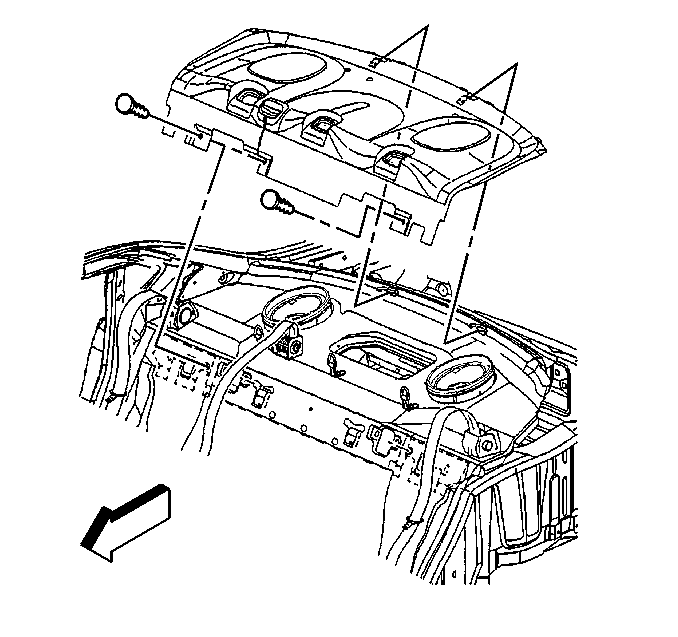
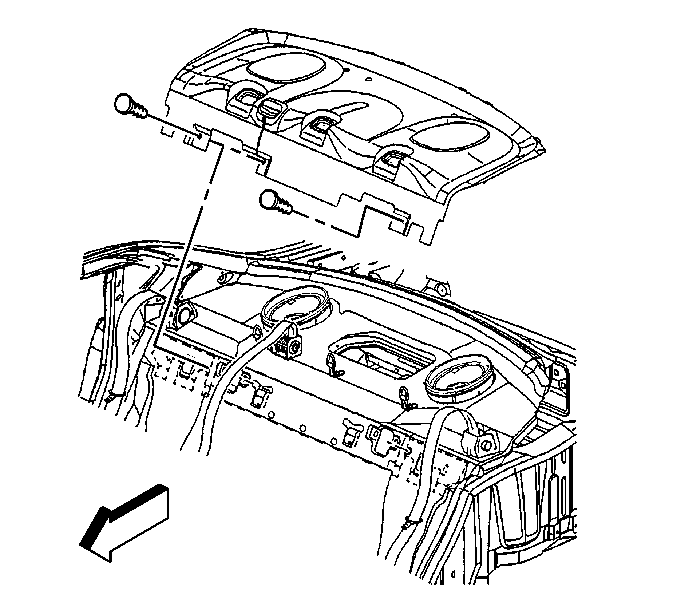
- Remove the push-in retainers from the front of the rear window trim panel.
- Lift the rear window trim panel and remove the seat belts through the slots in the rear window trim panel.
- Slide the rear window trim panel forward to disengage the integral hook from the retaining hole and remove the rear window trim panel.
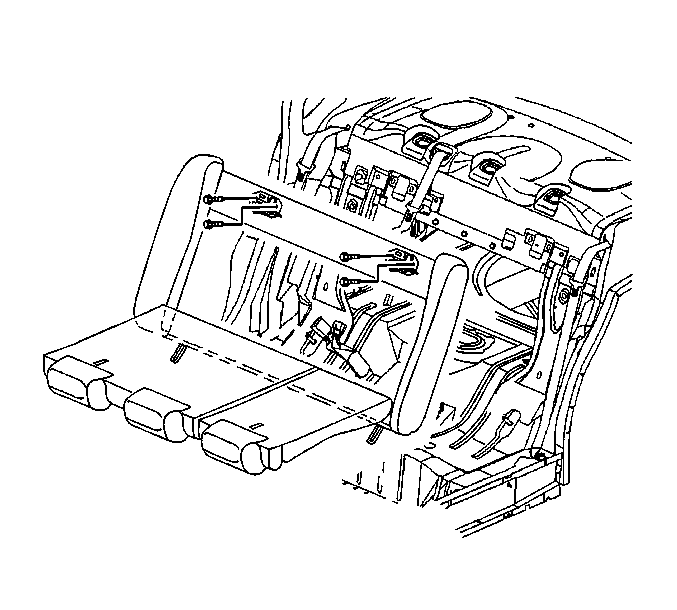
| 1.1. | Lower the seat backs. |
| 1.2. | Remove the upper bolts from the seat back frame. |
| 2.1. | Remove the rear seat cushion. Refer to Rear Seat Cushion Replacement in Seats. |
| 2.2. | Remove the rear seat back. Refer to Rear Seat Back Replacement in Seats. |
Installation Procedure
- Slide the rear window trim panel rearward to engage the integral hook in the retaining hole.
- Lift the rear window trim panel and route the seat belts through the slots in the rear window trim panel.
- Install the push-in retainers to the front edge of the rear window trim panel.
- Install the rear quarter upper trim panel. Refer to Rear Quarter Upper Trim Panel Replacement .
- If the vehicle is equipped with a fixed rear seat back, perform the following steps:
- If the vehicle is equipped with a folding rear seat back, perform the following steps:
| 5.1. | Install the rear seat back. Refer to Rear Seat Back Replacement in Seats. |
| 5.2. | Install the rear seat cushion. Refer to Rear Seat Cushion Replacement in Seats. |
Notice: Refer to Fastener Notice in the Preface section.
| 6.1. | Install the upper bolts to the seat back frame. |
Tighten
Tighten the bolts to 6 N·m (53 lb in)
| 6.2. | Return the seat back to the original position. |
Rear Window Shelf Trim Panel Replacement Monte Carlo
Removal Procedure
- Remove the rear seat cushion. Refer to Rear Seat Cushion Replacement in Seats.
- Remove the rear seat back. Refer to Rear Seat Back Replacement in Seats.
- Remove the rear upper quarter trim panel. Refer to Rear Quarter Upper Trim Panel Replacement .
- Remove the push-in retainers from the front of the panel.
- Lift the rear window trim panel and remove the seat belts through the slots in the rear window trim panel.
- Slide the rear window trim panel forward to disengage the tabs and remove the rear window trim panel.
Installation Procedure
- Slide the rear window trim panel rearward to engage the rear tabs.
- Lift the rear window trim panel and route the seat belts through the slots in the rear window trim panel.
- Install the push-in retainers in the front of the rear window trim panel.
- Install the rear quarter upper trim panel. Refer to Rear Quarter Upper Trim Panel Replacement .
- Install the rear seat back. Refer to Rear Seat Back Replacement in Seats.
- Install the rear seat cushion. Refer to Rear Seat Cushion Replacement in Seats.
