Important: Always perform the hood guide bumper assembly alignment before adjusting the hood.
- Adjust the hood until the hood is level.
- Align the feature lines of the hood and the door.
- Ensure that there is a 19 mm (0.75 in) gap between the rear edge of the hood and the front of the door.
- Adjust the hood for the following conditions:
| • | Alignment, side to side |
| • | Alignment, fore and aft |
Checking the Hood Bumper Assembly Alignment
- Open the hood.
- Obtain an assistant.
- Stand on the running board/fuel tank.
- Tell the assistant to lower the hood slowly.
- Look across the vehicle from rubber hood bumper to rubber hood bumper. Observe whether the centerline of the rubber hood bumpers align to the centerline
of the sheet metal hood guides.
- If the centerline of the hood bumpers and the hood guides do not align, align the hood bumper assembly.
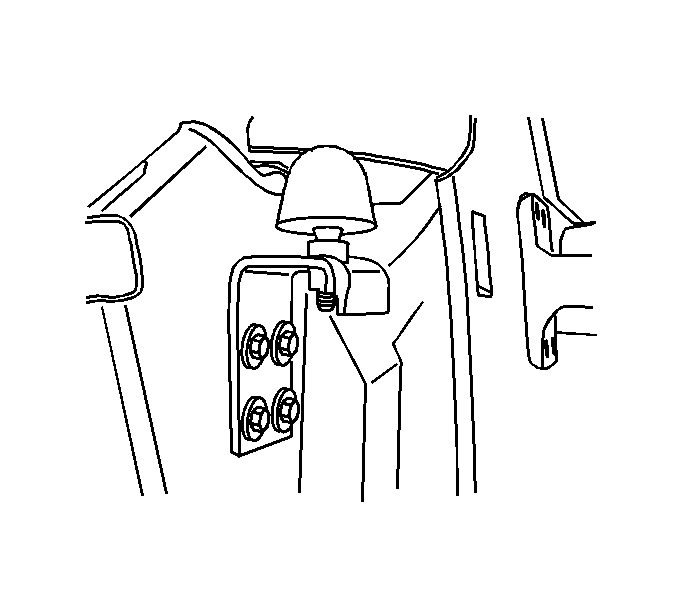
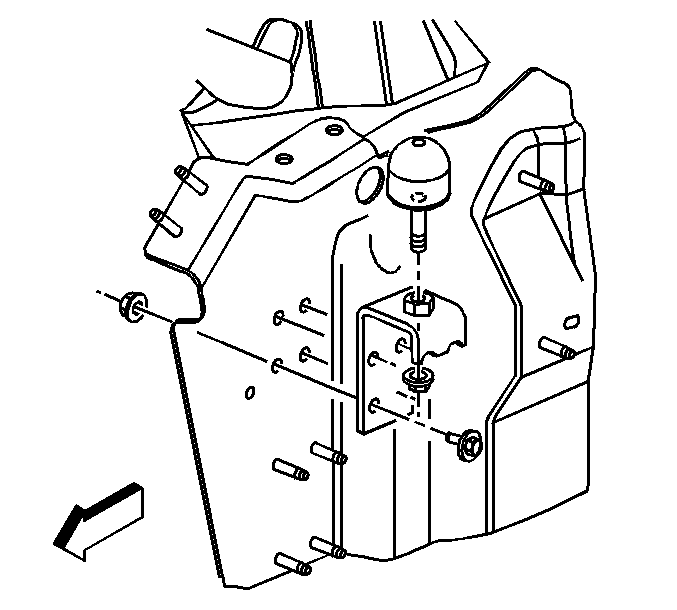
Hood Bumper Assembly Alignment
Use the following procedure in order to align the hood bumpers or in order to adjust the rear of the hood from side to side:
- Adjust the screw on the hood bumpers.
Notice: Use the correct fastener in the correct location. Replacement fasteners
must be the correct part number for that application. Fasteners requiring
replacement or fasteners requiring the use of thread locking compound or sealant
are identified in the service procedure. Do not use paints, lubricants, or
corrosion inhibitors on fasteners or fastener joint surfaces unless specified.
These coatings affect fastener torque and joint clamping force and may damage
the fastener. Use the correct tightening sequence and specifications when
installing fasteners in order to avoid damage to parts and systems.
- Slide the bumper into the slotted holes in the bumper bracket until the following conditions occur:
| • | The hood is in the desired position. |
| • | The rubber hood bumpers centerline aligns to the sheet metal hood guides centerline. |
| • | Verify that the left hand hood bumper centerline to the right hand hood bumper centerline measures 1720 mm (67.75 in). |
Tighten
Tighten the hood bumper nuts to 8 N·m (71 lb in).
Hood Alignment
Adjust the hood until the hood is level. Align the feature lines of the hood and the door. Ensure that there is a 19 mm (0.075 in) gap between the edge of the hood and the front of the door. Measure the gap 25.4 mm (1 in) below
the feature line.
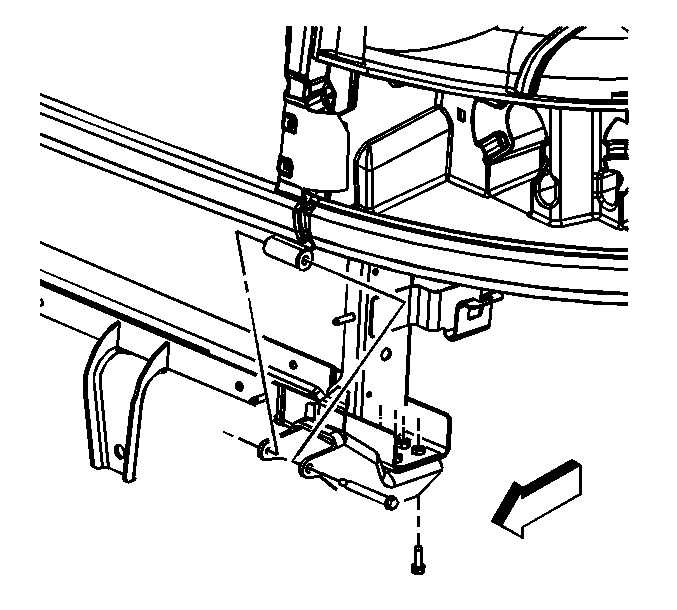
- Use the following procedure in order to adjust the hood fore and aft:
| 1.1. | Tilt the hood forward. |
| 1.2. | Ease the hood onto a padded table. |
| 1.3. | Loosen the bolts holding the hinge brackets to the radiator support. |
Notice: Use the correct fastener in the correct location. Replacement fasteners
must be the correct part number for that application. Fasteners requiring
replacement or fasteners requiring the use of thread locking compound or sealant
are identified in the service procedure. Do not use paints, lubricants, or
corrosion inhibitors on fasteners or fastener joint surfaces unless specified.
These coatings affect fastener torque and joint clamping force and may damage
the fastener. Use the correct tightening sequence and specifications when
installing fasteners in order to avoid damage to parts and systems.
| 1.4. | Slide the hood and the hinge brackets forward or rearward in order to obtain the 19 mm (0.75 in) gap. |
Tighten
Tighten the bolts to 30 N·m (22 lb ft).
- Use the following procedure in order to adjust the height of the hood:
| 2.1. | Tilt the hood forward. |
| 2.2. | Loosen the hood guide bracket to bumper bracket bolts. |
| 2.3. | Raise or lower the bumper brackets. |
Tighten
Tighten the bolts to 25 N·m (18 lb ft).
