Exhaust Manifold Replacement - Right Side 6.6L
Removal Procedure
- Remove the engine cover. Refer to Engine Cover Replacement in Interior Trim.
- Remove the air cleaner layer. Refer to Air Cleaner Replacement in Engine Controls - 6.6 (LB7).
- Remove the charge air pipes. Refer to Charge Air Cooler Inlet Pipe and Outlet Pipe Replacement in Engine Controls - 6.6 (LB7).
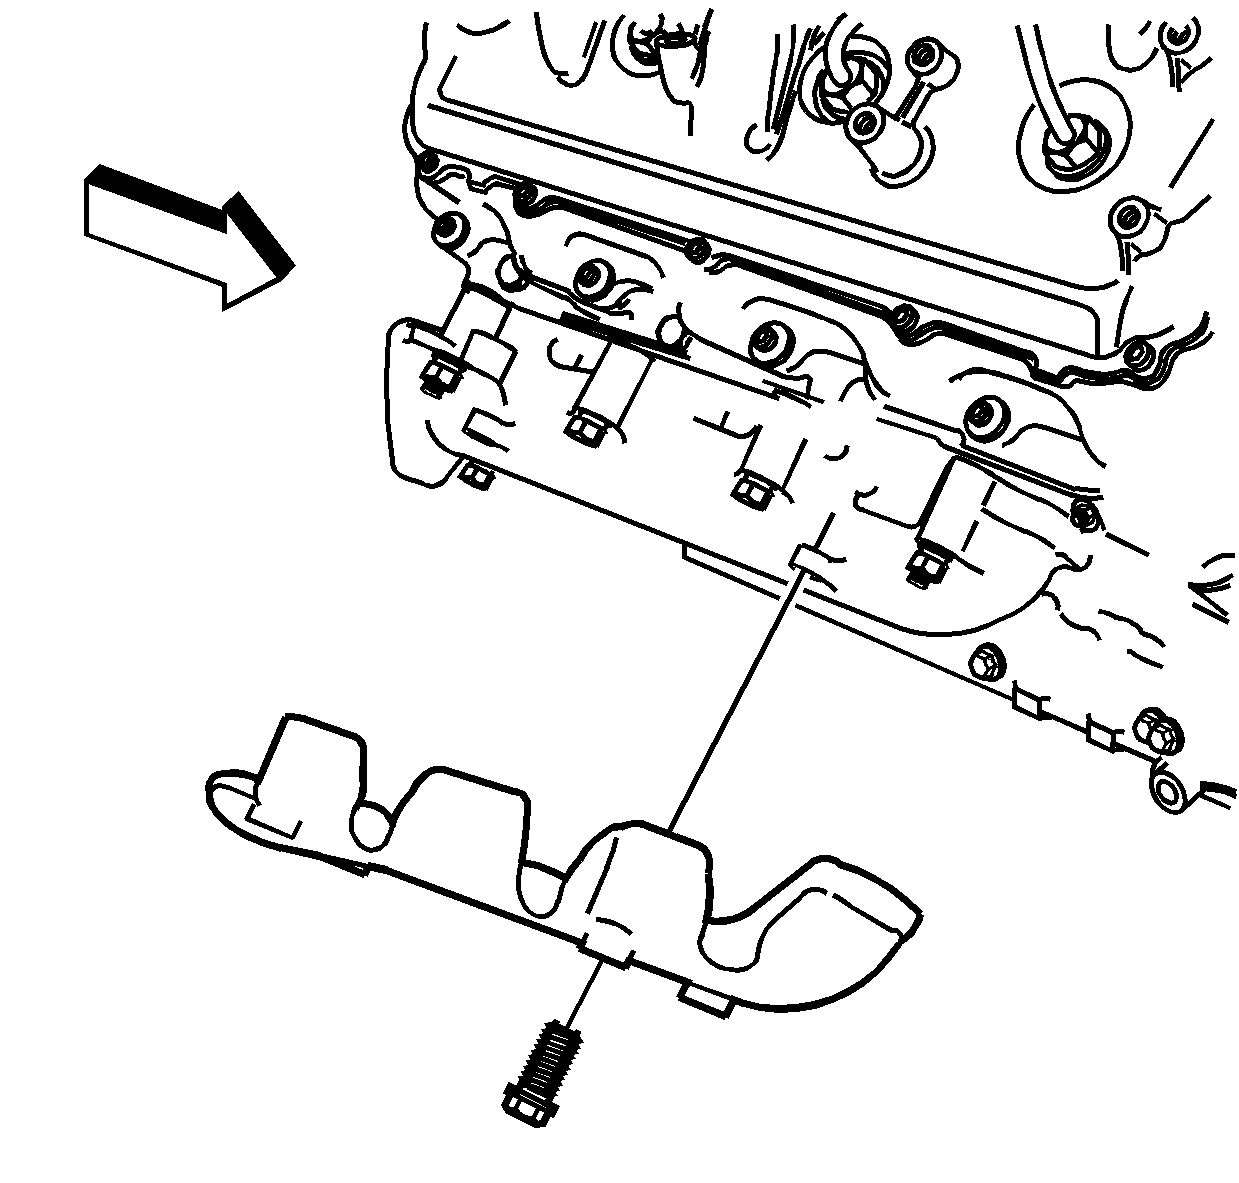
- Remove the exhaust manifold heat shield bolts.
- Remove the exhaust manifold heat shield.
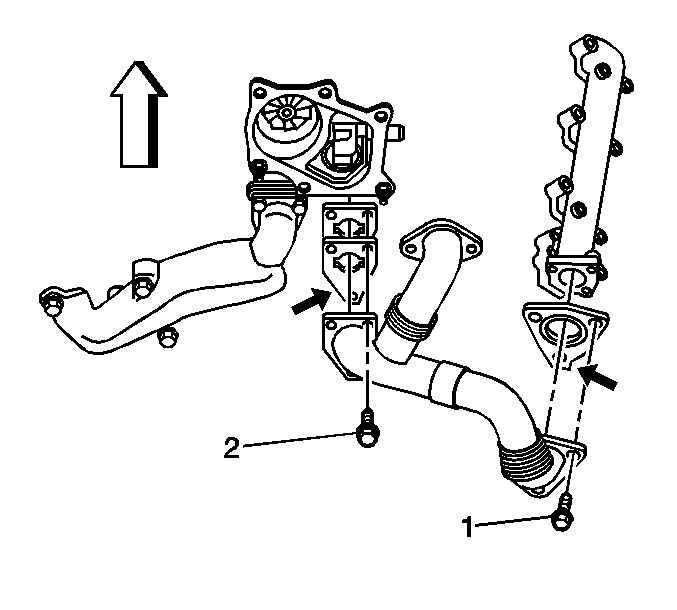
- Remove the right exhaust pipe to the exhaust manifold bolts (1).
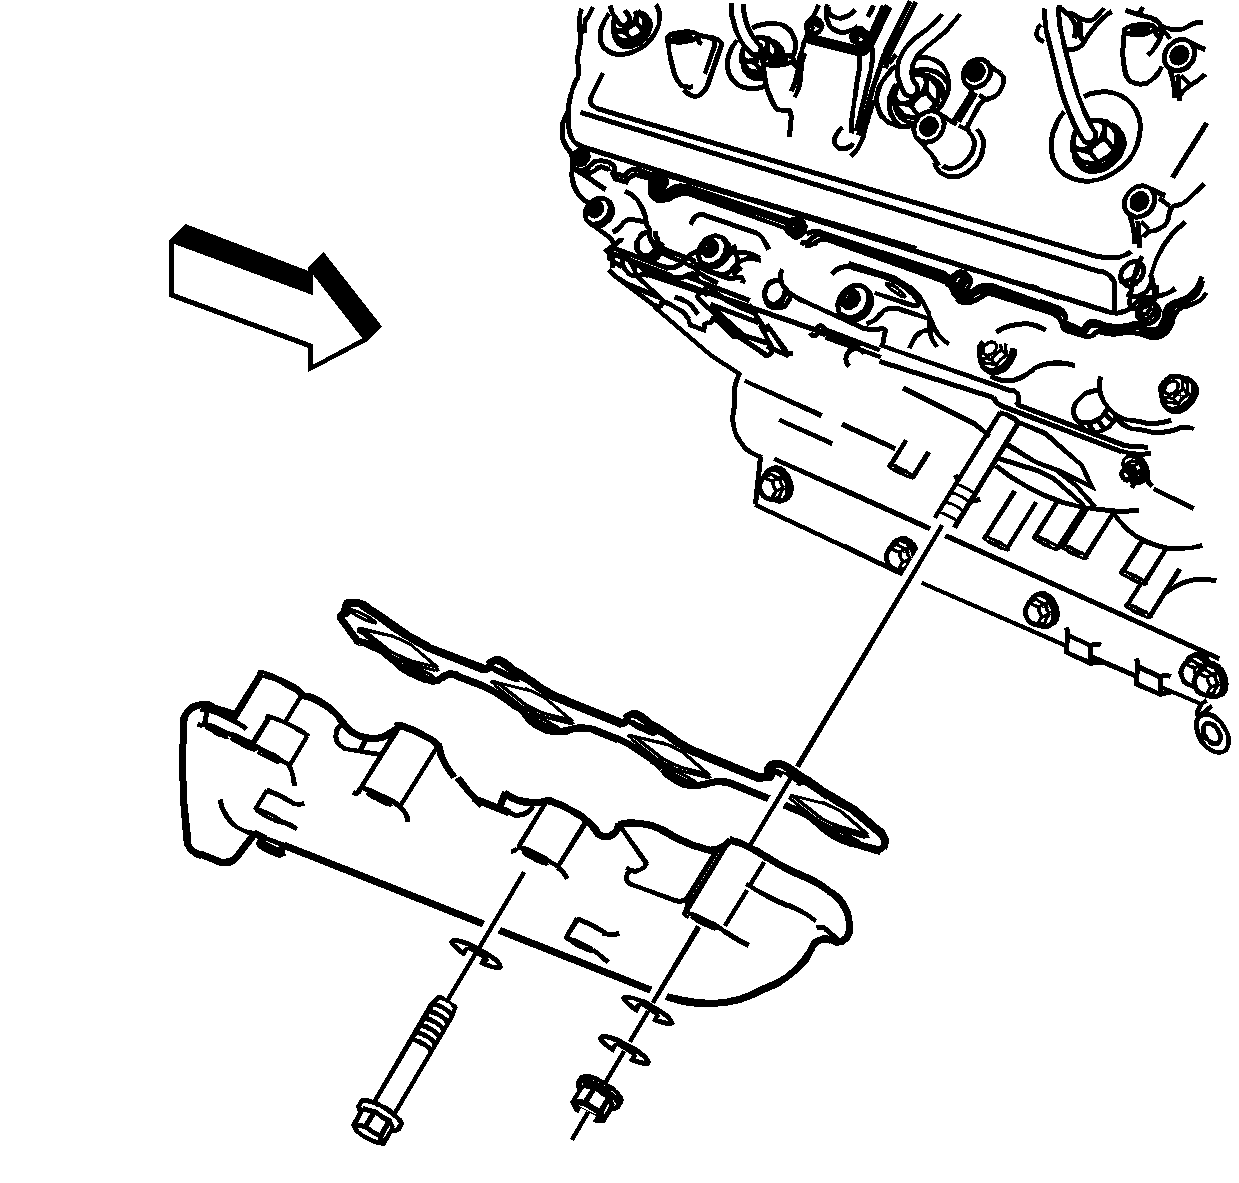
- Remove the bolts/nuts from the right exhaust manifold.
- Remove the exhaust manifold.
- Remove and discard the exhaust manifold gasket.
Installation Procedure
- Install the exhaust manifold gasket to the cylinder head.
- Install the exhaust manifold.
- Install the exhaust manifold bolts/nuts.
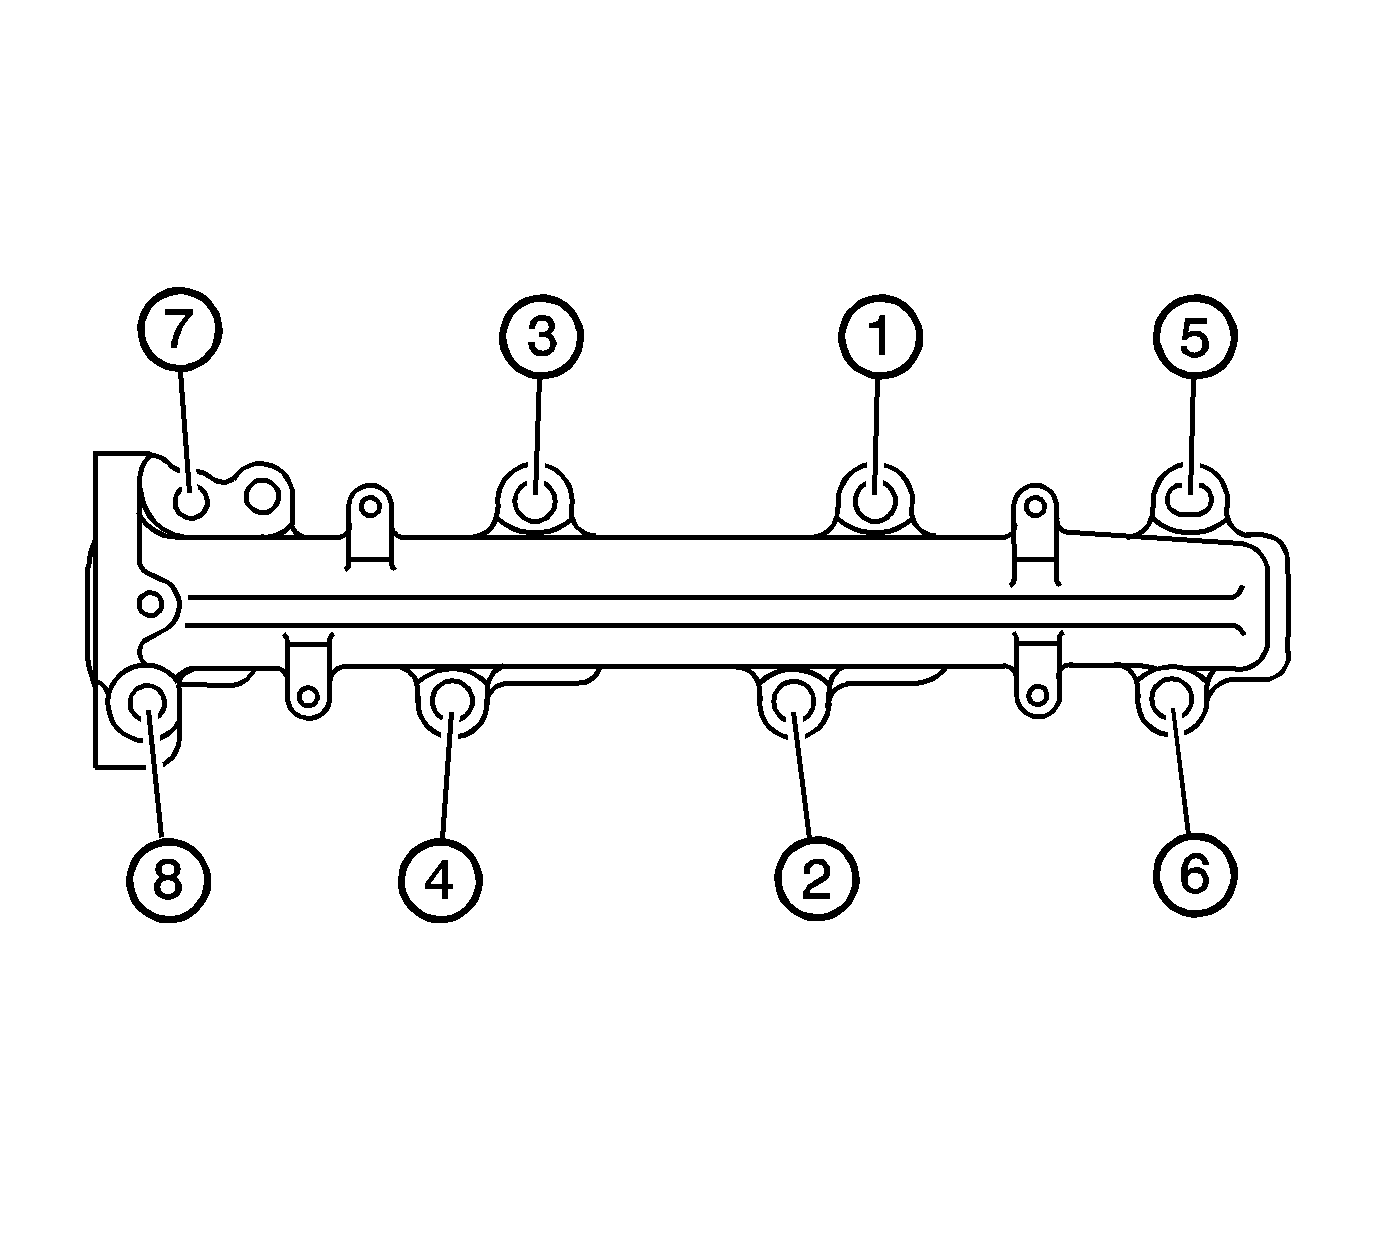
- Use the sequence shown, properly tighten the exhaust manifold bolts.
- Tighten the exhaust manifold bolt/nuts a first pass to 34 N·m (25 lb ft).
- Tighten the exhaust manifold bolts/nuts a final pass to 34 N·m (25 lb ft).
- Install the exhaust manifold heat shield.
- Install the exhaust manifold heat shield bolts.
- Install the exhaust pipe gasket. Align the tab on the gasket to face outward.
- Install the exhaust pipe bolts (1).
- Install the charge air pipes. Refer to Charge Air Cooler Inlet Pipe and Outlet Pipe Replacement in Engine Controls - 6.6L (LB7).
- Install the air cleaner layer. Refer to Air Cleaner Replacement in Engine Controls - 6.6L (LB7).
- Install the engine cover. Refer to Engine Cover Replacement in Interior Trim.
- Lower the vehicle.
Notice: Refer to Fastener Notice in the Preface section.
Tighten

Tighten
Tighten the exhaust manifold heat shield bolts to 8 N·m (71 lb in).

Tighten
Tighten the exhaust pipe to exhaust manifold bolts to 53 N·m (39 lb ft).
Exhaust Manifold Replacement - Right Side 8.1L
Removal Procedure
- Raise and suitably support the vehicle with safety stands. Refer to Lifting and Jacking the Vehicle in General Information.
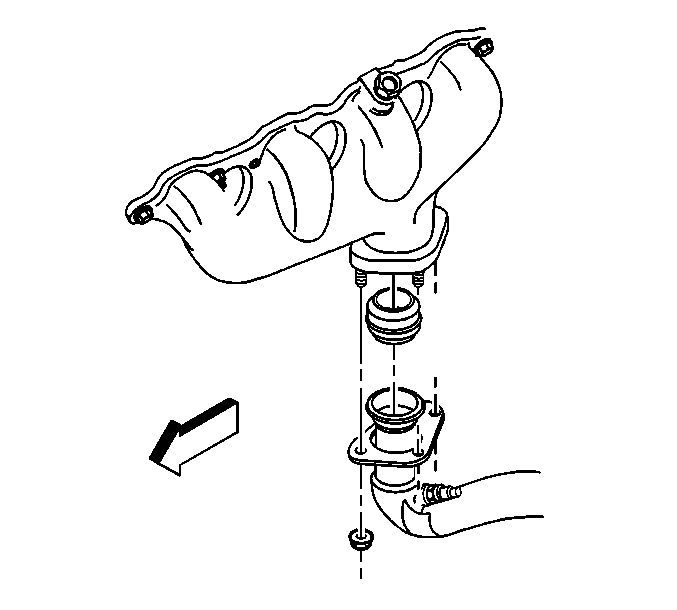
- Remove the exhaust manifold pipe nuts. The left side is shown, the right side is similar.
- Remove the exhaust pipe seal.
- Allow the muffler pipe to hang.
- Lower the vehicle.
- Remove the spark plug wires from the spark plugs and ignition coils.
- Remove the spark plugs. Refer to Spark Plug Replacement in Engine Controls - 8.1L.
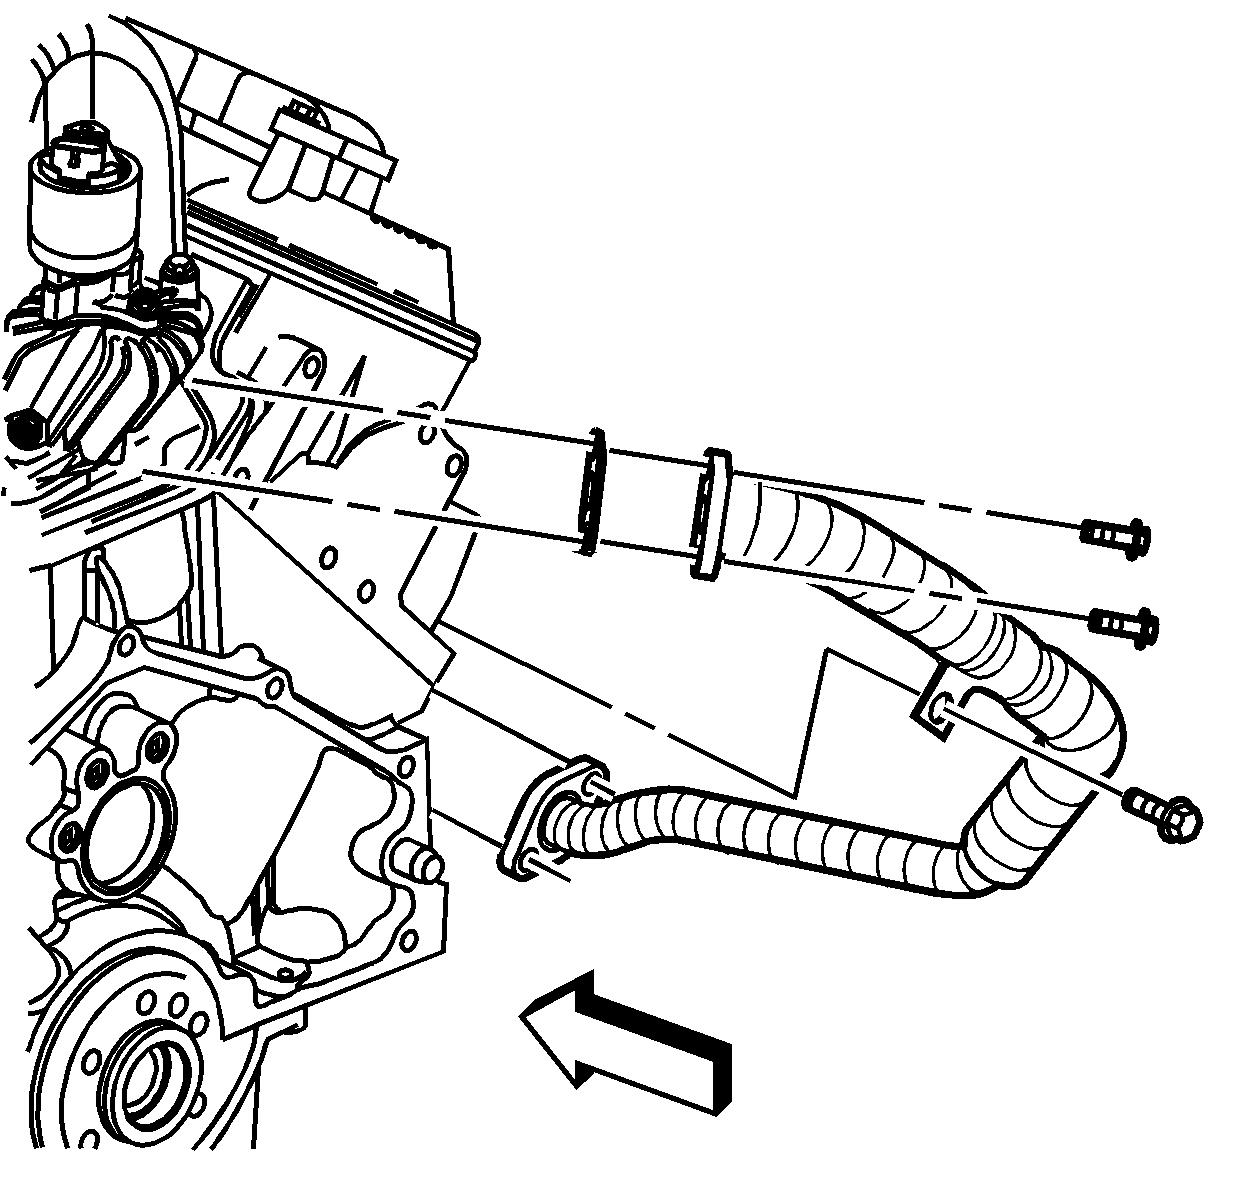
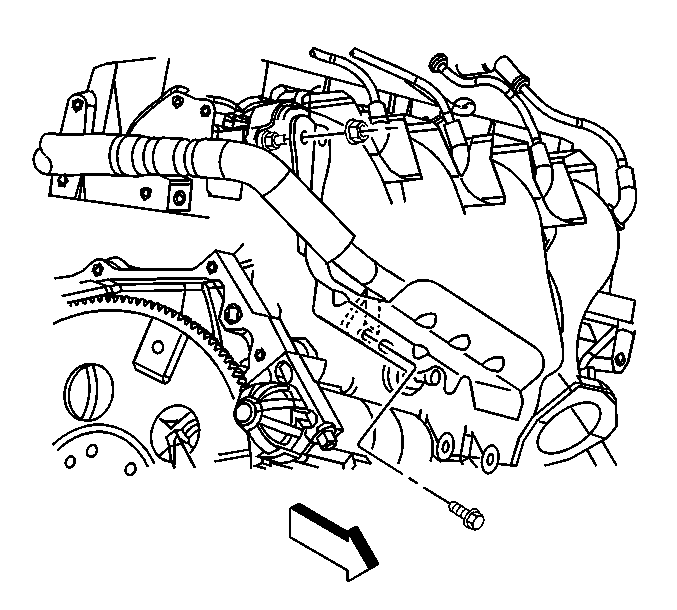
- Remove the exhaust gas recirculation (EGR) pipe bolts from the EGR adapter plate.
- Remove the EGR pipe nuts from the exhaust manifold.
- Remove the EGR pipe bracket bolt.
- Remove the EGR pipe and gaskets. Discard the gaskets.
- Remove the starter motor heat shield bolt and nut.
- Remove the starter motor heat shield.
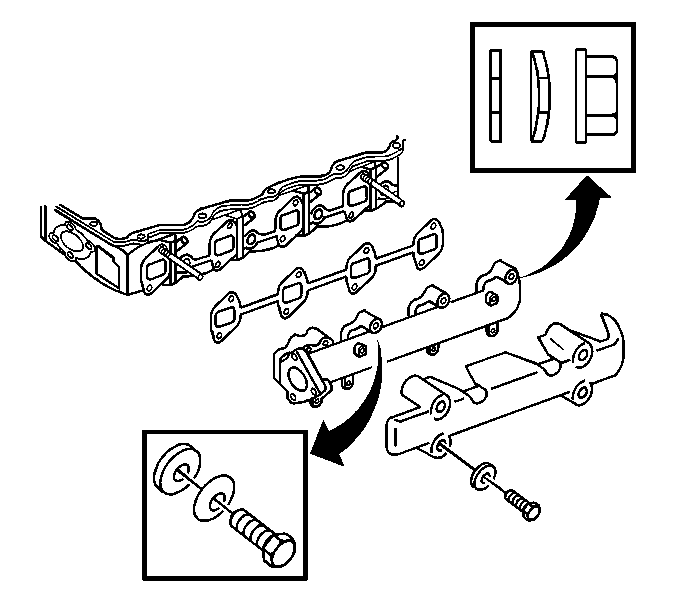
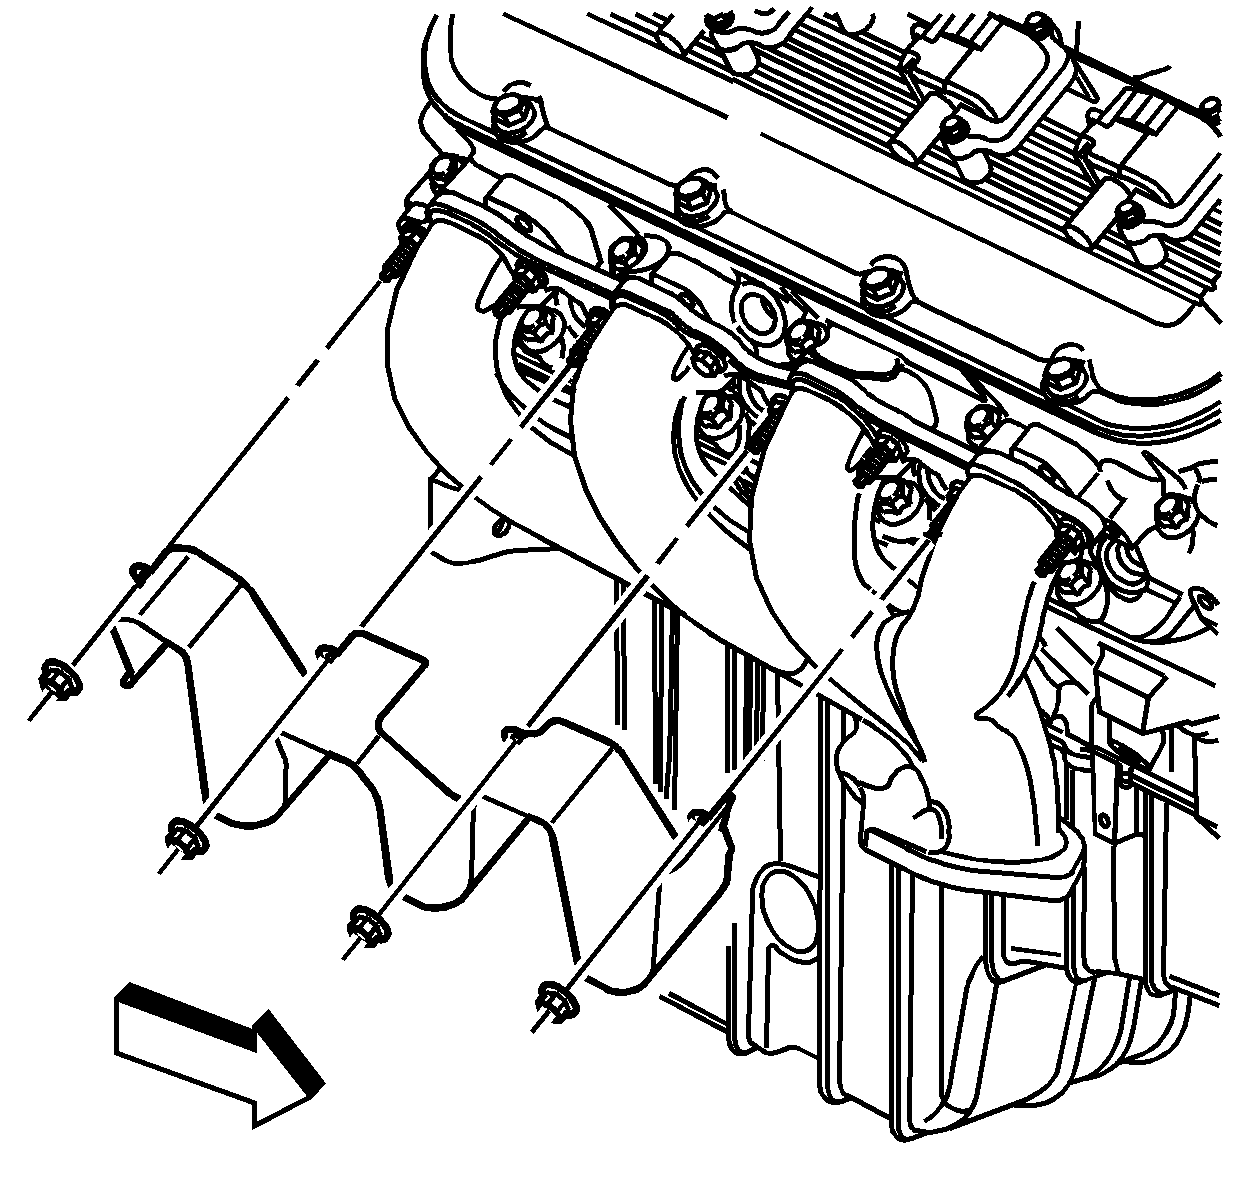
- Remove the exhaust manifold heat shield nuts.
- Remove the exhaust manifold heat shield.
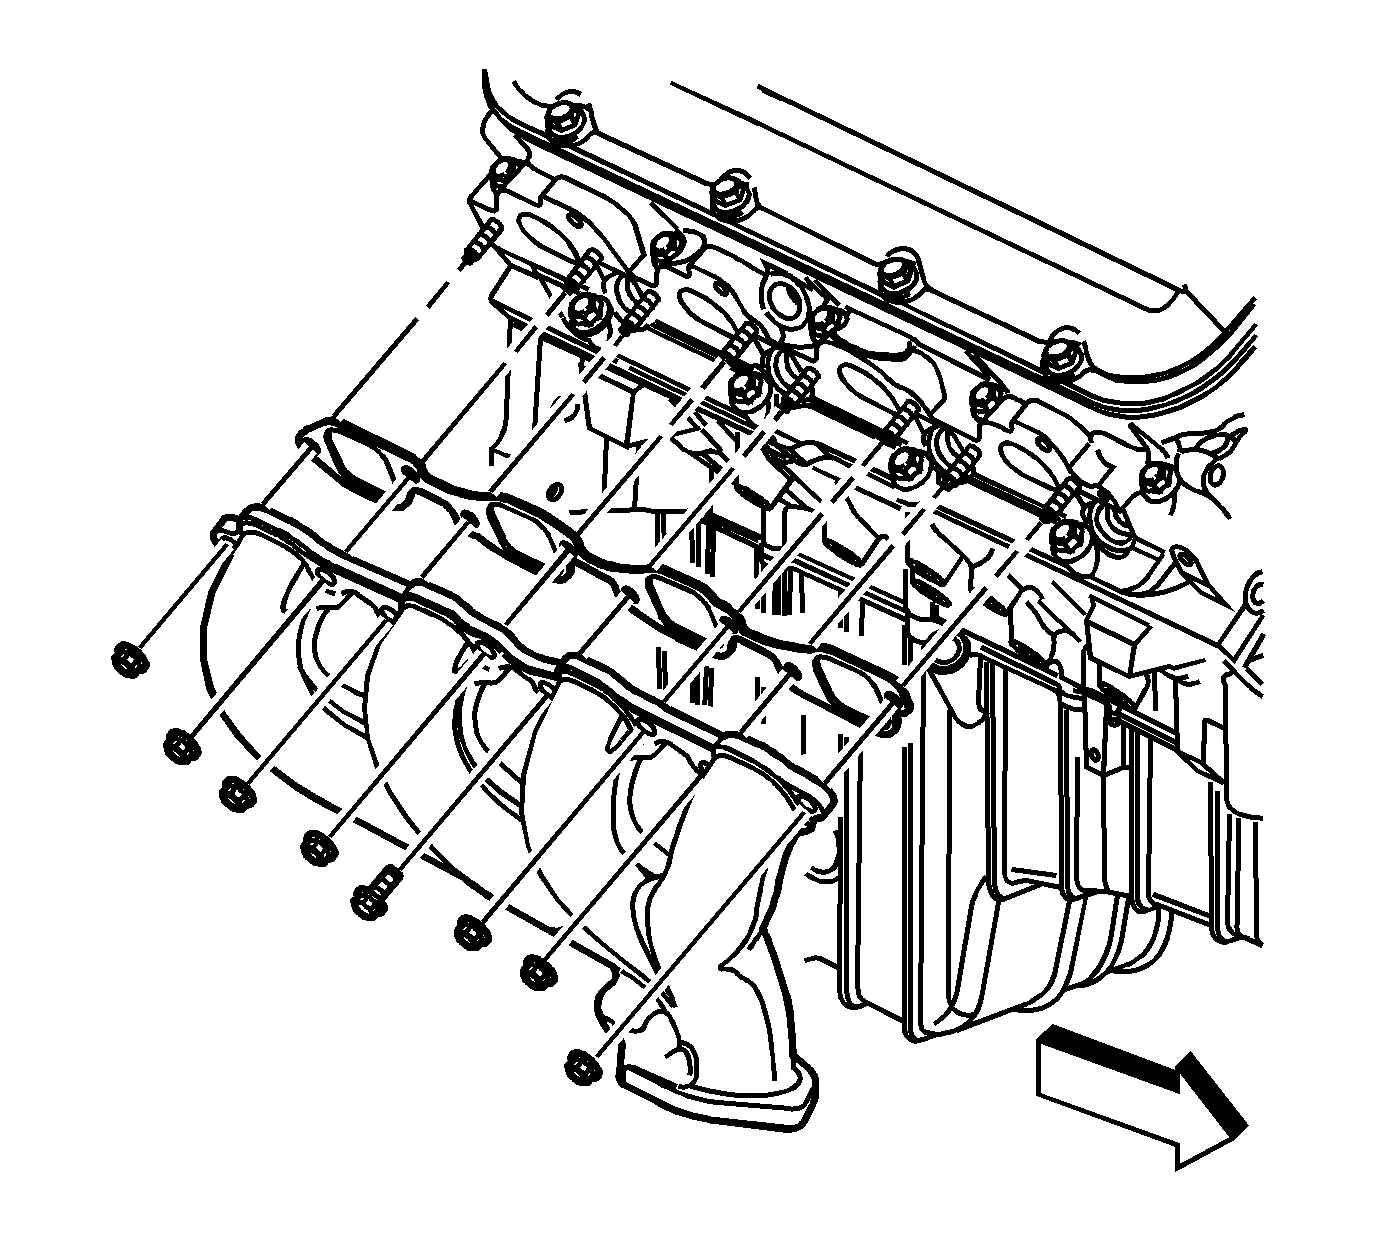
- Remove the exhaust manifold bolt and nuts.
- Remove the exhaust manifold and gasket. Discard the gasket.
- Clean and inspect the exhaust manifold.
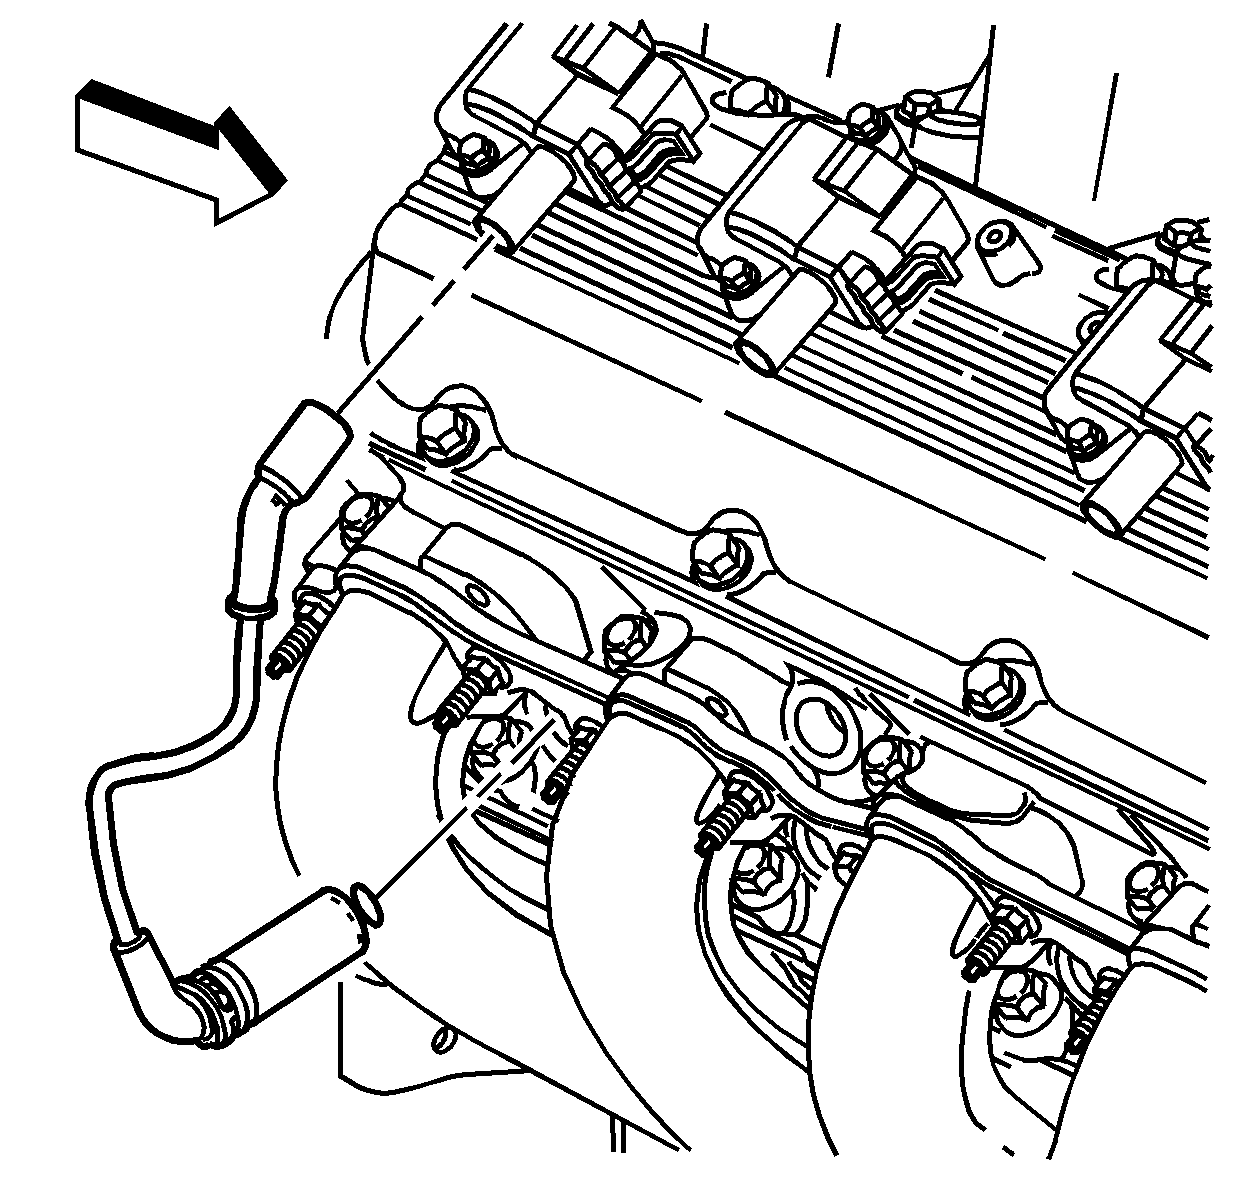
Important: Twist the spark plug boot one-half turn in order to release the boot. Pull on the spark plug boot only. Do not pull on the spark plug wire or the wire could be damaged.
Installation Procedure
- Install a NEW exhaust manifold gasket.
- Install the exhaust manifold.
- Install the exhaust manifold bolt and nuts.
- Install the exhaust manifold heat shield.
- Install the exhaust manifold heat shield nuts.
- Install the starter motor heat shield.
- Install the starter motor heat shield bolt and nut.
- Install the EGR pipe and NEW gaskets.
- Install the EGR pipe nuts to the exhaust manifold.
- Install the EGR pipe bolts to the EGR adapter plate.
- Install the EGR pipe bracket bolt.
- Install the spark plugs. Refer to Spark Plug Replacement in Engine Controls - 8.1L.
- Install the spark plug wires to the spark plugs and ignition coils.
- Raise and suitably support the vehicle with safety stands.
- Raise the muffler pipe into position.
- Install the exhaust pipe seal.
- Install the exhaust manifold pipe nuts. The left side is shown, the right side is similar.
- Lower the vehicle.

Notice: Use the correct fastener in the correct location. Replacement fasteners must be the correct part number for that application. Fasteners requiring replacement or fasteners requiring the use of thread locking compound or sealant are identified in the service procedure. Do not use paints, lubricants, or corrosion inhibitors on fasteners or fastener joint surfaces unless specified. These coatings affect fastener torque and joint clamping force and may damage the fastener. Use the correct tightening sequence and specifications when installing fasteners in order to avoid damage to parts and systems.
Tighten
| • | Tighten the exhaust manifold bolt to 35 N·m (26 lb ft). |
| • | Tighten the exhaust manifold nuts to 16 N·m (12 lb ft). |

Tighten
Tighten the exhaust manifold heat shield nuts to 25 N·m (12 lb ft).


Tighten
Tighten the EGR pipe nuts to 30 N·m (22 lb ft).
Tighten
Tighten the EGR pipe bolts to 30 N·m (22 lb ft).
Tighten
Tighten the EGR pipe bracket bolt to 50 N·m (37 lb ft).

Important: Fully install the spark plug wire by pushing on the exposed end of the spark plug boot. Do not push the spark plug wire on to the spark plug by using the metal heat shield.

Tighten
Tighten the exhaust manifold pipe nuts to 50 N·m (37 lb ft).
