WINDNOISE (SERVICE PROCEDURE)

VEHICLES AFFECTED: 1990 LUMINA SEDANS
Customer comments regarding windnoise on 1990 Lumina models may be addressed by using the procedures on the individual items listed in this bulletin.
Proper diagnosis may be made with a variety of tools and methods including stethoscopes, dust guns, sonic instruments, visual inspections, dollar bill method and etc. It is important to remember that windnoise can best be described as air leaking from the inside of the vehicle outward while traveling at highway speeds. Turbulence or windrush is best described as air passing over and around body openings and mouldings.
Prior to any repairs, the front door, auxiliary weatherstrips and door opening weatherstrips should be visually inspected for proper gaps, fits, weatherstrip contact, and sealing. The vehicle should also be road tested to determine the location and degree of windnoise/turbulence on the vehicle.
Some primary areas of windnoise may be:
1. Upper "A" pillar door opening weatherstrip to door frame.
2. Front window run channel to door frame.
3. Rear door vent glass retainer to door frame.
The recommended materials to be used with the following procedures are:
WEATHERSTRIP SHIMMING MATERIAL: USE ------------------------------ Glass setting tape, P/N RTG1/16....1/16 (.062) X 1 1/2"
Source: American Dominion Sure Seal Products
GLASS SETTING TAPE 1/16 (.062) X 1 1/2 RTG 1/16 ------------------ Dominion Sure Seal Limited American Sure Seal Inc. 5496 Gorvan Drive 26800 Michigan Ave. Mississauga, Ont. L4W3E6 Inkster, MI. 48141 416-625-7900 313-561-3060
SEALING MATERIAL FOR WEATHERSTRIP AND SHIM: USE
PERMATEX (R) CLEAR SUPER AUTO SEAL PART NO. 84 05 OZ. TUBE
SILICONE RUBBER FOR DOOR FRAME SEALING: USE
3M (R) SUPER SILICONE SEALER - 08661 CLEAR - 3 oz. TUBE - 08662 BLACK - 3 oz. TUBE
AMERICAN/DOMINION SURE SEAL SILICONE SEALANT (R) ------------------------------------------------ CZC clear - 12 oz. cartridge CDB black - 12 oz. cartridge LZC clear - 04 oz. tube LZB black - 04 oz. tube
PERMATEX (R) RTV SILICONE ADHESIVE SEALANT
66c clear - 11 oz. cartridge 16c black - 11 oz. cartridge 66b clear - 03 oz. tube 16b black - 03 oz. tube
"We believe these sources and their products to be reliable. There may be additional manufacturers of such products. General Motors does not endorse, indicate any preference for or assume any responsibility for the products from these firms or for any such items which may be available from other sources."
1. DOOR OPENING WEATHERSTRIP TO FRAME ----------------------------------
If test indicates noise in this area, the weatherstrip to door frame contact can be checked using dollar bill method.
DOLLAR BILL METHOD:
Place a dollar or similar size piece of paper between weatherstrip and contact surface, then close door.
Slowly withdraw the bill or paper after the door is closed to check the amount of pressure on the weatherstrip.
There should be a medium amount of resistance as the bill or paper is slowly withdrawn. Continue around the entire seal area. If there is little or no resistance, it indicates there is insufficient contact to form a good seal. This test may indicate that the door or weatherstrip is out of alignment.
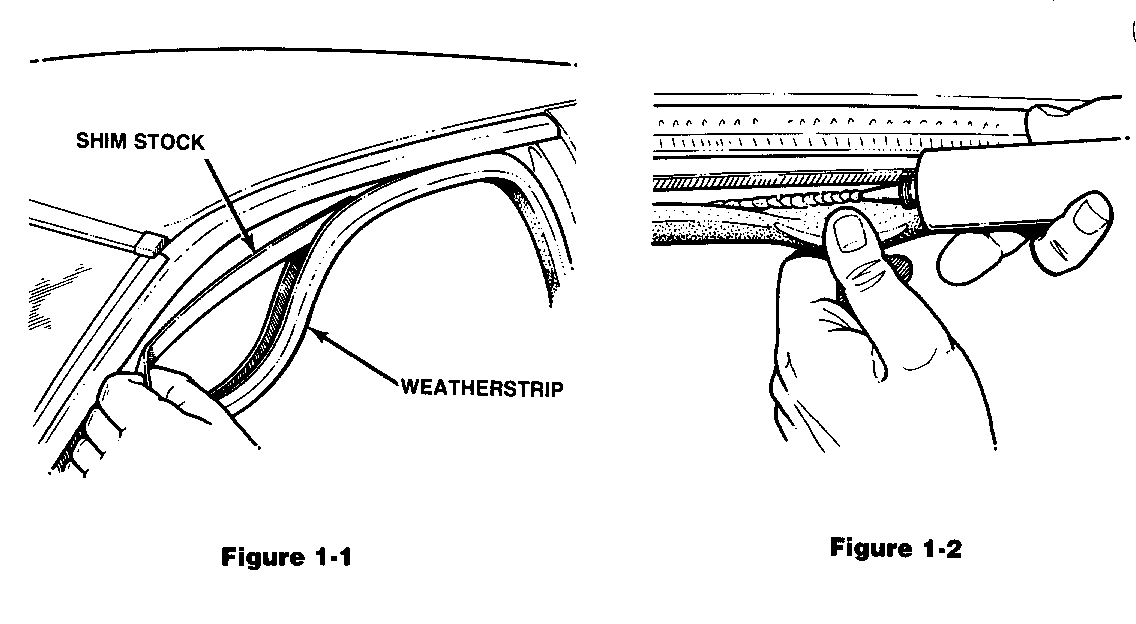
- Remove garnish moulding at door opening. - Pull down weatherstrip in area of light contact. - After determining length of shim stock, remove 1/4" off the width of the material, fold in half and properly position on flange in area to be shimmed. - Shim weatherstrip outboard using glass setting tape (Figure 1-1). - Install weatherstrip over shim material. - Reinstall garnish moulding. - Seal shim and weatherstrip to body using clear auto sealer (Figure 1-2). - With clean shop towel wipe excess clear auto sealer from area of repair - Clean any excessive sealer from weatherstrip with shop towel lightly coated with mineral spirits.
IMPORTANT: If more contact is required adjust lower door outboard SLIGHTLY (approximately 1 to 1.5 mm) by loosening LOWE DOOR SIDE HINGE NUTS, and moving door outboard, tighte nuts to 27 N.m. (20 ft. lbs.)
NOTICE: MOVING DOOR OUTBOARD MORE THAN SPECIFIED AMOUNT MAY CREATE AN UNSEALED CONDITION AT THE BOTTOM OF THE DOOR FRAME TO WEATHERSTRIP.
2. FRONT WINDOW RUN CHANNEL TO DOOR FRAME -------------------------------------- With door trim panel, upper seat belt attachment, inner belt strip and door frame inside garnish moulding removed:
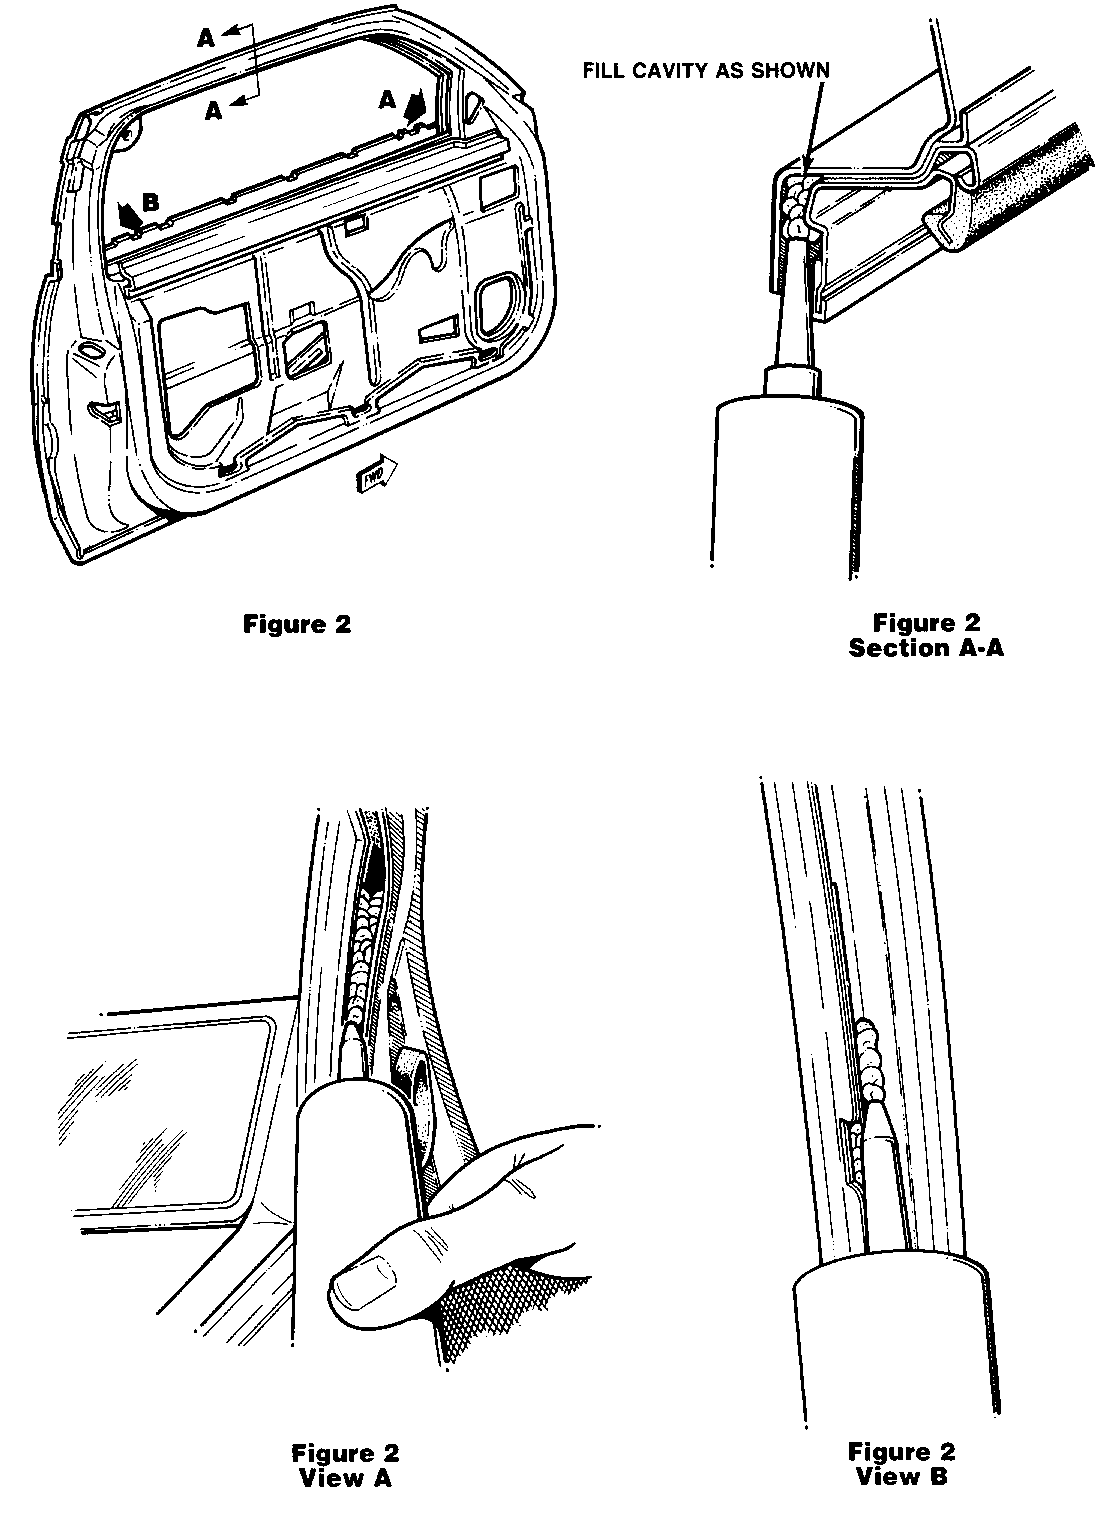
A. Carefully inject silicone sealer (clear or black) into the area between the door flange and window weatherstrip retainer see Figure 2-section A-A. Inject enough material until slight squeeze out is seen. Apply material the full length of the upper frame portion from the top of the foam pad at the mirror patch area to the rear upper corner at belt attachment.
B. Starting at the foam pad between the front run channel and the inside door flange at front, fill cavity from that pad downward to approximately one inch below the belt line (See Figure 2, view A).
C. With the same material, starting approximately one inch below the belt line at the rear of door frame (See Figure 2, view B), fill cavity to the rear upper corner of the door frame.
D. Reinstall garnish moldings, inner belt strip, upper seat belt attachment and door trim panel.
3. REAR DOOR VENT GLASS RUBBER CHANNEL TO DOOR FRAME ------------------------------------------------- After removing door trim panel inner seal strip retainer and door frame inside garnish moulding:
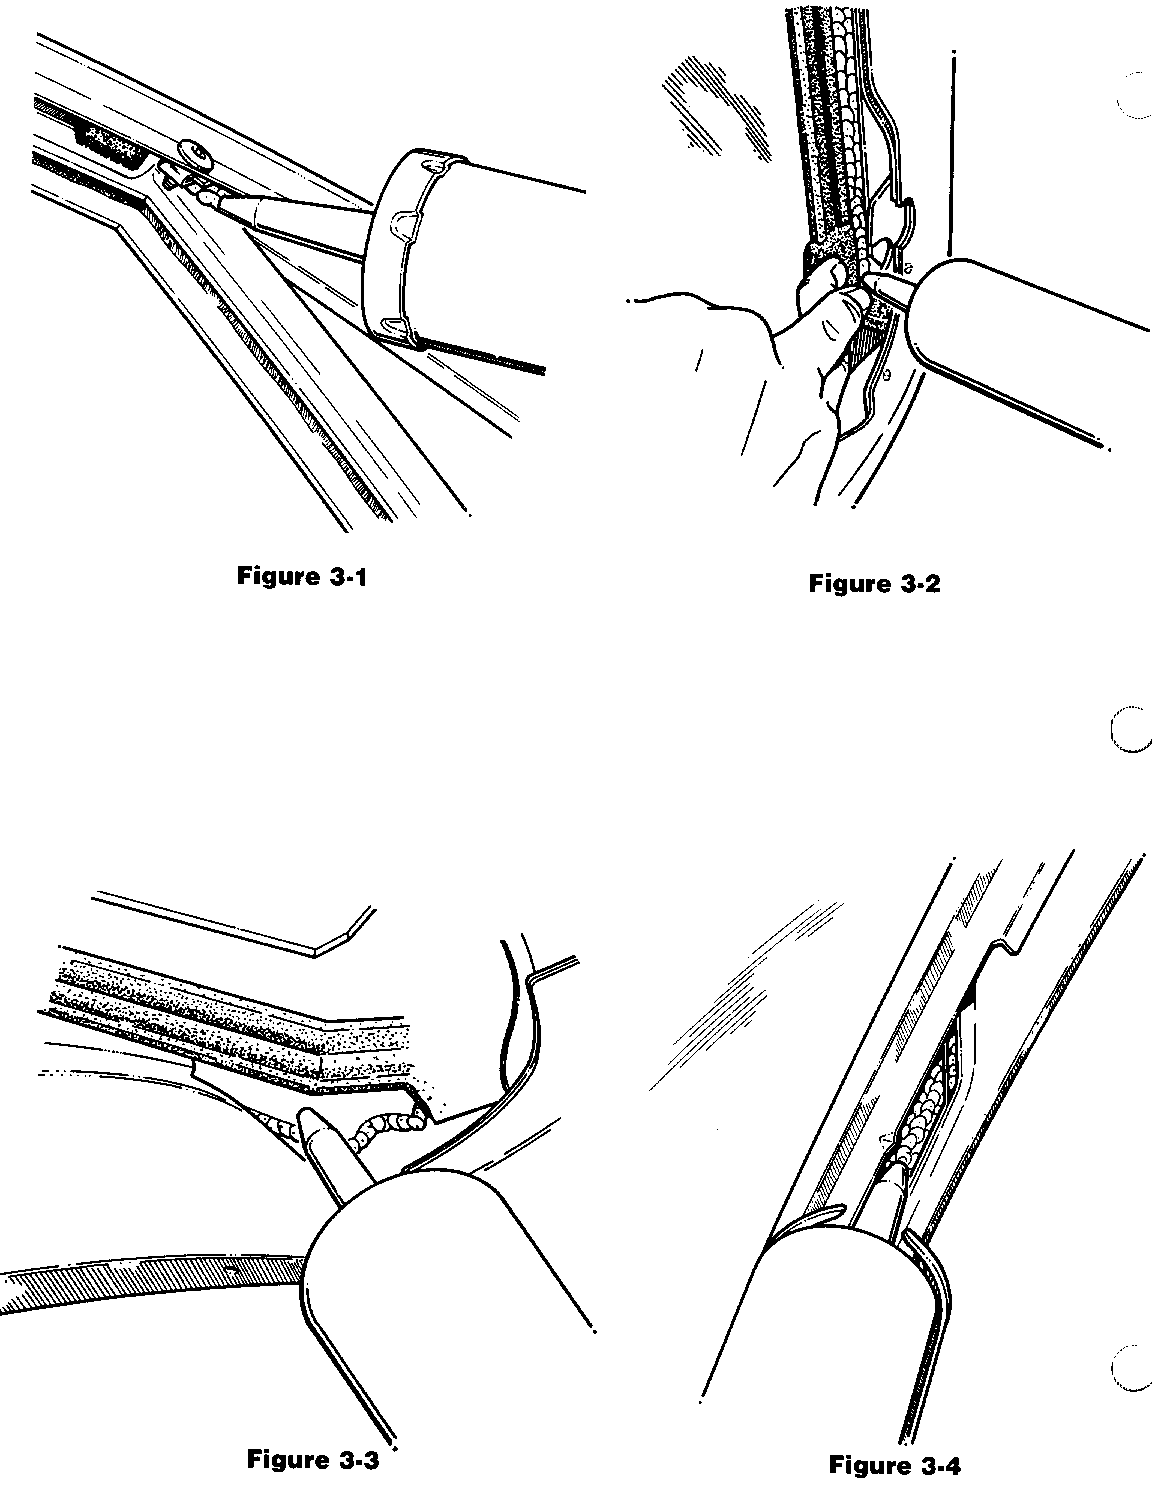
A. Carefully inject silicone rubber (clear or black) into area between the door flange and stationary glass rubber channel at the top of the division post (Figure 3-1). Inject enough of the material until slight squeeze out is seen to insure sealing of this area.
B. While holding the flap out of the way, apply a bead of the the same material between the inner edge of the rubber channel and the outer edge of the door frame flange as shown in (Figure 3-2). Apply the bead the full length of the frame portion until slight squeeze out is seen.
C. Continue down the door frame flange to the lower rear corner of the rubber channel, sealing all rubber to frame surfaces as shown in Figure 3-3.
D. Inject enough material into cavities in the door frame to plug or seal the holes as shown in Figure 3-4.
E. Reinstall door frame inside garnish moulding, inner seal strip retainer and trim panel.
IMPORTANT: Operations using silicone rubber, some minor odour may be present and will dissipate after a short period of time.
Use most applicable Labour Operation and time from the Canadian Labour Time Guide.


General Motors bulletins are intended for use by professional technicians, not a "do-it-yourselfer". They are written to inform those technicians of conditions that may occur on some vehicles, or to provide information that could assist in the proper service of a vehicle. Properly trained technicians have the equipment, tools, safety instructions and know-how to do a job properly and safely. If a condition is described, do not assume that the bulletin applies to your vehicle, or that your vehicle will have that condition. See a General Motors dealer servicing your brand of General Motors vehicle for information on whether your vehicle may benefit from the information.
