SERVICE MANUAL UPDATE-SEC. 8A SCHEMATICS AND DIAGNOSTICS

SUBJECT: SERVICE MANUAL UPDATE - SECTION 8A SCHEMATICS AND DIAGNOSTICS ADDITIONAL OPTION AD
VEHICLES AFFECTED: 1990 CHEVROLET LUMINA
Electrical information for the Power Seat Option content is being supplied to supplement the 1990 Section 8A Service Manual.
COMPONENT LOCATION
Component Center.............Behind RH side of I/P, near I/P compartment..........
C200 (106 cavities)..........Behind RH side of I/P..............
C313 (2 cavities)............Under LH front seat
G304.........................Under LH front seat................
S240.........................I/P harness, behind RH side of I/P.....................
TROUBLESHOOTING HINTS
- Try the following checks before doing the System Check.
1. If none of the Seat Functions operate, check the PWR ACC Circuit Breaker by operating the Power Door Locks.
2. If the Rear or Front Height does not function, but the entire seat moves up and down, replace the LH Power Seat Switch.
3. If the entire seat does not move up and down but the rear and front height functions operate properly, replace the LH Power Seat Switch.
- Go to System Check for a guide to normal operation.
- Go to System Diagnosis for diagnostic tests.
SYSTEM CHECK
- Use the System Check Table as a guide to normal operation.
SYSTEM CHECK TABLE ACTION NORMAL RESULT ---------------------------------- Move Rear Height Rear of seat moves Switch up and down up and down Move Front Height Front of seat moves Switch up and down up and down Move the Entire Seat Entire seat moves Switch up and down up and down Move the Entire Seat Entire seat moves Switch forward and forward and backward backward
Refer to System Diagnosis when a result is not normal.
SYSTEM DIAGNOSIS
- Diagnostic steps for the symptoms listed in the following table are listed after the table.
SYMPTOM TABLE SYMPTOM FOR DIAGNOSIS ---------------------------------- None of the seat Do test A functions work Some, but not all Do test B seat functions work
A: NONE OF THE SEAT FUNCTIONS WORK
Connect: TEST LAMP
At: LH POWER SEAT SWITCH CONNECTOR (Disconnected)
Connect Correct For Between Result Diagnosis --------------------------------- F (ORN/BLK) Test lamp See 1 & Ground lights ------------------------------------- F (ORN/BLK) Test lamp See 2 & C (BLK) lights ------------------------------------ - If all the results are correct, reconnect the connector and go to Test B.
1. Check ORN/BLK (60) wire for an open (see schematic).
2. Check BLK (150) wire for an open (see schematic).
B: SOME, BUT NOT ALL SEAT FUNCTIONS WORK
Connect: TEST LAMP
At: LH SEAT MOTOR CONNECTORS (Connected)
Condition:
- Operate Entire Seat Switch in the FORWARD and BACK positions
Connect Correct For Between Result Diagnosis -------------------------------------------------
C3/B Test lamp (LT GRN) lights See 1 & A (TAN) ------------------------------------------------- - Rear Height: Up and Down - Entire Seat: Up and Down -------------------------------------------------- C2/B Test lamp (LT BLU) & lights See 1 A (YEL) ------------------------------------------------- - Front Height: Up and Down - Entire Seat: Up and Down ------------------------------------------------- CI/A Test lamp (DK BLU) & lights See 1 B (DK GRN) ------------------------------------------------- - If all the results are correct, replace the suspect Motor(s). See the Body Service Manual Section 9 for replacement procedures.
1. Check the wires from the LH Power Seat Switch. Replace the LH Power Seat Switch if the wires are OK.
POWER SEATS
CIRCUIT OPERATION
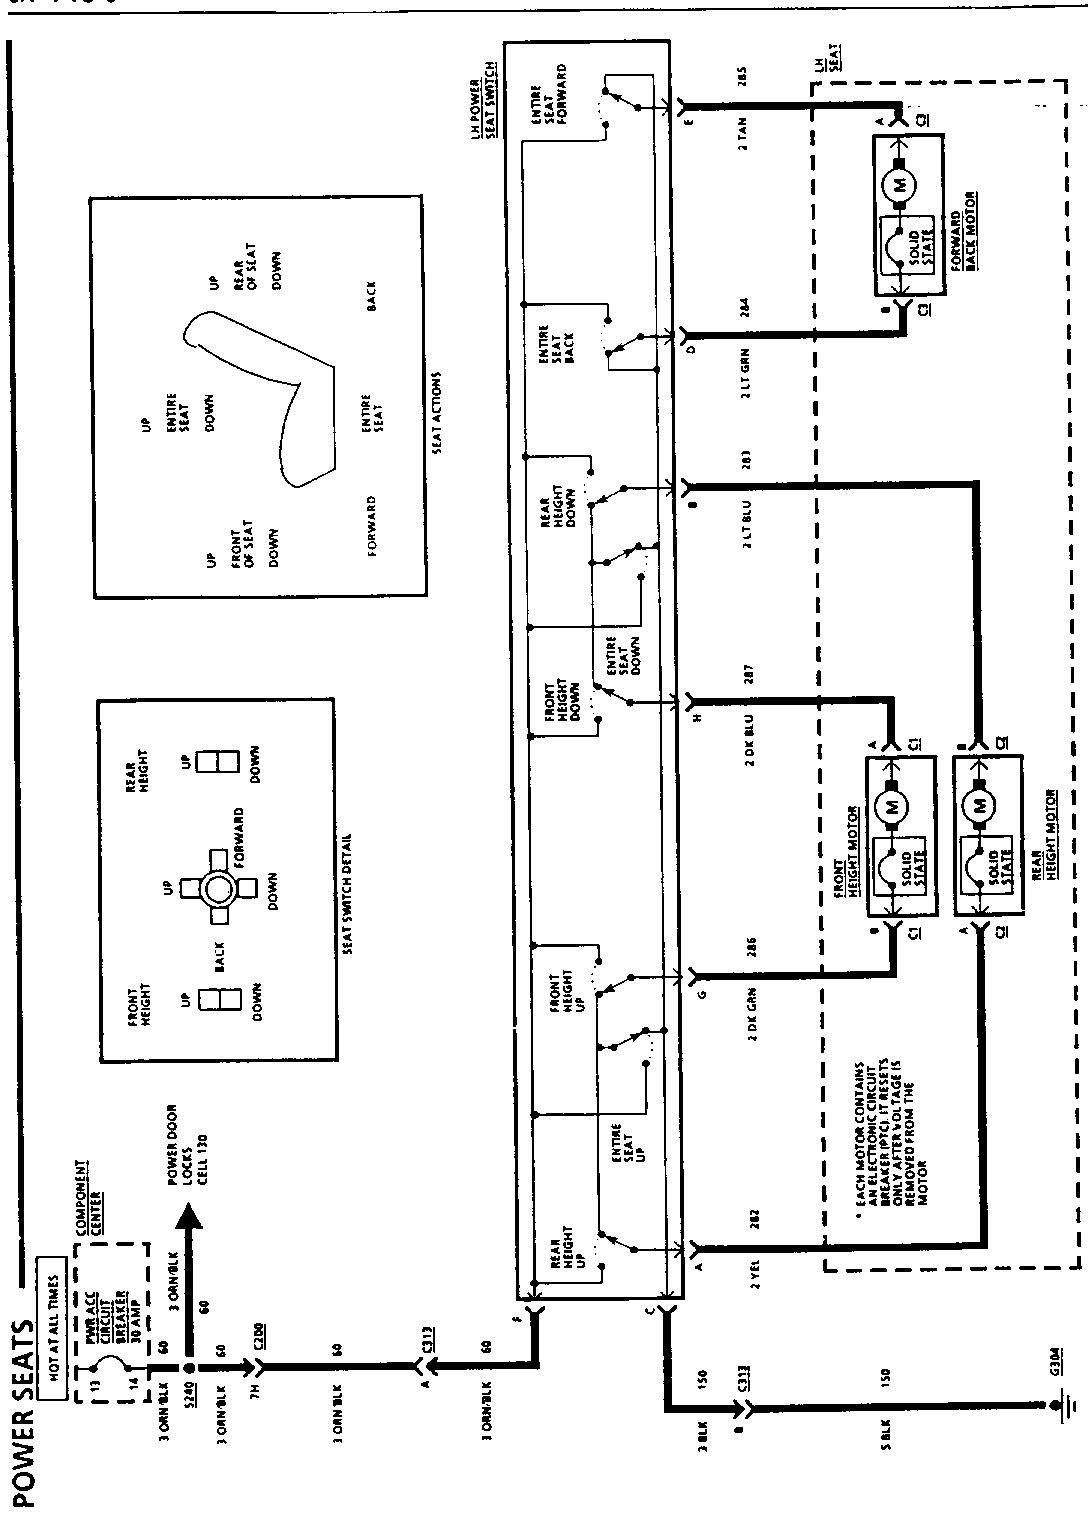
There are three reversible motors that operate the Power Seat. The front and back height of the seat are operated by different motors. They can be raised or lowered independently of each other. When the Entire Seat Switch is pushed to the UP or DOWN position, both motors run to move the front and back of the seat at the same time.
The Forward-Back Motor is operated by the Entire Seat Switch. When it is held in the BACK position, battery voltage is applied through the switch contacts to the LT GRN wire and the Forward-Back Motor. The motor is grounded through the TAN wire and the contact of the Back Switch to ground G304. The motor runs to drive the seat backward until the switch is re- leased.
In the FORWARD position, the TAN wire receives battery voltage and the LT GRN wire is grounded. This reversed polarity causes the motor to run in the opposite direction and drive the seat forward.
The Front and Rear Height Motors work in a similar way when the Front or Rear Height Switch is operated.
To raise the entire seat, the Entire Seat Switch is held in the UP position. This applies battery voltage to both the YEL and DK GRN wires and to the Front and Rear Height Motors. The motors are grounded through the Entire Seat Down Switch contacts to ground G304. Both motors run to drive the entire seat up. A similar action occurs to move the entire seat down.
Each motor contains a self-resetting circuit breaker to protect it from overload.
POWER SEATS
COMPONENT LOCATION Component Center..............Behind RH side of I/P, near I/P compartment................
C200 (106 cavities).......... Behind RH side of I/P....................
C313 (2 cavities) ........ Under LH front seat
G304........................ Under LH front seat.......................
S240........................ I/P harness, behind RH side of I/P........................... POWER SEATS -----------
TROUBLESHOOTING HINTS
- Try the following checks before doing the System Check.
1. If none of the Seat Functions operate, check the PWR ACC Circuit Breaker by operating the Power Door Locks.
2. If the Rear or Front Height does not function, but the entire seat moves up and down, replace the LH Power Seat Switch.
3. If the entire seat does not move up and down but the rear and front height functions operate properly, replace the LH Power Seat Switch.
- Go to System Chock for a guide to normal operation.
- Go to System Diagnosis for diagnostic tests.
SYSTEM CHECK
- Use the System Check Table as a guide to normal operation.
SYSTEM CHECK TABLE ACTION NORMAL RESULT
Move Rear Height Rear of seat moves Switch up and down up and down Move Front Height Front of seat moves Switch up and down up and down
Move the Entire Seat Entire seat moves Switch up and down up and down Move the Entire Seat Entire seat moves Switch forward and forward and backward backward
- Refer to System Diagnosis when a result is not normal.
SYSTEM DIAGNOSIS
- Diagnostic stops for the symptoms listed in the following table are listed after the table.
SYMPTOM TABLE
SYMPTOM FOR DIAGNOSIS
None of the seat Do test A functions work Some but not all Do test B seat functions work
A: NONE OF THE SEAT FUNCTIONS WORK
Connect: TEST LAMP
At: LH POWER SEAT SWITCH
CONNECTOR (Disconnected)
Connect Correct For Between Result Diagnosis ---------------------------------------- F (ORN/BLK) Test lamp See 1 & Ground lights ---------------------------------------- F (ORN/BLK) Test lamp See 2 & C (BLK) lights ---------------------------------------- If all the results are correct, reconnect the connector and go to Test B.
1. Check ORN/BLK (60) wire for an open (see schematic).
2. Check BLK (150) wire for an open (see schematic).
B: SOME, BUT NOT ALL SEAT FUNCTIONS WORK ------------------------------------- Connect: TEST LAMP
At: LH SEAT MOTOR CONNECTORS (Connected)
Condition:
- Operate Entire Seat Switch in the FORWARD and BACK positions -------------------------------------- Connect Correct For Between Result Diagnosis -------------------------------------- C3/B Test lamp (LT GRN) lights See 1 & A (TAN) -------------------------------------- - Rear Height: Up and Down - Entire Seat: Up and Down -------------------------------------- C2/B Test lamp (LT BLU) & lights A (YEL) -------------------------------------- - Front Height: Up and Down - Entire Seat: Up and Down
CI/A Test lamp (DK BLU) & lights See 1 B (DK GRN-) -------------------------------------
- If all the results are correct, replace the suspect Motor(s) See the Body Service Manual Section 9 for replacement procedures.
1. Check the wires from the LH Power Seat Switch. Replace the LH Power Seat Switch if the wires are OK.
POWER SEATS
CIRCUIT OPERATION
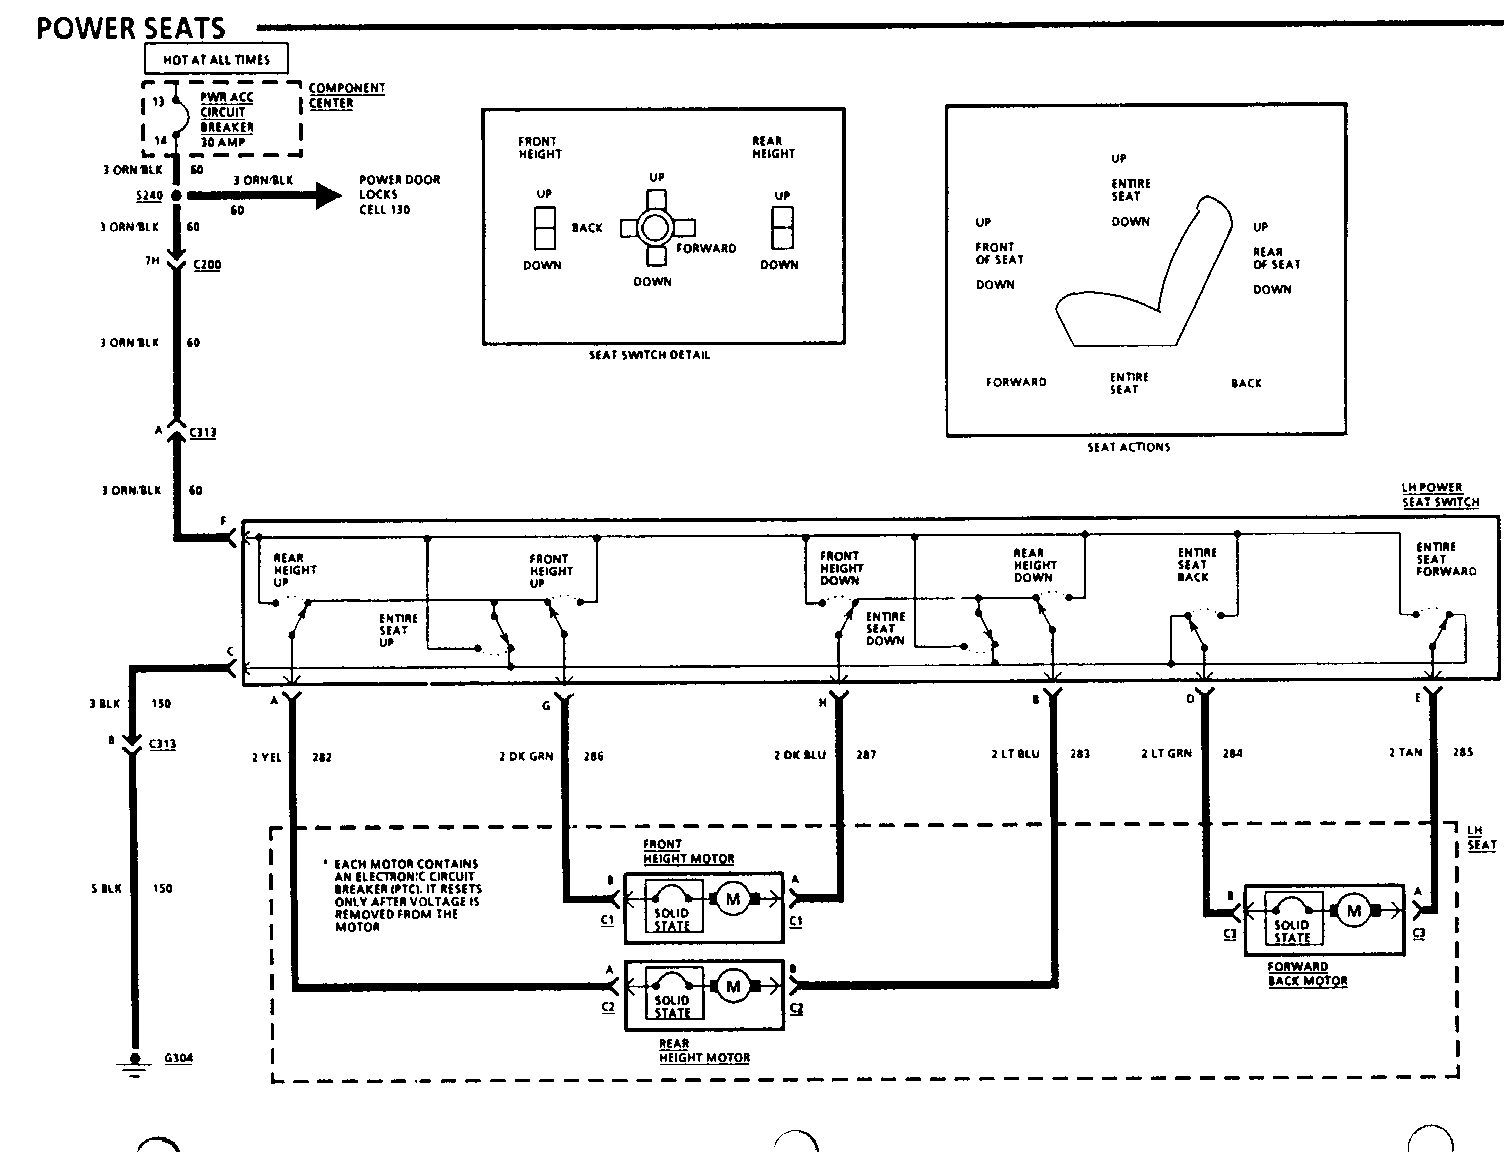
There are three reversible motors that operate the Power Seat. The front and back height of the seat are operated by different motors. They can be raised or lowered independently of each other. When The Entire Seat Switch is pushed to the UP or DOWN position, both motors run to move the front and back of the seat at the same time.
The Forward-Back Motor is operated by the Entire Seat Switch. When it is held in the BACK position, battery voltage is applied through the switch contacts to the LT GRN wire and the Forward-Back Motor. The motor is grounded through the TAN wire and the contact of the Back Switch to ground G304. The motor runs to drive the seat backward until the switch is re- leased.
In the FORWARD position, the TAN wire receives battery voltage and the LT GRN wire is grounded. This reversed polarity causes the motor to run in the opposite direction and drive the seat forward.
The Front and Rear Height Motors work in a similar way when the Front or Rear Height Switch is operated.
To raise the entire seat, the Entire Seat Switch is held in the UP position. This applies battery voltage to both the YEL and DK GRN wires and to the Front and Rear Height Motors. The motors are grounded through the Entire Seat Down Switch contacts to ground G304. Both motors run to drive the entire seat up. A similar action occurs to move the entire seat down.
Each motor contains a self-resetting circuit breaker to protect it from overload.


General Motors bulletins are intended for use by professional technicians, not a "do-it-yourselfer". They are written to inform those technicians of conditions that may occur on some vehicles, or to provide information that could assist in the proper service of a vehicle. Properly trained technicians have the equipment, tools, safety instructions and know-how to do a job properly and safely. If a condition is described, do not assume that the bulletin applies to your vehicle, or that your vehicle will have that condition. See a General Motors dealer servicing your brand of General Motors vehicle for information on whether your vehicle may benefit from the information.
