SERV MANUAL UPDATE-SEC.8B LIGHTING SYSTEM & HORNS

SUBJECT: MANUAL UPDATE - SECTION 8B LIGHTING SYSTEM AND HORNS (AIMING THE 55 x 135 MINI-QUAD HEADLAMP)
VEHICLES AFFECTED: 1991 GRAND PRIX COUPE
* THIS BULLETIN HAS BEEN REVISED TO ADD ADDITIONAL INFORMATION REGARDING HEADLAMP REPLACEMENT, AND TO CLARIFY THE AIMING PROCEDURES.
GENERAL DESCRIPTION
No external aimer is required for the 55 x 135 mini-quad headlamp system unless the vehicle has been damaged in a collision.
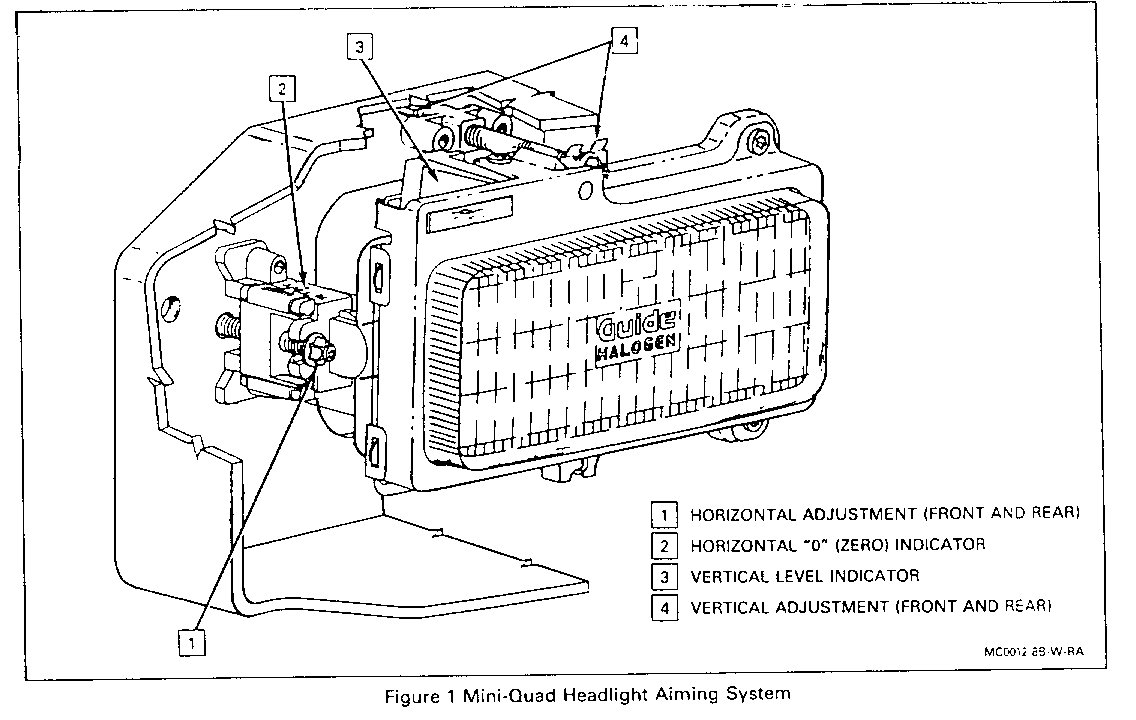
Vertical aim is accomplished by reading the level bubble with the vehicle sitting on a level surface and adjusting as needed. Horizontal aim has been factory preset and the indicator should point to "O" (Zero).
HEADLAMP REPLACEMENT - (COUPE)
Remove or Disconnect
1. Open hood. 2. Raise headlamp access panel. 3. Electrical connector from headlamp. 4. Screw (1) from headlamp support panel. 5. Bottom screws (2) from headlamp frame. 6. Assembly, by lifting straight up. - DO NOT apply pressure to plastic bubble of vertical aim indicator. 7. Screw (2) from headlamp retaining ring. 8. Rotate the headlamp retaining ring away from the headlamp. 9. Headlamp.
Install or Connect
1. New headlamp. 2. Screws (2) to headlamp retaining ring. Tighten - Screws to 2 Nm (18 in.lbs.) 3. Assembly. - Make sure two guide tabs drop into headlamp support panel. Tighten - Bottom screws to 5 Nm (44 in.lbs.) - Screw to headlamp support panel to 5 Nm (44 in.lbs.) 4. Electrical connector to headlamp. 5. Lower headlamp access panel. 6. Close hood.
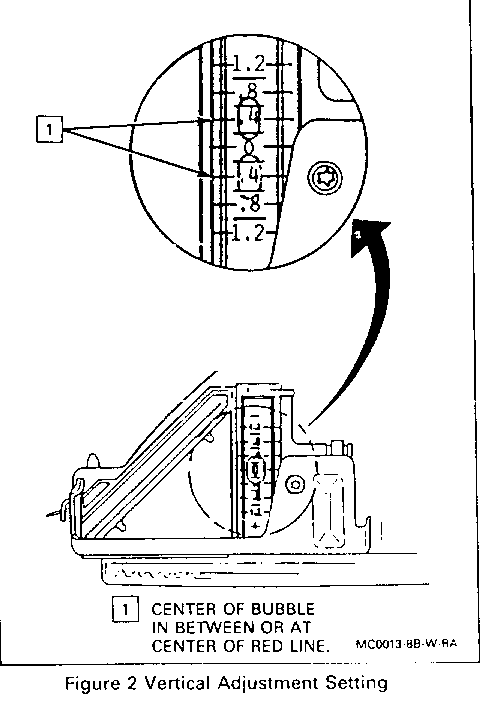
AIMING - Refer to Figures 1 and 2
1. Prepare the vehicle:
a. Make sure all components are in place, if other service has been done to the vehicle. b. Place the vehicle on a level surface.
IMPORTANT: VEHICLE MUST BE LEVEL. IF NECESSARY, PADS MAY BE USED ON UNEVEN FLOORS.
c. Stop all other work on the vehicle. d. Make sure the vehicle has 1/2 tank of fuel or less. e. Close doors. f. Rock vehicle sideways.
NOTICE: HORIZONTAL AIM OF HEADLAMP MUST BE DONE FIRST. ADJUSTING VERTICAL AIM FIRST WILL RESULT IN INCORRECT HEADLAMP AIM.
2. Assure horizontal adjuster is set to "O" (Zero) mark:
a. If vehicle has been damaged, refer to "Aiming Headlamps After Collision" in this update.
b. If horizontal pointer is not set at "O" (Zero), turn the horizontal pointer aiming screw until pointer is lined up with "O".
3. Adjust the vertical aim by turning the vertical aiming screw until the bubble in the level is centered at "O" (Zero). If fuel tank is near empty to 1/4 full, adjust aim to center bubble at minus (-) .3 degrees. This will reduce the chance of raising the headlamps into oncoming driver's eyes when the fuel tank is filled.
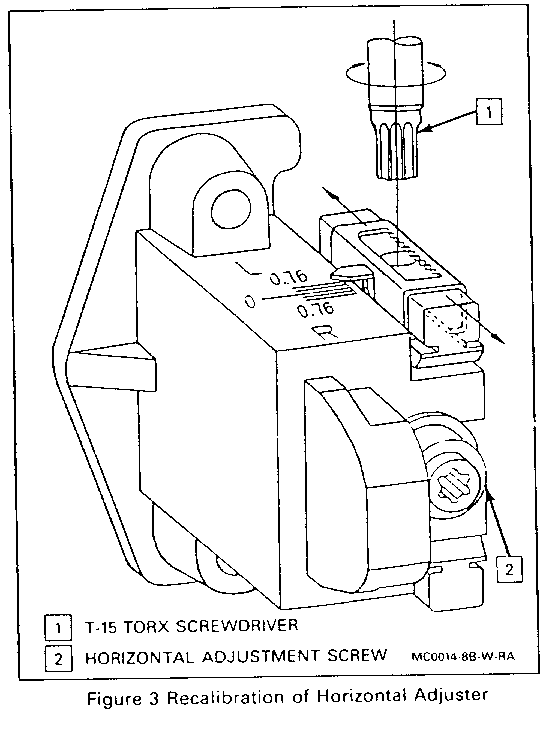
AIMING HEADLAMPS AFTER A COLLISION - Refer to Figure 3
1. Prepare the vehicle.
A. Make sure all components are in place, if other service has been done to the vehicle.
B. Place the vehicle on a level surface.
IMPORTANT: Vehicle must be level, if necessary, pads may be used on uneven floors.
C. Stop all other work on the vehicle.
D. Close doors.
E. Rock vehicle sideways
NOTICE: HORIZONTAL AIM OF HEADLAMPS MUST BE DONE FIRST. ADJUSTING VERTICAL AIM FIRST WILL RESULT IN INCORRECT HEADLAMP AIM.
2. Headlamp aim may be accomplished using a wall and visual aiming as described in Motor Vehicle Manufacture's Association (M.V.M.A.) Vehicle Inspection Handbook, Section 5, "Lighting and Inspection", 1990 edition.
3. It may be necessary to recalibrate the horizontal adjuster after a collision. This is done AFTER completion of the wall aiming procedure. Use a T-15 Torx screwdriver to reset the horizontal aim pointer to "0" (Zero).


General Motors bulletins are intended for use by professional technicians, not a "do-it-yourselfer". They are written to inform those technicians of conditions that may occur on some vehicles, or to provide information that could assist in the proper service of a vehicle. Properly trained technicians have the equipment, tools, safety instructions and know-how to do a job properly and safely. If a condition is described, do not assume that the bulletin applies to your vehicle, or that your vehicle will have that condition. See a General Motors dealer servicing your brand of General Motors vehicle for information on whether your vehicle may benefit from the information.
