CAMPAIGN: AUX. REAR SPRING NOT INSTALLED

Models: 1991 Lumina Euro With FE2 Suspension (Built at Oshawa Plant #1)
TO. ALL AFFECTED DEALERS:
General Motors of Canada has determined that certain 1991 Chevrolet Lumina Euro model vehicles equipped with FE2 suspensions and built at Oshawa Plant #1 were assembled without auxiliary rear springs. This condition may cause the involved vehicles to have a "mushy" or "undulating" ride. The handling of these vehicles will not be affected.
To correct this condition, dealers are to install the missing auxiliary springs.
VEHICLES INVOLVED:
Only the 5 vehicles listed below are involved:
2G1WN51T5M9164494 2G1WN51T3M9164526 2G1WN51T0M9164502 2G1WN11T5M9164438 2G1MN51T1M9164525
All affected vehicles have been identified by the VIN listing provided to involved dealers with this bulletin. Any dealer not receiving a listing was not shipped any of the affected vehicles.
DEALER CAMPAIGN RESPONSIBILITY:
Dealers are to perform this campaign on all involved vehicles at no charge to owners, regardless of kilometres traveled, age of vehicle, or ownership, from this time forward.
Whenever a vehicle subject to this campaign is taken into your new or used vehicle inventory, or it is in your dealership for service, you are to ensure the campaign correction has been made before selling or releasing the vehicle.
Owners of vehicles recently sold from your new vehicle inventory are to be contacted by the dealer, and arrangements made to make the required modification according to instructions contained in this bulletin.
CAMPAIGN PROCEDURE:
Refer to Section 4 of the Service Policies and Procedures Manual for the detailed procedure on handling Product Campaigns. Dealers are requested to complete the campaign on all transfers as soon as possible.
OWNER NOTIFICATION:
All owners of record at the time of campaign release are shown on the attached computer listing and have been notified by first class mail from General Motors. The listings provided are for campaign activity only and should not be used for any other purpose.
PARTS INFORMATION:
Parts required to complete this campaign are being shipped directly to the assigned dealers. DO NOT ORDER PARTS FROM GMSPO.
PARTS AND LABOUR CLAIM INFORMATION:
Credit for the campaign work performed will be paid upon receipt of a properly completed campaign claim card or DCS transmission in accordance with the following:
Repair Code Description Time Allowance ----------- -------------------------------- ------------- 2A Install Rear Aux. Springs - Both Sides 1.0
Time allowance includes 0.1 hour for dealer administrative detail associated with this campaign. An allowance of $20.00 is included in 2A for parts handling.
SERVICE PROCEDURE:
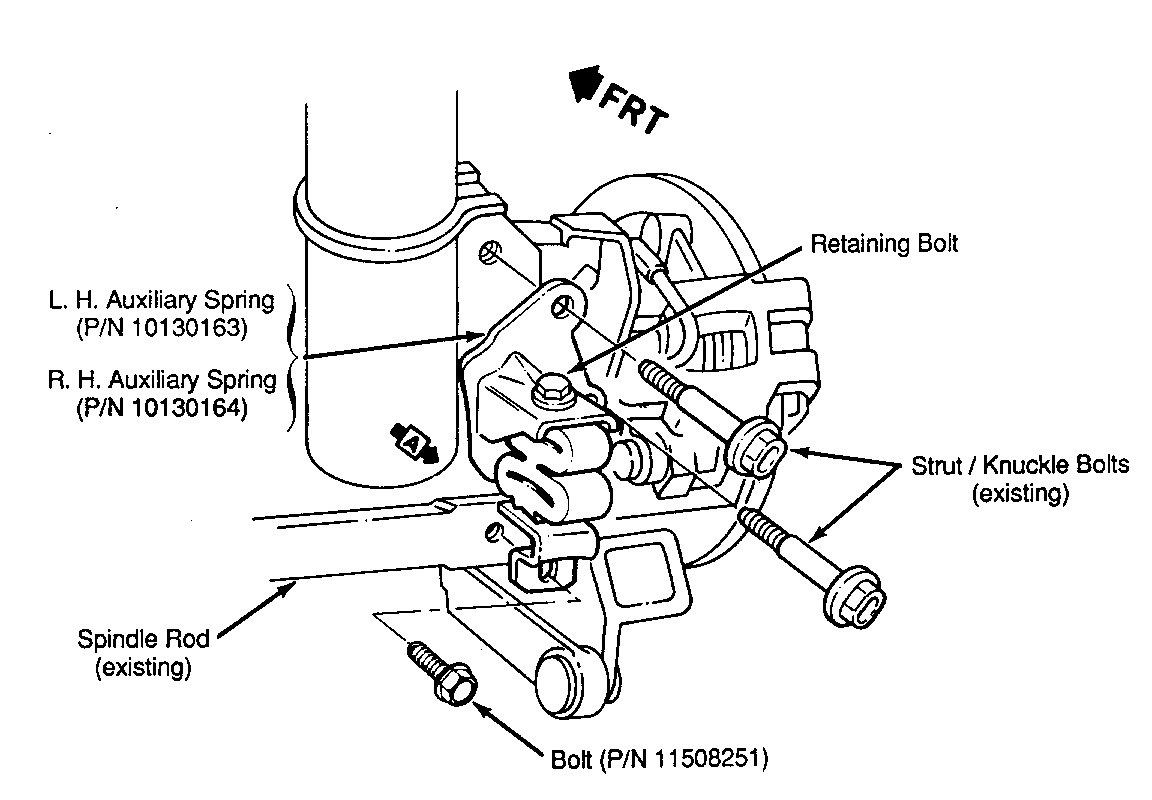
NOTICE: Rear auxiliary spring assemblies are maintained in a compressed state by a bolt between the upper and lower brackets. Removal of this bolt prior to Step 10 of this procedure may result in personal injury.
1. Raise vehicle and support so that rear suspension is hanging down in a full rebound position.
2. Remove both rear wheel and tire assemblies.
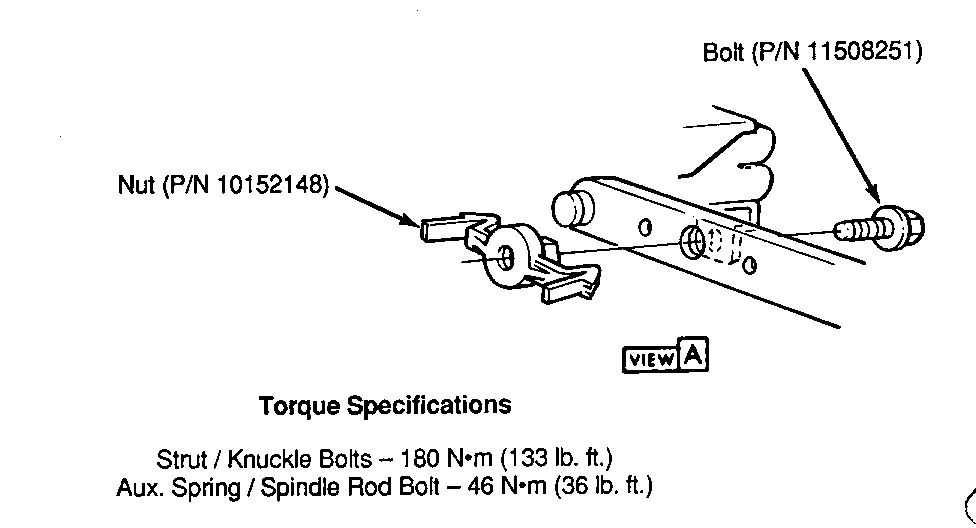
3. Install nuts into holes or rear spindle rods as shown in illustration on page 3 (View A).
4 Remove right-hand upper strut/knuckle attaching bolt.
5. Position new strut/knuckle attaching bolt through right-hand rear auxiliary spring and install into strut and knuckle assembly. Install nut and tighten, leaving attachment loose enough so that auxiliary spring can be rotated into position after removal of lower strut/knuckle bolt.
6. Remove right-hand lower strut/spindle attaching bolt.
7. Rotate auxiliary spring into position and install new strut/knuckle lower attaching bolt and nut.
8. Hand start spindle-rod-to-auxiliary-spring bolt.
9. Torque new upper and lower strut/knuckle attaching bolts to 180 N.m (133 lb. ft.). See illustration on page 4.
10. Slowly remove retaining bolt (Illustration, page 4). This bolt is not to be reinstalled.
11. Torque spindle-rod-to-auxiliary-spring bolt to 46 N.m (36 lb. ft.).
12. Repeat steps 4 through 11 for left-hand auxiliary spring installation.
13. Install wheel and tire assemblies.
14. Lower vehicle.
15. Install Campaign Identification Label.
INSTALLATION OF CAMPAIGN IDENTIFICATION LABEL
Clean surface of radiator upper mounting panel and apply a Campaign Identification Label. Make sure the correct campaign number is inserted on the label. This will indicate that the campaign has been completed.
INSERT CAMPAIGN NUMBER
INSERT DEALER CODE
Dear General Motors Customer:
General Motors of Canada has determined that certain 1991 Chevrolet Lumina Euro model vehicles equipped with FE2 suspensions and built at Oshawa Plant #1 were assembled without auxiliary rear springs. This condition may cause the involved vehicles to have a "mushy" or "undulating" ride. The handling of these vehicles will not be affected.
To correct this condition, your General Motors dealer will install the missing auxiliary rear springs. This service will be performed for you at no charge.
Please contact your GM dealer as soon as possible to arrange a service date.
This letter identifies your vehicle. Presentation of this letter to your dealer will assist their Service personnel in completing the necessary correction to your vehicle in the shortest possible time.
Subsequent to contacting your dealer, further assistance, if required, may be obtained from our Customer Assistance Centre, toll free, by calling 1-800-263-3777 (English), or 1-800-263-7854 (French).
We are sorry to cause you this inconvenience; however, we have taken this action in the interest of your continued satisfaction with our products.


General Motors bulletins are intended for use by professional technicians, not a "do-it-yourselfer". They are written to inform those technicians of conditions that may occur on some vehicles, or to provide information that could assist in the proper service of a vehicle. Properly trained technicians have the equipment, tools, safety instructions and know-how to do a job properly and safely. If a condition is described, do not assume that the bulletin applies to your vehicle, or that your vehicle will have that condition. See a General Motors dealer servicing your brand of General Motors vehicle for information on whether your vehicle may benefit from the information.
