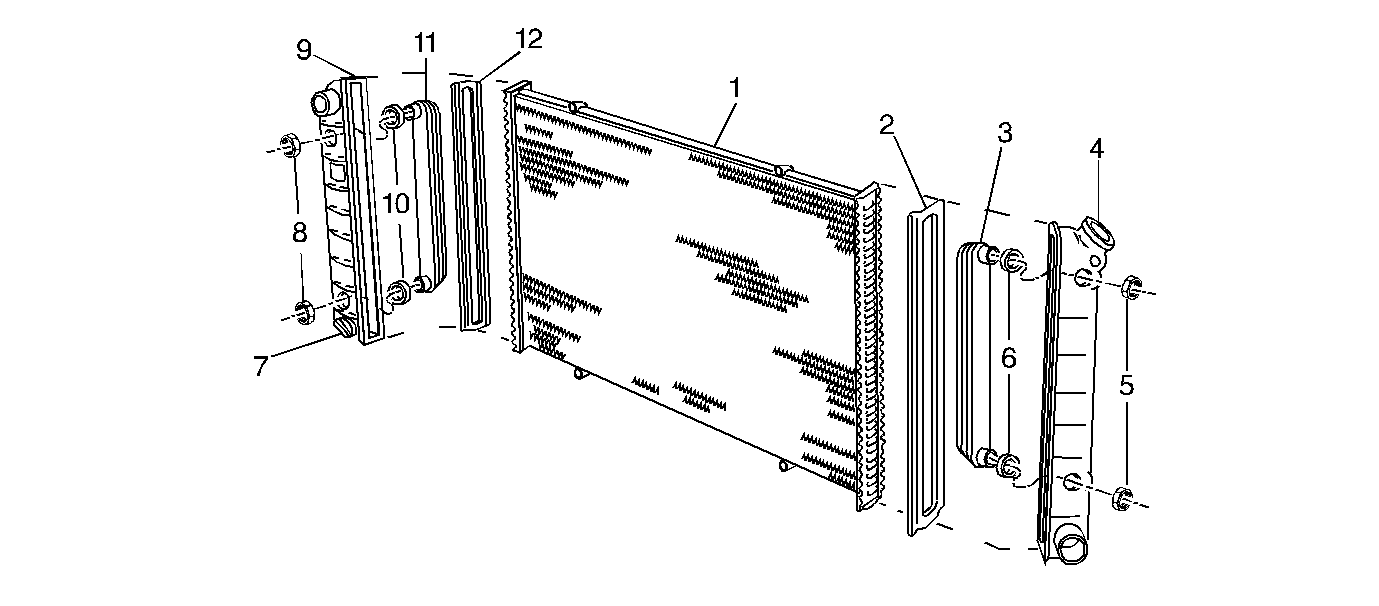
These engines use a cross-flow, lightweight aluminum and plastic radiator. The radiator consists of the following components:
| • | A brazed aluminum tube and center core (1) |
| • | Two plastic end tanks (9, 4) |
| • | A transmission oil cooler (3) |
| • | An engine oil cooler (11) |
| • | A radiator drain cock (7) |
Clinch tabs fasten the end tanks to the core. A high temperature rubber gasket (2) seals each of the end tanks. The right side end tank houses the transmission oil cooler. The left side end tank houses the engine oil cooler. Rubber gaskets (6) and nuts (5) seal the oil cooler fittings to the end tanks. The drain cock is plastic and this is at the bottom of the left side end tank.
Cross-Flow Radiator Core and Outlet and Inlet Tanks

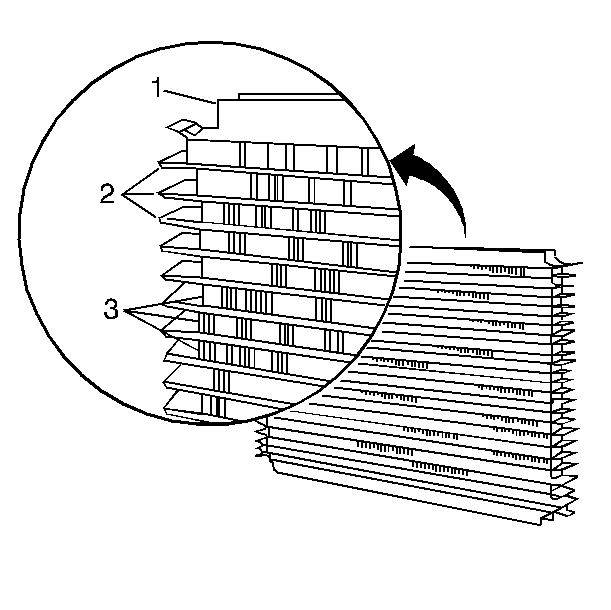
These models have an aluminum, cross-flow design core (1). The core uses a stack of horizontal tubes (2) that resist plugging. The cooling fins (3) surround these tubes. The top and bottom ribs strengthen the assembly. The saw-cut in each strengthening rib allows for expansion during temperature changes.
The inlet and the outlet tanks are molded from high-temperature, nylon reinforced plastic. A high-temperature rubber gasket seals the tank flange around the edge. The inlet and the outlet tanks are clamped to the right side and the left side of the core with clinch tabs. These tabs are part of the aluminum header at each end of the core. Radiators used with automatic transmissions have transmission oil coolers with inlet and outlet fittings for transmission fluid circulation.
You can identify an aluminum-plastic radiator by the black plastic side tanks and an aluminum radiator core.
Transaxle Oil Cooler
The transaxle oil cooler is in the right side end tank of the radiator. You can replace the oil cooler by removing the tank from the core. This cools the transaxle oil that flows through the cooler.
Engine Oil Cooler
The 3.1L (L82) engine comes with an optional engine oil cooler which uses engine coolant flowing through an oil cooler at the oil filter.
Radiator Drain Cock
The radiator drain cock is on the bottom, left side of the radiator end tank. The drain cock includes the drain cock and the drain cock seal. Use the drain cock when you drain the coolant.
Radiator Filler Cap

The crossflow radiator uses a pressure-vent filler cap to allow a buildup of 103 kPa (15 psi) in the cooling system. The cap allows the system to operate at a higher than atmospheric pressure. This pressure raises the boiling point of the coolant to about 129°C (265°F) at sea level, which increases the cooling efficiency of the radiator.
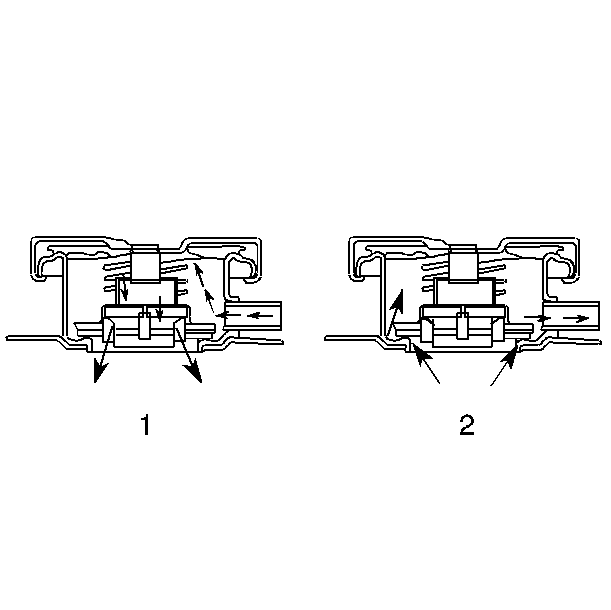
The pressure-type cap contains a blowoff (pressure) valve (2) and a vacuum (atmospheric) valve (1). A spring of pre-determined strength holds the pressure valve against the valve's seat. This spring protects the radiator by relieving any pressure that exceeds design limits. A spring holds the vacuum valve against the valve's seat which permits opening of the valve in order to relieve vacuum created in the system when the system cools. This prevents radiator collapse.
Caution: Do not remove the radiator cap while the cooling system is hot. Serious personal injury may result. Only remove the radiator cap from a cool engine.
Caution: As long as there is pressure in the cooling system, the temperature can be considerably higher than the boiling temperature of the solution in the radiator without causing the solution to boil. Removal of the pressure cap while the engine is hot and pressure is high will cause the solution to boil instantaneously -- possibly with explosive force -- spewing the solution over the engine, fenders and the person removing the cap.
The radiator cap is designed to discourage unintentional removal. Safely remove the cap in the following way:
- Slowly rotate the cap counterclockwise, do not press down, to the detent.
- Allow any residual pressure, indicated by a hissing sound, to be relieved.
- After the hissing stops, continue to rotate the cap counterclockwise until the cap is removed.
The following is embossed on the cap:
| • | A caution regarding opening of the cap |
| • | Arrows that indicate the proper closed position |
