DTC P0442 Evaporative Emission (EVAP) System Small Leak Detected for Chevrolet Lumina 1997
Circuit Description
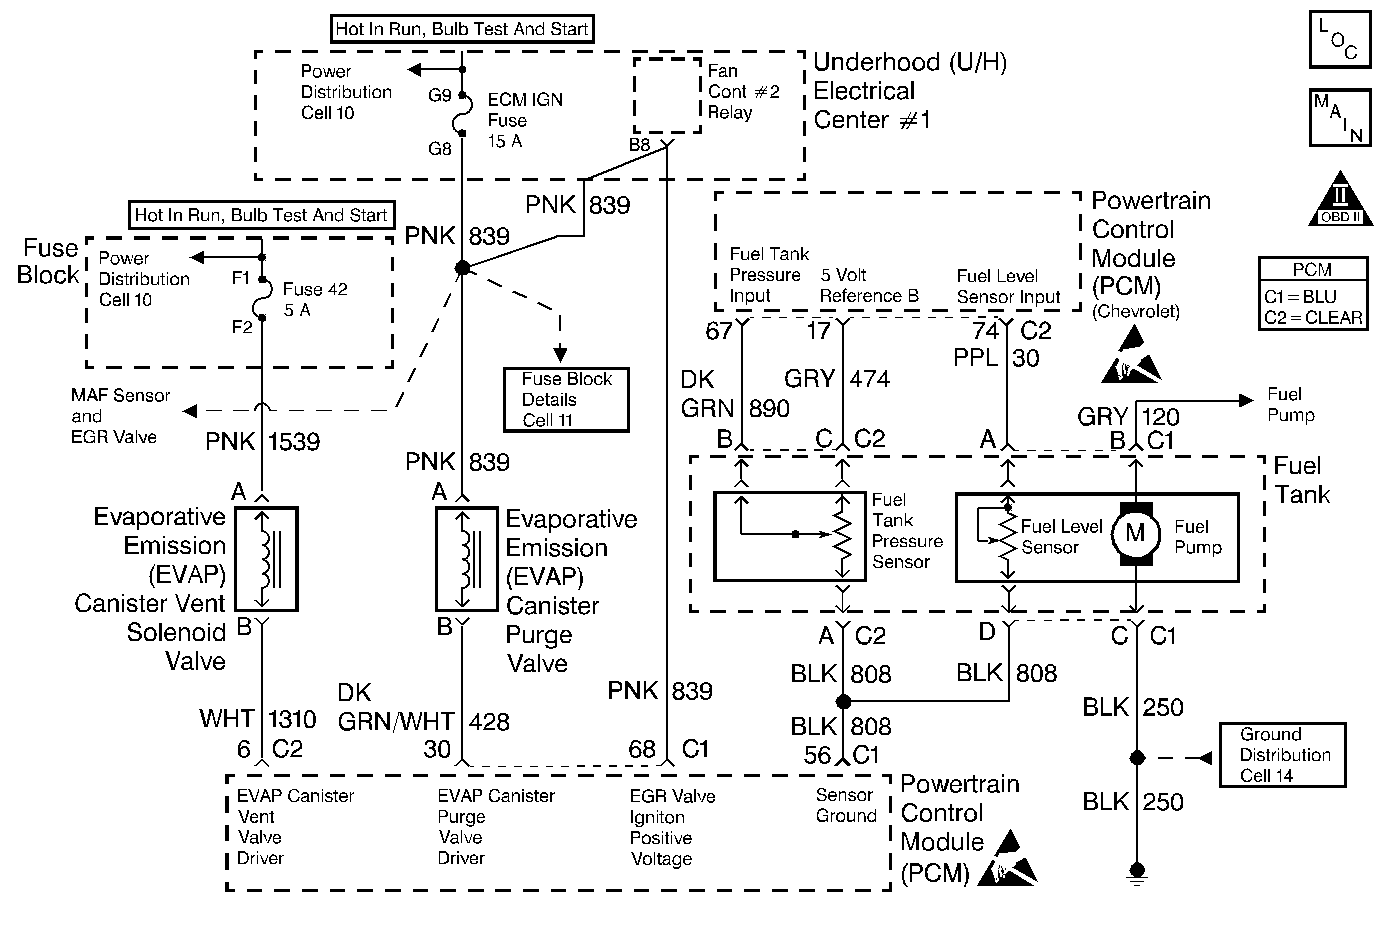
The evaporative system includes the following components:
| • | The fuel tank. |
| • | The EVAP vent solenoid. |
| • | The fuel tank pressure sensor. |
| • | The fuel pipes and hoses. |
| • | The fuel cap. |
| • | The EVAP vapor lines. |
| • | Ther EVAP purge lines. |
| • | The evaporative emission canister. |
| • | The EVAP purge solenoid. |
The evaporative leak detection diagnostic strategy is based on applying vacuum to the EVAP system and monitoring vacuum decay. The PCM monitors vacuum level via the Fuel Tank Pressure sensor input. At an appropriate time, the EVAP purge solenoid and the EVAP vent solenoid are turned ON, allowing engine vacuum to draw a small vacuum on the entire evaporative emission system. After the desired vacuum level has been achieved, the EVAP purge solenoid is turned OFF, sealing the system. A leak is detected by monitoring for a decrease in vacuum level over a given time period, all other variables remaining constant. A small leak in the system will cause DTC P0442 to be set.
Conditions for Setting the DTC
| • | No TP sensor, ODM, IAT sensor, or MAP sensor DTCs set. |
| • | The DTC P0440 diagnostic test has passed. |
| • | A vacuum decay condition indicating a small leak is detected during the diagnostic test. |
Action Taken When the DTC Sets
Important: Although these diagnostics are considered type A, they act like type B diagnostics under certain conditions. Whenever the EVAP diagnostics report that a system has passed, or if the battery has been disconnected, the diagnostic must fail during 2 consecuitive cold start trips before setting a DTC. The initial failure is not reported to the diagnostic executive or displayed on a scan tool. A passing system always reports to the diagnostic executive immediately.
| • | The PCM will illuminate the MIL during the first trip in which the diagnostic test has been run and failed. |
| • | The PCM will store conditions which were present when the DTC set as Freeze Frame and Fail Records data. |
Conditions for Clearing the MIL/DTC
| • | The PCM will turn OFF the MIL during the third consecutive trip in which the diagnostic has been run and passed. |
| • | The History DTC will clear after 40 consecutive warm-up cycles have occurred without a malfunction. |
| • | The DTC can be cleared by using the scan tool. |
Diagnostic Aids
Check for the following conditions:
- Cracked or punctured EVAP canister.
- Damaged source vacuum line, EVAP purge line, EVAP vent hose or fuel tank vapor line.
- Poor connection at PCM.
- Damaged harness.
Inspect harness connectors for backed out terminals, improper mating, broken locks, improperly formed or damaged terminals, and poor terminal to wire connection.
Inspect the wiring harness to the EVAP vent solenoid EVAP purge solenoid and the fuel tank pressure sensor for an intermittent open or short circuit.
Reviewing the Fail Records vehicle mileage since the diagnostic test last failed may help determine how often the condition that caused the DTC to be set occurs. This may assist in diagnosing the condition.
Test Description
Number(s) below refer to the step number(s) on the Diagnostic Table.
-
If a EVAP vent solenoid or EVAP purge solenoid electrical fault is present, the purge system will not operate correctly. Repairing the electrical fault will very likely correct the condition that set DTC P0442.
-
Checks the fuel tank pressure sensor at ambient pressure.
-
Verifies that the fuel tank pressure sensor accurately reflects EVAP system pressure changes.
Step | Action | Value(s) | Yes | No | ||||||
|---|---|---|---|---|---|---|---|---|---|---|
1 | Was the Powertrain On-Board Diagnostic System Check performed? | -- | ||||||||
Is DTC P1655 EVAP Purge Solenoid Control Circuit or DTC P1675 EVAP Vent Solenoid Control Circuit also set? | -- | Go to the other DTC first | ||||||||
Is Fuel Tank Pressure at the specified value? | 0 in. H2O | |||||||||
|
Important:: Before continuing with diagnosis, zero the EVAP Pressure and Vacuum
(inches of H2O) gauges on the
Is Fuel Tank Pressure at the specified value? | 5 in. H2O | |||||||||
5 |
Does the EVAP pressure decrease to less than the second specified value within 2 minutes? | 15 in. H2O 10 in. H2O | Refer to Diagnostic Aids | |||||||
6 |
Can the specified vacuum be maintained? | 5 in. Hg | ||||||||
7 |
Was a problem found? | -- | ||||||||
8 | Replace the EVAP vent solenoid. Refer to Evaporative Emission Vent Valve Replacement . Is action complete? | -- | -- | |||||||
9 |
Was a problem found? | -- | ||||||||
10 |
Is action complete? | -- | -- | |||||||
11 |
Does the EVAP pressure decrease to less than the second specified value within 2 minutes? | 15 in. H2O 10 in. H2O | System OK |