ROAD NOISE/WINDNOISE AT FRONT DOOR-GLASS CHIPPED ON TOP

SUBJECT: ROAD NOISE/WINDNOISE, FRONT DOOR GLASS CHIPPED ON TOP EDGE (SERVICE PROCEDURE) (Revised to correct Part # on Second page)
VEHICLES AFFECTED: 1990 U VANS
CONDITIONS:
----------- 1. Road Noise at Base of Front Doors and Sliding Side Door
2. Road Noise At Front Door Inner Belt Sealing Strip
3. Windnoise at the Top of the Front Doors
4. Front Door Glass Chipped on the Top Edge
CORRECTION:
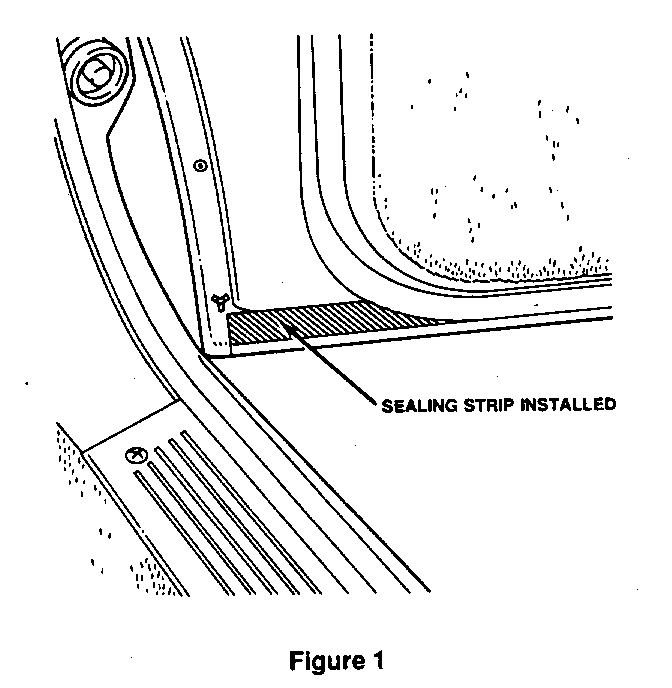
------------ FOR CONDITION NUMBER 1 (RH, LH + SLIDING SIDE DOOR) sealing strips should be installed on sliding and front doors at time of repair.
1. Open the door and clean the inboard lower edge of the door frame (hem flange) with oil free naphtha or alcohol.
2A. If body is significantly below 70 F (20 C) due to shop temperature or prior environmental temperature, warm body panel with heat lamp or heat gun.
B. Remove the protective covering from the sealing
C. Install the new moulding strip, for front door installation, start 13mm rearward of the forward edge of the do r. See Figure 1.
3. For sliding door installation, apply sealing strip starting 13mm rearward of the front edge of the door.
IMPORTANT: It may be necessary to trim the rear edge of the sealing strip for proper fit.
RH Front Door Sealing Strip, P/N 10174714 LH Front Door Sealing Strip, P/N 10174714 Sealing Strip Sliding Side Door, P/N 10174713
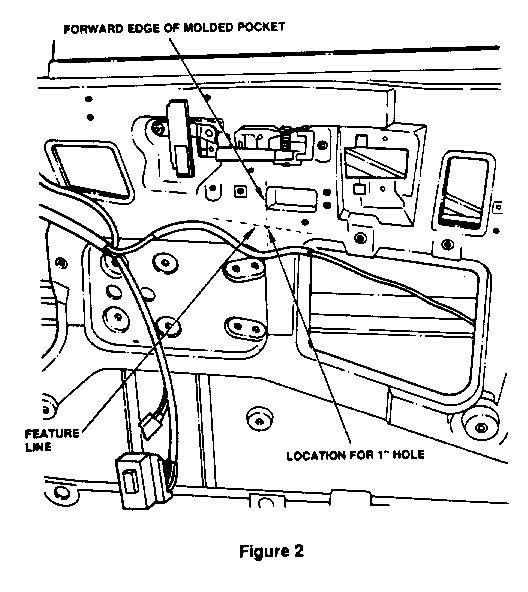
FOR CONDITION NUMBERS 2, 3, 4 (FOR POWER WINDOWS ONLY)
1. Lower window to full down position.
2. Remove lower trim panel and water deflector.
3. Remove wire harness retainer from inner panel to gain access for drilling hole.
IMPORTANT: For Steps Number 4 and 5, use drill stop on drill to stop the drill from coming in contact with the glass.
4. Using a 25mm hole saw, drill a hole in the inner panel straight down from the forward edge of the moulded pocket in the inner panel at the centre of the feature line. See Figure 2.
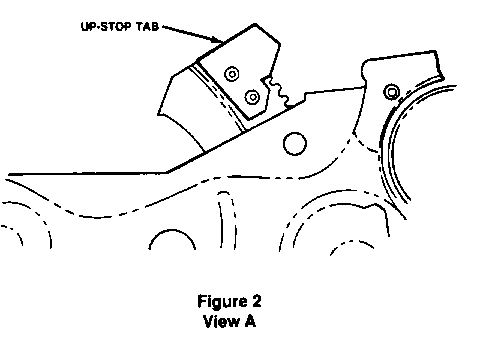
5. Reaching through the large access hole, position up-stop tab on end of regulator arm (See Figure 2, View A) and hold in place with vice grips (5" needle type). Drill one hole 3.5mm (9/64" diameter) in the sector arm to match hole in tab. Pop rivet into place, remove vice grips.
6. Drill another 3.5mm (9/64" diameter hole in the sector arm to match the hole in the tab, pop rivet into place.
7. Lightly file back side of rivet to prevent contact with regulator body.
8. Reinstall water deflector and trim pan?
9. Repeat operation for RH side.
RH Front Door Regulator up-stop tab, P/N 10186096 LH Front Door Regulator up-stop tab, P/N 10186097 Pop Rivet, 2 required for each up-stop, P/N 9437144
Use the most applicable Labour Operation and Time from the Canadian Labour Time Guide.
General Motors bulletins are intended for use by professional technicians, not a "do-it-yourselfer". They are written to inform those technicians of conditions that may occur on some vehicles, or to provide information that could assist in the proper service of a vehicle. Properly trained technicians have the equipment, tools, safety instructions and know-how to do a job properly and safely. If a condition is described, do not assume that the bulletin applies to your vehicle, or that your vehicle will have that condition. See a General Motors dealer servicing your brand of General Motors vehicle for information on whether your vehicle may benefit from the information.
