Engine Mount -- Revised R and R Procedure (Export)

| Subject: | Engine Mount - Revised R & R Procedure |
| Models: | 2007-2008 Chevrolet Caprice, Lumina (Export) |
| with V8 Engine |
Existing passenger vehicle SIP information (version 9.1) advises to remove the exhaust manifold to replace an engine mount and bracket assembly (RH or LH). This may cause unnecessary component disturbance.
It is possible to remove and engine mount (without bracket) using the existing procedure but NOT removing the exhaust manifold, as raising the engine assembly itself allows removal of the engine mount.
Warranty Information
The latest procedure and relevant labor time has been re-studied and the existing time allowance has been retained.
4.19 Engine Mounts
LT Section No. -- 00-475
Inspect
- Check the area around the engine mounts for any signs of fluid leakage. If an oil leak coming from the mount is visible, the mount is defective.
- Using a suitable engine lifting crane or a floor jack, raise the engine slightly to remove the weight from the mounts and to place the rubber slightly in tension. Ensure that the mounting rubber has not deteriorated, split or separated from its metal plates.
Notice: To protect the aluminum oil pan from damage when using a floor jack, position a suitable piece of wood or similar between the oil pan and the jack.
Note: If either fluid is visible or the rubber has deteriorated or separated, the engine mount must be replaced.
Remove
- Disconnect the ground battery cable terminal from the battery.
- If required, remove the strut tower brace. Refer to 1A1 - Body.
- If required, remove the engine dress covers.
- Raise the front of the vehicle and place on safety stands. For the locations of vehicle jacking and support locations, refer to 0A - General Information.
- Remove the exhaust pipe to manifold flange attaching nuts on the side the engine mount is to be removed. Refer to 8B - Exhaust System.
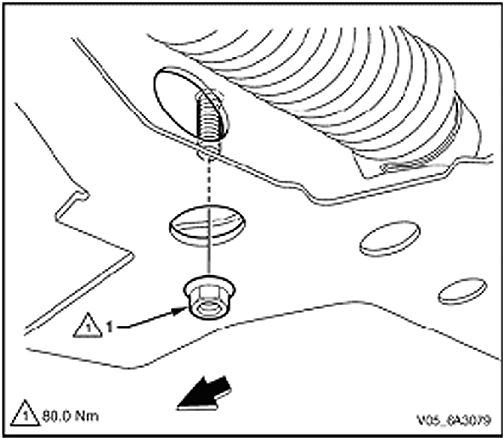
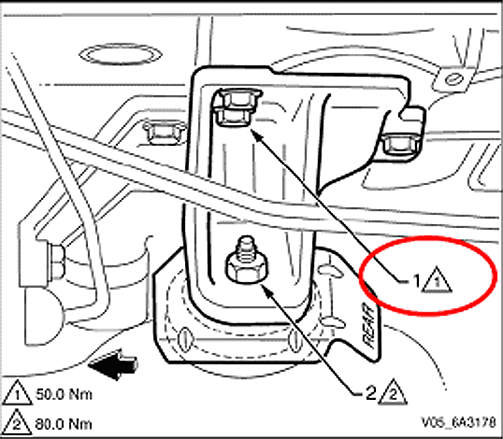
- From under the vehicle, remove the lower mounting to crossmember attaching nut (1) for both mounts.
- Using suitable engine lifting equipment or a floor jack, raise the engine and remove the weight from the engine mount.
- Remove the nut (2) attaching the engine mount to the bracket.
- Lift the engine mount and the heat shield from the crossmember and remove it from the vehicle.
Caution: Disconnection of the battery effects certain vehicle electronic systems. Refer to 00 - Warnings, Cautions and Notes before disconnecting the battery.


Notice: To protect the aluminum oil pan from damage when using a floor jack, position a suitable piece of wood or similar between the oil pan and the jack.
Note: Using a marker pen or similar, mark the relationship of the heat shield to the bracket to maintain the correction location in the reinstallation process.
Note: While the left-hand mount is shown, the operation is similar for either engine mount with the exception that for the right-hand engine mount, the battery harness bracket attaching bolt must be removed before removing the mounting bracket to the cylinder block bolts. Refer to 12O - Fuses, Relays and Wiring Harnesses.
Reinstall
- Install the engine mount and heat shield. Note the correct orientation as previously marked in Step 9.
- Install the engine mount stud into the crossmember.
- Lower the engine, allowing the weight to settle on the crossmember before installing the lower engine mount attaching nut.
- Reinstallation of the remainder of the components removed is the reverse of the removal procedure.
Tighten
Tighten the engine mount attaching nut to 80 N·m.
Tighten
Tighten the engine mount to crossmember attaching nut to 80 N·m.
